
Level 11
HARDHow to solve Sand Loop level 11? Get instant solution for Sand Loop 11 with our step by step solution & video walkthrough. Sand Loop 11 tips and guide.
Play Sand Loop Now
Experience the puzzle challenge firsthand
Game Screenshots
Sand Loop Level Guides
Level Overview: The Floridian Logistics Test
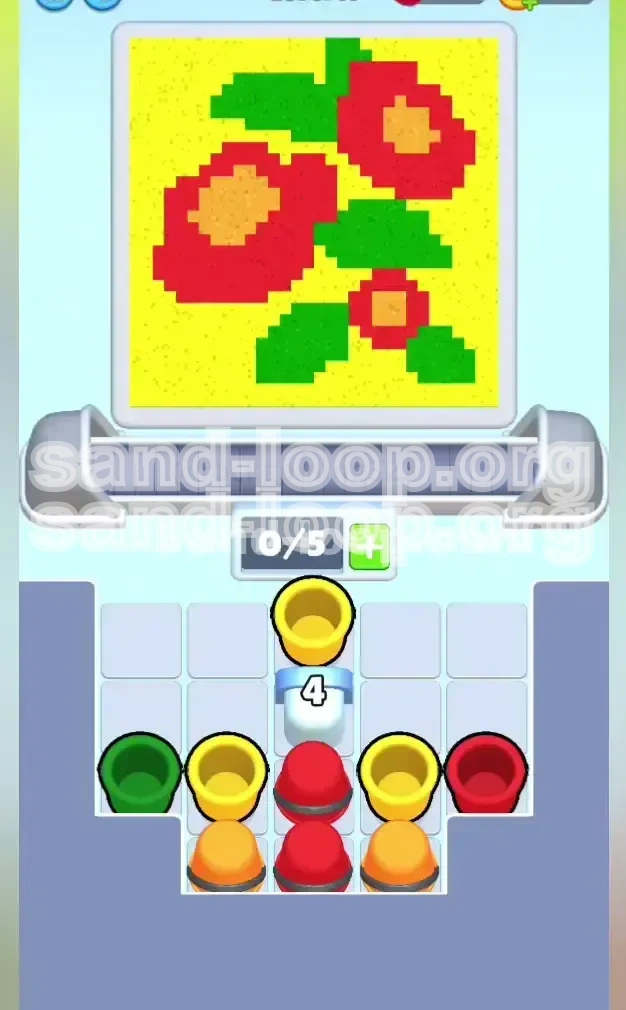
Sand Loop Level 11 presents itself as a creative canvas featuring two large red flowers against a bright yellow background, but underneath its artistic exterior lies a ruthless resource management simulation. This level is defined by a severe constraint known as "slot starvation." You begin with a conveyor belt that is already 71% full (5 cups loaded out of 7 possible slots), leaving you with a razor-thin margin for error. The visual composition is divided into four distinct zones: the massive yellow background (approx. 40% coverage), the red petals (approx. 35%), the green foliage (approx. 15%), and the small orange centers (approx. 10%). The challenge is not just the painting itself, but the logistical nightmare of retrieving the specific cups you need from a cluttered tray without causing a conveyor belt deadlock. This guide breaks down how to manage the flow, unblock your resources, and execute the precision required to clear the level.
The Slot Starvation Mechanic
The most critical element of Level 11 is the 5/7 starting capacity. With only two empty slots available on the conveyor belt, you cannot afford to treat the cup loading phase casually. Every time you place a cup on the belt, you are consuming a vital resource: space. If you accidentally load a cup you don't immediately need, you block the return path for empty cups. This turns the game from a simple "fill the shape" task into a complex puzzle of rotation and timing. You must constantly anticipate which cup will empty next and ensure there is a physical slot available for it to return to, or else the entire production line grinds to a halt.
Visual Composition Analysis
Understanding the surface area of the canvas is crucial for prioritizing your actions. The yellow background is the "tank" of the level—it absorbs vast amounts of sand but doesn't require high precision. The red petals are the "DPS"—they require attention but are large enough to be forgiving. The green leaves act as "connectors," requiring moderate care to avoid bleeding into the yellow. The orange centers are the "bosses"—they are small, isolated targets that demand surgical precision. A common failure point is treating all colors with the same pouring intensity; pouring yellow with the same force you use for red will result in an immediate overflow, wasting valuable percentage points.
The Resource Management Trap
Level 11 exploits a player's instinct to grab the most obvious color first. New players will often see the large yellow background and immediately load yellow cups to clear it. However, this is a trap. Loading yellow early clogs your limited belt space with a color that is easy to apply later. The level forces you to ignore the large background initially and focus on unblocking the harder-to-reach red and green cups first. If you prioritize the "easy" color (Yellow) over the "logistically necessary" colors (Red/Green), you will run out of slots to unblock the tray, leading to a soft-lock where you cannot progress.
The Precision Requirement
Unlike previous levels where you could "spray and pray" with the sand, Level 11 demands control. The flower centers are surrounded by red petals and green leaves. If your hand shakes or you pour for a fraction of a second too long, the orange sand will bleed into the red, or the green will bleed into the yellow. This contamination wastes percentage. In a level where every grain of sand counts due to slot limitations, a 2% loss due to bleeding can be the difference between a clean finish and a frustrating restart. The game forces you to slow down and treat every pour as a deliberate action.
Why Players Fail
Most failures in Level 11 occur around the 40-50% mark. This is the "mid-game crisis" point. Players have successfully filled the background and started the petals, but their tray is a mess of stacked cups, and their belt is full. They realize they need a specific color (usually Green or Orange) to finish a detail, but that cup is buried behind three other cups in the tray, and they have no slots on the belt to unblock it. They are forced to use a color they don't need just to free up a slot, which overfills a different area, triggering a cascade of errors. Success requires looking 2-3 moves ahead, treating the conveyor belt like a game of chess.
Core Objectives: Winning Strategy Breakdown
To conquer Level 11, you must shift your mindset from "painter" to "logistics manager." Your primary goal is not to fill the canvas, but to maintain a fluid state of cup rotation. If the belt moves smoothly, the painting will take care of itself. Here are the specific strategic pillars you must master.
Master the Slot Economy
Your most valuable resource is not the sand, but the empty slots on the conveyor belt. Treat an empty slot as gold. Having an open slot gives you the flexibility to unblock a buried cup or retrieve a returning empty one. Your primary objective is to always keep at least one slot open. If you ever hit 7/7 capacity, you are in immediate danger. A full belt means you cannot react to new developments, and if a color meter demands attention that you can't access, you are dead in the water. Prioritize unloading cups over loading new ones.
Establish the Core Cycle
Do not attempt to juggle all four colors (Red, Yellow, Green, Orange) simultaneously. You will fail. Instead, aim to establish a "Core Cycle" of three cups: Red, Yellow, and Green. These three should rotate on the belt continuously. You will only introduce the fourth cup (Orange) when the core cycle is stable and the specific meter demands it. By limiting your active rotation to three cups, you ensure that you always have one slot free for emergencies. This rhythm prevents the belt from clogging and ensures a steady supply of your primary workhorse colors.
Prevent Color Contamination
Efficiency is key, and contamination is the enemy of efficiency. Bleeding colors—where sand spills over from one zone to another—is a massive waste of progress. For example, if you fill the green leaves but spill onto the yellow background, you haven't just filled green; you've also made it harder to fill yellow later because the threshold is closer. Your objective is 100% purity in your fills. This means waiting for the cup to align perfectly under the dispenser and using controlled taps rather than holding the pour button. A slow, accurate pour is always faster than a fast, messy one that requires cleanup.
Balance the Progress Meters
You must aim to keep your color progress bars within a 10-15% range of each other at all times. If Red hits 50% while Yellow is still at 20%, you are creating a future bottleneck. Red will require more pours later, clogging the belt, while Yellow will require massive bulk pours that you won't have slot space for. A balanced meter means a balanced belt. If one color gets too far ahead, stop pouring it, even if it's right in front of you. Let the belt cycle empty if necessary to wait for the lagging color. This discipline prevents the "end-game scramble" where you are desperately trying to finish three colors at once.
The 85% Target Rule
A tactical error many players make is trying to finish one color to 100% before starting the next. In Level 11, this is fatal. Aim to reach 85% completion for all colors roughly at the same time. Do not try to finish any single color completely before the others are at least at 80%. The final 15% of the level is a "sprint phase" where you handle the final details. If you enter the final phase with one color at 100% and others at 70%, you will lose because the finished color prevents you from cycling the cup you need to fix the others. Keep everyone in the pack until the final stretch.
Efficiency Over Speed
Speed is your enemy in Level 11. Efficiency is your friend. A slow, deliberate pour that lands perfectly in the center of a leaf is infinitely better than a fast, messy pour that requires a cleanup cycle. Every movement of the cup should be intentional. Wait for the belt to align, wait for the previous pour to settle, and then strike. The game rewards patience and planning. If you try to rush the process, you will fumble the cup loading, jam the belt, and spend more time fixing mistakes than you would have spent just doing it right the first time.
Step-by-Step Walkthrough: The Action Plan
This walkthrough is divided into three distinct phases: The Setup (0-30%), The Grind (30-80%), and The Finish (80-100%). Follow these specific actions to navigate the level from start to finish without getting jammed.
Phase 1: The Setup (First 30 Seconds)
The beginning of the level is critical. You must unblock the belt and establish your rotation without triggering a jam. Mistakes here compound later.
- Step 1: Unblock Green. Start by identifying the Green cup in the tray. It is usually the most accessible but often blocked by others. Load Green first. Pour a single, short tap onto the leaf areas just to establish the color. Do not fill them yet.
- Step 2: The First Yellow Load. Immediately load a Yellow cup. Let the Green cup cycle out. When Yellow reaches the dispenser, pour 2-3 short bursts to start filling the background edges. Keep an eye on the slot count; ensure you have room to retrieve Green.
- Step 3: Red Introduction. As Yellow cycles, look to unblock the first Red cup. Load Red onto the belt. Now you have Green (returning), Yellow (active), and Red (loading). This is your Core Cycle.
- Step 4: The Wait. Let the belt run. Do not load the Orange cup yet. Watch your three cups rotate. Pour only when the cup is perfectly centered. Focus on keeping the colors roughly equal (around 15-20% progress).
Phase 2: The Grind (Mid-Game Balance)
This is the longest phase. You will be cycling the same 3-4 cups repeatedly. The challenge here is maintaining focus and not panicking when the meters get close.
- Step 5: Monitor the Meters. Glance at the progress bars after every pour. If Yellow is lagging behind Red and Green (e.g., Yellow 40%, Red 55%), prioritize Yellow on the next 2 cycles. Skip Red pours even if the belt brings it to you first.
- Step 6: Unblocking Orange. Around the 50% mark, check your tray. You likely have an Orange cup buried. Wait until you have a clear slot (a cup just emptied and returned). Pull the Orange cup out. Load it.
- Step 7: Precision Orange Pouring. Orange is only for the flower centers. When the Orange cup arrives, be extremely precise. Use single "tap-tap" inputs. Do not hold the button. Fill Orange to about 60-70%, then stop. Let it cycle or sit on the belt until the end.
- Step 8: Managing the Backup. By now, your tray is messy. Cups are returning empty. Don't reload them immediately if you don't need the color. It is better to have an empty slot on the belt than to reload Green when Green is already at 90%. Let the belt breathe.
Phase 3: The Final 20% (The Sprint)
Now you enter the danger zone. Small pours fill the meter quickly. One mistake can cost you the level.
- Step 9: The Micro-Pour. Reduce your pour duration by 50%. If you were doing a "one-second" pour, now do a "half-second" tap. The sand spreads faster now that the canvas is saturated.
- Step 10: Target the Gaps. Look for specific white pixels. Is there a gap in the leaf? Is the flower center not perfectly orange? Aim the cup nozzle specifically at the missing pixels.
- Step 11: The Final Cycle. You will likely have two colors at 95% and two at 90%. Load the 90% colors. As they pour, watch the meter like a hawk. The moment it hits 100%, stop.
- Step 12: Victory Lap. Once three colors hit 100%, the last color usually fills automatically or requires one final tiny tap. If you get a deadlock (conveyor full, colors not 100%), it means you loaded an unnecessary cup in Phase 2. Note that for the next run.
Color Order & Processing Guide
The order in which you process colors dictates the difficulty of the level. While you must use all four, the sequence of priority determines your success rate. Follow this hierarchy to minimize jams.
Primary Color: Red (The Anchor)
Red is your anchor. It covers the largest distinct objects (the flowers). You should process Red first and most frequently. However, because it is so large, it is forgiving. You can stop pouring Red at 90% and come back to it later. It does not require the same frantic energy as Yellow or the precision of Orange. Think of Red as the "safe space"—when in doubt, pour Red, but don't let it dominate your belt space to the exclusion of others.
Secondary Color: Yellow (The Bulk)
Yellow is the background. It dictates the pace. If Yellow falls behind, you are in trouble because you have to pour massive amounts of it to catch up. Process Yellow continuously but in small bursts. Do not try to finish Yellow in one go. It should be the background noise (pun intended) to your Red and Green work. The trick with Yellow is to pour it when you have a spare moment but never to load a Yellow cup if you don't have an immediate exit strategy for it.
Tertiary Color: Green (The Detail)
Green is your tertiary priority. It is smaller than Yellow but more detailed. It often sits on top of the Yellow background. Process Green when Red is cycling and you have a spare moment. It is best used to break up the rhythm of Red/Yellow pouring to prevent accidental overfilling. Because Green areas are often small stems or leaves, they fill up deceptively fast. Watch the Green meter closely; it can jump from 70% to 100% in a single second if you aren't careful.
Quaternary Color: Orange (The Finisher)
Orange is the quaternary color. It is the bottleneck. It should be processed last or only touched when absolutely necessary. Because the orange centers are small and surrounded by other colors, early Orange processing is risky. Save Orange for the final 20% of the level to avoid contamination and to ensure you have the precise motor control needed for the small targets. Loading Orange too early is a classic rookie mistake that leads to ruined Red petals.
The Loading Hierarchy
When looking at your tray, follow this loading hierarchy: Red > Yellow > Green > Orange. If you have slots open, load Red first. If Red is loaded, load Yellow. Only when Red, Yellow, and Green are in a stable rotation should you consider loading Orange. This hierarchy ensures that your "logistical pipeline" is always moving the most critical resources first.
Transition Points
There are specific transition points where you switch focus. At 0-30%, focus on clearing the tray and getting all colors on the belt. At 30-70%, focus on Yellow bulk filling. At 70-90%, focus on Red and Green refinement. At 90-100%, focus on Orange and Yellow gap filling. Recognizing which phase you are in prevents you from using the wrong strategy at the wrong time.
Key Tips & Stuck Solutions
Even with a plan, things go wrong. Here are practical tips to handle common situations and recovery tactics if you find yourself stuck.
Speed Run Tip: The Pre-Load
If you are aiming for a high score, use the "Pre-Load" technique. As a cup is pouring, you can often queue up the next cup in the tray or prepare to unblock a buried one. Don't watch the sand fall; watch the belt. By the time the current cup is empty, you should already have the next cup hovering over the load zone. This shaves seconds off your time and keeps the rhythm flowing.
Stuck Solution: The "Full Belt" Deadlock
Symptom: You have 7 cups on the belt, 0 slots open, and the color you need is buried in the tray.
Fix: This is usually a restart situation. However, if you want to try to save it, identify the cup closest to emptying. Pour it out completely, even if you don't need that color right now (just pour it into a waste area if possible). Once that cup returns empty, you have a slot. Immediately unblock the color you need.
Stuck Solution: The "99% Lock"
Symptom: You are at 99% completion, but the game won't end. You have a tiny white pixel somewhere you can't find.
Fix: Look at the flower centers (Orange) or the stem tips (Green). These are the most common places for missing pixels. If you can't find it, cycle a cup of the color that is at 99%. The pixel is likely a single dot that requires a "micro-burst" pour. Move the cup slightly while pouring to catch the edge of the pixel.
Common Mistake: The "Tilt" Error
Many players tilt their phone or controller too aggressively, thinking it helps spread the sand. In Level 11, excessive tilting causes the sand to slide into the wrong zones (e.g., Yellow sliding onto Green leaves). Keep your device steady. The dispenser does the work; your hands should just guide the cup.
Common Mistate: Ignoring the "Empty Return"
Don't ignore the empty cups returning to the tray. It's tempting to just let them pile up. But a cluttered tray makes it hard to see which cups are available. As soon as a cup returns empty, clear it away mentally so you know exactly what resources you have left.
Visualizing the Flow
Imagine the level as a heartbeat. The conveyor is the pulse. Thump (Load), Thump (Pour), Thump (Return). If you disrupt this rhythm by loading too fast, you get an arrhythmia (a jam). If you pour too slow, you get a weak pulse (slow progress). Find the rhythm where the belt moves smoothly, cups return exactly when needed, and your pours land like drumbeats on the target.