
Level 121
HARDHow to solve Sand Loop level 121? Get instant solution for Sand Loop 121 with our step by step solution & video walkthrough. Sand Loop 121 tips and guide.
Play Sand Loop Now
Experience the puzzle challenge firsthand
Game Screenshots
Sand Loop Level Guides
Level Overview: The Magma Mountain Challenge
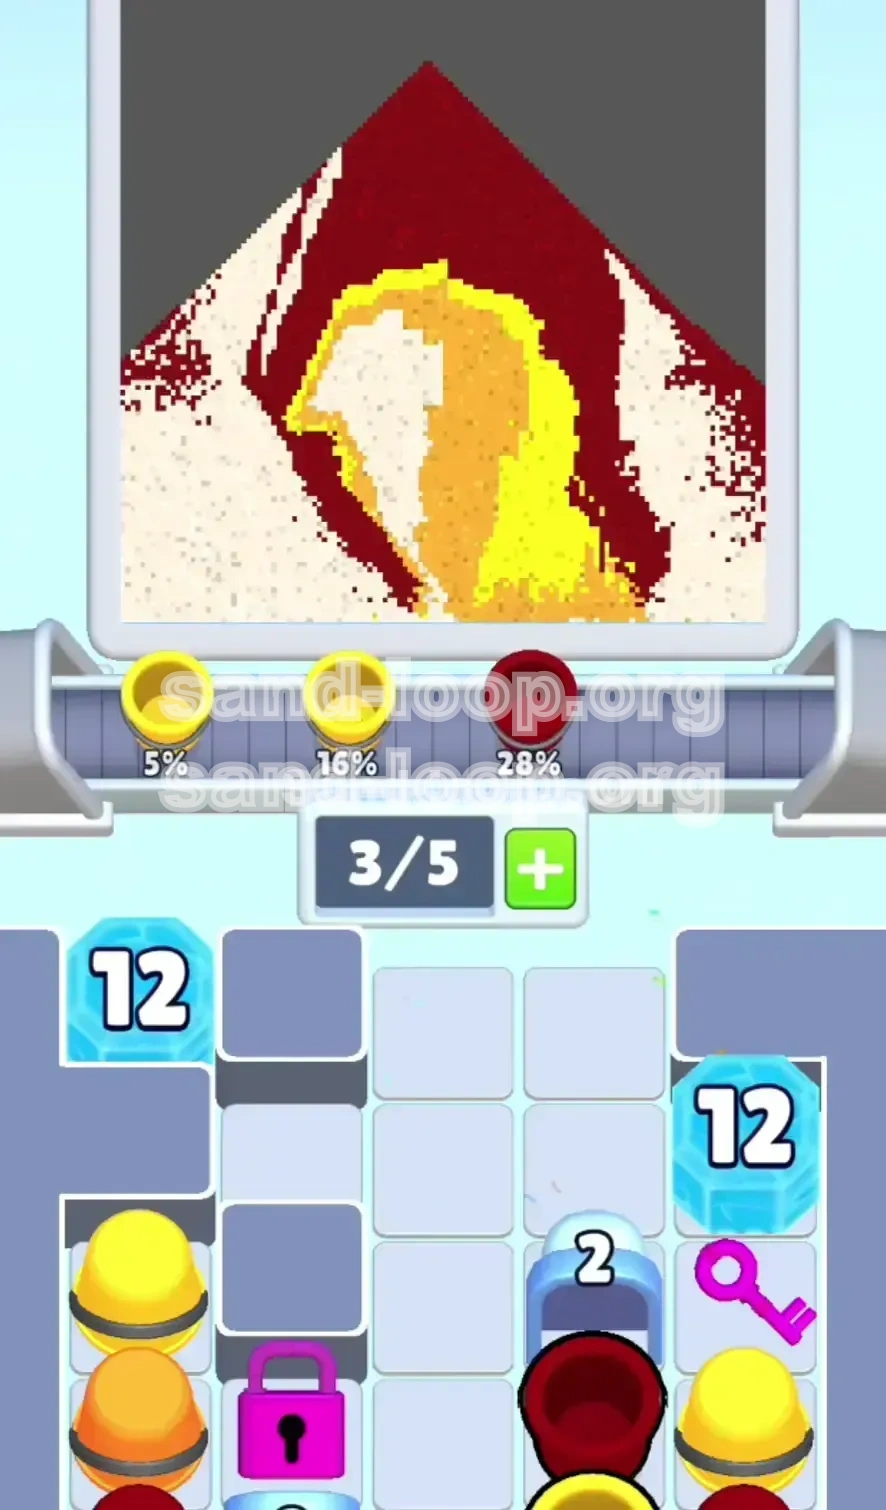
Level 121 of Sand Loop introduces a significant shift in gameplay mechanics, moving away from simple reflex-based challenges and into the realm of strict logic puzzles. This level is architecturally designed as a cross-section of a volcano, featuring a vibrant, molten core that must be protected by a hardened, outer shell of cooled lava rock. The visual presentation is striking, utilizing high-contrast colors like Dark Maroon, Bright Orange, and Blinding White to represent geological layers.
However, the aesthetic beauty hides a brutal logistical reality. This level is defined by a "Dependency Chain" mechanic. You are not free to pour colors at will; you are gated by resource availability. The critical challenge lies in managing a severely limited tray capacity (only 5 slots) while simultaneously trying to crack a heavy defensive barrier—a Right-Side Ice Block with a "12" counter—that guards your most essential resources. If you treat this as a speed run, you will fail. If you spam taps without planning your merge chains, you will deadlock the board. This guide is designed to help you navigate the logic gates, manage your inventory, and construct the perfect volcano.
The "Volcano" Architecture
The stage is built around a central triangular peak. Unlike previous levels where you might build flat layers or wide waves, this structure requires verticality. The challenge is physics-based: lighter colors (White/Yellow) represent the "heat" and must occupy the center, while heavier colors (Dark Maroon) represent the "shell" and must form the slopes. The difficulty arises because the conveyor belt moves horizontally, requiring you to time your drops with pixel-perfect precision to ensure the lighter colors don't slide off the steep slopes before the heavier walls can support them.
The Resource Bottleneck
The most critical feature of Level 121 is the artificial scarcity of resources. The game starts you with a depleted inventory of essential "Lava" colors (Orange and Yellow). These colors are locked behind a physical barrier on the board (The Pink Lock). You cannot build the core of the volcano without unlocking this stash. Consequently, the opening phase of the level is not about painting at all—it is about inventory management and survival.
The "12-Count" Ice Block
Situated on the bottom right of the screen is a massive Ice Block labeled with the number "12". This acts as the level's primary gatekeeper. In Sand Loop mechanics, this block does not melt over time; it only breaks when you perform a specific number of valid actions (merges or clears) in its vicinity. This creates a "kill quota" that you must reach before you can access the Pink Key hidden beneath it. Understanding how to efficiently farm these actions without clogging your tray is the difference between victory and defeat.
The "Hard Shell" Aesthetic
Visually, the level demands a Dark Maroon dominance. Approximately 60% of your final structure will be this dark, rocky color. However, applying this too early is the most common way to fail. The "Hard Shell" aesthetic must be saved for the endgame. During the early and mid-game, you must resist the urge to fill the background with Maroon, or you will bury the drop zone for the lighter colors needed for the core.
Tray Capacity Constraints
Your tray capacity is limited to 5 slots. In a level that requires you to cycle through roughly 12-15 cups to break the initial ice block, space is your most valuable currency. Every cup you pull from the spawner that isn't immediately used for a merge is wasted space. This level introduces a "High-Turnover" playstyle where you must merge generic cups instantly (often in pairs of two) simply to generate the numerical "Action Points" needed to break the ice, rather than doing it for the color.
Clear Objectives: The Logic Chain
To conquer Level 121, you must abandon the instinct to "paint first, think later." Your objectives are linear. You cannot complete Objective C without finishing Objective A. This rigid structure is what causes most players to get stuck, as they try to work on the volcano before they have unlocked the tools to build it. Below is the breakdown of your mandatory goals in order of execution.
Objective 1: Break the Right-Side Ice
Your immediate priority is the bottom right corner. The Ice Block standing there is not just scenery; it is the lock on the door to your success. Your first objective is to reduce its counter from 12 to 0. This requires you to process roughly 6 to 7 merges or clear actions. Do not focus on the volcano shape during this phase. Focus entirely on cycling cups. You need to clear the board to reveal the Pink Key hidden underneath the ice.
Objective 2: Acquire the Pink Key
Once the Ice Block shatters, a Pink Key is revealed. This item is time-sensitive in terms of board strategy, though it won't disappear. You must tap this key to unlock the corresponding Pink Lock on the bottom left side of the screen. Failing to do this immediately leaves you with a full tray of useless colors while your actual required resources (Orange and White) remain inaccessible.
Objective 3: Unlock the Supply Stash
The Pink Lock on the bottom left is guarding a cluster of pre-generated cups. These are high-tier colors, specifically the Oranges and Yellows needed for the volcano's core. Unlocking this stash effectively "doubles" your available resources. However, it also adds physical objects to the board that can block your view or tap targets if you aren't careful. Your goal here is to release these cups into the general pool so you can drag them onto the conveyor.
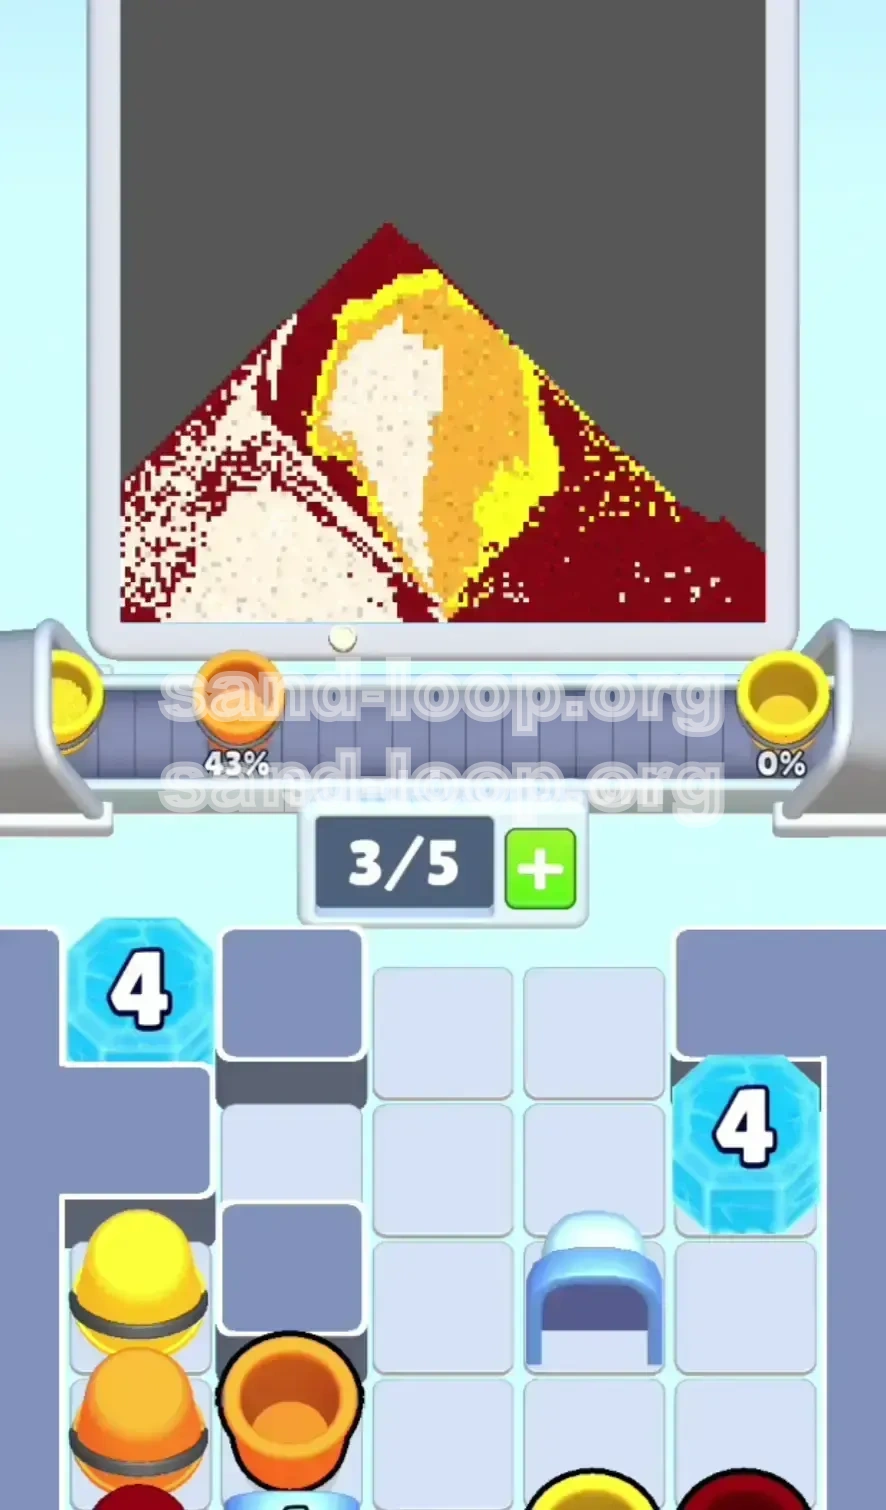
Objective 4: Construct the Lava Core
With the stash unlocked, your focus shifts to the center of the screen. You must build a vertical pile in the middle of the screen. This requires alternating between Orange and Yellow cups. The physics engine here is unforgiving; if you pour too fast, the sand will avalanche down the sides. You must build a stable, conical base that reaches about 50% of the screen height before you can even think about adding the final layer.
Objective 5: Apply the White Peak
The final artistic touch is the White "super-heated" center. This is the hardest color to place because it has a small spawn window. You must time your taps so that the White cup pours exactly when it is aligned with the center of the Yellow cone. If you pour it on the slopes, it ruins the "Geode" aesthetic. This objective is about precision timing and patience.
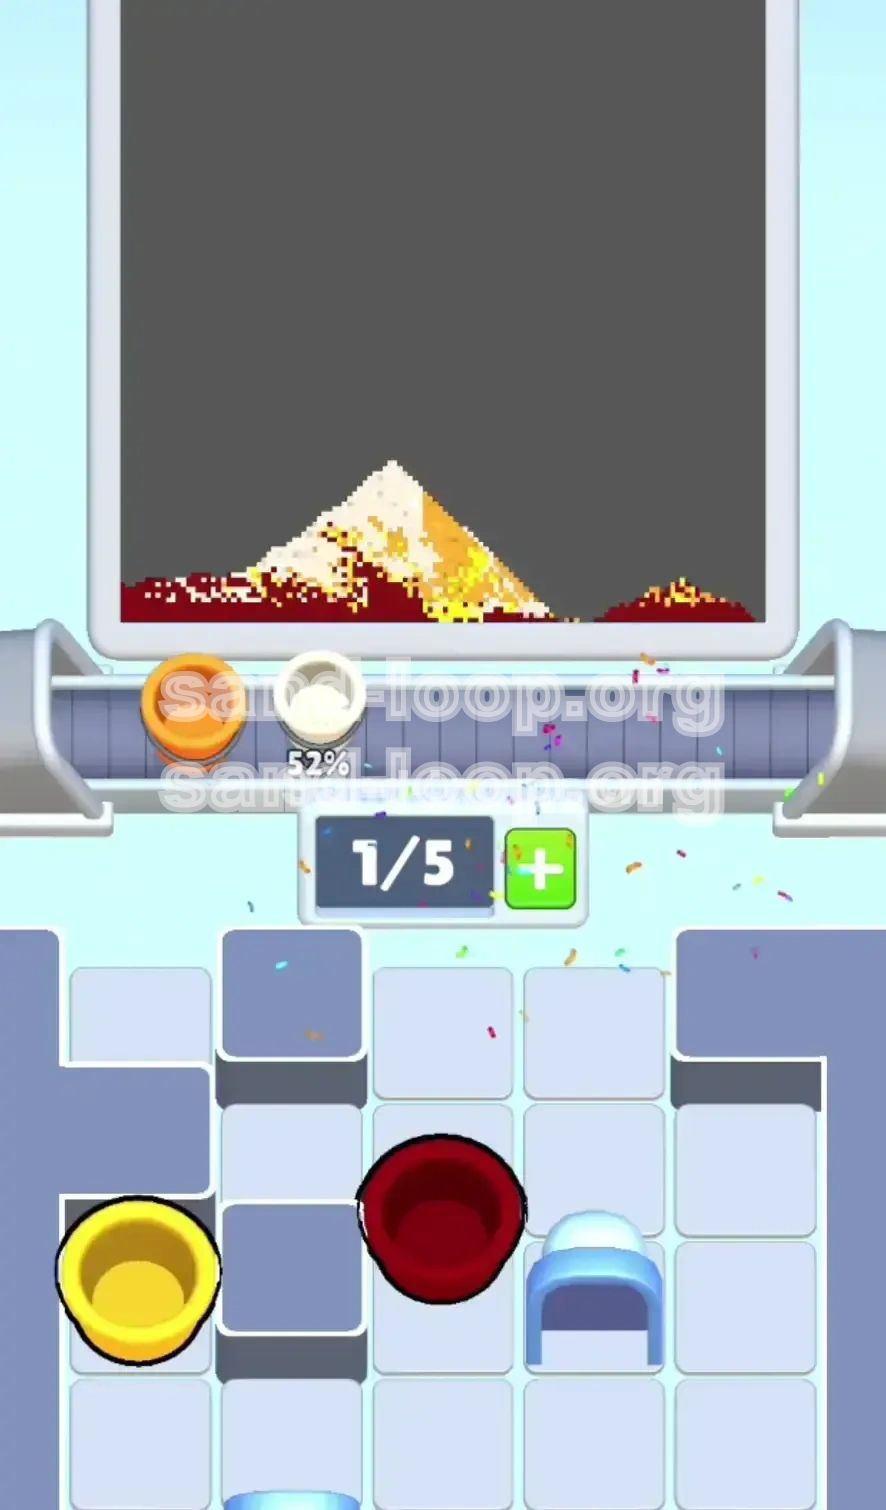
Objective 6: Seal with Dark Maroon
Only after the White peak is visible do you switch back to the Dark Maroon cups. The goal here is to cap the sides. You are essentially building a "crust" over the magma. You must avoid pouring Maroon over the White peak. The final structure should look like a dark mountain with a glowing crack down the middle.
Step-by-Step Walkthrough
This section provides the specific sequence of actions required to beat the level. Follow these steps in order. Do not skip ahead, and do not improvise heavily until you reach the final phase.
Phase 1: The "Ice Breaker" Opening
As soon as the level starts, look at the Right Side. Ignore the volcano shape for now.
- Tap all Red/Yellow cups on the right. Send them to the conveyor immediately. Even if the placement is messy, the goal here is to clear them from the tray.
- Merge generic cups. If the spawner (blue arch) creates two identical cups (e.g., two standard Reds), merge them instantly. This counts toward the Ice Block counter.
- Monitor the "12" Counter. Watch the number decrease. You need to get this to zero.
- Keep Tray Space Open. Maintain 2-3 empty slots in your tray. If you fill all 5 slots with colors you can't use, you cannot tap new cups to break the ice.
Phase 2: The Key and Lock Exchange
The moment the Ice Block hits 0, it shatters. Pause for a split second to assess the board.
- Tap the Pink Key. It is usually located right where the ice was.
- Identify the Pink Lock. Look to the bottom left. You will see a lock icon.
- Execute the Unlock. The key will fly to the lock and destroy it.
- Observe the Release. A stack of Orange and Yellow cups will spill out from the destroyed lock mechanism. These are your building blocks.
Phase 3: Building the Base (Orange Layer)
Now we start painting. The conveyor moves Left to Right.
- Load the Orange Cups. Drag the newly released Orange cups to the tray.
- Position for Center. Wait for the pouring cup to align with the horizontal center of the screen (usually the 50% mark).
- Create a Wide Base. Pour 2-3 Orange cups in the center. This forms the "magma chamber" floor.
- Widen the Slopes. Pour slightly off-center with the next few Orange cups to create a gentle slope. Do not make it too steep yet.
Phase 4: The Vertical Rise (Yellow Layer)
Once you have a stable orange base, switch to Yellow.
- Stack Yellow on Orange. You want to create a peak. Pour strictly in the center.
- Watch for Slippage. If the Yellow sand slides down the Orange side, your base is too flat. Pour more Orange on the sides to reinforce the walls.
- Build Height. You need the Yellow pile to rise to about 60-70% of the screen's vertical height.
- Save One Yellow. Keep one Yellow cup in reserve in case you need to patch a hole later.
Phase 5: The White Core Execution
This is the most dangerous part of the level. White cups are rare or slow-spawning.
- Wait for the White Cup. It usually comes from the main spawner or is the last cup in the stash.
- Timing is Everything. Do not tap until the pouring cup is exactly over the highest point of your Yellow peak.
- Quick Tap. Tap to pour. The White sand should land right on top of the Yellow, creating a glowing effect.
- Damage Control. If you miss and pour on the side, do not panic. You can cover the mistake with the final Maroon layer.
Phase 6: The Maroon Cap (Finishing Move)
With the core built, you just need to make it look like a rock.
- Switch to Dark Maroon. This is your standard filler color.
- Fill the Left and Right Sides. Pour Maroon on the far left and far right edges to build up the outer shell.
- Avoid the Center. Do not pour Maroon over the White peak. Leave the "crack" open.
- Final Polish. Use any remaining cups to smooth out the transition between the dark shell and the yellow core.
Color Order and Processing Logic
Success in Level 121 depends entirely on the sequence in which you process your colors. If you process the "Shell" colors before the "Core" colors, physics will ruin your day. The following is the scientifically optimal order to minimize resource friction and maximize stability.
The "Core First" Principle
Why not Maroon first? Imagine building a sandcastle. If you build the outer walls first and then try to pour water (lava) into the center, the water will just flow over the top or spill out because the walls aren't bonded to the center. By building the center (White/Yellow) first, you create a central pillar that the outer shell (Maroon) can adhere to. The friction between the core and the shell is what holds the volcano together.
Priority 1: Orange (The Foundation)
Orange acts as your secondary foundation. It is sticky enough to hold White but voluminous enough to build a base. You should process all Orange cups immediately after unlocking the Pink Lock. Do not save them. Get them on the board to occupy the middle ground. If you have Orange in your tray and the conveyor is in position, pour. Do not wait for Yellow.
Priority 2: Yellow (The Volume Builder)
Yellow is less sticky than Orange but provides the bulk of the mountain shape. Process Yellow cups immediately after Orange. The key here is to stack them high. If you have a choice between pouring a Yellow cup or saving space for a White cup, usually it is better to pour the Yellow to build the height, provided you have at least one slot open for incoming tools.
Priority 3: White (The Accent)
White is the "Trigger" color. It is sparse. You should only process White when you are ready for the final phase. Do not pour White early. If a White cup enters your tray and you aren't ready, keep it in the tray (taking up a slot) until the mountain is built. This is the only exception to the "keep tray empty" rule. Protect the White cup at all costs.
Priority 4: Dark Maroon (The Filler)
Dark Maroon is your "Trash" color until the end. It is abundant and easy to get. If your tray is full and you have a Maroon cup, merge it or pour it on the far edges. But generally, you should avoid tapping Maroon generators until the very end. If you accidentally pour Maroon over the center early, you effectively bury the drop zone for the rest of your core colors.
The "Merge-Only" Rule for Early Game
In the first 30 seconds of the level (the Ice Breaker phase), the order is: Merge > Paint. Do not worry about colors. If you see two Red cups, merge them. If you see a Red and a Blue, merge them if it helps clear space. The only color that matters during the ice phase is whatever lowers the counter fastest. Usually, this means processing the cheapest, most available cups (often Red/Maroon) just to generate action count.
Endgame Rebalancing
Once the core is built, the order flips. Now, Maroon becomes Priority 1. You need to encase the beauty in darkness. The processing logic shifts from "Precision" to "Coverage." You are no longer building up; you are filling out. At this stage, tap every Maroon cup you see and flood the sides.
Key Tips for Success
Even with a strategy, Level 121 has nuances that can trip you up. These tips are distilled from hundreds of attempts to help you manage the specific quirks of this stage.
Tip 1: The "3-Slot" Buffer
Never let your tray fill up completely if you are in the "Ice Breaking" phase. Always try to keep 2 slots empty (ideally 3). Why? Because the spawner might give you a White cup unexpectedly. If you have 4/5 slots full of Maroon and a White cup appears, you have to dump a Maroon cup to pick up the White one. That wasted time could cost you the level. Keeping space open gives you the flexibility to grab key items instantly.
Tip 2: Watch the Spawner "Arch"
The blue arch at the top often has a number (e.g., '2') or a timer. This tells you when the next batch of cups is coming. If you see the arch glowing or the timer resetting, hold off on your current pour for a split second. It is often better to wait 0.5 seconds to see if the new cup is the rare White one you need, rather than pouring a common Yellow and then having a full tray when the White arrives.
Tip 3: The "Tap-Drag" Rhythm
When building the peak, use a rhythm. Tap the cup, watch it align with the center, drag to pour. Don't just tap wildly. The "Drag" mechanic allows you to control the flow slightly. If you drag slightly left or right while pouring, you can steer the sand. This is crucial for keeping the Yellow pile centered without it toppling over.
Tip 4: Ignore the Score
Sand Loop often gives points for "combos" or "perfect pours." In Level 121, ignore the score. Do not go for a fancy combo if it means using a cup you need for the core. A 500-point combo is useless if you run out of White cups. Play for the Level Complete, not the High Score. Efficiency beats aesthetics here.
Tip 5: The "Fake" Merge
Sometimes you can use a merge to save space. If you have two cups that you don't need right now (say, two Maroons), and you need to free up a slot, merge them into a higher tier cup. This clears one slot from your tray immediately. You can then hold that higher tier cup for later (perhaps for the final shell layer) or use it to break the ice if you are still in that phase.
Tip 6: Conveyor Patience
The conveyor belt moves at a fixed speed. You cannot speed it up. If you miss a drop window (e.g., the cup moved past the center before you could pour), do not try to force it. Pouring off-center creates weak spots in the structure. Let the cup go. It will come back around or be recycled. Patience prevents the "Avalanche" effect where your whole mountain slides off because of one bad pour.
Common Mistakes to Avoid
Players often fail Level 121 for the same reasons. By identifying these common pitfalls, you can consciously avoid them.
Mistake 1: The Premature Cap
This is the #1 killer. You get impatient or nervous that the structure isn't filling up, so you start pouring Dark Maroon over the center to "finish" it. Once Maroon covers the center, the Yellow and White cups have nowhere to go but the sides. They slide down, creating a flat, ugly mess. You must resist the urge to seal the volcano until the very last second.
Mistake 2: Ignoring the Ice Block
Some players focus too much on painting the background with the available colors and ignore the Ice Block. They treat the level as a normal painting stage. Suddenly, they realize their tray is full of 5 colors they can't use, and the Ice Block is still at "8". They are now deadlocked. Always check the Ice Block counter first. If it's above 0, your only job is killing it.
Mistake 3: Overfilling the Tray
It is tempting to grab every cup you see. "I might need this later!" you think. No. A full tray is a dead tray. If you hold 5 cups, you cannot interact with the spawner, you cannot merge, and you cannot pick up the key. You become a spectator. Keep the flow moving. When in doubt, pour or merge.
Mistake 4: Wasting the White Cup
The White cup is your MVP. Using it to fill a small hole on the side is a waste. It belongs on the peak. Many players panic when they see the White cup and just pour it immediately to get it out of the tray. This results in a white splotch on the bottom slope. Wait. Hold the cup. Build the mountain up to meet the cup, not the other way around.
Mistake 5: Merging the Key
This sounds silly, but it happens in high-stress moments. You are trying to clear space, you see a Pink object, you merge it with another Pink object nearby. But wait—that wasn't a cup; that was the Key! Now the Key is gone, and the level is impossible to finish. Always distinguish between "Consumable Cups" and "Key Items."
Mistake 6: Creating "Steep Sides"
When building the Orange base, if you pour only in the exact center, you get a tall, thin tower. The physics engine in Sand Loop hates tall, thin towers. They will topple. You must create a pyramid. Wide base, narrow top. If you build a tower, the wind/movement of the conveyor will knock it over before you can get the Maroon shell on.
What to Do If You Get Stuck
Sometimes, despite your best efforts, things go wrong. The board is a mess, the tray is full, and the volcano looks like a pancake. Here is your emergency protocol.
Situation 1: The "Full Tray" Deadlock
You have 5 cups, none of them fit the current situation, and the Ice Block is still active.
The Fix: You must sacrifice. Look for two cups of the same color or tier. Merge them. This consumes two cups and produces one, effectively clearing one slot. Do this even if the resulting cup isn't useful right now. The goal is to get down to 4/5 or 3/5 slots so you can tap the spawner again for fresh resources.
Situation 2: The "Collapsed Peak"
Your mountain fell over. The Yellow is all over the floor, and the White is buried.
The Fix: Don't restart immediately. Use the Dark Maroon cups. Yes, you usually save these for the end, but in an emergency, use Maroon to build "dams" or walls on the sides. Corral the loose Yellow sand into the center. Once you have contained the mess, carefully pour more Yellow on top to rebuild the height. The Maroon walls will help hold it up.
Situation 3: Ice Block Won't Break
You are merging cups, but the counter isn't going down.
The Fix: Check the location. In Sand Loop, merges usually only count if they happen near the target. If you are merging on the far left, it might not count for the Ice Block on the right. Drag your cups to the right side of the screen/board before merging them. You have to "feed" the block with activity in its zone.
Situation 4: Missing the Pink Key
You broke the ice, but you don't see the key.
The Fix: It might have spawned underneath another cup. Tap and drag cups out of the way on the bottom right. The key is a small object; it can be hidden behind a stack of cups. Clear the area visually to find it. Do not proceed to the left side until you have clicked that key.
Situation 5: Spawner Stuck
The blue arch stops producing cups.
The Fix: This usually happens if your tray is full or if there is a physical blockage on the belt. Clear the belt by pouring cups off the end (sacrificing them). Once the belt is clear, the spawner should resume. If it doesn't, you might be experiencing a bug—restart the level.
Speed Run Tips
Once you have mastered the logic, you might want to aim for a faster completion time. Speed running Level 121 requires high-risk, high-reward maneuvers.
The "Pre-Load" Trick
As the level is loading, you can often tap the screen before the animation fully finishes. If you have memorized where the first Ice Block cups spawn, you can start tapping them immediately. Saving 1-2 seconds here adds up. Don't wait for the "Start" jingle to finish.
Batch Processing
Instead of Tap-Wait-Tap, try to queue your actions. If you know the next three cups are Red, Red, Blue, and you need to merge the Reds, tap them as fast as possible. Don't wait for the merge animation to fully complete before tapping the next one. The game allows for a slight input buffer. Fast fingers can break the Ice Block in under 10 seconds if you are precise.
Skip the "Perfect" Shape
For a speed run, the "Volcano" doesn't need to be pretty. It just needs to pass. You can pour the White slightly off-center. You can make the Maroon shell lumpy. As long as the colors are roughly in the right place, the level will clear. Don't waste time micro-adjusting the pour position. If it's 80% good, move on to the next cup.
The "Key Grab" Shortcut
As soon as the Ice Block hits "1" or "0", you can predict where the Key will appear. Move your finger to that location before the block actually vanishes. As soon as the Key appears, you are already there to tap it. This shaves off the reaction time of looking for the key.
Combine Merge and Move
When you unlock the Left Stash, the cups spill out. You can grab a cup and drag it to the tray *while* it is still settling from the explosion. You don't need to wait for the physics to settle. Grab the Orange cup the millisecond it is interactable and throw it on the belt.