
Level 152
HARDHow to solve Sand Loop level 152? Get instant solution for Sand Loop 152 with our step by step solution & video walkthrough. Sand Loop 152 tips and guide.
Play Sand Loop Now
Experience the puzzle challenge firsthand
Game Screenshots
Sand Loop Level Guides
Level Overview: The Pop-Art Floral Challenge
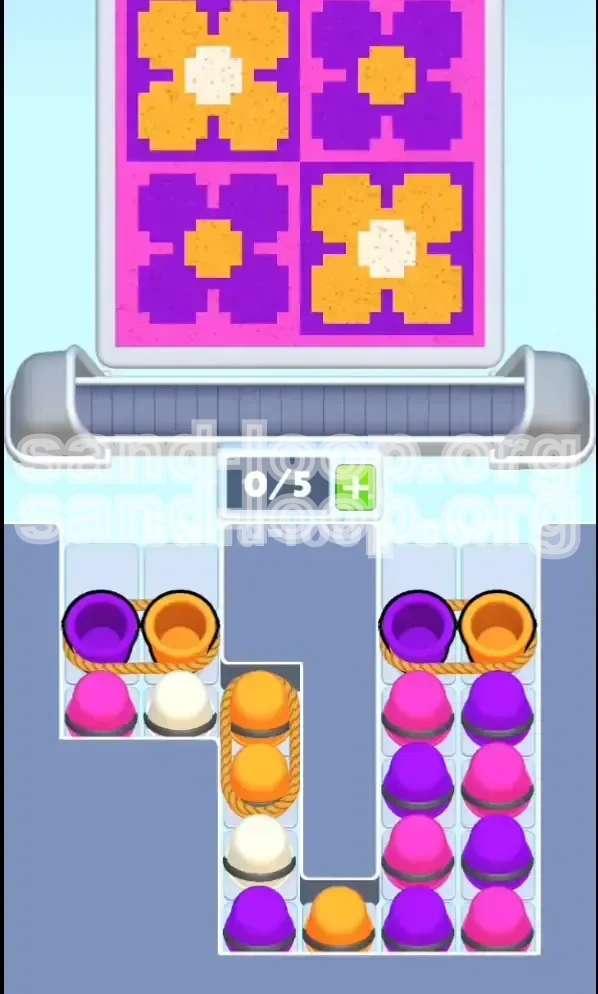
Welcome to the definitive walkthrough for Level 152, famously known as the "Pop-Art Flowers" challenge. This stage represents a significant shift in gameplay mechanics, moving away from pure speed and into the realm of resource management and spatial logic. The visual design is a symmetrical 2x2 grid featuring four stylized flowers, but the beauty of the art hides a ruthless inventory management puzzle.
The core difficulty in Level 152 is not your reaction time, but your ability to manage "heavy" inventory items. The supply tray is dangerously lopsided, creating a scenario where poor decisions in the first three seconds can lead to an unrecoverable traffic jam. You are dealing with a vibrant palette of Purple, Pink, Orange, and White, but the distribution of these colors is designed to test your foresight.
In this level, you must juggle the need for broad background strokes against the necessity of preserving rare resources for critical details. The right side of your tray acts as an infinite engine of color, while the left and middle sections are shallow, blocked, and trapped by complex roped configurations. Success depends entirely on how you dismantle these initial barriers.
The Inventory Logic Puzzle
Unlike previous levels where you could simply tap cups in any order, Level 152 operates on strict capacity logic. Your belt capacity is limited to 5 slots. However, the game introduces "Roped Pairs"—heavy items that count as double units or occupy sequential slots. If you fill your belt indiscriminately, you will hit a soft lock where no new cups can enter the shooting zone, and colors will stop flowing. You must treat your belt slots like currency; spend them wisely to keep the movement fluid.
The Asymmetrical Supply Tray
The physical layout of the cup tray is your first obstacle. The right column is a deep, seemingly endless stack of single cups. In contrast, the middle and left columns are frustratingly short. They are capped by roped pairs that must be cleared before you can access the valuable single cups underneath. This asymmetry forces a specific playstyle: you must rely on the right side for volume while carefully mining the left and middle sides for specific, rare colors.
The 2x2 Grid Structure
The canvas is a perfect checkerboard of four large quadrants. Each quadrant contains a flower with a specific color logic. Generally, you are looking at Purple and Pink backgrounds, with Orange petals and White centers. Understanding that the grid is symmetrical is key; the solution for the top-left flower often mirrors the solution for the bottom-right, allowing you to predict which colors you will need in bulk.
The "Heavy" Item Mechanic
This level introduces the concept of "weight" in inventory. Roped pairs (two cups tied together) behave differently than single cups. They occupy the belt longer and block the entry of subsequent cups. If you attempt to load two roped pairs simultaneously, you will fill 80-100% of your belt capacity instantly, causing a deadlock. You must learn to stagger these heavy items to maintain a steady flow of paint.
The Color Scarcity Issue
Not all colors are created equal here. Purple and Pink are abundant—too abundant, in fact. Orange is your mid-tier resource. However, White is critically scarce. There are very few White cups available in the initial tray. If you accidentally waste White paint on a background area or trap the White cups behind a wall of unusable Purple cups, you will fail the level. Preserving White is the primary strategic objective.
Clear Objectives: Your Mission Checklist
To conquer Level 152, you need a clear plan of attack rather than random tapping. Your mission is divided into three distinct phases: Deconstruction, Backgrounding, and Detailing. You cannot successfully move to the next phase without completing the previous one. Rushing the process usually results in a clogged belt and a loss.
Objective 1: Clear the Top Layer Blockers
Your immediate goal is to remove the "cap" from the tray. The roped pairs sitting at the top of the Left, Middle, and Right columns are acting as lids. You must clear these to access the single cups underneath. Specifically, the middle column's rope is guarding the most precious resource in the level: the White cups. Prioritize clearing these ropes without flooding your belt.
Objective 2: Establish Broad Backgrounds
Once the ropes are cleared, you will be flooded with Purple and Pink. Your second objective is to paint the large background areas of the four quadrants. Do not focus on the flower centers yet. You want to cover the canvas in the base colors first. This uses up the abundant "filler" colors and clears space on your belt for the rarer items to come.
Objective 3: Preserve White Paint
Throughout the entire level, you must operate with a "White Preservation Protocol." You need White exclusively for the tiny centers of the Orange flowers. Under no circumstances should you use White cups for large fill areas. You must deliberately keep your belt clear so that when White cups finally arrive from the middle chute, they have a clear path to the canvas without getting mixed into a Purple/Pink soup.
Objective 4: Execute the Orange-White Sequence
The final stage of the level requires precise timing. You must form the large Orange petals first. Immediately after the Orange is laid down, you must have a White cup ready to fire to place the center dot. If you do the Orange, then do a bunch of Purple, then do the White, the color blending logic might fail or you might run out of belt space. The Orange and White must be paired in your execution queue.
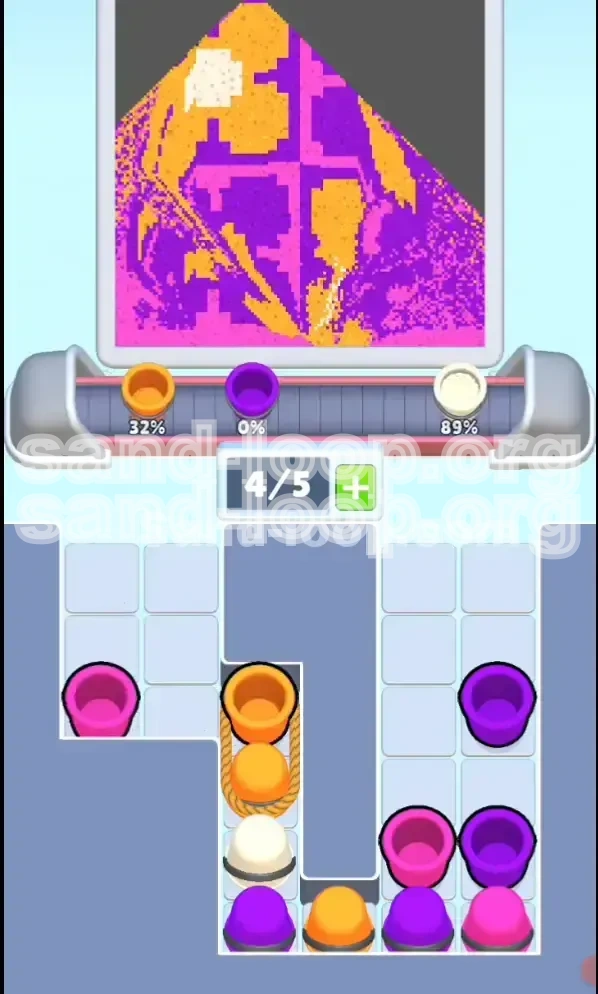
Objective 5: Manage Belt Saturation
Keep your belt saturation below 60% (3/5 slots) whenever possible. The only time you should hit 100% capacity is if you are 100% sure the next two shots will clear large chunks of the canvas. Keeping "buffer space" open allows you to react to unexpected color drops and prevents the soft-lock scenario where cups are waiting to enter the belt but can't.
Objective 6: Symmetrical Completion
Use the symmetry of the grid to your advantage. Don't hop around randomly. Finish the top-left flower completely, then move to the top-right. Or, finish all backgrounds, then all petals. Trying to do one part of the top-left, one part of the bottom-right, and so on will confuse your color management. Grouping your tasks by color type is the most efficient path to victory.
Step-by-Step Instructions: The Action Plan
This is the core of your strategy. Follow these steps in order. Do not skip steps, and do not improvise until you reach the "Cleanup" phase. This sequence is mathematically calculated to minimize belt jams.
Phase 1: The "Side-Sweep" Maneuver
As soon as the level starts, do not touch the middle column. Your fingers belong only on the Left and Right columns.
Step 1: Tap the Left Horizontal Rope (Purple/Orange pair). This sends two heavy cups to your belt.
Step 2: Immediately tap the Right Horizontal Rope (Purple/Orange pair). This sends two more heavy cups.
Current Status: Your belt is now at 4/5 capacity. You have two pairs of heavy cups moving toward the shooting zone. These contain the Purple and Orange needed for the base layer. Do not tap anything else. Wait for these cups to move at least halfway to the shooter. If you tap the middle rope now, you will fill the 5th slot and cause an immediate backup, stopping the conveyor belt.
Phase 2: Unearthing the White Gold
Once the first two pairs have moved sufficiently down the line (ideally after one pair has been fired), you have a small window of opportunity.
Step 3: Tap the Middle Vertical Rope (Orange/Orange pair).
The Logic: You are not tapping this because you need Orange. You are tapping this because it is sitting directly on top of a White Cup. By removing this rope, you unleash the White cup into the tray, making it available for the final phase. This is the most critical tap in the entire level.
Phase 3: The "Right-Hand Engine" Rhythm
With the top ropes gone, the Right Column transforms into your primary engine. It is now a tall stack of single Pink and Purple cups.
Step 4: Begin a steady rhythm on the Right Column. Tap the Pink/Purple cups to fill the background of the flowers.
The Rule: Tap two cups, wait a second, tap two cups. Do not spam-tap. You want to maintain a belt capacity of around 3/5. This allows the cups you collected earlier (the ones from the ropes) to be fired without blocking the new arrivals. The right column provides 80% of the paint needed for this level.
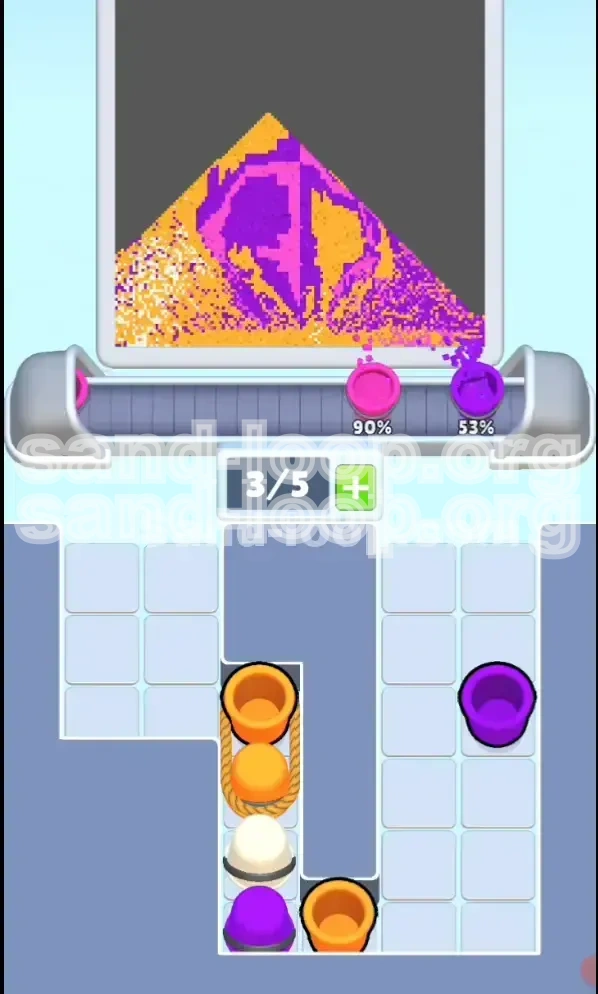
Phase 4: The Precise "White Window" Strike
As the Right Column churns, keep your eyes on the Middle Column. The White Cup you unearthed in Step 3 is now rising to the top of the middle stack.
Step 5: Pause the Right Column. Stop tapping the right side.
Step 6: Let the belt clear out until you have 0 or 1 cup waiting.
Step 7: Tap the Middle Column to grab the White Cup.
Why? You need to fire this White cup immediately into the center of the flower you are currently working on. If you mix it with the Right Column stream, it might get stuck behind a Purple cup or fire at the wrong time. The White paint needs a "clean lane" to hit the target.
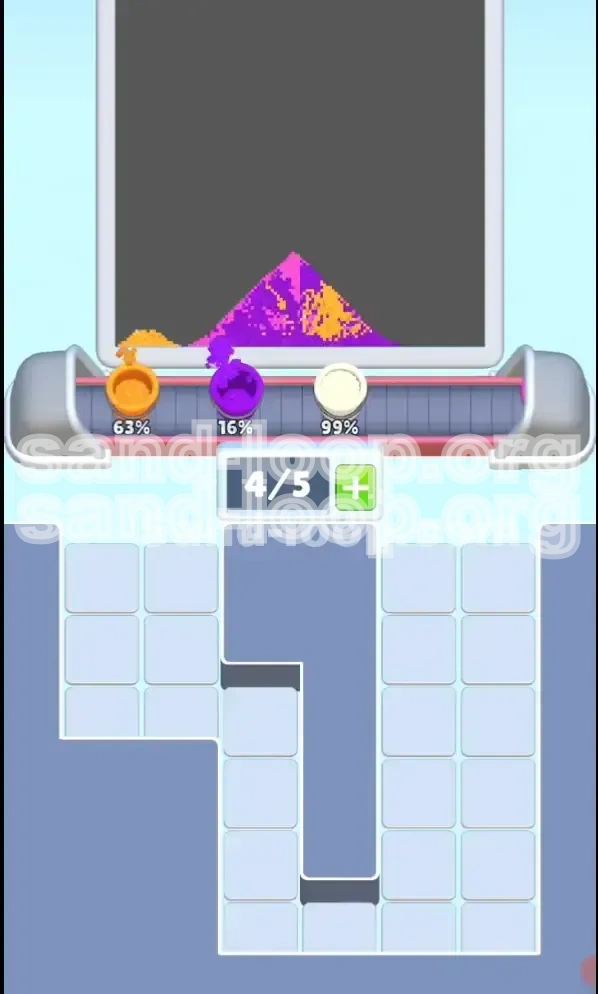
Phase 5: Leftover Mining and Cleanup
By the time the Right Column is exhausted (or the flower backgrounds are done), you will likely have some stray cups left on the Left Column.
Step 8: Check the Left Column. It usually has a few Pink or Purple single cups at the bottom.
Step 9: Use these for patching holes. If you missed a spot on the grid or if you need to slightly overfill a section to trigger the "Win" state, these leftovers are your emergency reserve.
Phase 6: Final Formation
Step 10: Focus on the Orange petals. If you still have Orange cups available (leftover from the initial ropes or from the middle column), ensure the large petal shapes are solid.
Step 11: Ensure the White centers are distinct. If the white looks too small or covered, grab another white cup if available. If not, ensure the surrounding orange is tight enough to make the white pop visually.
Color Order: The Processing Sequence
Processing colors in the wrong order is the number one reason players lose Level 152. The game's physics engine handles "wet paint" differently depending on the order of application. Here is the hierarchy you must follow to ensure the colors render correctly and the game registers your progress.
Priority 1: Purple Background (The Foundation)
Purple is your volume filler. It is the most abundant color in the tray (Right column). You must apply Purple first to the corners and background quadrants of the grid. Trying to apply White or Orange first is inefficient because you will just cover it up with Purple later. Get the Purple out of the way immediately to clear your inventory slots. Think of Purple as the "undercoat" of your painting.
Priority 2: Pink Background (The Contrast)
Pink serves as the secondary background color, usually alternating with Purple in the checkerboard pattern. Treat Pink exactly like Purple. It is abundant (Right column) and should be used to fill large areas. Do not use Pink for details; it is strictly for the broad strokes of the background petals. By exhausting Pink and Purple early, you reduce the visual noise on the screen, allowing you to see the Orange and White targets more clearly.
Priority 3: Orange Petals (The Shape)
Orange is the "shape-defining" color. It creates the flower petals. You must apply Orange only after the Purple/Pink background is established. If you apply Orange first, the subsequent Purple background layers might "bleed" into the Orange edges, making the flower look blurry or misshapen. Wait until the background is 80% dry, then lay down the Orange to create crisp, sharp lines for the flower petals.
Priority 4: White Centers (The Highlight)
White is strictly for the "pupil" of the flower. It must be applied last. If you apply White first, subsequent splashes of Orange or Purple will contaminate it, turning it gray or muddy. The White center needs to sit on top of the Orange petal. Furthermore, because White is so rare, you must wait until the Orange petal is perfectly formed before placing the White dot. A misplaced White cup cannot be easily corrected.
The "Feeder" Analysis
Analyzing the supply tray reveals a 70/20/10 split. 70% of your useful paint comes from the Right Column (Purple/Pink). 20% comes from the Roped Pairs (Orange). 10% comes from the Middle/Left (White/Rare). If you spend 90% of your time tapping the Right Column, you are following the correct probability curve. Ignoring the Right Column to hunt for specific colors in the middle is a statistical trap that leads to defeat.
The "Clean Belt" Rule for White
When processing the final color (White), the state of your belt matters. A "dirty" belt (full of mixed colors) risks mixing the White paint with the residue of previous colors. Ideally, you want the White cup to be the only cup, or one of two cups, on the belt when it fires. This isolation ensures the White paint hits the canvas with maximum purity and triggers the win condition cleanly.
Key Tips and Common Mistakes
Mastering Level 152 requires you to not only know what to do but also what not to do. The difference between a win and a loss often comes down to avoiding specific traps that the game designers have placed in your path. Here are the critical success factors and the pitfalls to avoid.
Key Tip: The "Unblock" Strategy
Always play to unblock the tray, not just to paint the canvas. When you look at the screen, don't just look for a matching color; look for cups that are blocking other cups. That Vertical Orange pair in the middle? It's blocking the White. Even if you don't need Orange right now, you must take it to get to the White. This "Miner" mentality—digging to reveal resources—is essential.
Common Mistake: The "Slot Cap" Trap
The most common error is tapping the Left, Middle, and Right ropes simultaneously. This fills the belt to 5/5 instantly. When the belt is full, the conveyor stops. When the conveyor stops, you cannot organize your colors. You are forced to fire randomly, ruining your color order. Rule of Thumb: Never let your belt go above 4/5 unless you are about to fire two shots instantly.
Common Mistake: Ignoring the Right Column
Many players get fixated on the tricky Roped Pairs on the left and ignore the steady stream on the right. This is backward. The Right Column is your safety net. If you run out of Purple on the right, you are in trouble. Keep the Right Column flowing. It acts as a "conveyor belt cleaner" because the single cups move faster and process easier than the roped pairs.
Key Tip: Visualizing the Stack
Learn to look "through" the top cups. When you see a Purple/Orange roped pair on the left, visualize the single cup underneath it. Is it a Pink? Is it a White? If you know what's coming next, you can plan your current move better. Don't just react to the current cup; plan for the next one.
Common Mistake: Wasting the White Cup
You only get one or two White cups. A common mistake is using a White cup to fix a tiny error in a Purple background. Never do this. A 95% Purple background is good enough. Save the White cup strictly for the flower center. If you waste it, you have to fail the level and restart because the tray will not generate another White cup in time.
Key Tip: Rhythm Tapping
Find a rhythm. Tap-tap-wait. Tap-tap-wait. This rhythmic tapping on the Right Column prevents the "Gulp" effect where the game swallows 4 cups at once and clogs the machinery. By maintaining a cadence, you ensure the shooting mechanism has time to reset and the belt has time to advance.
Stuck Solutions and Speed Run Tips
Sometimes, despite your best efforts, things go wrong. Or perhaps you are a veteran player looking to optimize your time. This section covers how to recover from bad situations and how to blitz the level for a high score.
Stuck Solution: The "Clogged Belt" Fix
Symptom: Your belt is full (5/5), the cups aren't moving, and you can't tap new ones.
The Fix: Stop tapping the tray entirely. Look at your shooting zone. Fire the cup that is currently ready at the largest matching color block on the canvas, even if it's not a perfect match. You need to free up that slot immediately. Once you drop to 4/5, the belt will lurch forward. Fire the next cup as fast as you can. Your goal is to drain the belt to 1/5 or 0/5 so you can regain control of the flow.
Stuck Solution: The "Missing White" Scenario
Symptom: You've painted everything except the flower centers, and you don't have a White cup available.
The Fix: This usually means you trapped the White cup behind a rope earlier in the level. Look at the Middle Column. Is there still a rope there? If so, you need to tap it immediately. If the rope is gone and there is no White, you may be in a "Fail State" where the game won't spawn more. In this case, look for a loophole: Can you cover the "missing" center with Orange to blend it in? If not, restart the level—it's faster than waiting for a miracle.
Speed Run Tip: The "Double-Tap" Start
For speed runners, the first two seconds are everything. Don't wait for the cups to settle. As soon as the level loads, perform the "Double-Tap" maneuver on the Left and Right ropes simultaneously (or with a split-second delay). This gets 4 cups onto the belt immediately. While they are traveling, you are already planning your middle column strike. Aggressive early play saves seconds on the clock.
Speed Run Tip: Color Stacking
Try to group your shots. Don't go Purple-Pink-Purple-Pink. Try to do Purple-Purple-Purple (clear belt), then Pink-Pink-Pink. This "batch processing" is faster because your brain doesn't have to switch contexts as often. It also minimizes the time the aiming reticle spends moving across the screen.
Speed Run Tip: Ignore Perfection
A 95% completion is often enough to trigger the "Level Complete" flag, especially if the remaining 5% is just filling in a corner. Don't obsess over making every pixel perfect. If the flower looks like a flower and the background is mostly filled, move on. The game's hit detection for "completion" is more lenient than you think. Chasing 100% perfection adds seconds to your time with no strategic benefit.
Speed Run Tip: Pre-loading the Belt
As you finish the last flower, look at the incoming tray. If you see the final required color is already on the belt and moving towards the shooter, you can often hit the "Next Level" prompt the moment the last cup fires. You don't need to wait for it to hit the canvas if the game logic registers the shot. This requires knowing the game's timing windows perfectly.