
Level 161
HARDHow to solve Sand Loop level 161? Get instant solution for Sand Loop 161 with our step by step solution & video walkthrough. Sand Loop 161 tips and guide.
Play Sand Loop Now
Experience the puzzle challenge firsthand
Game Screenshots
Sand Loop Level Guides
Level 161 Strategy Overview: The Ice and Mystery Gauntlet
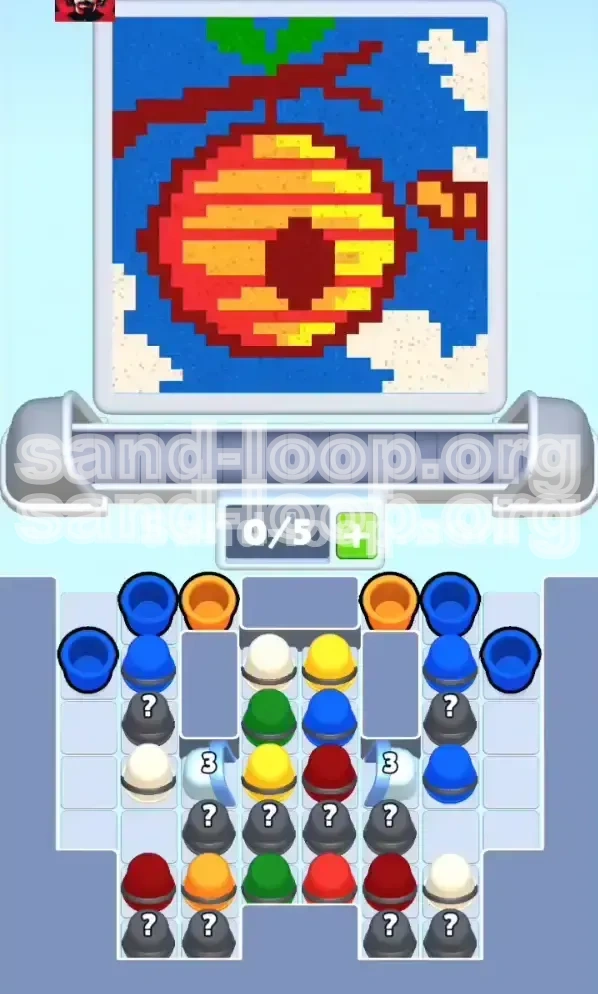
Sand Loop Level 161 is not just a painting task; it is a resource management puzzle disguised as an art game. In this level, titled "The Beehive," the primary objective is to paint a detailed scene featuring a beehive hanging from a branch, complete with a small bee, lush green leaves, and a vibrant blue sky background.
However, the challenge here is deceptive. You will face a heavily congested supply tray where approximately 40% of your usable paint is locked behind "Ice Block 3" barriers and hidden inside "Question Mark" (?) cups. Unlike standard levels where you can simply paint whatever colors are available, Level 161 forces you to play a specific opening sequence to avoid a deadlock.
The core difficulty lies in the central supply columns. If you prioritize painting the easy-to-reach blue sky first, you will fill your conveyor belt with cups that you cannot use immediately, leaving no room to maneuver the specific colors required to break the ice. This guide breaks down the mathematical approach to clearing this level, ensuring you maintain a fluid rhythm without running out of moves.
Identifying the Core Threats
- Ice Block 3 (Central Obstruction): These are the level’s main bottlenecks. Located in the middle columns, they block access to the lower half of the supply tray. Each requires exactly 3 cups of a specific color to be sacrificed (poured) next to them to shatter.
- Question Mark (?) Cups: Hidden beneath the ice. These cups have a randomized color output. They are risky because they can flood your belt with unwanted colors (like Green when you need Yellow) if revealed too quickly.
- The "Bee" Dead Zone: A small cluster of pixels on the right side representing a bee. It is surrounded by blue sky. If you over-pour the blue sky background, you might accidentally seal off the bee's pixels, making it impossible to detail them later with Brown and Yellow.
Understanding the Color Palette Distribution
The paint supply is unevenly distributed, which dictates your painting order. You cannot rely on a consistent flow of every color.
- High Volume: Bright Blue (Sky). These cups are abundant on the far left and right edges.
Orange and Yellow (Hive). These are mostly trapped in the center behind the ice. - Low Volume: Dark Brown (Branch/Bee), Green (Leaves), and White (Clouds). These are scarce and often located at the very bottom of the mystery stacks.
The Conveyor Belt Capacity Limit
Your conveyor belt has a maximum capacity of 5 cups. In this level, hitting 5/5 capacity is dangerous because it limits your ability to "shop" for the right colors in the mystery pile.
- The 3-Slot Rule: Try to keep your belt at 3/5 capacity or lower until the Ice Blocks are destroyed. This leaves 2 empty slots to catch new colors revealed from the mystery cups.
- Slot Management: Every slot on your belt represents a "move." If you fill your belt with 5 Blue cups, you have committed to 5 moves of painting the sky, which wastes time when you actually need to be breaking ice blocks.
Primary Objectives for Success
To achieve 100% completion on this level, you must adhere to a strict hierarchy of goals. Do not focus on the aesthetic result (the painting) initially; focus on the mechanics of clearing the tray.
Objective 1: Shatter the Ice Blocks Immediately
Your first and foremost priority is to clear the "Ice Block 3" obstacles in the central columns. Think of these as a dam holding back your water supply. Until the dam is broken, you are working with limited resources.
- You must identify the color adjacent to the ice block (usually Yellow or White) and feed that color into the queue.
- Do not worry about "wasting" Yellow paint on the hive if it helps break the ice faster. The volume of paint locked behind the ice is worth the early sacrifice.
- Failure to break the ice within the first 10-15 moves will result in a "soft lock," where your available paint is consumed, and the remaining paint is inaccessible.
Objective 2: Manage the "Mystery Cup" Reveal
Once the ice breaks, the Question Mark cups will slide up and replace the empty slots. This phase is about risk management.
- The Reveal Rate: Do not tap all available mystery cups at once. Reveal them one by one.
- The Dump Strategy: If a revealed mystery cup is Green (for leaves) but you are currently painting the Hive body (Orange/Yellow), you must be prepared to dump that Green cup into an acceptable area to save your slot space, or hold it until the end.
- Your goal here is to convert the unknown (?) cups into known colors so you can plan your next 3 moves.
Objective 3: Strategic Sky Filling
The Blue Sky is your "buffer." Because Blue cups are plentiful and unblocked, they are your tool for controlling the pace of the game.
- Use Blue paint to fill time when you are waiting for specific Orange or Brown cups to cycle into your belt.
- However, stop painting the sky when you get within 15% of completion to avoid sealing off the small "Bee" pixel cluster on the right.
Objective 4: Precision Detailing
The final phase involves the scarce colors: Brown, Green, and White.
- You must complete the Hive and Sky to such a degree that only the detailed elements remain.
- At this stage, you will likely have to cycle your belt empty, waiting for the specific Green or Brown cups to spawn from the bottom of the stack.
Step-by-Step Walkthrough: The Opening Phase
This section covers the critical first 20% of the level. If you get this wrong, the rest of the level is an uphill struggle.
Step 1: Scan the Ice Block Adjacencies
As soon as the level loads, do not tap anything. Look at the columns directly underneath the Ice Blocks (marked with a 3).
- Identify the color of the cup immediately touching the bottom of the ice block. Let's assume for this guide it is Yellow.
- Look at the two cups below that. Are they Yellow or Orange?
- Your mental plan should be: "I need to move 3 Yellow cups to the processing belt."
Step 2: Load the Belt with Ice-Breaking Colors
Tap the necessary cups (e.g., Yellow) to load them onto your conveyor belt. Ignore the Blue cups on the far edges for now.
- If the belt has 2 Yellow cups, do not load more yet. You need to see where the paint lands on the canvas.
- If the Beehive area is already full of Yellow (from previous pours), and you are forced to load a 3rd Yellow cup to break the ice, you may need to perform a "sacrifice pour" onto a nearly finished area to clear the cup from your belt.
Step 3: Execute the Ice Break
Pour the loaded cups onto the canvas. Since the Ice Blocks require the color to be "used" (poured), you must direct your stream.
- Aim for the largest unpainted area of the matching color (the Hive body).
- Once the 3rd cup is poured, the Ice Block will shatter.
- Result: The columns shift. The hidden Question Mark (?) cups now move into the playable zone.
Step 4: Pause and Reveal
With the ice gone, resist the urge to tap wildly. You have new unknown elements.
- Tap one Question Mark cup. It reveals itself—let's say it's Green.
- You are currently painting the Hive (Orange/Yellow). You do not need Green yet.
- Action: Load that Green cup onto your belt as a placeholder, or if your belt is full, dump a small amount of Green on the leaf area just to clear the cup from the belt if you desperately need space.
- Repeat this slow reveal until you have 3 known colors on your belt.
Step 5: Initial Sky and Branch Setup
While managing the center, keep an eye on the far left and right columns.
- If the center is clogged with colors you don't need, grab a Blue cup from the edge.
- Pour the Blue into the bottom corners of the sky. Do not go high yet.
- This keeps your belt moving and prevents the timer (if active) or your rhythm from stalling while you wait for the center to align.
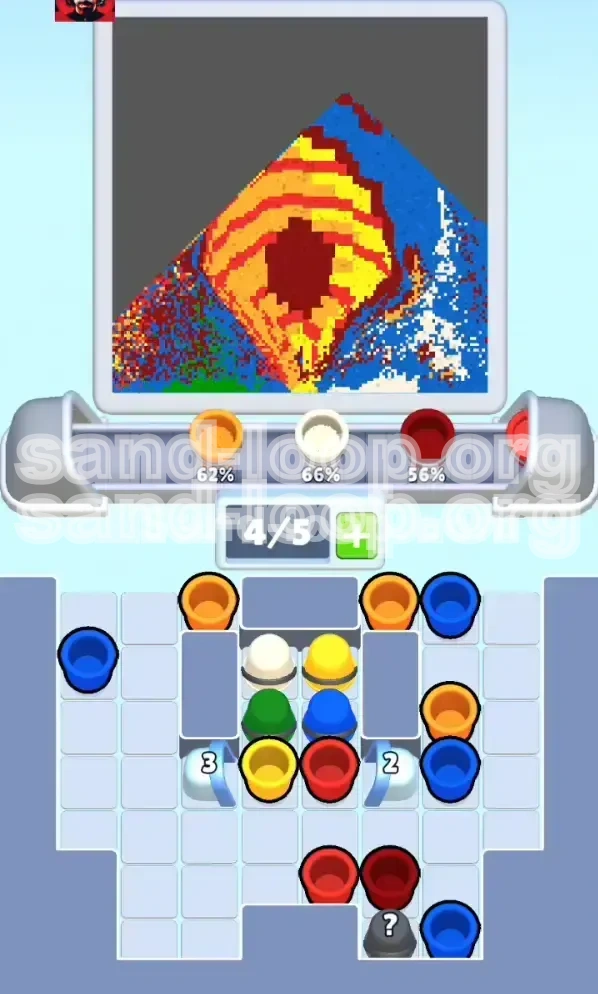
Step-by-Step Walkthrough: The Mid-Game Strategy
You have broken the ice. Now you are in the thick of painting the Hive and managing the chaos of random colors.
Step 6: The Hive Stripe Technique
The beehive consists of alternating Orange and Yellow stripes. This is visually confusing.
- Focus on the base color (Orange): Always prioritize filling the larger Orange sections first. Orange paint is generally less frequent than Yellow in the mystery cups.
- Use Yellow to fill the gaps. If you have a belt full of [Yellow, Blue, Yellow], paint two Yellow stripes, then switch to Blue for the sky to let the Yellow cup stack refresh.
- Avoid Overfill: Do not pour Orange over a Yellow stripe. The game physics might splash the paint, requiring you to redo the stripe and wasting a cup.
Step 7: The Branch Connection
The branch (Dark Brown/Red) runs across the top.
- You will likely receive Brown cups randomly from the mystery pile.
- Do not pour Brown until the main Hive body is at least 70% complete.
- Pouring Brown too early is risky because the branch connects to the hive. If you pour Brown on the branch but the connection point (hive top) isn't ready, the paint might not flow correctly, leaving a gap.
Step 8: Managing "Bad" Colors
You will load a color you don't need (e.g., Green when painting the sky).
- Don't Panic: Look at your belt capacity. If you are at 4/5, you are in trouble.
- The "Dump" Zone: Identify the smallest possible area for that color. If you get an early Green cup, find a single leaf pixel at the very top and pour just enough to empty the cup. Do not paint the whole leaf cluster yet.
- This frees up the slot so you can go back to hunting for Ice-breaking colors or Hive colors.
Step 9: The Sky Buffer Expansion
By now, the bottom of the screen (Hive) is filling up. The Blue cups are stacking up on the edges.
- Aggressively paint the Blue sky now. Fill the center and upper sides.
- Warning: Leave a 2-pixel gap around the area where the Bee will go (top right).
- Use the Blue paint to reset your board. If the center columns are giving you junk, ignore them for a moment and purely mine the Blue columns to clear space.
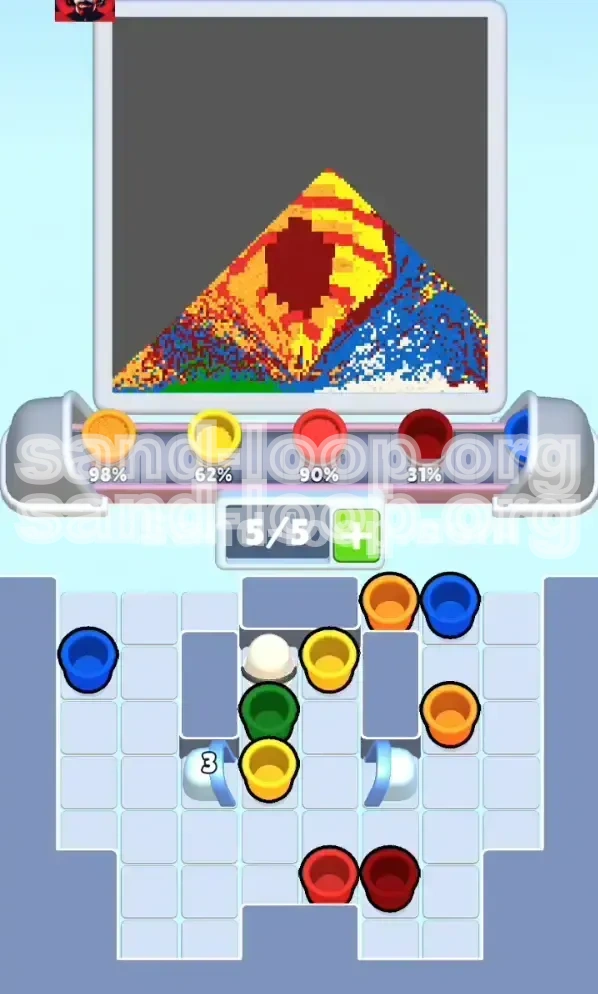
Step-by-Step Walkthrough: The Endgame and Details
The main structures are done. Now you are hunting for the last few percentages.
Step 10: The Bee Rescue
This is the most common failure point. The Bee is tiny (Brown body, Yellow wings) against a Blue background.
- Ensure you have saved 1 Brown cup and 1 Yellow cup (or have them available in the supply).
- If the sky is already painted Blue around the bee's location, you must be extremely precise.
- Pour the Brown first to create the "body" anchor. Then, pour the Yellow for the wings. If you pour Yellow first, it might blend into the sky if the Blue isn't fully dry (metaphorically speaking—depending on game physics).
Step 11: The Leaf Cluster Sweep
With the Hive and Sky done, only Green and White remain.
- Empty your belt of all non-Green/White colors. Pour them into any tiny mistakes or gaps in the main colors.
- Load up the Green cups. Pour them into the leaf cluster at the top left.
- Follow up immediately with White for the cloud accents. The White cups are often the very last cups to spawn from the bottom of the mystery stack.
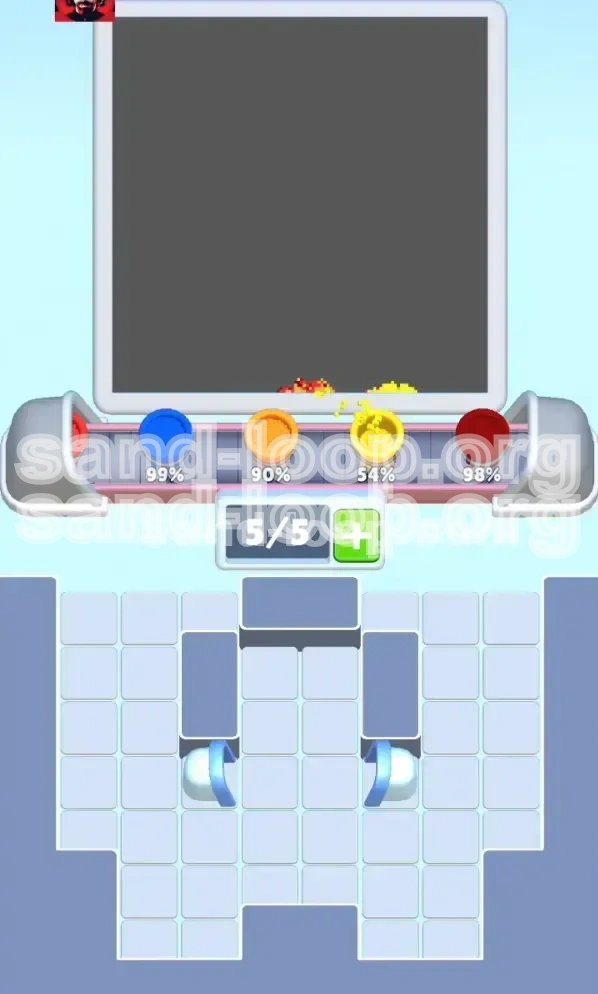
Step 12: The "Empty Tray" Wait
Sometimes, you will have 98% completion, but the last cup you need is at the very bottom of the tray, buried.
- If you are stuck, stop tapping the supply columns.
- Use the current cups on your belt to finish as much as possible.
- Once your belt is empty, tap the supply column. The game will cycle the remaining cups, bringing the bottom ones to the top.
- This "refresh" mechanic is the key to getting those final stubborn White or Brown cups.
Advanced Tips and Common Mistakes
Mastering Level 161 requires foresight. Avoid these pitfalls to ensure a smooth run.
Common Mistake: The "Full Belt" Deadlock
The Scenario: You see 5 cups on your belt: Blue, Blue, Blue, Yellow, Green. The canvas needs Orange (which is hidden in the supply). You cannot tap the supply to get Orange because your belt is full. You cannot pour the Green or Yellow anywhere useful without ruining the canvas.
The Fix: Never let your belt fill up with "safe" colors (Blue) while you are waiting for a "key" color (Orange). Keep 2 slots open. If you must tap a Blue cup, immediately pour it onto the sky before tapping anything else.
Common Mistake: Ignoring the Ice Block Cost
The Scenario: You focus on painting the sky Blue. You ignore the center. Suddenly, you run out of Blue cups. You look at the center, and the Ice Block is still there. You have no Yellow cups to break it because you used them all on the hive earlier. Game Over.
The Fix: Count your cups. If you see a "3" on an Ice Block, ensure you have at least 3 matching cups available in the visible supply before you start painting other areas.
Speed Run Tip: The "Sky First" Variation
If you are confident in your tapping speed, you can attempt a variation:
- Rapid Sky Fill: Immediately drain the left and right columns of Blue. Paint 90% of the sky in the first 10 seconds.
- Why this works: It clears the supply columns of "junk" (Blue), allowing the center columns (which contain the critical Hive colors) to slide over and become accessible faster.
- Risk: If you don't manage the Ice Block immediately after, you will run out of paint entirely. Only use this if you have the Ice Block solution (3 Yellow cups) already visible on screen.
Tip: Using Sound Cues
In many puzzle games, audio cues indicate when a cup is ready or when a color is matched.
- Listen for the distinct "shatter" sound of the Ice Block. Once you hear it, immediately shift your focus from "Ice Breaking" to "Mystery Revealing."
- The change in sound cues helps you react faster than looking at the visuals alone, saving precious seconds in a speed run.
Stuck Solution: The Force Refresh
If the screen is filled with paint, but you are stuck at 99%:
- Check for "micro-pixels." Sometimes a single unpixel remains hidden in a corner.
- If you truly have no moves, look at the supply tray. Is it empty? If yes, wait 2 seconds. The game often auto-refills or shifts the tray when it detects idle time.
- If the tray is not empty but full of wrong colors, you must "dump" a color. Find the area of the canvas with the most "extra" space (usually the bottom corners of the sky) and dump a cup there to force a new cycle.