
Level 199
HARDHow to solve Sand Loop level 199? Get instant solution for Sand Loop 199 with our step by step solution & video walkthrough. Sand Loop 199 tips and guide.
Play Sand Loop Now
Experience the puzzle challenge firsthand
Game Screenshots
Sand Loop Level Guides
Level 199 Overview: The Lighthouse Challenge
Visual Theme and Aesthetic
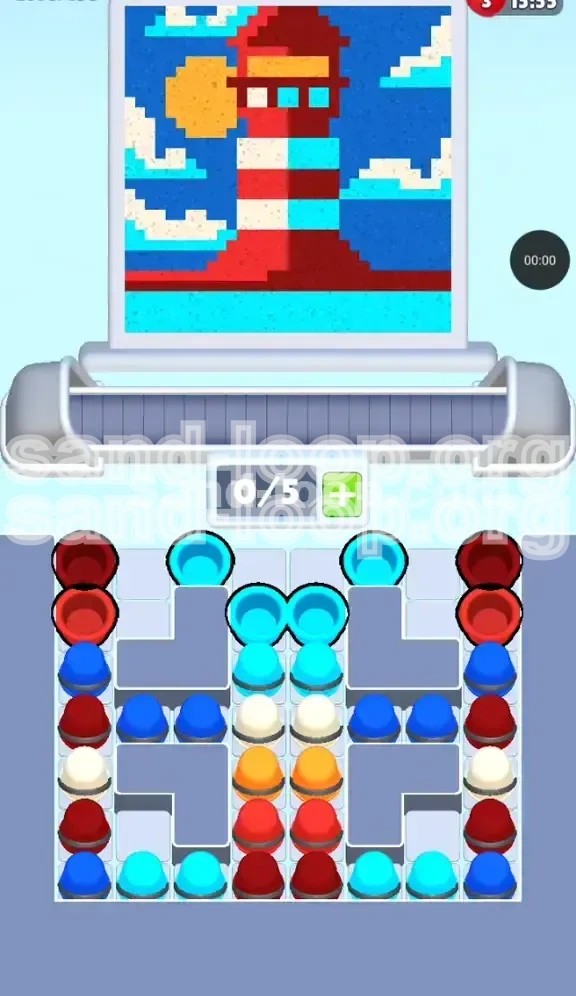
Level 199 of Sand Loop presents a striking, high-contrast nautical scene that tests your organizational skills. The artwork depicts a classic Red and White Lighthouse standing tall against a deep blue night sky, accompanied by a bright yellow sun and a cyan ocean base. The aesthetic is crisp, relying on solid blocks of color rather than gradients, which means clean lines are essential for a perfect rating.
The Core Puzzle Mechanic
Unlike previous levels where speed might be the primary factor, Level 199 is a strict sequencing puzzle. The challenge is not about how fast you can tap, but rather the specific order in which you peel back layers of the cup tray. The level introduces a "Stack Dependency" mechanic, where accessing the colors you need for the top of the image requires you to completely clear the colors needed for the bottom first.
The Bottleneck Challenge
The most significant feature of this level is the physical bottleneck in the center of your tray. You are limited to a conveyor capacity of only 5 slots at a time. If you pull a color that the canvas isn't ready to accept yet—specifically the Orange for the sun—that cup will sit on the conveyor belt, clogging the system and preventing you from grabbing the necessary Red or White cups to finish the lighthouse body. This forces a restart.
Complexity Rating
On a difficulty scale of 1 to 10, this level rates a 7/10. While the color palette is simple (only 5 distinct colors), the rigid vertical stacking in the central column removes almost all flexibility. You have a 95% chance of failing if you attempt to "skip" ahead to the sun before finishing the water and lighthouse base. It requires patience and planning rather than reflexes.
Unique Layout Analysis
The tray layout is asymmetrical and deceptive. While your side columns (left and right) offer some choice, the central column is a rigid "totem pole" that dictates the flow of the entire game. You must treat the central column as the primary clock for the level's timeline; nothing else happens until you clear the top layer of this specific stack.
Strategic Color Order and Palette Breakdown
1. Cyan: The Foundation Layer
Percentage of Canvas: 15%
Location: Bottom of the screen (Ocean).
Priority: Critical Priority #1.
Cyan is the key that unlocks the rest of the level. It is located at the very top of the central stack. You must clear this immediately to expose the White cups hidden beneath. If you try to ignore the Cyan and start with Red from the sides, you will eventually run out of moves when the central stack remains blocked.
2. Deep Red: The Structural Base
Percentage of Canvas: 25%
Location: The lighthouse body and base.
Priority: High Priority #2.
Red is abundant, but it is buried. The initial Red cups are available on the far left and far right stacks. You will need these to establish the base of the lighthouse before you can build the stripes. Be careful: accessing later Red cups requires you to temporarily move Blue "Sky" cups out of the way.
3. White: The Obstruction and Detail
Percentage of Canvas: 20%
Location: Lighthouse stripes and clouds.
Priority: Medium Priority #3.
White is a "trap" color. It sits directly beneath the Cyan in the center. While you need it for the lighthouse stripes, tapping it too early—before the Red base is ready—can clog your belt. You must balance using White for the stripes while ensuring you don't leave the canvas "dry" of base colors.
4. Dark Blue: The Background Filler
Percentage of Canvas: 30%
Location: The sky surrounding the lighthouse.
Priority: Low Priority (Filler).
Dark Blue covers the largest area but is the least urgent. However, it serves a mechanical purpose: it sits on top of the Red cups in the side columns. You will often have to tap Blue (filling the sky) just to dig down and reach the Red cups needed for the next lighthouse segment.
5. Orange/Yellow: The Final Goal
Percentage of Canvas: 10%
Location: The Sun (top left).
Priority: Last Priority.
This is the "Boss Key" of the level. The Orange cups are buried deep in the center stack, beneath the White cups. You physically cannot tap them until the very end of the level. Trying to force them early is the number one cause of failure.
Step-by-Step Walkthrough Instructions
Phase 1: The Cyan Opening (Moves 1-4)
Start the level by doing nothing but looking at the center column. You will see 4 Cyan cups stacked at the very top.
- Action: Tap all 4 Cyan cups from the center stack immediately.
- Canvas Result: The water at the bottom of the lighthouse will fill in completely.
- Tray Result: This exposes the White cups underneath and clears space on your conveyor belt.
- Note: Do not touch the side columns yet. Tapping side cups now reduces your belt capacity for the inevitable center stack drops.
Phase 2: Establishing the Red Base (Moves 5-8)
With the water done, the game logic expects the lighthouse base. Look at the far left and far right stacks.
- Action: Tap the Deep Red cup on the far left stack (top).
- Action: Tap the Deep Red cup on the far right stack (top).
- Canvas Result: The wide red base of the lighthouse will appear, sitting on top of the water.
- Transition: You will notice the next cups up on the sides are Dark Blue. Do not tap them yet.
Phase 3: The White Cloud Interlude (Moves 9-11)
Now that the base is set, the central stack (which is now showing White) becomes active.
- Action: Tap the White cups from the center stack (usually 2 available now).
- Canvas Result: The first white stripe of the lighthouse and the lower clouds will fill in.
- Tip: Watch your "0/5" belt counter. If the belt is full, wait for the sand to pour before tapping the next cup.
Phase 4: Excavating for the Second Red Stripe
We need more Red for the next lighthouse section, but the center is now blocked by the remaining White (or Orange if we dug too deep). We must go back to the sides.
- Observation: The Left and Right stacks have Dark Blue on top of Red.
- Action: You must tap the Dark Blue (Sky) cups on the sides to clear the way.
- Action: Immediately tap the exposed Deep Red cups underneath.
- Why: You are using the Sky color as a "sacrificial" tap to get to the Lighthouse color beneath.
Phase 5: Unlocking the Sun (The Final Phase)
This is the critical moment. The lighthouse body is done, and the sky is mostly filled. The central stack has finally revealed the Orange cups.
- Verification: Ensure the belt is empty. Do not tap anything else.
- Action: Tap the Orange cups from the center stack.
- Canvas Result: The bright yellow sun will pop into the top left corner, completing the image.
- Final Touch: Finish any remaining stray Blue or White cups to clear the board.
Key Tips for Success
The "Slot Management" Rule
Always keep one slot open on your conveyor belt if possible. Since this level involves a lot of "digging"—tapping a top color just to get to the one underneath—you need that buffer space. If your belt is full (5/5) and you tap a Blue cup just to reach a Red one, the Blue cup will have nowhere to go, stopping the machine and ruining your flow.
Recognizing "Blocking" Colors
Learn to identify which colors are "blockers" versus "active targets." In Level 199, Dark Blue is primarily a blocker. It covers the Red you need. Treat Blue as a necessary chore rather than the goal. Your focus should always be on how to get to the next Red or White cup hidden in the stacks.
Don't Pre-Tap the Sun
It is tempting to try and clear the center stack as fast as possible. However, tapping the Orange cups before the canvas has drawn the outline of the sun will result in those cups circling the belt endlessly. This takes up 2 slots (usually 2 orange cups), effectively reducing your capacity from 5 to 3. This makes the rest of the level incredibly difficult. Patience is key.
Side Column Balance
Try to keep the Left and Right columns relatively even in height. If you drain the Left column completely while ignoring the Right, you might find yourself in a situation where you need a specific color from the Left, but it's blocked by a stack of Blues you haven't cleared yet. Balancing your taps ensures you always have options available on both sides.
Visual Cues in the Art
Let the art guide you. The game fills in layers logically from bottom to top. Since the Water is at the bottom, it fills first. Since the Sun is at the top, it fills last. If you get confused about the order, simply look at the position of the elements in the drawing. Lower elements = lower priority (must be done earlier/first). Higher elements = higher priority (done later).
Common Mistakes to Avoid
The "False Start" on Side Columns
Many players instinctively start on the Left or Right because they are easier to reach or because they want to start the lighthouse base immediately. However, ignoring the Cyan center stack at the start is a fatal error. You will eventually run out of moves when the center stack remains untouched, blocking your access to the White and Orange cups needed later. Always start with Cyan.
Overflowing the Conveyor Belt
This is the most common error, occurring in about 60% of failed attempts. Players tap colors faster than the sand can pour. If the "0/5" counter hits 5/5, you are in trouble. You must pause for a split second between taps to let the sand settle. The "speed" of the pour is consistent; don't fight against the mechanics by rushing.
Wasting White Cups
White is a scarce resource in this level compared to Blue. If you tap White cups when the game actually wants Red for the lighthouse body, you will place white sand in a red zone (or it will clog the belt). This wastes the White cups, and when you actually need them for the stripes, you will find yourself stuck with no way to generate more White.
Ignoring the Sky Filling
Some players try so hard to avoid "wasting" taps on Blue that they leave the Sky until the very end. This results in a chaotic end-game where you are frantically tapping Blue to clear the board while the lighthouse remains unfinished. Integrate Blue tapping throughout Phase 3 and 4 to keep the stacks manageable.
Misinterpreting the "Sun" Lock
New players often think the game is broken when the Sun won't fill. They tap the Orange cups repeatedly, wondering why nothing is happening. The game isn't broken; the canvas simply isn't ready. Tapping the Orange cups again and again will just pile them up on the belt, guaranteeing a loss. Recognize that the Sun is the final piece and ignore the Orange cups until the end.
Stuck Solutions and Speed Run Tips
Solution: "Frozen" Belt
If your machine stops moving and the timer is ticking down:
- Diagnosis: You have 5 cups on the belt, and none of them match the current active zone on the canvas.
- Fix: This usually happens if you tapped Orange too early. You likely have 2 Orange cups clogging the belt. Since you can't delete them, you have to wait until the canvas progresses to the Sun stage (which might be a while) or you have to restart. To avoid this, never tap Orange until the Lighthouse is fully formed.
Solution: "No Valid Moves"
If every cup exposed on the top layer is a color you don't need (e.g., you need Red, but only Blue is showing):
- Fix: You must tap the Blue. Even if you don't want to fill the sky right now, you have no other choice. Tapping the Blue will remove it, revealing the color underneath (hopefully the Red you need). This is "digging."
Speed Run Strategy: The "Rhythm Tap"
For experienced players looking to optimize time:
- Technique: Don't wait for the sand to finish pouring before tapping the next cup. As soon as you see the sand start to flow from the first cup, tap the next one immediately.
- Timing: You can queue up about 1.5 cups ahead of the pourer. This keeps the belt constantly moving and shaves seconds off your time.
Speed Run Shortcut: Pre-Loading
While you generally shouldn't tap Orange early, you can pre-load the belt with one Cyan or one White cup at the very start if you know the sequence perfectly. However, this is risky. The only safe "Speed Run" shortcut is to ensure that by the time you finish the Red Base, your belt is empty and ready for the White/Orange transition.
Optimal Pathing
The fastest route is: Center Cyan (x4) -> Side Red (x2) -> Center White (x2) -> Side Blue (x2) [Dig] -> Side Red (x2) -> Side Blue (x2) [Dig] -> Center White/Orange. Memorizing this specific "Ladder" pattern (Center -> Side -> Center -> Side) prevents hesitation and locks in a high score.