
Level 33
HARDHow to solve Sand Loop level 33? Get instant solution for Sand Loop 33 with our step by step solution & video walkthrough. Sand Loop 33 tips and guide.
Play Sand Loop Now
Experience the puzzle challenge firsthand
Game Screenshots
Sand Loop Level Guides
Level 33 Strategy Guide: Mastering the Neon Cat
Welcome to Level 33 of Sand Loop, widely known by players as the "Neon Cat" challenge. This stage represents a significant difficulty spike compared to previous levels, primarily due to its "Inverted Supply" mechanic. In most levels, you can paint borders immediately; here, the paint required for the borders is locked underneath everything else. This guide is designed to help you navigate the logic, manage your tray capacity, and execute the perfect dig to liberate the Gold Key.
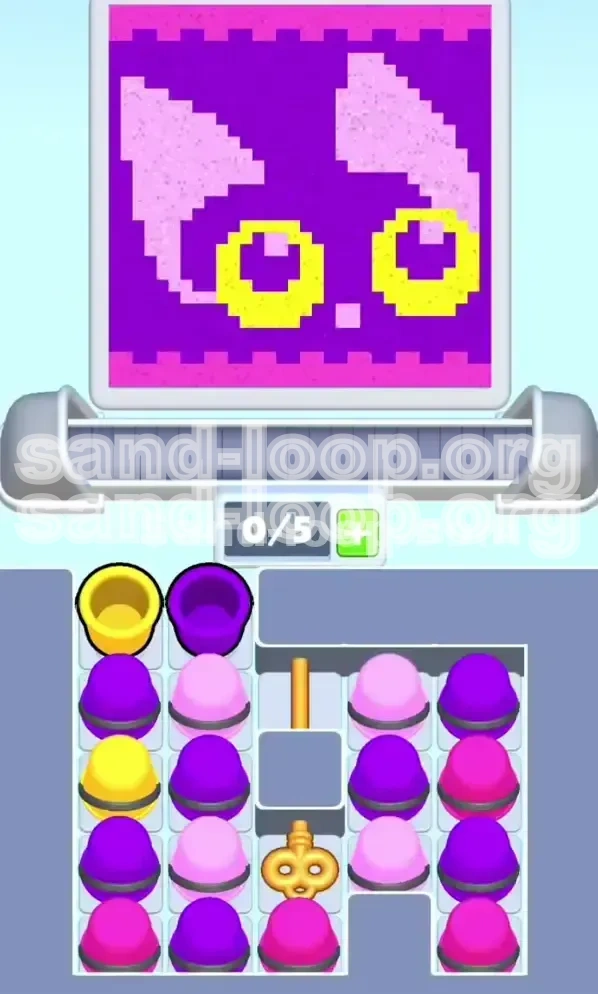
The Stage Overview
Level 33 is a Logic & Digging stage disguised as an art game. The objective is to fill a pixelated calico cat portrait with neon sand. However, the puzzle lies in the physical arrangement of your supply tray. Unlike standard levels where cups are dispensed randomly or evenly, this level requires you to methodically excavate the bottom layer to access the necessary resources.
Core Mechanics and Challenges
The central challenge is resource unavailability. The Magenta cups required for the top border are buried at the very bottom of the tray, beneath stacks of Dark Purple and Light Pink. Furthermore, a Gold Key is trapped in the bottom-center slot, blocked by high walls of sand. You cannot simply tap randomly; you must clear specific vertical columns to free the key and unlock the final game state.
The Visual Breakdown
The art style is vibrant, using a high-contrast neon palette. You are filling a dark background (Dark Purple), a large face shape (Light Pink), two massive eyes (Yellow), and jagged borders (Magenta). Recognizing these color zones is vital because it dictates the order in which you load your conveyor belt.
Why This Level is Different
This level introduces a high-stakes "Capacity Management" mechanic. Your conveyor belt only holds 5 slots. If you tap cups too quickly, you will fill the belt with colors that cannot be poured yet (e.g., loading Magenta before the border is ready), causing a deadlock that forces a restart. Speed is secondary to rhythm here.
Victory Conditions
To achieve 100% completion, you must fill every pixel of the canvas without overflowing the conveyor belt. The specific difficulty lies in filling the top Magenta border last, as it is physically impossible to access the paint for it until the very end of the digging process.
Strategic Objectives and Color Logic
Before you tap a single cup, you need a battle plan. Rushing into this level without understanding the "Color Hierarchy" will result in immediate failure. The logic of this level dictates that you must work from the center of the canvas outward, mirroring the excavation of your supply tray.
Understanding the Inverted Supply
The term "Inverted Supply" means the paint you need first is at the top, but the paint you need last is at the bottom. The game forces you to paint the face (Pink) and eyes (Yellow) before you can even think about the borders. This ensures that if you make a mistake early, you won't have wasted the rare Magenta resources.
The Yellow Priority
Yellow is your "opener." It occupies the largest contiguous area (the eyes) and is located at the top of the left column. By clearing Yellow first, you solve two problems: you fill a large section of the canvas quickly, and you lower the stack height on the left side to begin reaching the buried items.
The Purple and Pink Rhythm
Dark Purple (background) and Light Pink (face) will make up about 80% of your gameplay. You must alternate these. Focusing solely on Pink will clog your belt because the face has complex edges that pour slower. Alternating with Purple allows the sand to settle in the large empty background spaces, keeping the flow moving.
The Magenta Trap
Magenta is the trap color. It is used for the top border, which is the first thing you see on the canvas. New players instinctively want to fill this first. However, doing so is impossible. The Magenta cups are crushed at the bottom of the right column. You must ignore the top border completely until the final 20% of the level.
The Gold Key Bottleneck
The Gold Key is the physical lock of the level. It sits in the bottom-center slot, blocked by the high stacks of cups on the left and right. Your objective in the mid-game is not just painting, but "digging" a hole through those stacks to free the key. Tapping the key is the trigger that opens the final phase.
Capacity Thresholds
Your conveyor belt has a limit of 5 units. A critical objective is to keep the belt load between 2 and 4 units at all times. Allowing it to hit 5/5 is dangerous because if a cup finishes pouring and the belt is full, the flow stops. If a cup on the belt cannot pour (e.g., its area is full), the entire game jams. Keep it flowing.
Step-by-Step Walkthrough: The Excavation Phase
This section covers the first 50% of the level. The goal here is to clear the initial layers of sand and expose the buried items in the tray without clogging your machine.
Step 1: The Yellow Eye Opener
Immediately upon starting, look at the top-left corner of the tray. You will see a Yellow cup. Tap this first. The Yellow paint corresponds to the two large eyes of the cat.
Actionable Tip: Tap the Yellow cup once. Watch it travel to the nozzle. While it is pouring, do not tap anything else. The eyes are large targets; they will accept sand quickly. This clears the top-left slot, revealing the stack of Purple cups underneath.
Step 2: Establishing the Purple-Pink Rhythm
Once the Yellow cup is pouring, your tray will reveal a mix of Dark Purple and Light Pink cups in the left and center columns. Do not tap all the Pinks.
Actionable Tip: Look at the canvas. If the face (Pink) is overflowing but the background (Purple) is empty, switch targets. Tap one Purple cup, let it travel, then tap one Pink cup. This 1:1 ratio prevents the machine from flooding one specific zone of the picture.
Step 3: Monitoring the Capacity Counter
Watch the x/5 counter at the top of your conveyor belt.
Actionable Tip: If your belt is at 4/5, stop tapping. Wait for a cup to finish and empty. You need to keep one "buffer" slot open at all times. This buffer is your emergency space if you need to tap a specific color to free up a jam.
Step 4: Clearing the Left Column
Focus your tapping efforts on the leftmost column of the tray. The Gold Key is buried in the center-bottom, but the left column usually sits atop the "rubble" blocking it.
Actionable Tip: Systematically tap the left column until it lowers by about 50%. You don't need to empty it, just lower it enough so you can see the sides of the bottom-center slot where the key is sitting.
Step 5: Equalizing the Stacks
Don't let the left side become empty while the right side remains full. This creates an imbalance that makes it hard to tap new colors.
Actionable Tip: Shift your tapping to the right side if the left side gets too low. You want the top surface of the sand supply to be relatively level. This ensures that as cups are removed, the remaining stacks slide down evenly.
Step 6: Analyzing the Pour Speed
Notice that Dark Purple pours faster than Light Pink. This is because the background is a single large area, while the face has jagged edges.
Actionable Tip: Exploit this speed difference. You can have two Purple cups on the belt for every one Pink cup. This keeps the nozzle occupied efficiently, as the Purple sand vanishes into the background quickly, clearing space for the Pink sand to follow.
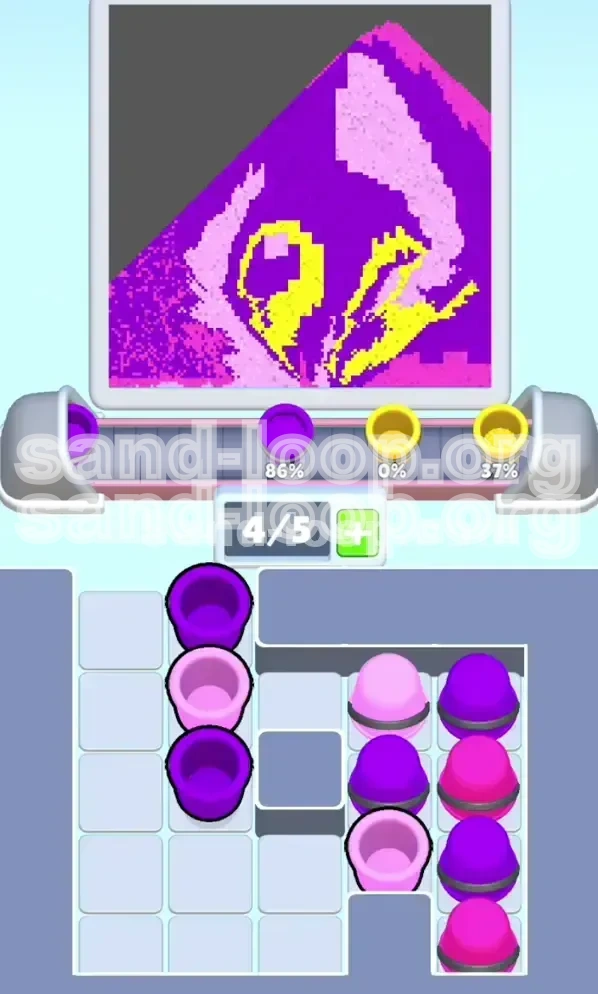
Mid-Game Tactics: Digging for the Key
You are now in the thick of the puzzle. The Yellow eyes are done, and the face is half-filled. The tray is a mess of stacked cups. The priority now shifts from "Painting" to "Digging." You need to reach the bottom of the screen.
Identifying the Key's Location
The Gold Key is located in the bottom-center slot. It is likely obscured by a "locked" graphic or simply covered by the cups above it. You cannot tap it yet because the game mechanics prevent interaction with blocked items.
The "Dig Down" Technique
This is the core physical skill of Level 33. You must remove the cups directly sitting on top of the key.
Actionable Tip: Stop looking at the canvas. Look at the tray. Identify which column is pressing down on the key. Tap those cups relentlessly. Even if the canvas is full and the belt is busy, you must clear the physical obstruction in the tray to progress.
Managing the Belt During the Dig
As you frantically tap to dig down, your belt might fill up.
Actionable Tip: If the belt is full (5/5), pause your digging. Look at the canvas. Find a color that is currently pouring and has empty space left. If the belt is stuck because a Pink cup is waiting for a tiny pixel of space, tap a Purple cup to fill the background instead, clearing the bottleneck.
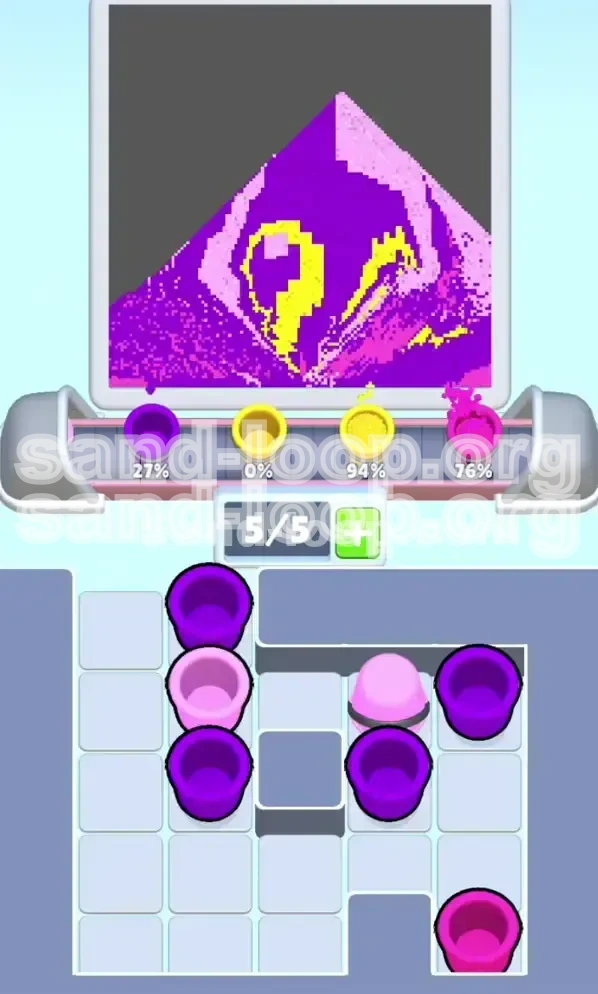
Freeing the Key
Once the stacks on the left and right of the key are lowered, the Key will "pop" or become clickable.
Actionable Tip: The moment the Key is accessible, tap it. The Key does not paint anything; it travels to the "Lock" mechanism. This usually clears the final obstruction or releases the final batch of cups. Treat the Key as a "free cup" that takes up a belt slot but doesn't pour sand, effectively giving you a moment of breathing room to reset your belt strategy.
Preparing for the Bottom Layer
With the Key gone and the upper columns cleared, you are now staring at the bottom row of the tray.
Actionable Tip: Assess what remains. You should have mostly Magenta cups left, perhaps with some straggling Purple or Pink cups. Clear the stragglers first. Do not load the Magenta until the tray is empty of all other major colors.
Stabilizing the Canvas
Before you touch the final color, ensure the main canvas is 95% complete.
Actionable Tip: Check for "micro-holes"—tiny 1-pixel gaps in the background or ears that you missed. Filling these now prevents the frustration of having a full belt of Magenta and realizing you have to go back to fix a Purple hole, wasting precious time and belt space.
End-Game Execution: The Magenta Finish
This is the final 10% of the level. The excavation is over. The canvas is mostly full. The only thing left is the borders. This phase requires precision timing.
Exposing the Magenta Cups
The Magenta (Hot Pink) cups are now at the top of the tray, exposed by your digging efforts. These are the final pieces of the puzzle.
The Top Border Challenge
The top border is jagged and narrow. It takes a long time to fill because the sand stream is wider than the border itself, leading to frequent overflow/rejection by the game physics.
Actionable Tip: Do not send multiple Magenta cups at once. Send one Magenta cup. Wait for it to finish. Send the next one. If you queue two Magenta cups, the second one will likely bounce off the full border and clog your belt.
The Bottom Border
There is often a bottom border as well.
Actionable Tip: Alternate your attention between the top and bottom borders if there are separate cups for them, or let the auto-flow handle it. Ensure the Magenta stream has a clear path. If the face (Pink) is slightly overfilled into the border area, the Magenta might not stick. You may need to wait for the sand to settle.
Final Capacity Check
Your belt should be nearly empty now.
Actionable Tip: Keep 1 or 2 slots open. As the level ends, the game often dumps remaining cups automatically. If you are at 5/5 capacity with cups waiting for a tiny border pixel, the game might stall. Keeping space open ensures the final grains of sand can flow freely.
Completing the Loop
Once the borders flash and fill, the level is complete.
Actionable Tip: Watch the "Level Complete" animation trigger. It usually happens the moment the last Magenta pixel settles. If it doesn't trigger immediately, zoom in and look for the one pixel you missed—it's usually hiding in the cat's ear or the corner of the border.
Celebrating the Neon Cat
You have successfully navigated the Inverted Supply logic. You painted the face before the border, dug through the supply tray to find the key, and managed your belt capacity like a pro.
Actionable Tip: Take a mental note of the rhythm you found in the mid-game (alternating Purple and Pink). That rhythm is the key to almost all "digging" levels in Sand Loop. Mastering it here will make the next 10 levels significantly easier.
Advanced Troubleshooting and Common Mistakes
Even with a guide, things can go wrong. This section addresses the specific pitfalls of Level 33 that cause players to fail or restart.
The "Premature Border" Mistake
The Mistake: Trying to fill the top border with Magenta in the first 10 seconds because you see it empty.
The Consequence: You jam the belt with Magenta cups you can't use, preventing you from loading Yellow and Purple, causing a deadlock.
The Fix: Train your eyes to ignore the top border. Tell yourself: "The border is not part of the level yet." It is background decoration until the end.
The "Belt Deadlock" Error
The Mistake: Tapping too fast when the belt is at 4/5 capacity.
The Consequence: The belt hits 5/5. A cup finishes pouring, but the space behind it is blocked by a cup of a different color that can't pour yet (e.g., a Magenta cup waiting for a border that isn't open). The flow stops.
The Fix: If the belt stops, identify the cup at the nozzle. If it can't pour, you have a deadlock. You have no choice but to restart the level. Prevention is better than cure: keep the belt at 3/5 or lower.
The "Forgotten Key" Syndrome
The Mistake: Painting the entire face and background but forgetting to clear the column to reach the Gold Key.
The Consequence: You are left with a beautiful cat face, but the level won't end because the Key is still buried. You have no cups left to tap to dig it out.
The Fix: If you are 90% done but the key is buried, you might be stuck. Check if you have any moves left. If not, restart. In your next run, prioritize the Key when the stacks are at 50% height, not 90%.
Micro-Hole Frustration
The Mistake: Finishing the level with 99% completion and unable to find the last spot.
The Consequence: Wasting minutes staring at the screen.
The Fix: The hole is usually in the "Dark Purple" background, often hidden behind the "Light Pink" ear layer. Look for dark pixels that are actually black (empty) rather than purple. Zooming in (if your platform allows it) helps.
Color Confusion
The Mistake: Confusing Light Pink (Face) with Magenta (Border).
The Consequence: Using precious Magenta cups to fill the face, leaving you with no paint for the border at the end.
The Fix: Magenta is a deep, hot pink. Light Pink is almost white/pastel. Ensure you are using the pastel pink for the face. Save the hot pink for the final strips.
Platform Specifics
The Issue: On mobile devices, the "tap area" for cups can be small, leading to misclicks.
The Fix: Play on a larger screen if possible, or ensure your fingers are dry. A misclick on a buried cup can load your belt with the wrong color, ruining your rhythm. Be deliberate with every tap.