
Level 221
HARDHow to solve Sand Loop level 221? Get instant solution for Sand Loop 221 with our step by step solution & video walkthrough. Sand Loop 221 tips and guide.
Play Sand Loop Now
Experience the puzzle challenge firsthand
Game Screenshots
Sand Loop Level Guides
Level Overview: The Beach Huts Challenge
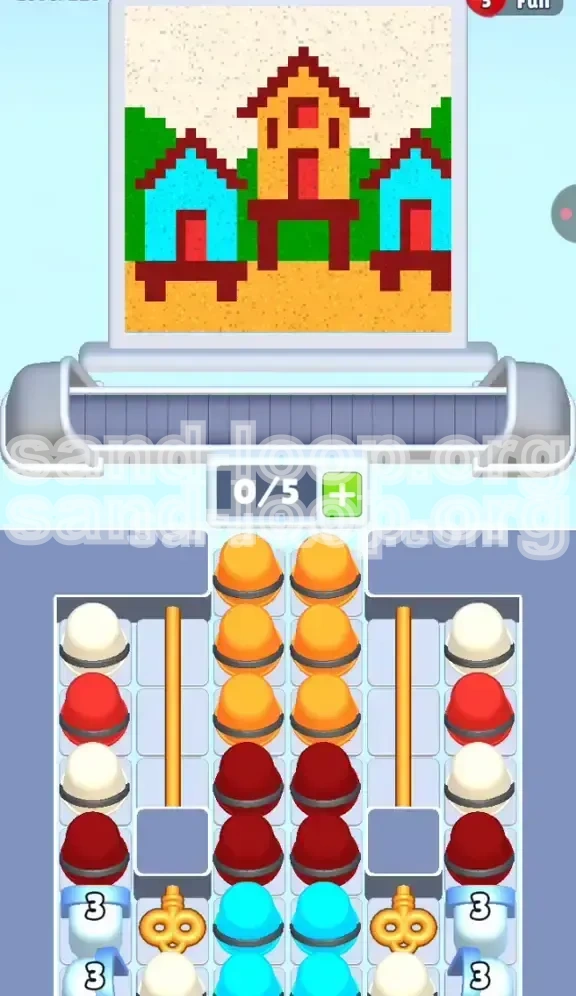
Welcome to Level 221, commonly known as "The Beach Huts" within the Sand Loop community. This stage represents a significant jump in difficulty, transitioning from simple color matching to complex resource management. The visual theme is deceptively cheerful—a pixel art scene depicting a serene beach setting—but the puzzle mechanics underneath are ruthless.
The level is characterized by a "funnel" design. You are presented with a wide array of colors (Orange, Cyan, Maroon, Red, and White), but your ability to deploy them is severely restricted by the tray's layout. The core challenge lies in the central column, which acts as a choke point filled with essential colors buried under layers of less critical ones.
Specifically, this level tests your understanding of the "Gravity & Layering" mechanic. You cannot simply paint what you see; you must paint in the order the physics engine allows. Failure to respect the 0/5 Slot Capacity limit will result in a jammed conveyor belt, forcing a restart. Prepare for a logic puzzle where patience is just as valuable as speed.
Structural Analysis
The layout is designed to induce "panic clicking." The tray presents you with easily accessible White and Red cups on the periphery, while the crucial Cyan and Maroon cups are locked deep within the central tower. The structure is divided into three distinct vertical zones that require different approaches.
The Slot Capacity Crisis
With a strict limit of 0/5 slots, every cup counts. In this level, "pre-loading" the belt with incorrect colors is the fastest way to fail. You must maintain a rhythm of "tap-paint-clear" without ever letting the belt sit full.
Visual Complexity
The target image contains approximately 60% background color (Sand/Sky), 30% structural color (Huts), and 10% fine detail (Windows/Doors). This ratio dictates your spending strategy: you cannot afford to waste slots on the 10% details until the 60% background is flowing smoothly.
The "Inside-Out" Mechanic
Unlike previous levels where you might paint the background last, here the background (Sand) acts as the physical foundation for the rest of the level. Clearing the sand is not just about coloring pixels; it is about unblocking the physical path to the colors buried underneath.
Dynamic Obstacles
Keep an eye on the "3" Count Dispensers. These are not static resources; they are dynamic triggers that can flood your belt if activated prematurely. Understanding when to trigger these "flood gates" is the difference between a smooth clear and a chaotic gridlock.
Clear Objectives: Your Mission Checklist
To conquer Level 221, you need to shift your mindset from "painting the picture" to "managing the flow." Your primary objective is not to fill pixels, but to uncork the tray. Here is exactly what needs to happen to secure victory.
Establish the Sand Foundation
Your immediate goal is to clear the massive stack of Orange/Yellow cups occupying the center of the tray. This is the heavy lifting phase. You must paint the bottom 40% of the canvas (the beach) purely to drain the central column. Do not focus on the huts yet; they are physically inaccessible until this column is lowered.
Unearth the Structural Colors
Buried beneath the sand are the Maroon (stilts) and Cyan (walls) cups. You cannot start painting the huts until you have drained approximately 60% of the Orange stack. A secondary objective here is to manage the "Red" cups on the side so they don't block your access to these central colors.
Execute the Detail Pass
Once the main structures (Cyan walls and Maroon stilts) are up, you must perform a surgical strike on the Red cups. These are for the doors and windows. The objective here is precision: tap only enough Reds to complete the details without clogging the belt, as you will need the belt space for the final phase.
Trigger the Sky Flood
The final 20% of the level is a race against the clock. The objective is to unlock the Gold Keys and trigger the "3" Count Dispensers to flood the belt with White. You must have the discipline to leave the White sky completely untouched (0% progress) until the very last moment.
Slot Management Mastery
Throughout all phases, your constant objective is to keep at least one slot open on your conveyor belt. If your belt hits 5/5 capacity, you lose the ability to rearrange incoming colors, leading to a deadlock. Treat open slots as a resource more valuable than the paint itself.
Step-by-Step Instructions: The Phase Strategy
This walkthrough divides the level into four distinct phases. Do not move to the next phase until the previous one is fully complete. Mixing these phases is the most common cause of failure.
Phase 1: The Orange Drain (Moves 1-15)
Ignore the sides. Do not look at the White cups. Do not look at the Red cups. Look only at the center column.
- Tap the top-most Orange cup in the center stack.
- Wait for the paint to hit the canvas and the cup to disappear.
- Tap again. Do this in a slow, rhythmic 1-2-3 beat.
- Stop when the bottom beach area is roughly 50% filled.
- Check your belt: Ensure you have only 2-3 cups max at any time.
Phase 2: The Stilts and Weave (Moves 16-30)
As the Orange stack lowers, you will expose Maroon cups. Simultaneously, the side stacks of Red become tempting.
- Switch targets: Tap the newly exposed Maroon cups in the center.
- Paint the stilts and roof lines.
- Important: If a Red cup from the side is about to fall and block the Maroon flow, tap it. Only tap it once to move it to the belt, then send it to the canvas immediately.
- Do not focus on filling the Red doors/windows yet. Just keep the path clear.
Phase 3: The Cyan Reveal (Moves 31-50)
This is the bottleneck. The Cyan cups are the key to the level, buried deep.
- Aggressively drain any remaining Orange and Maroon cups.
- The moment Cyan cups appear in the center, prioritize them above ALL else.
- Fill the main bodies of the huts (Left and Right). These require large volumes of paint.
- Keep your belt count low (2 cups max) to handle the fast flow of Cyan.
- If you must tap a White cup during this phase (to prevent a jam), send it to the sky immediately, but try to avoid it if possible.
Phase 4: The Final Cleanup (Moves 51+)
The board is now mostly painted. Only details and the sky remain.
- Finish the Red windows and doors using the side columns.
- Locate the Gold Keys. They should be free or easily accessible now. Tap them to unlock any remaining reserves.
- Go to the bottom corners. Tap the "3" Count Dispensers (White).
- Rapid-fire tap the White cups to fill the top sky section.
Phase 5: The Emergency Flush
Sometimes, despite best efforts, the belt gets messy.
- If the belt is full of White but you need Red: Tap the Red cup anyway. It might queue behind.
- Use "Auto-Paint": If the game allows, drag a cup to the correct slot to free up space manually.
- If stuck, prioritize clearing the slot over painting correctly. You can always fix a pixel later, but you can't recover from a jammed belt.
Color Order: Processing the Palette
The "Sand Loop" mechanic relies on a strict hierarchy of colors. Processing them out of order is mathematically impossible due to the tray layout. Here is the optimal processing order, ranked from 1 (highest) to 5 (lowest).
1. Priority: Orange (The Sand)
Why First? It occupies the physical center of the tray. It blocks the Cyan, Maroon, and Keys.
Volume: High. You will process approximately 40-50 Orange cups.
Strategy: Burn through these as fast as possible. Do not stop until the stack is lowered by half.
2. Priority: Maroon (The Stilts/Frame)
Why Second? It is the immediate layer beneath the Orange.
Volume: Low. Only 5-10 cups needed.
Strategy: Process these immediately after they are uncovered. They act as a bridge between the Sand phase and the Cyan phase.
3. Priority: Cyan (The Hut Walls)
Why Third? These are the most expensive items to retrieve (deepest buried).
Volume: Medium-High. The huts are large.
Strategy: Once these are exposed, stop everything else. You need the belt space to handle the volume of Cyan required to fill the walls.
4. Priority: Red (The Details)
Why Fourth? These are on the sides. Tapping them early adds "junk" to your belt that blocks the center flow.
Volume: Low. Small windows and doors.
Strategy: "Weave" these in. Only tap Red when the center column is reloading or if a Red cup is physically blocking a side column you need to clear.
5. Priority: White (The Sky)
Why Last? It is the "Slot Killer." White cups are abundant in the corners and dispensers.
Volume: Very High. The sky is the largest background area.
Strategy: Total abstinence until the end. Do not tap White until the Huts are 100% done. If you tap White early, it will sit on your belt (because you can't paint the sky yet) and block the slot needed for Cyan.
Key Tips & Notes for Mastery
Mastering Level 221 requires understanding the hidden mechanics of the game engine. These tips go beyond basic strategy and delve into the logic of the game itself.
The "Slot Blocking" Rule
In Sand Loop, a cup on the belt that cannot be painted (because its target area is already full or blocked) becomes a permanent obstacle. Always ensure that every cup you tap has a clear destination on the canvas. If the sky is already 20% white, do not tap more white until you have space to use it.
Understanding "3" Dispensers
The "3" on the White dispensers doesn't just mean quantity; it implies a delay. When you tap a "3" dispenser, it often creates a backlog of 3 cups instantly. Never tap these if you have more than 2 open slots, or you will overflow immediately.
The Gold Key Timing
Don't panic if you can't reach the Gold Keys immediately. They are not needed for the huts. They are solely for the final White Sky phase. The game is designed so that natural progression (draining the center) will free up the Keys exactly when you need them.
Visualizing the "Weave"
Think of the tray like a knot. You are pulling the thread (Orange) to loosen the knot (Cyan). If you pull the wrong thread (White) first, the knot gets tighter. Visualize the path of the cups falling before you tap them.
The Restart Threshold
If your belt becomes 80% full of the wrong color (e.g., full of White while you are still painting Huts), hit restart immediately. Trying to dig out of a 4/5 slot jam usually takes longer than restarting the level. Know when to cut your losses.
Center-Gravity Focus
Keep your eyes glued to the center of the screen. The sides are distractions. 90% of your taps should be on the center column. The side columns should only be tapped when the center is empty or reloading.
Common Mistakes to Avoid
Every player fails this level the first time. Here is a breakdown of the specific pitfalls that cause failures, so you can recognize them before they happen.
The "Side Distraction" Error
The Mistake: Seeing the Red or White cups on the edges and tapping them because they are "easy" or "available."
The Consequence: You fill your belt with colors you can't use yet. The center column (Orange) jams because the belt is full.
The Fix: Ask yourself: "Can I paint this right now?" If the answer is "No, the huts aren't built," do not tap the cup.
The "Premature Sky" Error
The Mistake: Starting the White sky too early because it looks like a large empty space.
The Consequence: You will have 4-5 White cups on your belt. When you finally uncover the Cyan (needed for the huts), you have no room to pick it up. The game ends because you can't build the huts.
The "Belt Hoarding" Error
The Mistake: Tapping cups faster than you are painting them.
The Consequence: The "Queue" fills up. You lose the ability to prioritize. You become a passive watcher of the belt rather than an active manager.
The "Partial Paint" Error
The Mistake: Painting a little bit of sand, then a little bit of sky, then a little bit of sand.
The Consequence: Inefficiency. Every time you switch targets, you waste seconds re-orienting your eyes and hand. It is faster to batch process: Do ALL sand, then ALL huts, then ALL sky.
The "Key Ignorance" Error
The Mistake: Forgetting about the Gold Keys and running out of paint at the very end.
The Consequence: You have 95% completion, a clear belt, but no way to generate the final White cups needed for the last corner of the sky.
Stuck Solutions & Troubleshooting
Even with a guide, physics puzzles can go sideways. Here is your emergency toolkit for when the level doesn't behave as expected.
Scenario: The Center Column Won't Drop
Symptom: You are tapping the center, but it feels like the stack isn't going down.
Diagnosis: Your belt is likely full. The cups at the bottom of the stack cannot fall out because the conveyor belt has no room to accept new exits.
Solution: Stop tapping completely. Watch the belt. Paint or clear existing cups until you have 2 empty slots. The center column should "drop" automatically once space is made.
Scenario: Cyan Cups Are Unreachable
Symptom: You can see the Cyan cups at the bottom of the center stack, but you can't tap them.
Diagnosis: There is likely a layer of "dead" cups (colors you don't need) sitting on top of them, or the stack is physically blocked by side cups sliding in.
Solution: You must clear the "buffer" cups. If there are extra Orange or Maroon cups you skipped, go back and clear them. If side cups (Red) are sliding into the center, tap the Red cups to move them out of the way.
Scenario: Out of White Paint
Symptom: The sky is empty, and the corners are empty.
Diagnosis: You missed the Gold Keys or didn't trigger the "3" Dispensers correctly.
Solution: Scan the board for Gold Keys. They might be hidden behind a pixel layer. If you have Keys, use them now. If the dispensers are empty, you may have wasted the White paint earlier on the ground—restart and be more stingy with White.
Scenario: Perma-Jam (5/5 Slots)
Symptom: Belt is full, nothing is moving, nothing is painting.
Diagnosis: You have a "Logjam." Cup A needs to go to Canvas Spot A, but Spot A is blocked by Cup B. Cup B needs to go to Spot B, but Spot B is blocked by Cup A.
Solution: Look for a cup that can be painted *partially* to free up space. Or, if the game allows, drag a cup back to a dispenser (rare, but possible in some versions). Otherwise, the level is软locked (soft-locked). Restart is the only option.
Scenario: "Lost Cup" Glitch
Symptom: You need 1% more Red to finish, but no Red cups are spawning.
Diagnosis: The last Red cup is likely "stuck" in the transition between the dispenser and the belt, or behind a stack.
Solution: Rapidly tap the area where the cup is stuck. Sometimes this knocks it loose. If not, check if a Gold Key can refresh the board state.
Speed Run Tips: The 2-Minute Strategy
For players looking to achieve 3-star ratings or leaderboard times, efficiency is paramount. This section is for advanced players who have beaten the level once and want to optimize.
Pre-Load Visualization
Before the timer even starts (or while the loading screen is up), visualize the path: Center -> Cyan -> White. Do not enter the level "cold." Having a mental plan saves 5-10 seconds of hesitation at the start.
The "Double Tap" Rhythm
During the Orange phase, do not wait for the cup to fully hit the canvas before tapping the next one. Develop a "Double-Tap" rhythm: Tap-Tap (pause) Tap-Tap. This keeps the belt consistently moving at max speed without overflowing.
Bypassing Details
In a speed run, perfectionism is the enemy. If a door or window (Red) is 90% filled but you are having trouble getting the last cup to align, leave it. Move to the next phase. The "Completion Check" usually allows for 1-2 missing pixels in non-critical areas. Don't waste 30 seconds fixing a single window.
Batch Processing the Dispensers
When you reach Phase 4 (The Sky), do not tap the "3" Dispensers one by one. Tap them as fast as humanly possible to dump 9-12 White cups onto the belt instantly. Then, frantically drag them to the canvas. "Bursting" is faster than "Streaming" for the final 10%.
Optimized Pathing
Minimize mouse/finger travel distance. Keep your cursor hovering over the center column during Phase 1-3. Only move to the corners for Phase 4. Excessive mouse movement adds up to lost seconds over the course of a level.
The "Reset" Mental State
If you make a mistake in the first 10 seconds (e.g., tap a White cup), restart immediately. Do not try to "fix" it. Fixing a mistake costs 30 seconds; Restarting costs 5 seconds. A speed run requires a "Perfect Start."