
Level 224
HARDHow to solve Sand Loop level 224? Get instant solution for Sand Loop 224 with our step by step solution & video walkthrough. Sand Loop 224 tips and guide.
Play Sand Loop Now
Experience the puzzle challenge firsthand
Game Screenshots
Sand Loop Level Guides
Sand Loop Level 224 Walkthrough: Mastering the Abstract Sunset
Welcome to the definitive guide for Sand Loop Level 224. This stage is a beautiful but deceptive puzzle that tests your spatial awareness and slot management skills rather than your speed. Unlike previous levels where you might rush to break ice or pour rapidly, Level 224 requires a calculated, rhythmic approach.
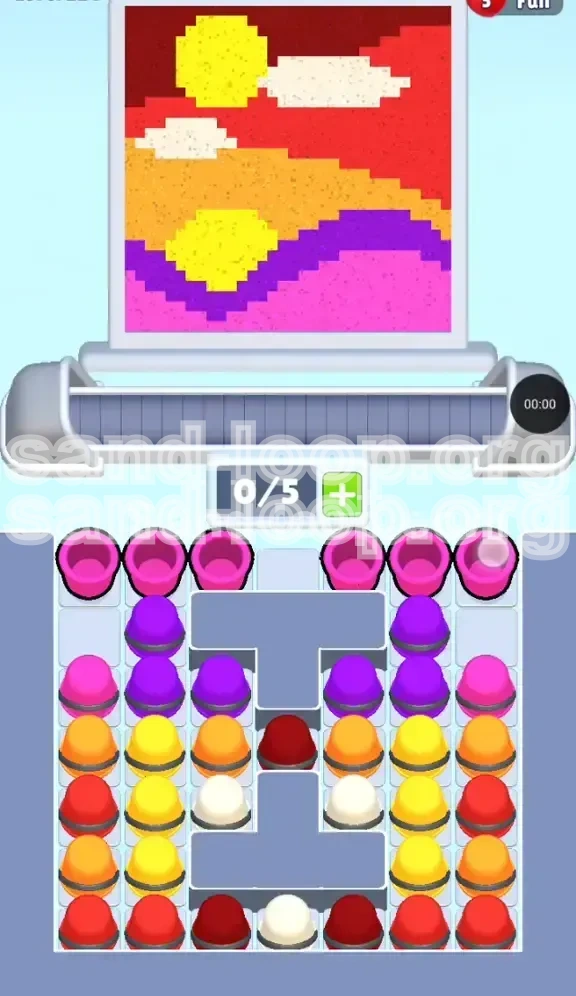
The level features a stunning pixel-art sunset divided into six distinct color zones. Your challenge is to manage a densely packed supply tray that is "locked" behind a specific order of operations. If you act too hastily, you will clog your conveyor belt with unusable colors, leading to a restart. This guide breaks down the logic of the supply tray, the precise color order, and the step-by-step strategy to clear the Abstract Sunset with ease.
The Core Challenge: The T-Blocker Mechanic
The central difficulty in Level 224 is structural. Your supply tray is bisected by a massive, immovable grey "T-Shape" obstacle. This isn't just scenery; it dictates your entire strategy. This barrier separates the essential "Sky Colors" (Red and White) in the center from the "Water Colors" (Pink and Purple) on the flanks. You cannot access the center until you have demolished the columns on the left and right sides. This forces a strict "Outside-In" progression that feels counter-intuitive at first.
Slot Economy Management
Your conveyor belt has a standard capacity of 5 slots. In this level, keeping slots open is more vital than filling them. Because the supply tray is packed, cups shift constantly. If you load your belt with 5 Pink cups early on, you leave no room for the Purple or Red cups that unlock as you clear the board. A good rule of thumb is to keep 2 slots open at all times to allow for "emergency swaps" if the wrong color slides into place.
Color Zone Breakdown
The canvas is a stratified landscape. Understanding the hierarchy is key:
- The Sky (Dark Red & White): The top layer. Hardest to access due to the central block.
- The Sun (Yellow): The focal point. Needs to be poured before the Red sky to avoid bleeding, but requires the left flank to be cleared first.
- The Hills (Orange): The middle layer. Generally accessible once the initial Pink/Purple blockade is lowered.
- The Water (Hot Pink): The foreground. This is your starting point.
- The Wave (Purple): The danger zone. A thin line that cuts across the bottom; pouring this incorrectly is the fastest way to fail.
Why Speed Kills
This is a logic puzzle, not a race. Tapping too fast causes "accordion errors" where the physics engine can't keep up with the cup removals, potentially misplacing a cup into an occupied slot. Furthermore, pouring carelessly will lead to "color bleeding," where Pink flows into the Purple wave zone, creating a permanent smudge that ruins the 100% completion requirement.
Level Objectives and Success Criteria
Before you start pouring, let's clarify exactly what needs to be done to pass this level. Understanding the win conditions prevents wasted effort on low-priority areas.
Clearing the "Blocker" Row
Your immediate objective is not to fill the picture, but to clear the top row of the supply tray. The tray is capped with a dense layer of Pink cups. Your first goal is to remove enough Pink cups to trigger the gravity shift that drops the Purple and Orange cups into the playable zone. Think of the first 30 seconds as a mining operation—you are digging for access, not painting yet.
Isolating the Purple Wave
The most critical objective in the middle phase is to define the Purple wave without touching the surrounding Pink. This requires precision. The Purple zone is only about 10-15 pixels wide in some areas. You must fill this narrow strip perfectly to unlock the rest of the board. If the Purple zone is satisfied, the rest of the level flows naturally.
Unlocking the Central Vault
The "Endgame" objective is accessing the Dark Red and White cups trapped in the geometric center of the tray. You cannot trigger this until the left and right columns are roughly 70% cleared. Your goal is to manage your outer resources efficiently so you don't run out of belt space right when the center unlocks.
Achieving Flow State
Success in Level 224 is defined by a continuous pour. You want to avoid "stops" where you are waiting for cups to settle. By planning your color order 3 steps ahead, you can ensure that as soon as one cup finishes pouring, the next required color is already sliding down the chute. This prevents the timer from becoming a threat.
Final Accuracy Check
Completion requires >90% accuracy. Special attention must be paid to the White clouds. They are small, isolated targets surrounded by Red sky. If you pour carelessly, you will waste the limited White supply. A key objective is to preserve White cups until the very end to clean up the sky details.
The Ultimate Color Order Strategy
This section provides the specific sequence of colors you need to follow. This is the "cheat sheet" for the level's logic. Do not deviate from this hierarchy unless you are stuck.
Phase 1: The Pink Foundation (Priority 1)
Why Pink First? The Pink cups are sitting on top of the release mechanism for the Purple and Orange cups. You must clear them.
The Strategy: Tap the Pink cups immediately. Pour them into the bottom "Water" section of the canvas. However, stop pouring when the water is about 80% full. Do not overfill. You need a small reservoir of empty space in the belt to catch the Purple cups that will drop next.
Phase 2: The Purple Barrier (Priority 2)
Why Purple Second? The Purple cups are exposed immediately after the Pink layer breaks. The Purple wave sits *above* the Pink water on the canvas. If you wait, you might accidentally cover the Purple zone with Pink overflow.
The Strategy: Alternate between tapping Pink and Purple. Keep the belt balanced (2 Pink, 2 Purple). Pour the Purple strictly into the wave channel. Treat this like a coloring book—stay inside the lines. Once the wave is solid purple, you can ignore Purple cups for the rest of the level.
Phase 3: The Sun and Hills (Priority 3)
Why Yellow/Orange Third? With the bottom half (Pink/Purple) solidified, the left and right flanks of the tray collapse, revealing the Orange and Yellow reserves.
The Strategy: Switch your focus to the middle of the screen. Tap Orange cups to fill the "Hills." Then, tap Yellow for the "Sun." Note: The Sun is often surrounded by sky. If you haven't unlocked the Red yet, just fill the Sun and stop. Don't let Yellow bleed into the sky area, or the Red won't stick later.
Phase 4: The Sky and Clouds (Priority 4)
Why Red/White Last? These are trapped in the center "T-Block" island. They are the final reward for clearing the sides.
The Strategy: Once the sides are gone, the center Red cups will slide into position. Flood the remaining top canvas with Red. Finally, use the scarce White cups to dot the clouds. This should be the final touch to clear the level.
The "Hidden" Dependency Chain
Remember: You cannot skip steps. Trying to force Red before clearing Pink is mathematically impossible because the game's physics engine locks the Red behind the Pink columns. Patience is your weapon.
Step-by-Step Walkthrough Guide
Follow these actionable instructions to navigate the level from start to finish. This is the linear path to victory.
Step 1: The Initial Break
As soon as the level loads, look at the top row of the supply tray. It will be 100% Pink.
1. Tap 3 Pink Cups rapidly.
2. Load them onto your conveyor belt (Slots 1, 2, and 3).
3. Leave Slots 4 and 5 empty.
4. Begin pouring Pink into the bottom ocean zone.
5. Crucial: Stop pouring when the meter is at 90%. Do not wait for the "Perfect" bonus if it risks clogging your belt. You need to clear the slot.
Step 2: The Flank Collapse
Once the first row of Pink vanishes, the tray will shift. You will see Orange and Purple cups flanking the sides.
1. Identify the Purple cups on the right or left side.
2. Tap 2 Purple Cups and 1 Pink Cup.
3. Pour the Pink into the remaining water gaps.
4. Pour the Purple into the wave channel. Move your mouse/finger slowly. The wave is jagged; follow the zig-zag pattern precisely.
5. If you run out of Purple, tap more. If you run out of Pink, tap more. Keep these two colors cycling until the bottom 40% of the canvas is completely finished.
Step 3: Unlocking the Middle Layer
With the bottom gone, the tray shifts again. The "T-Blocker" is still holding the Red, but the sides are now flowing with Orange and Yellow.
1. Clear any remaining Pink or Purple cups off your belt immediately.
2. Tap 2 Orange Cups.
3. Pour them into the "Hills" section (the middle band of the image).
4. Tap 2 Yellow Cups.
5. Pour Yellow into the Sun circle.
6. Note: The Yellow Sun has a reflection in the water. Make sure you pour enough Yellow to fill that reflection patch at the bottom, separate from the main sun.
Step 4: Breaching the Center
The tray should now look sparse. The Grey T-Shape is the only thing left standing. The columns supporting it are gone.
1. The center will collapse, dropping Dark Red and White cups into the main tray.
2. Tap 3 Red Cups immediately.
3. Pour them aggressively into the top "Sky" section. Since the sky is large, you can pour quickly here without fear of bleeding (the boundaries are wide).
Step 5: The Cloud Precision
The final act. You have a Red sky, a Yellow sun, Orange hills, and Pink water. Only the clouds remain.
1. Tap 1 White Cup.
2. Pour it *very* slowly into the cloud gaps in the sky.
3. Do not overlap the Red sky. White cannot cover Red effectively if the layer underneath is already thick.
4. If clouds are not fully filled, tap the second White cup.
5. Finish the level.
Key Tips, Mistakes, and Stuck Solutions
Even with a plan, things can go wrong. This section covers the nuances that separate a clear from a "Game Over."
Key Tips for Efficiency
- The "Touch and Drag" Method: On the Purple wave, don't just click the cup. Touch the cup and drag the stream immediately. This gives you split-second precision to correct your aim if the sand drifts.
- Slot 1 Rule: Always keep Slot 1 (the one closest to the dispenser) empty or occupied by a color you intend to use *next*. This prevents the dispenser from spitting a crucial color into Slot 3 where it might block you.
- Pre-loading: If you know the next color is Yellow (e.g., after finishing Orange), don't wait for the belt to empty. Tap the Yellow cup while the Orange is still pouring the last 5%. This queues it up perfectly.
- Identify "Filler" Colors: Sometimes you get a color you don't need right now (like extra Pink when you are working on the Sky). If you have to take it, pour it into a corner of the already-filled zone to get rid of the cup without ruining the puzzle.
Common Mistakes to Avoid
- The "Clogged Belt" Syndrome: This happens when you fill all 5 slots with Pink at the start. When Purple unlocks, you have no room to grab it, and the Purple cups slide off the screen or get stuck behind the dispenser. Fix: Never fill more than 3 slots with the same color.
- Bleeding the Sun: Pouring Yellow too wildly so it touches the Orange hills or the Red sky. Once Yellow touches Orange, it's hard to fix. Fix: Under-pour slightly. It's better to have a tiny gap in the Yellow than a massive yellow smudge on the orange hill.
- Ignoring the White Scarcity: Wasting White cups on the background or accidentally pouring them into the water. Fix: Pretend White cups are made of gold. Do not tap them until the clouds are the *only* thing left to do.
What to Do If You Get Stuck
Sometimes the RNG (Random Number Generator) of the cup drops feels unfair. Here is how to recover:
- Scenario: No Red Cups are spawning. You likely didn't clear enough of the side columns. The "T-Blocker" requires a certain weight threshold to drop. Go back and find any remaining Pink or Orange cups you might have skipped and pour them out to force the tray to shift.
- Scenario: Purple ran out too fast. This happens if you over-poured the wave. If the wave is thick but the level says it's not enough, look for tiny pixel gaps in the zig-zag. Zoom in if possible. If not, you may need to restart and be more frugal with the Purple.
- Scenario: The Belt Won't Move. Sometimes physics glitches occur. Shake your device or swipe wildly on the belt to "jiggle" the cups loose. If a cup is genuinely stuck (e.g., inside the grey block geometry), the level is bugged, and you should restart.
Speed Run Tips (For Advanced Players)
Once you have mastered the logic, you can aim for a sub-30 second clear.
- Pre-emptive Tapping: While the opening animation is fading out, start tapping the top-left Pink cup. You can steal a second of time before the game logic fully locks in.
- The "Double Tap" Trick: Tap the dispenser twice rapidly to load two cups of the same color instantly into slots 1 and 2. This saves the animation time of the cup sliding down individually.
- Bulk Pouring: Don't let go of the mouse/finger. For the Sky (Red) and Water (Pink), you can pour the entire cup in one continuous stream. Only lift your finger for the Sun and Waves to adjust direction.
- Ignore "Perfect" Pours: Trying to hit the bonus circle for a "Perfect" pour often wastes time. Just getting the sand in the zone is 90% of the value. Speed runners prioritize flow over precision bonuses.