
Level 225
HARDHow to solve Sand Loop level 225? Get instant solution for Sand Loop 225 with our step by step solution & video walkthrough. Sand Loop 225 tips and guide.
Play Sand Loop Now
Experience the puzzle challenge firsthand
Game Screenshots
Sand Loop Level Guides
Level Overview: The Vertical Silo Challenge
Welcome to the definitive walkthrough for Level 225. This stage is a significant difficulty spike that tests your ability to manage resources rather than your reflexes. Unlike previous levels where you could tap freely, this stage introduces a strict "Column Logic" mechanic. The supply tray is divided into vertical silos, meaning cups only drop vertically within their own column; they do not slide sideways to fill gaps.
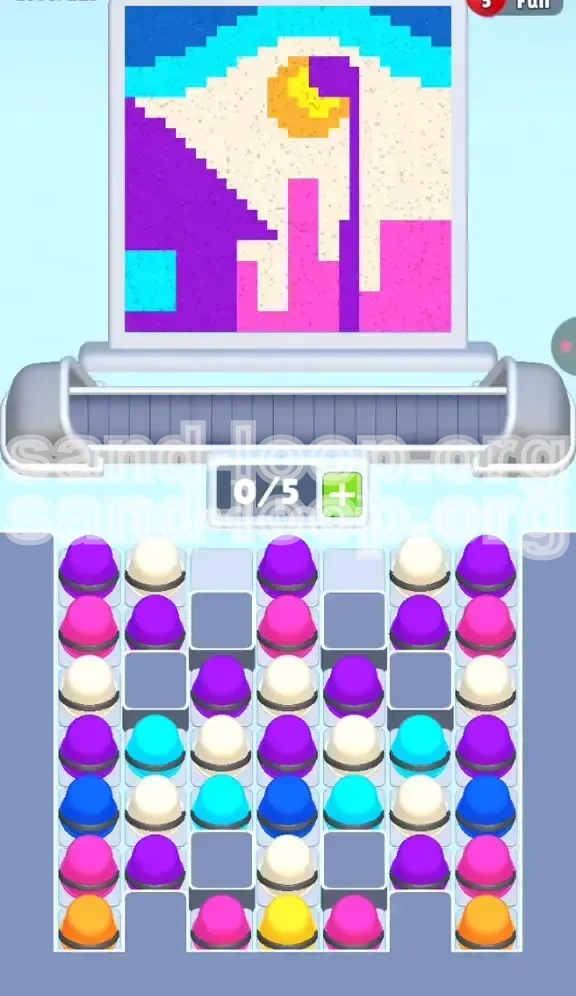
Visually, you are painting a "Geometric Sunset." The image features a heavy skyline in deep purple and beige, with a small, high-stakes sun in the center. The challenge lies in the supply distribution: the colors you need immediately (Purple and Beige) are abundant, while the colors for the details (Orange, Yellow, Cyan) are buried under four to five layers of useless filler.
The Vertical Silo Mechanic
The most critical feature of this level is the physical barrier between cup stacks. In standard levels, if you create a gap, cups slide diagonally to fill it. Here, they do not. If a stack is 5 cups deep, you must tap and remove the top 4 cups before you can access the 5th. This linear progression forces you to plan your moves 5 steps in advance.
The Supply Depth Problem
Analysis of the supply tray reveals a severe depth imbalance. The "Primary Colors" (Purple, Pink, Beige) are located in rows 1 and 2. The "Secondary Colors" (Blue, Cyan) are in rows 3 and 4. The "Rare Colors" (Orange, Yellow) are exclusively in row 5 at the very bottom. You cannot simply dig for the sun; you must clear the entire upper crust first.
The 5-Slot Bottleneck
Your conveyor belt has exactly 5 slots. Because the Rare Colors are at the bottom, digging for them requires putting 4 "garbage" cups onto your belt just to free up the one you need. If you dig too early, your belt will fill with Purple cups that the nozzle isn't ready to paint yet, causing an immediate deadlock.
The Nozzle Path
The nozzle follows a strict "Snake" pattern. It typically starts on the far left (Purple area), snakes down to the bottom right (Pink area), moves up to the middle (Beige area), and finishes at the top center (Sun/Sky). Your tapping rhythm must mirror this snake pattern. Tapping out of rhythm is the number one cause of failure.
The "Deadlock" Risk
There is a 95% chance of deadlock if you tap the center column before the nozzle has finished the outer edges. The center column contains the Sun colors. If you release these too early, they will sit on your belt, taking up valuable space while you wait for the nozzle to return to the center.
Clear Objectives and Color Strategy
To beat Level 225, you need to complete the painting in a specific sequence without ever clogging your conveyor belt. The objective is not just to fill the canvas, but to manage the flow of materials from the tray to the machine.
Phase 1: The Base Layer (Purple & Pink)
Your first objective is to clear the top two rows of the side columns. The nozzle starts on the left and right edges. You must tap the left and right columns exclusively until the nozzle is ready to move inward. Do not touch the center stack yet.
Phase 2: The Triangle (Beige)
Once the borders are defined, the nozzle will move to the large geometric triangle in the center. This area consumes a massive amount of beige paint. You must clear the beige cups from the center column and the inner sides of the left/right columns to prepare for this phase.
Phase 3: The Sky (Cyan & Dark Blue)
These colors are located in the middle layers of the side columns. You need to access them only after the large Beige triangle is partially filled. The sky is painted in narrow strips, so you only need to release 2-3 cups at a time.
Phase 4: The Sun (Orange & Yellow)
This is the final objective. The sun is small but requires specific colors buried at the bottom of the tray. You must time the excavation of these bottom-row cups perfectly with the nozzle's arrival at the top-center of the canvas.
Color Order Priority
The processing order is strictly hierarchical: Purple/Pink > Beige > Blue/Cyan > Orange/Yellow. Any deviation from this order will result in a clogged belt. You must prioritize the "Common Colors" to clear space for the "Rare Colors."
Capacity Management
Your goal is to keep 2 slots empty at all times. Never let the belt fill up with 5 cups. If you have 4 cups and the next cup you need is buried deep, wait. Do not tap. Let the current cups pour and clear space before digging deeper.
Step-by-Step Walkthrough: The Early Game
The early game is defined by speed and aggression. You need to clear the clutter on the tray to expose the useful colors below.
Start: The Left Flank (Purple)
As the level starts, the nozzle will hover over the purple block on the left. Immediately tap the Far-Left Column. Tap it 3 times rapidly. This puts 3 Purple cups on the belt. Since the nozzle is painting Purple, these will pour instantly, clearing space for more.
Moving Right: The Pink Zone
Watch the nozzle. As it traverses from the top-left to the bottom-right, shift your focus to the Far-Right Column. Tap the top 2 cups (Pink). Do not tap the third cup yet, as it might be Blue or Cyan, and you aren't ready for Sky colors.
The "Bridge" Technique
There is a brief moment when the nozzle moves from the bottom-right back up toward the center. Use this time to tap the Middle-Left and Middle-Right Columns. These usually contain the secondary layers of Purple or Pink needed to fill the gaps between the main structures.
Monitoring the First Row
By the time the nozzle has painted the bottom 20% of the canvas, the first row of cups in all columns should be gone. If any cup from Row 1 remains, tap it out now. You cannot access Row 2 (where the Beige and Sky colors hide) until Row 1 is empty.
Preparing for Beige
As the nozzle moves toward the large center triangle, ensure your belt has only 2 or 3 cups on it. You need the buffer space to handle the large volume of Beige paint that is about to be required. If your belt is full, stop tapping and wait 2 seconds.
Avoiding the "False Dig"
Do not be tempted to tap the center column (Column 3) just because it has a visible color. If the nozzle isn't over the center triangle, a Beige cup is useless. Save that tap for when the nozzle actually arrives.
Step-by-Step Walkthrough: The Mid-Game Logic
The mid-game is about precision. You are now dealing with the "Vertical Silo" constraints. You must dig vertically to get the colors you need, but you can only do so if you have the belt space to hold the excavated debris.
Excavating the Center (Beige)
The nozzle is now painting the large Beige triangle. You need to tap Column 3 (Center). However, the top cup is likely Purple, and the second is Beige. Tap the Purple one to pour it (or discard it if the nozzle has passed Purple), then immediately tap the Beige one.
The "Column Clear" Rule
Focus on one column at a time. Do not alternate between Left and Right rapidly. Pick the Middle-Left Column. Dig down 3 cups deep. This releases a mix of Purple and Beige. Let these pour. Once that column is "dry" (no more useful colors immediately accessible), switch to the Middle-Right Column and repeat.
Unearthing the Sky (Cyan/Blue)
Once the Beige triangle is 50% complete, look at the side columns. You will see Cyan or Dark Blue in the 3rd or 4th slot. The nozzle will eventually move to the top strip of the canvas. Tap these Blue cups only when the nozzle is actively painting the top sky section.
Managing the Vertical Drop
Remember, tapping a cup in the Middle-Left column drops the stack *only* in that column. If you need a Blue cup from the bottom of the Middle-Right column, you must clear the 2 cups above it. This takes time. Plan your taps so the Blue cup arrives on the belt exactly when the nozzle reaches the sky section.
The 3-Slot Buffer
In the mid-game, reduce your belt usage to a maximum of 3 cups. Why? Because digging for the next set of colors often requires moving 2 "garbage" cups out of the way. You need the empty slots to temporarily hold these garbage cups while you wait for the useful one to arrive.
Synchronizing the Strip
The Sky is not painted in one block; it's painted in strips. The nozzle does the top-left, then jumps to the top-right. Ensure you have Cyan ready for the left pass and Dark Blue ready for the right pass. Do not load both colors simultaneously if you can avoid it.
Step-by-Step Walkthrough: The Endgame
The final 10% of the level is the most dangerous. You are hunting for Orange and Yellow, buried at the very bottom of the center columns. This is where 90% of players fail.
Isolating the Sun
The sun is located in the top-center of the canvas. The nozzle will only reach this spot after completing the Sky and the bottom of the Beige triangle. Wait for the nozzle to move to the top-center position. Do not tap any Sun colors until it arrives.
The "Dig and Wait" Maneuver
The Yellow and Orange cups are at the bottom of Column 2 and Column 4. Above them are likely leftover Beige or Purple cups. Tap one cup. Wait for it to pour. Tap the next. Do not spam tap. If you release 3 cups at once, you will fill your belt with colors you can't use yet.
Precision Tapping
You likely only need 2 Orange cups and 2 Yellow cups to finish the level. That's it. Do not clear the rest of the stack. Once the sun is painted, the level ends. Ignore the remaining cups in the tray.
Handling the Overflow
If you accidentally tap too many cups and your belt clogs with Orange/Yellow while the nozzle is on the Sky, you are in trouble. Your only hope is to wait for the nozzle to finish the Sky and loop back to the Sun. This takes valuable seconds. If you are in a speed run, this mistake is fatal.
The Final Push
As the sun fills up, the level will slow down slightly. Ensure the last pixel is filled. The game checks for 100% completion. If a single pixel of the sky is missing because you missed a Blue cup, you won't get the stars. Double-check the top corners of the canvas as the nozzle finishes its path.
Victory Lap
Once the sun is complete, the nozzle will perform a final pass over the whole canvas to verify. If you managed your belt space correctly, you will clear the level with 0 or 1 cups left on the belt, signifying a perfect efficiency run.
Key Tips and Common Mistakes
To truly master Level 225, you must understand the theory behind the mechanics. These tips will help you avoid the common pitfalls that plague new players.
Tip 1: The "No-Look" Start
For the first 5 seconds, do not look at the canvas. Look only at the Left and Right columns. Tap them rhythmically. Left, Right, Left, Right. This builds a rhythm that matches the nozzle's initial side-to-side movement and prevents early clogging.
Tip 2: Predictive Digging
Look at the "Ghost" image of the canvas. If the next area to be painted is Purple, look at your tray. Identify which column has Purple closest to the top. Tap that column *before* the nozzle arrives. This ensures the paint is ready on the belt the moment the nozzle needs it.
Common Mistake: The Center Trap
The biggest mistake is tapping the Center Column (Column 3) too early. Players see the Beige cups and want to use them. But the nozzle paints the sides first. If you tap Center early, you fill your belt with Beige while the nozzle is painting Purple. The Beige cups block the belt, and you can't add more Purple. Result: Deadlock.
Common Mistake: The "Spam" Reflex
When the nozzle is moving quickly, players tend to tap frantically. In Level 225, speed is your enemy. A fraction of a second's pause to check belt capacity can save a run. Only tap when you know there is a slot for the cup to land.
Tip 3: Garbage Management
Sometimes you have to tap a "wrong" color cup just to dig down to the "right" color cup beneath it. This is acceptable, but only if you have 2 empty slots. The "wrong" cup becomes garbage that takes up space. Only perform this dig when you have the buffer to absorb the bad cup.
Tip 4: Nozzle Orientation
Pay attention to the nozzle's direction. Is it moving Left-to-Right or Right-to-Left? If it's moving Left-to-Right across the sky, prioritize the Cyan cups on the left side of the tray. If it's moving Right-to-Left, prioritize the Dark Blue on the right. This minimizes the travel time for cups on the belt.
Stuck Solutions and Speed Run Strategies
If you are failing repeatedly or trying to achieve a high score, these advanced strategies will help you optimize your gameplay.
Solution: The Hard Reset
If you are stuck with a full belt and the nozzle is on the opposite side of the canvas, don't panic. Stop tapping immediately. Wait for the belt to rotate. Usually, 1 or 2 cups will pour (if you are lucky and the nozzle passes over their color). This frees up space. Once you have 1 empty slot, resume tapping slowly.
Solution: Dealing with "Stacked" Rares
Sometimes, two rare colors (e.g., Orange and Yellow) are stacked in the same column. You need the Yellow (bottom) but the Orange (top) is blocking it. You must tap the Orange. If the nozzle isn't ready for Orange, that cup becomes a "blocker." You must wait until the nozzle hits the Sun, pour the Orange, and then tap the Yellow. This requires precise timing.
Speed Run Strategy: Pre-loading
To maximize speed, you want the paint on the belt *before* the nozzle arrives. As the nozzle paints the bottom-right Pink area, start tapping the Center Column for Beige. By the time the nozzle moves to the center, you should have 2 Beige cups already waiting on the belt. This shaves seconds off your time.
Speed Run Strategy: Batch Processing
Group your taps. Instead of tapping Left-Right-Left-Right, tap Left-Left-Left (clearing the column to the Beige layer), then pause, then Right-Right-Right. This batch processing keeps the belt rhythm consistent and prevents the "jitter" that comes from constant micro-adjustments.
Advanced Tip: The "Belt Loop" Timing
The conveyor belt takes about 4-5 seconds to complete a full rotation. Use this timer. If you missed a Blue cup and it's going to loop around, calculate where the nozzle will be in 5 seconds. If the nozzle will be at the Sun in 5 seconds, don't worry about the Blue cup; focus on getting the Yellow cup ready instead.
Final Check: The 99% Bug
Sometimes the game ends at 99% completion. This usually happens because a single pixel in the corner was skipped. To prevent this, in the final seconds of the level, slow down. Ensure the nozzle passes over the top-left and top-right corners completely. Do not let the level timer cut off the final pass.