
Level 226
HARDHow to solve Sand Loop level 226? Get instant solution for Sand Loop 226 with our step by step solution & video walkthrough. Sand Loop 226 tips and guide.
Play Sand Loop Now
Experience the puzzle challenge firsthand
Game Screenshots
Sand Loop Level Guides
Sand Loop Level 226: Comprehensive Strategy Guide
Introduction to the Santa Claus Challenge
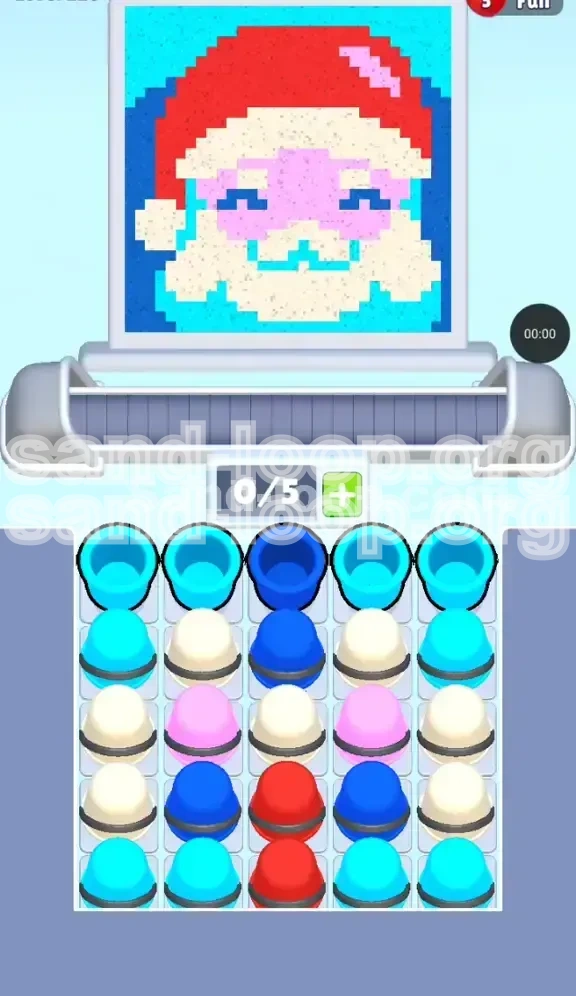
Sand Loop Level 226 presents a classic pixel art puzzle featuring a festive Santa Claus portrait. Unlike abstract levels where colors are randomly distributed, this level requires you to construct a recognizable image: a figure sporting a red hat, a pink face, a white/cream beard, and dark blue eyes set against a cyan background.
The Core Mechanic: Vertical Dependency
The primary difficulty in this stage lies in the vertical stacking of your color trays. The logic of the image dictates that you paint the top of the canvas (the hat) early on, but the game mechanics bury the essential Red cups at the very bottom of the central pillar. This creates a "vertical dependency" paradox where you must ignore the top of the canvas for a significant portion of the run to excavate the colors needed to finish it.
Why This Level Stalls Players
Players often fail here because they try to paint the image in logical order (top-to-bottom). When they find the Red paint locked, they panic and start randomly dumping background colors (Cyan) to lower their conveyor count. This leads to a full conveyor of useless colors. Understanding that you must "dig" before you "paint" is the key to victory.
Canvas and Layout Analysis
The canvas is dense, with approximately 70% of the pixels belonging to the central figure (Santa) and the remaining 30% dedicated to the Cyan background. The background acts as a sink for excess paint, but the central figure requires precise color sequencing. The "Danger Zone" is the face area, where Pink, Cream, and Dark Blue pixels interlock in a tight pattern.
Level Overview and Objectives
Primary Goal: Unlock the Center Column
Your main objective is not just to fill the canvas, but to drill down through the center of the sand dispenser. Specifically, you must clear the top three layers of the central column to access the Red reservoir located in Rows 4 and 5. Without this Red paint, the level is mathematically impossible to complete.
Secondary Goal: Manage Conveyor Flow
You must maintain a strict "4-slot maximum" rule on your conveyor belt. Keeping one slot open is critical to prevent deadlock. If you fill all 5 slots, you cannot tap the center column to dig, bringing your run to a grinding halt.
Color Distribution Strategy
The level forces you to process colors in an inefficient order. You will be handling Cyan (background) and Dark Blue (eyes) before you touch the Red (hat) or Pink (face). You must accept that you will be painting the background edges and eyes first, effectively working "inside-out" rather than top-to-bottom.
The 90% Rule
Aim to reach 90% completion of the background and face details before you unleash the flood of Red paint. If you try to apply Red too early, you will run out of conveyor space to hold it, forcing you to waste the most valuable color in the level.
Identifying the Bottleneck
Identify the specific "bottleneck" cups immediately: Row 1 Center (Dark Blue), Row 2 Center (Dark Blue), and Row 3 Center (Cream). These three cups are the gatekeepers of the level. Every move you make should be calculated to eliminate these specific obstacles.
Step-by-Step Walkthrough: Phase 1 (The Excavation)
Step 1: The Initial Tap
As soon as the level starts, locate the top-center cup. It is Dark Blue. Tap it immediately. Do not touch the Cyan cups on the far left or right yet. Your goal is to create a vertical shaft in the center of the dispenser.
Step 2: The Second Dig
Once the first Dark Blue cup is cleared, the second layer of the center column is revealed. It is also Dark Blue. Tap this next. At this point, your conveyor should only have 1 or 2 Blue cups. Pour these onto the canvas. The Santa eyes are located in the center of the upper-middle canvas. Pour the Blue here. If the eyes are already full, you may need to waste a small amount of Blue in the corner, but do not hold onto it.
Step 3: Managing the Sides (Cyan Sink)
While you are focusing on the center, you will notice Cyan cups spawning on the far left and right columns (Row 1 and 2). You can tap these, but only if you have space on your conveyor. Pour Cyan into the top-left and top-right corners of the background. The goal here is to clear the side rows slightly to improve visibility, but do not prioritize them over the center dig.
Step 4: Reaching the Cream Layer
After clearing the second Dark Blue, the Cream cup in Row 3 Center is unlocked. This is a critical milestone. Before tapping this Cream cup, ensure you have emptied your previous paints. You want your conveyor as empty as possible to handle the incoming flow.
Step 5: The Cream Transition
Tap the Row 3 Center Cream. This corresponds to the beard and hat trim. Pour this into the bottom center of the canvas (the beard area). By removing this Cream cup, you are essentially striking gold—it unblocks the massive reservoir of Red paint sitting directly beneath it in Rows 4 and 5.
Step-by-Step Walkthrough: Phase 2 (The Main Event)
Step 6: The Red Gold Rush
With the Cream cup gone, the Red cups in Rows 4 and 5 are now accessible. Tap the Row 4 Center Red cup. Then, immediately tap the Row 5 Center Red cup. Your conveyor should now be filling up with Red paint.
Step 7: Painting the Hat
Target the top-center of the canvas with the Red paint. This is Santa's hat. It is a large area, so it will consume a significant amount of the liquid. Keep tapping the Red cups as they refresh. The top of the screen should rapidly turn from blank to red.
Step 8: Introducing the Flesh Tones
While the Red paint is flowing, you will see Pink cups appearing in the center rows (flanking the Red column). You can start tapping these Pink cups now. The Red and Pink paints can coexist on the conveyor. Pour the Pink into the middle of the face, just below the Red hat and above the Cream beard.
Step 9: Background Cleanup
At this stage, the main figure is likely 80% complete. You will have a mix of Cyan, Cream, and maybe leftover Blue on the sides. Now is the time to aggressively tap the side columns to finish the Cyan background. Since the main character is painted, you can dump the Cyan paint anywhere there is a gap without risk of messing up the face details.
Step 10: Final Polish
Check the canvas for any "pixel specks." These are small single-pixel gaps often found between the hat and the face, or the nose and the beard. Use your remaining paint supplies to fill these gaps. Usually, you will have a surplus of background color to use for these final touch-ups.
Color Order and Processing Logic
The Dark Blue Priority (Tier 1)
Although Dark Blue covers the smallest area of the canvas (less than 5%), it is the most important color to clear first. It acts as the "lid" on the jar of paint you need. You must process Dark Blue first not because of visual demand, but because of mechanical necessity.
The Cream Pivot (Tier 2)
Cream serves as the pivot point between the "digging phase" and the "painting phase." It is the last obstacle before the Red. Process Cream as soon as it is exposed in Row 3. Don't save it. Use it to define the boundaries of the face, which helps prevent color bleeding when you apply the Red and Pink later.
The Red Flood (Tier 3)
Red is the highest volume color. It should be processed in a massive batch once unlocked. Do not tap Red, switch to Pink, then come back to Red. Tap the Red cups back-to-back to maximize flow and clear the dispenser rows, allowing new colors to spawn from the bottom.
The Pink Balance (Tier 4)
Pink is the "medium" color. It is neither buried as deep as Red nor as accessible as Cyan. Process Pink while you are waiting for Red cooldowns or while the conveyor is moving. Pink is risky because it borders the Cream beard; ensure your aim is steady.
The Cyan Background (Tier 5)
Cyan is the "filler" color. It is abundant and located in the easiest positions (side columns). Process Cyan only when you have no other pressing colors in the center, or when you need to lower your conveyor count to make room for a center dig.
Key Tips for Success
Keep One Slot Open
This is the golden rule of Sand Loop. Never fill your 5-slot conveyor completely. If you have 4 colors and need to tap a 5th to clear a blockage, you are stuck. Always try to operate with 3 or 4 cups on the belt, giving you flexibility to react to new spawns.
Waste is Not Failure
In Level 226, you will be forced to waste paint. You might need to pour Dark Blue into a corner just to get it off your conveyor. Do not hoard colors hoping for a spot to open up. If a color is blocking your access to the center column, pour it out into the background immediately, even if it's the "wrong" color for that spot.
Recognize the "Stacked" Pattern
The center column in this level is a vertical stack: Blue -> Blue -> Cream -> Red -> Red. Memorize this order. If you know what is coming next, you won't be surprised when the Red appears, and you can reserve space on your conveyor in anticipation.
Background vs. Subject
Train your eyes to distinguish between the subject (Santa) and the background. The background pixels are essentially a "trash can" for overflow. If you accidentally pick up a Cyan cup while you are working on the face, just pour it into the background immediately. Don't let it sit on your conveyor taking up a slot.
Timing the Center Tap
Watch the animation cycle. After you pour a color, there is a brief moment where the liquid settles. Use this split second to glance at the sand dispenser. If a center column cup has refreshed, be ready to tap it the moment the conveyor is free.
Common Mistakes to Avoid
Mistake 1: Hoarding Red Paint
Many players get excited when they finally unlock the Red and try to fill their entire conveyor with it. This is dangerous. If you have 5 Red cups and suddenly need a Pink cup to finish the face, you have no room to pick it up. Take Red in batches of 2 or 3.
Mistake 2: Ignoring the Eyes
The eyes are easy to miss because they are small. If you pour a large blob of Pink or Cream over the eye area, you effectively lose the ability to complete the level perfectly. Always check if the Dark Blue eyes are filled before you start flooding the face with Pink.
Mistake 3: Premature Background Filling
Don't spend the first minute just filling the Cyan background. If you clear the side columns completely but leave the center column blocked, you have no way to generate new colors. The game relies on the center column spawning new colors from the bottom.
Mistake 4: Mixing Wet Colors
Avoid pouring two different colors right next to each other while they are still wet. For example, pouring Pink directly next to wet Cream can sometimes result in the colors bleeding into each other's designated pixels. Let one color dry slightly before applying its neighbor.
Mistake 5: Panic Tapping
When the screen gets full of cups, it's easy to start tapping randomly. This leads to picking up colors you don't need. If you feel overwhelmed, stop tapping for 2 seconds, pour out what is on your conveyor, and reassess the center column.
Stuck? Troubleshooting Solutions
Scenario: The Center Column Won't Clear
Symptom: You tap the center, but the cup won't disappear.
Cause: Your conveyor is full.
Fix: You must pour out a cup. It doesn't matter which one. Pick the color that matches the largest area of unfinished canvas (usually the background) and dump it. Once you have a slot open, the center cup will load onto the conveyor.
Scenario: Out of Red, But Hat is Incomplete
Symptom: You used all the Red, but the hat still has white gaps.
Cause: You probably poured Red into the background by mistake, or the hat area is actually mixed with Cream/White pixels.
Fix: Check if the gaps are actually Cream (hat trim). If they are indeed Red gaps, you need to tap more center cups to cycle through the dispenser until Red respawns. This takes time, so be patient.
Scenario: Conveyor Full of Useless Colors
Symptom: You have 5 cups, but none of them match what you need to paint (e.g., you have 5 Cyan but need to paint the face).
Fix: You are in a "color lock." Do not try to paint the face. Instead, look for any Cyan gaps in the background to pour them out. If the background is full, you may have to waste a cup into an already-filled area to force it off the conveyor.
Scenario: Can't Find the Eyes
Symptom: You have Blue paint but don't know where to put it.
Fix: Look at the very center of the "face" area. The eyes are typically located just above the midpoint of the Pink section. If you still can't find them, look at the pixel preview on the level start screen to memorize their location.
Scenario: Level Won't End at 100%
Symptom: The timer is running, but the level won't complete.
Fix: Zoom in (if possible) or scan the edges of the canvas. There is likely a single pixel gap in a corner or between two colors. Use your leftover paint to systematically check every pixel border.
Speed Run and Efficiency Tips
The "Side-Tap" Shortcut
While the center column is your main focus, don't ignore the side columns entirely. If you see a Row 1 Cyan cup while your conveyor is empty, tap it. It's faster to process a side cup immediately than to wait for it to cycle around. However, never tap a side Row 3 or 4 cup until the center is clear.
Pre-Loading the Conveyor
Before you unlock the Red in Row 4, try to have your conveyor filled with colors that are easy to place, like Cyan or Cream. This way, when the Red spawns, you can quickly dump your current load and grab the Red without fumbling for space.
Bulk Pouring Technique
Instead of tapping a cup, waiting for it to pour, and then tapping the next, try to "queue" your actions. Tap a cup, and while the liquid is traveling to the canvas, immediately tap the next cup you need. This shaves milliseconds off every cycle, which adds up to seconds in a speed run.
Memorize Spawn Points
The dispenser is static. The Red is always in the center. The Cyan is always on the edges. Do not waste time scanning the whole tray. Train your muscle memory to go straight for the center tap after every pour.
The 40% Threshold
In a speed run context, ignore 100% accuracy. If the face is 95% filled, move on. As long as the "game over" check doesn't trigger, you can leave tiny pixel gaps. Focus on getting the large blocks of color (Hat, Beard, Background) done first. Details are secondary to flow.