
Level 242
HARDHow to solve Sand Loop level 242? Get instant solution for Sand Loop 242 with our step by step solution & video walkthrough. Sand Loop 242 tips and guide.
Play Sand Loop Now
Experience the puzzle challenge firsthand
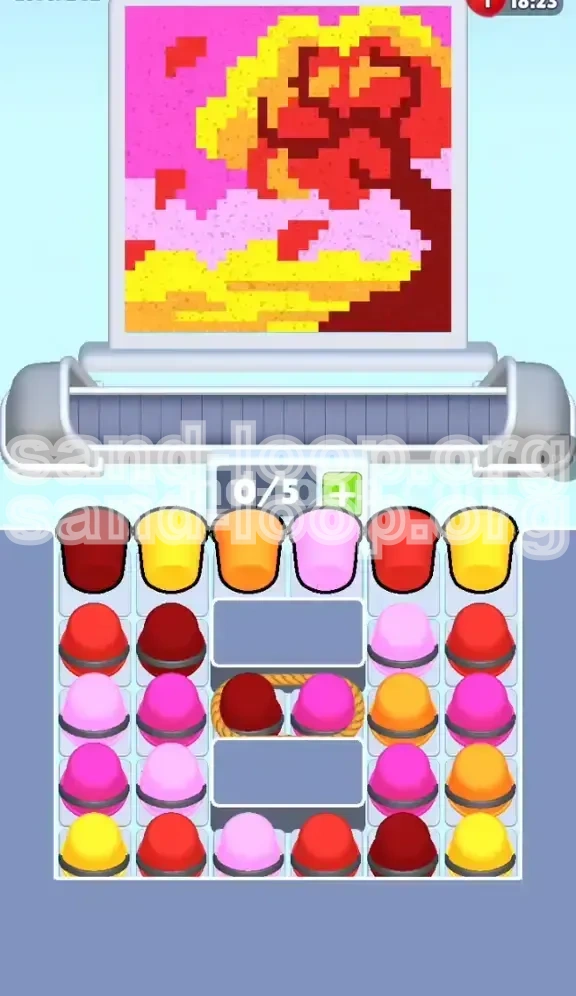
Game Screenshots
Sand Loop Level Guides
Level Overview: The Autumn Tree Challenge
Welcome to the comprehensive walkthrough for Sand Loop Level 242. This stage is a visually deceptive puzzle that masquerades as a simple art project but functions as a rigorous logic test. The level features the "Autumn Tree," a vibrant composition split between a pink sky, a yellow ground, and a complex, multi-colored tree in the center. While there is no ticking clock to induce panic, the level is designed to test your organizational skills.
The primary difficulty in Level 242 stems from the unique physical layout of the supply tray. Unlike previous levels where you could freely slide columns, this stage introduces a "Split-Tray" mechanic. Gray static barriers and a central rope binding effectively sever the flow of materials, turning the tray into three isolated islands of resources. You cannot rely on speed; you must rely on careful queue management to prevent the conveyor belt from clogging with unusable colors.
The Visual Composition
The canvas depicts a serene fall landscape, but do not let the artistic style fool you. The image is divided into three distinct horizontal zones that dictate your color priority. The top is a gradient of Hot Pink and Light Pink sky. The middle is a chaotic mix of Reds, Oranges, and Browns forming the tree canopy. The bottom is a solid Yellow ground. Understanding this geography is the first step to mastering the level, as the nozzle will sweep across these zones in a predictable pattern.
The Split-Tray Mechanic
This is the core obstacle of Level 242. The supply tray is not a solid grid. It is fractured by "Dead Zones"—gray blocks that prevent vertical movement in the center columns. This means cups in the left and right wings cannot slide into the center to help out. You are forced to manage the resources on the far left and far right independently, only interacting with the center when the specific path clears.
The Rope Binding Trap
Located deep in the center column (Row 3) lies a rope connecting a Dark Red cup and a Pink cup. This is a static lock. Unlike other cups that slide down when space is made, these two are tied together. They act as a plug for the center column. Releasing them requires specific timing and available belt slots, making them a potential bottleneck if triggered prematurely.
Color Complexity
The palette introduces a challenge in color discrimination. You are dealing with three distinct shades of red/brown: Dark Red/Brown (Trunk), Bright Red (Leaves), and Orange (Foliage). The danger lies in the similarity between Dark Red and Bright Red under pressure. Confusing a trunk color with a leaf color will jam your belt, as the nozzle will reject the wrong shade for a specific pixel area.
Strategic Importance
This level shifts the gameplay from "tapping fast" to "thinking ahead." You must maintain a mental map of where every color is located within the three columns. Success in Level 242 is not measured by speed, but by your ability to keep the conveyor belt flowing at a steady 60-70% capacity, ensuring you always have the right color ready before the nozzle arrives at its destination.
Clear Objectives: Your Mission Goals
To secure a "Perfect" rating and clear Level 242, you must achieve more than just filling the canvas. You need to execute a strategy that minimizes waste and prevents the dreaded belt jam. Here is exactly what you need to accomplish to finish this stage.
Prevent Conveyor Belt Clogs
Your primary objective is to never let the conveyor belt reach maximum capacity (5/5 slots). Because the tray is split, you cannot easily swap cups. If you fill the belt with the wrong colors, you have nowhere to put the excess, leading to overflow. Aim to keep the belt at 3/5 capacity to allow for maneuverability when the center column finally opens up.
Isolate the Tree Trunk
The tree trunk is painted in Dark Red/Brown and is surrounded by Bright Red leaves. Your objective is to clear the Bright Red and Orange cups from the queue before you start processing the Dark Red trunk. If you have Bright Red cups on the belt while the nozzle is painting the trunk, you will create a mess. Prioritize colors based on the nozzle's current height.
Manage the Three Zones
You must successfully empty the Left Wing and Right Wing of the tray without letting the Center Column rot. The objective is to balance your tapping between the left and right sides. If you drain the Left Wing completely before touching the Right Wing, you will lose access to crucial colors needed for the sky and ground later in the level.
Release the Rope Lock
A key milestone objective is the safe release of the roped cups in the center. You must clear the obstructing cups above them (Row 2) and ensure you have exactly 2 open slots on your belt before triggering the rope. Releasing the rope prematurely when the belt is full is a common fail state that results in immediate game over or significant point penalties.
Achieve Color Accuracy
With three shades of red/orange, accuracy is paramount. Your goal is to achieve 95%+ color accuracy. This means training your eyes to instantly distinguish between the "Leaf Red" and the "Trunk Brown." Mixing these up not only wastes time but also forces you to use precious sand to correct mistakes, draining your resources faster than the tray can replenish them.
Step-by-Step Instructions: The Opening Phase
The first 20% of the level is critical for setting the rhythm. The nozzle will typically begin its sweep in the upper left corner, painting the sky, or drop immediately to the center for the tree top. Your initial moves must stabilize the tray.
Step 1: Analyze the Nozzle's Starting Position
Before you tap a single cup, watch the nozzle. If it starts at the top-left, you are in "Sky Mode." If it drops to the middle, you are in "Canopy Mode." This split-second observation determines your first three taps. Do not assume the level always starts the same way; the nozzle path can vary slightly based on RNG.
Step 2: Clear the Center "Cap" Immediately
Look at the top-middle section of the tray (Row 1 & 2). You will see Orange and Pink cups sitting directly above the gray dead zones. Your first priority is to tap these. Why? Because they are blocking access to the rope mechanism below. Clearing these "Cap" cups allows you to see the state of the center column and prevents mid-game pileups.
Step 3: Alternate Wings for Belt Loading
Once the center cap is gone, shift focus to the outer wings. Do not empty one column. Perform an "Alternating Tap" pattern. Tap one Dark Red from the Left Wing, then immediately tap one Yellow from the Right Wing. This keeps your conveyor belt balanced with a mix of colors, ensuring that whether the nozzle goes up or down, you have a valid color ready to dispense.
Step 4: Prioritize Pink for the Sky
If the nozzle is sweeping the top horizon, you need Hot Pink and Light Pink. The Right Wing usually holds a stack of Pink cups. Tap these aggressively (up to 3 cups) to keep up with the sky painting phase. The sky is the largest continuous area, so getting it out of the way early reduces the complexity of the board later.
Step 5: Monitor the "Tree Top" Demand
As the nozzle moves into the center of the canvas, it will demand Bright Red and Orange. These are likely located in the bottom rows of your Left and Right wings. Start pulling these forward. If you see the nozzle hovering over the orange pixel clumps, ensure you have an Orange cup in your active slot (Slot 1) before it arrives.
Step-by-Step Instructions: The Mid-Game Execution
As the level progresses past the 40% mark, the sky is likely finished, and the nozzle will focus intensely on the tree and ground. This is where the Split-Tray becomes a major headache.
Step 6: Transition to Ground Colors (Yellow)
With the sky done, the nozzle will drop to the bottom to paint the Yellow ground. The Right Wing is your primary source for Yellow. You can now drain the Right Wing stack more aggressively. Tap the Yellow cups until the ground section is 80% complete. Do not over-tap; excess yellow sand is useless once the ground is done.
Step 7: Isolate the Trunk Colors
Now the challenge shifts to the "Dark Red" vs. "Bright Red" distinction. The nozzle will move from the leaves (Bright Red) to the trunk (Dark Red). You must clear any Bright Red cups from your belt immediately. If you have a Bright Red cup queued, tap it out into a leaf area. You need to clear space for the Dark Red cups, which are heavier and trickier to place.
Step 8: Trigger the Rope Mechanic
This is the critical turning point. By now, the Center Column "Cap" is gone, and the Rope (Dark Red + Pink) is exposed. To release it, you must have 2 empty slots on your conveyor belt. The moment you have space, tap the roped pair. Ideally, do this when the nozzle is near the bottom of the tree (requiring Dark Red) or touching up the horizon (requiring Pink).
Step 9: Clearing the Bottom Row "Sludge"
The bottom row (Row 5) of the tray is often a messy mix of leftovers—Light Pink, Red, and Yellow. These are "Garbage Colors" that are only needed for tiny pixel fixes. Do not load these onto the belt unless the nozzle is directly over a matching pixel. Let them sit in the tray until the very end to avoid clogging your limited slots.
Step 10: Finalize the Tree Trunk
The trunk requires precise bursts. Do not hold the tap. Tap, release, and check the fill. The trunk is a thin structure. It is better to under-fill and tap again than to over-fill and spill sand onto the Yellow background. Over-spilling creates "pollution" on the canvas that blocks further painting and hurts your score.
Color Order: Processing the Palette
Understanding the hierarchy of colors is the secret weapon for Level 242. Not all colors are created equal, and treating them as such leads to failure. Here is the optimal processing order to maintain flow.
Priority 1: The Sky (Hot Pink & Light Pink)
Percentage of Canvas: ~35%
The sky is your "bread and butter." It requires a large volume of sand but is very forgiving regarding placement. Process these colors first. The Pink cups are abundant in the Right Wing. Clearing these early frees up massive amounts of space in your tray and removes the stress of the time limit.
Priority 2: The Ground (Yellow)
Percentage of Canvas: ~25%
Yellow is a "blocking color." It sits at the bottom of the canvas but often at the bottom of your cup stacks. You need to mine through other colors to get to it. Prioritize Yellow once the sky is 50% done. If you wait until the very end, you might find your Yellow cups trapped under unusable Dark Red cups.
Priority 3: The Leaves (Bright Red & Orange)
Percentage of Canvas: ~30%
These colors are chaotic. They are scattered in pixelated clumps. You cannot process these in one go. You must process them in "waves." Load a Bright Red cup, paint a cluster, wait for the nozzle to move, load the next. Do not queue multiple Red cups; the nozzle will move away from the tree to touch up the sky, and you will be stuck with a Red cup you can't use.
Priority 4: The Trunk (Dark Red/Brown)
Percentage of Canvas: ~10%
This is the lowest volume but highest risk color. The trunk is thin and requires precision. Process this dead last. By processing it last, you ensure that no other colors are competing for your attention. You can focus 100% on guiding the nozzle along the narrow path of the trunk without worrying about the sky or ground running out of time.
The Danger of "Middle" Priority
Avoid mixing these orders. If you try to paint the trunk (Priority 4) while the sky (Priority 1) is still empty, you will run out of time. The game penalizes you heavily for leaving large empty areas like the sky unpainted. Always fill the large, solid color blocks (Sky/Ground) before tackling the fine details (Tree/Trunk).
Key Tips and Common Mistakes
To transform your gameplay from struggling to smooth, you must internalize these tips and avoid the pitfalls that trap most players in Level 242.
Tip: The "Slot 3" Rule
Never let your conveyor belt fill past slot 3 (out of 5). Keeping slots 4 and 5 empty gives you the buffer needed to absorb the "Roped Pair" release when it finally happens. If you are sitting at 5/5, you are playing Russian Roulette with your game progress.
Tip: Visual Differentiation
Train your eyes to spot the difference between the Trunk Brown and Leaf Red. The Trunk Brown is a deep, maroon/chocolate tone. The Leaf Red is a vibrant vermilion. If you are colorblind or struggle with this, look at the shape: Trunks are vertical lines; Leaves are clouds. Use the pixel shape as a secondary check if the color is ambiguous.
Tip: Manual Nozzle Guidance
Don't just watch the nozzle; lead it. If you know the rope is about to release a Dark Red cup, manually drag the nozzle to the trunk area before you tap the rope. This ensures that the sand flows exactly where it needs to go the millisecond it enters the belt, minimizing the chance of a spill.
Mistake: Ignoring the Gray Blocks
Many players tap the center column expecting the cups to slide down like water. They won't. The gray blocks are absolute walls. Tapping a cup above a gray block when you don't need that color is a waste of a move. Only tap the center when you are ready to commit to clearing that entire section.
Mistake: The "Perfect" Trap
Trying to fill every single pixel to 100% completion on the first pass is a mistake. It is better to leave a pixel at 90% and move the nozzle to the next area than to over-fill and spill. You can always come back for touch-ups later. Spills are permanent pixel pollution that ruins your score.
Mistake: Tunnel Vision
Focusing only on the tree while the Left and Right wings remain untouched is a recipe for disaster. The game balances the nozzle speed based on how much sand is available. If you ignore the wings, you might run out of a specific color (like Yellow) halfway through the ground, forcing the nozzle to hover uselessly while you scramble to find a cup.
Stuck Solutions and Speed Run Tips
If you find yourself in a bind or looking to optimize your time, use these advanced strategies to get back on track or shave seconds off your run.
Solution: The Belt Jam Fix
Scenario: Your belt is full (5/5), the nozzle is hovering over the trunk, but you have a Pink cup on the belt.
Fix: You cannot dump the Pink cup. You must manually move the nozzle to the nearest Pink pixel in the sky (even if it's already painted) and fire the cup there to empty it. This clears the slot for the Trunk color. It wastes a bit of sand, but it's the only way to clear the jam without losing.
Solution: Trapped Under the Rope
Scenario: The cups you need are stuck in the center column under the Rope, but you can't clear the Row 2 cups above them because the nozzle won't go there.
Fix: You have to "Force the Hand." Manually drag the nozzle to the area corresponding to the Row 2 cups (usually the upper leaves). Even if it's not perfectly 100% ready, use those colors to clear the path. You must create a vertical path to the rope before you can access the lower resources.
Speed Run: Pre-Loading the Queue
For a speed run, you can ignore the "Slot 3" rule slightly. As soon as the level starts, tap the Left Wing and Right Wing caps simultaneously. Load 4 cups immediately. The game allows a split-second of grace period at the start where the nozzle lags. Use this to build a full inventory before the painting actually begins.
Speed Run: The Rope Skip
If the center column is giving you trouble, ignore it entirely until the very end. Focus 100% on draining the Left and Right wings. If you play perfectly, the Left and Right wings contain enough colors to finish 90% of the painting. Only clear the center column when the nozzle is practically idle, forcing the game to wait for the final pieces.
Speed Run: Aggressive Nozzle Movement
Don't wait for the nozzle to sweep naturally. Manually drag it from the top left (Sky) to the bottom right (Ground) in rapid succession. By forcing the nozzle to cover large distances, you trick the game into thinking you need different colors sooner, triggering the supply logic to refresh the tray cups faster than normal.