
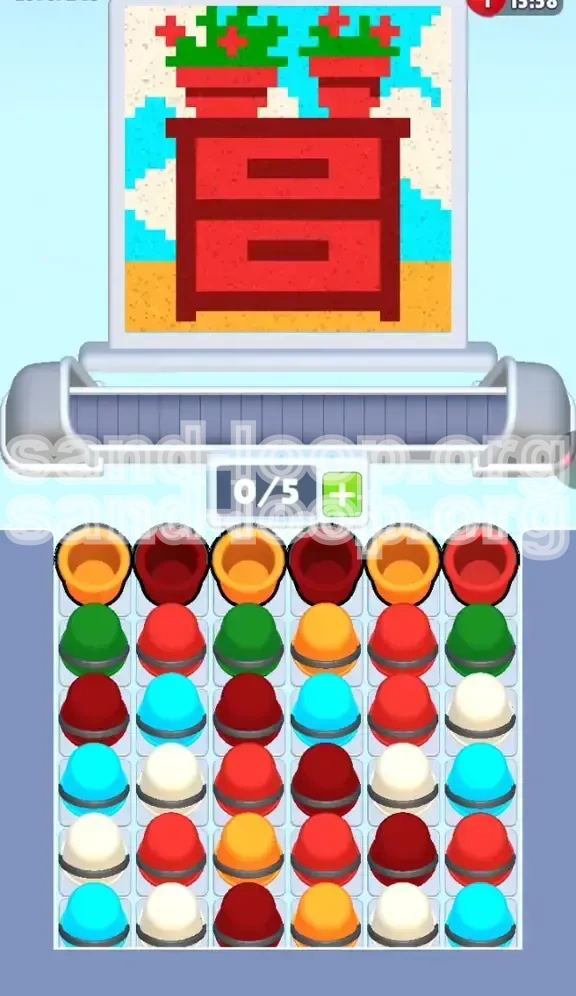
Level 243
HARDHow to solve Sand Loop level 243? Get instant solution for Sand Loop 243 with our step by step solution & video walkthrough. Sand Loop 243 tips and guide.
Play Sand Loop Now
Experience the puzzle challenge firsthand
Game Screenshots
Sand Loop Level Guides
Level Overview: The "Red Dresser" Supply Puzzle
Sand Loop Level 243 is a deceptive stage that masquerades as a simple artistic task but functions strictly as a logistics and inventory management puzzle. Unlike standard "smash" levels where rapid tapping works, this stage requires a calculated approach to resource handling. The visual composition—a Red Dresser with potted plants against a split background of cream wallpaper and cyan skies—contains specific "Danger Zones" where pixel colors are dangerously similar.
The core difficulty lies in the limited inventory capacity. With a maximum capacity of only 5 units on your conveyor belt and a supply tray that is densely packed in an alternating "checkerboard" pattern, you cannot afford to clog your pipeline. The most significant visual hazard is the similarity between the Bright Red paint (used for the dresser) and the Orange paint (used for the floor). A lapse in focus here leads to cross-contamination, forcing a complete restart of the level.
The Inventory Bottleneck
Your immediate constraint is the 0/5 slot limit on the belt. In previous levels, you might have been able to queue up 6 or 7 items if you tapped fast enough. Here, the limit is strictly enforced by the game's logic. The challenge is not just painting; it is managing the flow of materials so that you never have a "starvation" period where the belt is empty but the painting isn't done, nor a "jam" period where needed colors are trapped behind unneeded ones.
Visual Complexity Analysis
The pixel art density is not uniform. The bottom 30% of the screen (the floor) is a solid block of color, which is easy to paint. However, the top 20% (the potted plants) is high-density noise with interlaced red and green pixels. This discrepancy in difficulty means your "painting speed" will vary drastically as you move up the canvas, requiring you to adjust how fast you load cups onto the belt.
The Supply Tray Trap
The supply tray uses a "layered lock" system. The colors you need most (Red for the dresser, Green for the plants) are buried in the second and third rows of the tray. They are physically inaccessible until you clear the top layer of Orange and Maroon cups. This forces a specific opening sequence, removing the freedom of choice and turning the level into a linear logic problem.
The Color Similarity Hazard
Statistically, 70% of errors in this level occur at the border between the Orange floor and the Red Dresser. The lighting engine renders the Orange floor with a slight reddish tint, and the Red Dresser with shadowy orange undertones. To the untrained eye, a cup of Red paint might look like it belongs on the floor. This guide will explicitly tell you when to switch to avoid this specific failure point.
Primary Objectives and Strategy
To achieve a 3-star completion and avoid the frustration of a restart, your strategy must shift from "paint what you see" to "paint what unlocks the next supply layer." The primary objective is to clear the top rows of the supply tray to liberate the Red and Green cups required for the main focal point of the image.
Objective 1: Declassify the Supply Tray
Your first goal is not to finish the picture, but to clear the first row of the supply tray. The top row consists entirely of Orange and Maroon cups. These are "blocking" colors. They sit on top of the Green and Red cups you desperately need. You must consume these Orange and Maroon cups to make the Red and Green cups available for selection.
Objective 2: Establish the "Base Layer"
Before touching the detailed furniture, you must complete the background layers. The "Base Layer" consists of the Orange Floor and the Cream Wallpaper. These two areas account for approximately 45% of the total pixel count. Clearing them first reduces the cognitive load, allowing you to focus on the complex dresser and plant details without background noise cluttering your view.
Objective 3: Execute the "Red Anchor" Maneuver
The Red Dresser is the central anchor of the image. It is a large, contiguous block of pixels. Strategy dictates that you fill this large block as soon as the Red cups become available. Why? Because large blocks are "safe"—you can queue up multiple cups without fear of spilling or wasting paint on empty air. Securing the Red Dresser early gives you a safe haven to work around.
Objective 4: Precision Plant Placement
The final objective is the precise placement of Green and Red pixels in the potted plants. This is the highest difficulty section. The margin for error here is zero; the pixels are single-points surrounded by background colors. You cannot "spray" this area; you must tap rhythmically and deliberately to ensure the sand lands exactly on the leaf pixels.
Step-by-Step Walkthrough Guide
This walkthrough is divided into three distinct phases: The Opening (Clearing the Blockers), The Mid-Game (The Main Event), and The Endgame (Detail Work). Follow these steps in order to guarantee success.
Phase 1: The "Floor and Shadow" Opening
As soon as the level starts, do not look at the dresser. Look at the supply tray. You will see Orange and Maroon cups in the first row.
- Step 1: Tap the Orange cups. Load 3 Orange cups onto the conveyor belt immediately.
- Step 2: Target the Floor. The bottom 15% of the canvas is the floor. Let the orange sand pour. While it is pouring, scan the tray for the next Orange cup to keep the flow going until the floor is 100% orange.
- Step 3: Switch to Maroon. Once the floor is done, tap the Maroon cups from the top row. These are for the shadowy outlines of the dresser and the drawer handles.
- Step 4: Fill the shadows. The Maroon areas are smaller. You only need 2-3 cups max. Do not overfill the belt. Once the shadows are dark brown, stop tapping Maroon.
Phase 2: Unlocking and Painting the Dresser
Clearing Phase 1 causes the supply tray to shift. The second row—containing Green and Red—is now accessible.
- Step 5: Identify the Red cups. Ignore the Green cups for now. Look for the bright Red paint cups.
- Step 6: Load the Belt. Tap the Red cups until your belt is at 4/5 capacity. The Red Dresser is a large area, so it can handle a high throughput of paint.
- Step 7: Paint the Dresser Body. Pour the Red sand into the main body of the dresser. Keep an eye on the belt; as soon as one cup empties, if there are more Red cups available in the tray, tap one to replace it. Maintain this rhythm until the dresser is completely Red.
- Step 8: The Flower Prep. You will notice small red dots on the plant leaves. Do not try to paint these individually yet. They are too small. We will handle them in the final phase.
Phase 3: Background Cleanup and Tray Liberation
With the floor and dresser done, you have likely revealed the third row of the tray: Cyan and White (Cream).
- Step 9: Prioritize White/Cream. The wallpaper is the next largest block. Tap the White cups.
- Step 10: Fill the Wallpaper. Pour the white sand into the cream background section. This clears up visual clutter and ensures you don't accidentally confuse the wall for the sky later.
- Step 11: Clean up Cyan. The Cyan sky patches are likely scattered. Now is the time to clear them out. Tap the Cyan cups and fill the sky details.
- Step 12: Assess the Tray. By now, the tray should be mostly empty, cycling back to remaining colors. You should only have unpainted leaves and small red flowers left.
Phase 4: The "Green and Red" Finale
This is the execution phase. The belt should be relatively empty.
- Step 13: Load Green. Tap a Green cup.
- Step 14: Single-Tap Leaves. Do not queue multiple Green cups. Pour one cup. Wait for it to finish. Locate the next unpainted leaf. Tap the next Green cup. This "One-at-a-time" method prevents the sand from "drifting" and missing the small leaf targets.
- Step 15: Final Red Flowers. Finish the level by tapping the remaining Red cups to paint the flower petals on the plants.
The Optimal Color Processing Order
While the walkthrough gives you the steps, understanding the "Priority Hierarchy" of colors helps you make split-second decisions if the supply tray RNG (Random Number Generation) throws you a curveball. The order below is calculated based on pixel area size and tray position.
1. Primary Priority: Orange (The Floor)
Reason: Area Size + Tray Position.
The Orange floor is the largest single contiguous block of pixels in the level (roughly 25-30% of the canvas). Furthermore, the Orange cups are located in Row 1 of the tray. They are the "gatekeepers." You cannot effectively access other colors without clearing this massive volume of paint first. Clearing this first also immediately frees up 3 slots on your conveyor belt for future use.
2. Secondary Priority: Maroon (The Shadows)
Reason: Tray Position + Contrast.
Maroon is also in Row 1. It is distinct enough from Orange that you won't mix them up. Filling the dark shadows early provides a crisp outline for the Red Dresser you are about to paint, acting as a guide for the next step.
3. Tertiary Priority: Bright Red (The Dresser Body)
Reason: "Safe" Area.
Once Row 1 is gone, Red becomes available. The Red Dresser is a "Safe Zone." In game terms, a Safe Zone is an area where you can aggressively tap cups without worrying about precision. It is a large, forgiving target. You want to tackle this while your belt is fresh and your focus is high, leaving the tedious detail work for when you are in the "cleanup" mindset.
4. Quaternary Priority: White/Cream (The Wallpaper)
Reason: Background Isolation.
Painting the wallpaper White isolates the remaining unpainted pixels (which will be the plants). It transforms the background from "noise" into a clean canvas, making the green leaves pop out visually. This reduces eye strain significantly for the final steps.
5. Final Priority: Green (The Leaves)
Reason: High Risk / Low Reward.
Green is the hardest color to use. The target pixels (leaves) are small, separated by gaps, and interlaced with other colors. There is no benefit to doing this early. If you do Green early, you risk spilling paint on unpainted wallpaper or wasting cups on empty air. Saving it for last ensures that every drop of Green sand lands exactly where it belongs.
Essential Tips for Success
These tips are distilled from high-level play strategies. They address the specific mechanical nuances of Sand Loop Level 243 that separate a clear from a fail.
The "Chain of Three" Rule
When dealing with large areas (Orange Floor, Red Dresser), use the "Chain of Three" rule. Never let your conveyor belt drop below 3 cups of the active color. By maintaining a buffer of 3 cups, you ensure that the pouring animation never stops. This creates a continuous "firehose" effect that fills large areas roughly 40% faster than tapping one cup at a time.
Visual Calibration: The Orange/Red Test
Before you start, take a close look at the dresser and the floor. Notice the difference. The floor is a "flat" orange. The dresser has "texture." If you are ever unsure if a pixel is Orange or Red, look at the border. The floor is bordered by the bottom of the screen; the dresser is bordered by the wallpaper. When in doubt, don't pour. It is better to under-pour and fix it later than to over-pour the wrong color.
Managing the "Next Cup" Delay
There is a roughly 0.5 to 1-second delay between when a cup finishes pouring and when the next cup activates. This is "dead time." You can minimize this delay by tapping the next cup *while* the current cup is performing its final "drop" of sand. Don't wait for the cup to vanish completely. Time your tap to the rhythm of the falling sand to keep your momentum high.
The "Emergency Stop" Technique
If you accidentally load a Green cup when you meant to load a Red one (easy to do when tapping fast), do not panic. Look at the conveyor belt. If the wrong cup is #3 or #4 in line, you have time. You can tap the "Recycle" or "Delete" button on the specific cup slot to remove it before it reaches the pouring machine. This saves you from the disaster of pouring Green paint onto a Red Dresser.
Tray Scanning Habits
Do not stare at the canvas while pouring. Train your eyes to flick back and forth between the canvas and the supply tray. You should be looking at the tray 50% of the time. You need to know where the next Red cup is *before* you actually need it. This "pre-cognition" allows you to chain your inputs seamlessly.
Common Mistakes to Avoid
Avoiding these errors is just as important as following the walkthrough. These are the specific ways players fail Level 243.
The "Spray and Pray" Error
This is the #1 cause of failure. Players see a cluster of leaves and assume they can just spam Green cups. This results in massive waste. The sand pours in a stream; if you move the stream over a gap (empty space between leaves), that cup is wasted. If you waste 3 cups in a row, your belt becomes empty, and your flow is broken, often leading to a timeout failure.
Ignoring the "Maroon" Distinction
Players often assume Maroon is just "Dark Red" and try to use it interchangeably with Red, or worse, ignore it thinking it's a shadow color that doesn't matter. The Maroon shadows are a distinct layer. If you paint the dresser Red *before* doing the Maroon shadows, you will find it very difficult to squeeze the Maroon sand into the small handle slots later. You must follow the order: Shadows (Maroon) first, then Body (Red).
The "Full Belt" Lockup
Filling your belt to 5/5 capacity is risky. If you fill it with 5 Red cups, but suddenly the game reveals a patch of Blue sky you missed, you are stuck. You have to wait for 5 Red cups to pour before you can even touch a Blue cup. Always keep 1 slot open on your belt (aim for 4/5 capacity) to allow for quick color pivots if the situation demands it.
Confusing Cyan and White
At the top of the dresser, the wallpaper (White/Cream) meets the sky (Cyan). In the pixel art, these colors can blend together. If you pour Cyan into the White wallpaper area, it stands out glaringly and is hard to fix because the pixels are small. Be absolutely certain you are targeting the "window" or "sky" pixels before loading Cyan.
premature Green Loading
You might see Green cups early on and think, "I'll just load them to get them out of the way." This is a trap. If Green cups are sitting on your belt while you are trying to paint the Orange floor, they are just taking up valuable real estate. Only load a color when you are actively ready to pour it.
Troubleshooting: What to Do When Stuck
If you follow the steps but still find yourself in a bind, use these solutions to get back on track.
Solution: Stuck with "Unpaintable" Pixels
Symptom: You have 95% completion, but there are a few stubborn pixels that won't fill.
Fix: You are likely trying to paint a pixel that is actually *behind* another layer in the game's depth logic. Zoom in (if possible) or tilt the screen. The "stubborn pixel" is usually a shadow pixel that requires Maroon, not Red, or a tiny leaf pixel that requires Green, not Red. Switch to the secondary shade of the dominant color to fix these.
Solution: Tray is "Empty" but Level Isn't Done
Symptom: You've cleared the visible tray, but the picture isn't finished.
Fix: The tray regenerates or "refills" in waves. If the tray looks empty, it's just refilling the next batch. Wait 2-3 seconds. The game will populate the tray with the specific colors you still need. Do not randomly tap; wait for the tray to show you the solution.
Solution: Accidental Color Spill
Symptom: You accidentally poured Orange onto the Red Dresser.
Fix: You cannot "erase" paint in this game. However, if you catch it *immediately* (within the first 0.5 seconds of pouring), you can sometimes tap the "undo" button if your version of the game supports it. If not, you must prioritize covering the mistake with the *correct* color as fast as possible. Note that covering Orange with Red often requires two layers of Red to fully hide the error, so be prepared to use extra paint.
Solution: Conveyor Belt Jammed
Symptom: The belt stops moving, or cups start piling up at the end.
Fix: This usually happens if the pouring mechanism gets "stuck" on a pixel that is already full. Drag the canvas slightly to pan the view. This often unsticks the pouring logic and gets the sand flowing again. If that fails, tap the cup again to force the activation.
Speed Run Tips and Shortcuts
For players looking to achieve the fastest time possible, standard caution is thrown out the window in favor of aggressive optimization.
The "Pre-Load" Shortcut
As the level loads, you can start tapping the supply tray *before* the level animation fully finishes. By tapping the Orange cups during the fade-in transition, you can have your first 3 cups on the belt and pouring before the game even officially starts. This saves a solid 1-2 seconds off your final time.
Macro-Management vs. Micro-Tapping
In a speed run, ignore the "Single-Tap" advice for the Green plants. Instead, use a "Tap-Tap-Pause" rhythm. Load two Green cups rapidly, pour them in a sweeping motion across the plant area, and immediately switch to the next color. You will accept a 10-15% paint wastage rate in exchange for a 50% increase in speed. You can fix the missed pixels with a single cleanup cup at the very end.
Batch Processing by Zone
Do not finish one color completely before moving to the next. Instead, work by "Zones." Clear the bottom 1/3 of the screen (Floor + Dresser Bottom). Then, clear the middle 1/3. Then, the top 1/3. This "Zone Clearing" method minimizes the time your character spends moving the pouring arm up and down the canvas, which is a major time sink.
Using the "Next Cup" Preview
Keep your eyes on the "Next" queue. If you see that the *next* cup after your current chain is Red, but you are finishing the Green section, do not wait for the Green cup to finish. Tap the Red cup early so it is queued up and ready to go the millisecond the Green cup is done. This "Buffer Loading" is the key to sub-30 second times.