
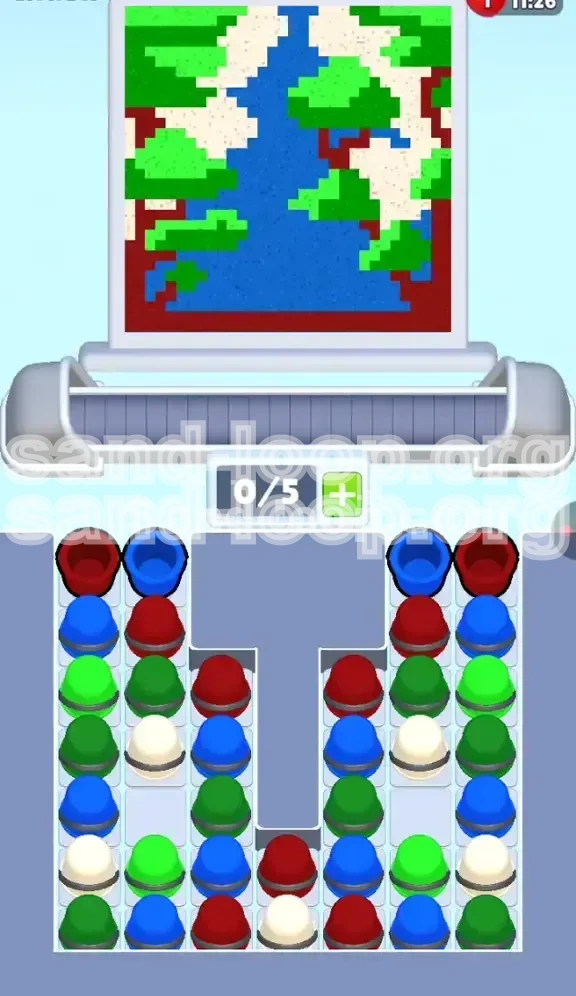
Level 245
HARDHow to solve Sand Loop level 245? Get instant solution for Sand Loop 245 with our step by step solution & video walkthrough. Sand Loop 245 tips and guide.
Play Sand Loop Now
Experience the puzzle challenge firsthand
Game Screenshots
Sand Loop Level Guides
Level 245: The River Valley - Mastering the Landscape
Welcome to the definitive walkthrough for Sand Loop Level 245, widely known as the "River Valley" challenge. This level is a significant shift from the abstract puzzles you may have encountered earlier; it is a test of flow management and color discipline disguised as a landscape painting task. The objective is to render a vibrant scene featuring a blue river cutting through a valley, flanked by sandy banks and red earth borders.
While the visual result is picturesque, the gameplay mechanics are strictly logical. The level introduces a heavy reliance on the "Symmetry Trap"—a board layout that tempts you into mirroring your moves on both sides simultaneously. To succeed, you must abandon the urge for symmetry and adopt a rhythmic, staggered approach. There are no countdown timers or frozen blocks here; the only enemy is a clogged conveyor belt and poor color sequencing.
Core Mechanics Analysis
Unlike standard puzzles where you simply match colors, Level 245 requires you to act as a "river engineer." The central blue stripe must remain unbroken from top to bottom. If you allow other colors to interrupt the flow of the blue sand, you will create visual gaps in the water that are difficult to fix later. The challenge is compounded by the board's verticality, which prioritizes filling the center column before the edges can be completed.
The Capacity Constraints
While you have a generous 5-slot capacity on your conveyor belt, this is actually a psychological trap. Having 5 slots allows you to pick up cups recklessly at the start. However, the supply tray is partitioned by a large T-shaped divider, meaning you cannot simply grab everything in sight. You must leave specific slots open to facilitate the necessary "digging" operations required to reach the buried blue cups.
Understanding the Palette
The canvas is divided into four distinct zones, each demanding a specific pouring rhythm:
- Deep Blue (The River): This is the critical path. It runs vertically down the center. It requires a steady, uninterrupted stream of sand.
- Cream/Beige (The Banks): These sit directly against the river. They are narrow and require precision to avoid "muddying" the blue water.
- Vibrant Green (The Foliage): Located on the outer edges, these are chunky and irregular. They are best filled in bursts rather than a slow stream.
- Dark Red (The Earth): The frame of the picture. These are the lowest priority in the initial phase but crucial for the final 10% of the level.
The Visual Trap
The board is perfectly mirrored left-to-right. New players often tap the left cup and immediately tap the corresponding right cup. This is a mistake. The supply tray is not stacked identically on both sides in terms of accessibility. Tapping symmetrically often leads to a situation where you have two Red cups and two Green cups on the belt, but zero Blue cups available, causing the river to run dry. You must play one side, then the other, or alternate based on availability, not visual position.
Strategic Objectives and Color Priority
To clear Level 245 without getting stuck, you need a rigid hierarchy of operations. The level fails when players prioritize the "easy" colors (Green and Red) over the "critical" colors (Blue and Cream).
Priority 1: The Central Spine (Blue)
Your primary statistic to watch is the "Blue Flow Rate." The blue river acts as the central spine of the painting. If the blue sand stops pouring for more than 2-3 seconds, the layers of cream or green on top of it may harden (figuratively) and block the river's path later. You must ensure there is always at least one Blue cup either on the belt or actively being poured.
Priority 2: The Buffer Zones (Cream)
The cream-colored sandy banks act as a buffer between the water and the land. The danger here is "muddying." If you pour Green sand before the Cream banks are established, the Green will bleed into the river path. Conversely, if you pour Blue before the Cream borders are set, the Blue will spill into the Red earth zones. The Cream layer must be established immediately after the initial Blue flow starts.
Priority 3: The Outer Frame (Green & Red)
Green and Red are "filler" colors in this level. While they make up 40% of the visual image, they are mechanically less dangerous. You can pour Green sand at almost any time as long as it doesn't clog your belt. Red is for the very end. A common mistake is filling the top corners with Green and Red too early, leaving no slots available to dig out the Blue cups buried underneath.
Managing the Conveyor Belt
Think of your 5-slot belt as a currency. You start with 5/5 empty slots. A smart move is to keep 1 slot empty at all times during the first 50% of the level. Why? Because you need space to temporarily store a cup that is "in the way" while you dig for a Blue one. If you go to 5/5 full capacity early, you lose the ability to manipulate the tray and become dependent on the color sensor, which leads to a deadlock.
The Digging Philosophy
This level is 60% pouring and 40% digging. You will frequently encounter a scenario where the only available Blue cup is buried under two Green cups. You must be willing to pick up those Green cups (clogging your belt temporarily) just to get the Blue out. Treat Green cups not as resources, but as "debris" blocking your access to the river water.
Endgame Sequencing
The final 20% of the level (the bottom of the canvas) changes the rules. The river widens, and the Red earth borders converge. Here, the priority shifts to "containment." You must use your remaining Blue and Cream cups to finalize the river delta before sealing the edges with Red. If you run out of Blue here, the level is mathematically impossible to finish.
Step-by-Step Walkthrough: Phase 1 (The Top Third)
The beginning of the level is chaotic. The supply tray is dense, and the canvas is empty. This phase sets the rhythm for the entire game. Your goal is to establish the "Blue Column" while preventing the belt from clogging.
Step 1: The Initial Tap
As the level starts, ignore the Red cups in the top corners. Immediately look for the Blue cups located in the top center of the tray. Tap the Blue cup that is most accessible (usually on the left or right of the central divider). Do not tap both yet. Watch the sand flow. Once the sand stream begins, look for a second Blue cup on the opposite side to create a staggered continuous flow.
Step 2: Establishing the Cream Banks
After the first 5-10 seconds of Blue flow, the river center will be wet, but the banks are dry. Now, look for the Cream/Beige cups. These are usually located just below the initial Blue layer in the tray. Tap one Cream cup. The goal here is to paint the "shoulders" of the river. Do not tap two Creams in a row yet; you need to alternate to keep the flow moving.
Step 3: The First Green Barrier
You will soon hit a "Green Wall"—a row of Green cups blocking access to the lower Blue cups. You must clear this. Tap two Green cups from the left side. This will fill your belt. Immediately switch focus to the center. You need to get the sand pouring from these Green cups to clear the physical space in the tray. While the Green pours, manually scan the tray for the next Blue cup location.
Step 4: Staggered Filling
By now, your belt likely has: Blue, Cream, Green, Green. This is a dangerous mix. You need to manage the order. If the Blue cup is pouring, do not tap a new cup until the Blue is nearly finished. This "micro-pausing" prevents the belt from moving too fast. If you simply spam taps, you will fill the belt with low-priority Greens and lock yourself out of the Blue cups you need for the middle section of the river.
Step 5: Assessing the River
Look at the canvas. Is the blue line solid? Are there gaps? If there are gaps, you must prioritize finding the next Blue cup, even if it means picking up a Red cup and moving it to a temporary slot. Do not worry about the Green trees looking perfect yet. The river must be continuous.
Step 6: Clearing the Top Quadrants
Once the river is flowing past the halfway mark, you can afford to be aggressive with the Green and Red cups on the far left and right edges. These cups are far from the center and won't interrupt your Blue flow. Tap the outer edge cups to clear the top corners of the canvas. This frees up visual space and clears the tray for the more complex middle phase.
Step-by-Step Walkthrough: Phase 2 (The Middle Grind)
This is the hardest part of the level. The easy top cups are gone. You are now fighting the T-shaped divider in the tray. The supply of Blue cups becomes scarce, and the "Pocket Problem" begins.
Step 7: Confronting the T-Shape Divider
The gray T-block in the middle of the tray creates a bottleneck. Cups get trapped under the horizontal bar. To free them, you must clear the cups in the columns immediately adjacent to the T-bar stem. Focus your tapping on the 3rd and 4th columns from the left. Do not touch the far left columns yet. Clearing these inner columns is the only way to drop the trapped cups down to a collectible height.
Step 8: The Pocket Problem
There are likely one or two Blue or Cream cups trapped deep in the "pocket" under the T-bar. You cannot see them well. To get them, you have to perform a "cycle pick-up." This means picking up a nearby cup (even if you don't need it), placing it on the belt to free the physical space, and allowing the trapped cup to slide into the accessible zone. It feels wasteful, but it is necessary.
Step 9: Belt Management Crisis
In this phase, your belt will often be full (5/5). You will have a mix of Green, Red, and Cream. You might be waiting for a Blue cup to become available. If you are stuck, look at the cup currently pouring. If it's Green, and you see a Blue cup become available in the tray but you have no slots, you must make a split-second decision: dump a useful cup (like Cream) to get the Blue, or wait and risk the river drying up. Rule of thumb: Always dump Red or Green to save a slot for Blue.
Step 10: Replenishing the River
The river on the canvas is likely half-painted. The middle section requires a fresh surge of Blue. Once you successfully dig out a Blue cup from the lower tray, tap it immediately. Follow it with a Cream cup to fix any bleed-over from the Green trees you've been painting. The rhythm here is: Blue (Core) -> Cream (Fix) -> Green (Fill).
Step 11: Handling the Earth Borders
As you move down, the Red Earth borders start to intrude into the middle of the canvas. You need to start integrating Red cups into your cycle. However, do not pour Red directly next to the unfinished Blue river. Always ensure there is a buffer of Cream or dry canvas between the Red pour and the Blue river to prevent color contamination.
Step 12: The Mid-Point Clear
Your goal for the end of Phase 2 is to have the top 60% of the canvas completely finished, and the bottom 40% empty. Your tray should be looking relatively empty on the top tiers, with most remaining cups clustered in the bottom center. The belt should have a maximum of 3 cups to give you flexibility for the finale.
Step-by-Step Walkthrough: Phase 3 (The Final Stretch)
The home stretch. The river widens, and the trees give way to the earth. The margin for error is zero. One wrong tap here can leave you with 5% of the level unfinished and no moves left.
Step 13: The River Delta
At the bottom, the blue river often widens into a delta shape. This consumes a large amount of Blue sand. Check your remaining resources. Do you have two Blue cups left? If not, you are in trouble. You must prioritize Blue over everything else now. Stop painting the trees. Stop painting the edges. Focus entirely on getting the remaining Blue sand onto the canvas.
Step 14: The Final Red Frame
Once the river is complete, the canvas will look mostly done except for the jagged red corners at the bottom. These are easy to miss. Now you can spam the remaining Red cups. Since the river and banks are already painted (and "dry"), you can pour Red aggressively without fear of ruining the center of the image.
Step 15: The Gap Filler
There will almost certainly be tiny pixel-level gaps between the Red, Green, and Blue zones. This is where your remaining Cream/Beige cups come in. Cream is the universal filler. If you have a Cream cup left, pour it over any transition zones that look rough. It will blend the Blue and Red edges smoothly.
Step 16: Emergency Unloading
If you are stuck with 98% completion and one stubborn unpixelated spot, check your belt. You might need to manually unload a cup. If you have a cup on the belt that doesn't match the final needed color, you may have to wait for it to pour (wasting sand) to clear the slot. There is no "undo" button, so patience is key.
Step 17: Victory Conditions
The level ends when the bottom red corners are filled and the blue river connects seamlessly to the bottom edge. Do not worry if the top trees look slightly messy—texture is part of the "landscape" style. As long as the central blue spine is unbroken and the borders are contained, the game will register the level as complete.
Advanced Tips and Common Mistakes
Even experienced players fail Level 245 due to specific psychological traps. Understanding *why* you fail is the key to beating it consistently.
The Symmetry Trap
The Mistake: Tapping the Left Cup and then the Right Cup immediately after because they look like a pair.
Why it fails: The supply tray physics are not symmetric. Tapping the right side might shift a column on the left, burying a crucial Blue cup you were aiming for.
The Fix: Play in "L" shapes. Pick a zone (e.g., Top Left), clear it, then move to a different zone (e.g., Bottom Right). This chaotic movement keeps the tray shifting dynamically and prevents cups from getting stuck in uniform rows.
The "Full Belt" Panic
The Mistake: Seeing 4/5 or 5/5 slots full and spamming taps to clear space, resulting in the wrong colors pouring.
The Fix: Embrace the pause. If the belt is full, stop tapping for 2 seconds. Watch the current cup pour. As soon as it finishes, you have a free slot. Use that split second to grab the specific color you need, rather than frantically tapping random cups and making the situation worse.
Ignoring the "Ghost" Blue
The Mistake: Assuming that because you can't see a Blue cup, it isn't there.
The Fix: In Sand Loop, cups slide. Sometimes a Blue cup is hidden *behind* a Green cup in the tray, or it will slide into view once you clear a specific column. Always assume there is a solution; you just haven't shifted the tray correctly yet to reveal it.
Over-Prioritizing the Trees
The Mistake: Spending the first minute making the Green trees look perfect and lush.
Why it fails: Green is abundant. Blue is scarce. If you waste your easy access time on Green, you will run out of moves to dig for the Blue later.
The Fix: The trees can look ugly. They can be patchy. As long as they are roughly the right shape, move on. The river is the only thing that must be perfect.
Speed Run Strategies
For those looking to optimize their time or achieve a high score:
- Pre-Loading: While the very first cup is pouring, you can tap the next cup. Queue up a Blue -> Cream -> Green sequence in your head before you even start tapping.
- Tap Firing: Once you reach the bottom 20% of the level and the Red borders are all that's left, you can "tap fire" (tap rapidly) on the remaining Red cups since there is no more complex logic needed, just filling space.
- Ignore the UI: Don't look at the percentage counter. Look at the canvas. You can "feel" when the level is done by the visual density of the sand faster than the UI can update.
Dealing with Stuck Scenarios
Sometimes, despite your best efforts, you get stuck. The board is 95% full, you have 3 cups on the belt, and none of them match the remaining hole. If the hole is Blue and you have only Red, you might have to restart. However, sometimes the solution is to pour the Red into a *finished* area (which doesn't change the color much) just to cycle the belt and hope the next cup underneath is the one you need. It's a desperate gamble, but it works 10% of the time.