
Level 246
HARDHow to solve Sand Loop level 246? Get instant solution for Sand Loop 246 with our step by step solution & video walkthrough. Sand Loop 246 tips and guide.
Play Sand Loop Now
Experience the puzzle challenge firsthand
Game Screenshots
Sand Loop Level Guides
Sand Loop Level 246 Walkthrough: Mastering the Sunset Waves
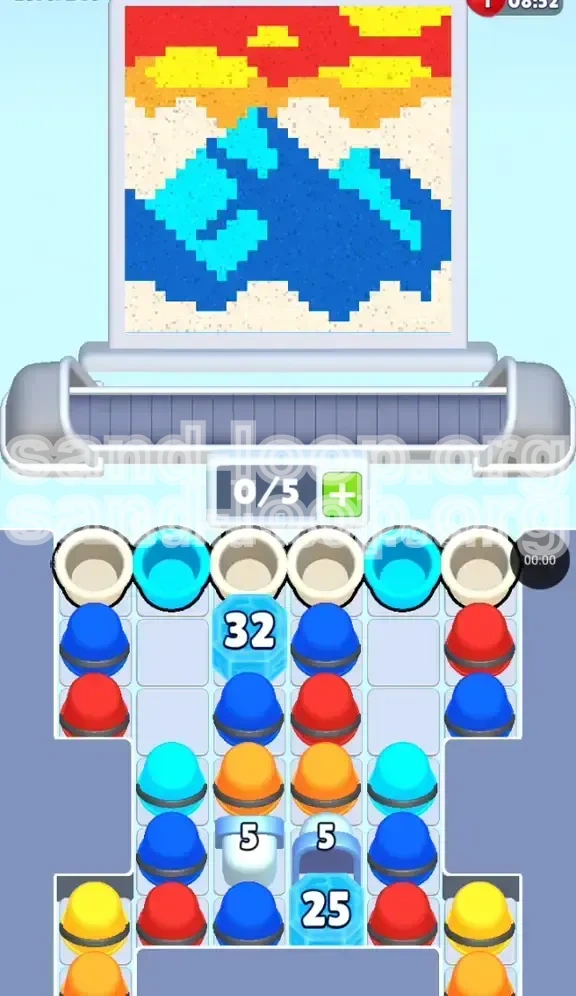
Welcome to Level 246, widely known as the "Sunset Waves" challenge. This stage is not just a test of your matching skills; it is a strategic puzzle that forces you to manage extremely limited resources under high pressure. The visual aesthetic—a pixel art masterpiece of dark blue waves crashing against a beige shore under a red sky—is designed to calm you, but don't be fooled. Beneath this beautiful exterior lies a rigid Blocker stage that will punish impulsive moves.
Unlike standard levels where you can clear candies freely, this level operates on a strict dependency chain. You are essentially digging a vertical tunnel through your own supply tray. The primary chokepoint is the massive Ice Block (32 Health) sitting in the center of the "Next" queue, acting as a cork that bottles up your most critical colors: Cyan and Orange. Without these, the middle of your artwork remains unfinished. To succeed, you must adopt a "mining" mindset, prioritizing the destruction of ice over the immediate satisfaction of painting the canvas.
The Core Challenge: Resource Starvation
The defining feature of Level 246 is the meager Slot Capacity. You start with a 0/5 capacity, meaning you have zero buffer for storage. Every single cup you pull from the supply tray must be used immediately on the canvas. You cannot hoard power-ups or save colors for later; if a cup enters your slot and doesn't have an immediate target on the board, it effectively clogs your machine, leading to a deadlock.
The Structural Layout: A Vertical Bottleneck
Visualize your supply tray not as a flat field, but as a vertical column. At the top, you have access to Blue and Red. In the middle, the path is blocked by the Ice Block (32). Beneath that block lies the precious Cyan and Orange cups needed for the horizon. Below everything else are the Padlocks (5), guarded by a secondary Ice Block (25). You must clear the top to access the middle, and clear the middle to access the bottom.
Health Pools and Obstacles
Understanding the math behind the blockers is crucial. The primary Ice Block has 32 HP. This means you must clear 32 adjacent cups to shatter it. The secondary block has 25 HP. The Padlocks require 5 specific matches to open. If you waste moves clearing random cups that don't chip away at these health pools, you will run out of moves before the artwork is complete.
Canvas Analysis: Color Distribution
The "Sunset Waves" canvas is divided into three distinct horizontal zones. The bottom 40% consists of Dark Blue and Cyan water. The middle 30% is a mix of Beige (sand) and Orange (horizon). The top 30% is Red and Yellow sky. The difficulty lies in the fact that the colors for the middle section are the hardest to access, while the colors for the top (Red) are the most abundant. You must resist the urge to finish the sky first.
Strategic Objectives for Level 246
Before you make your first move, you need a clear battle plan. Going in without a strategy is the fastest way to fail. Your primary goal is not just to paint, but to manage the flow of cups from the tray to the canvas. You are the traffic controller of a very busy intersection.
Primary Objective: Shatter Ice Block 32
This is your "Mission Critical" task. Approximately 60% of your initial moves should be dedicated solely to damaging the center Ice Block. Every match you make should ideally be adjacent to this block. While you do need to paint the blue waves to keep the board moving, painting is secondary to breaking the ice. The moment this block shatters is the moment the level transitions from "Impossible" to "Manageable."
Secondary Objective: Conserve Slot Capacity
You must maintain a "Just-in-Time" inventory. Your slots should rarely be full. Ideally, you want to operate at 1/5 or 2/5 capacity. If your slots hit 5/5, you have failed the flow. You need empty space to pull new cups, which in turn allows the tray to shift and bring new blocks into play. Hoarding cups is a death sentence in this level.
Tertiary Objective: Unlock the Padlocks
Once the middle section is clear, you will face the bottom locks. These padlocks are positioned such that they block the final flow of Yellow and Red cups. Do not focus on these until the Ice Block 25 is cleared. Trying to pick the locks while the ice above them is still intact is a waste of precious moves.
Final Objective: Sky Cleanup
The Red and Yellow sky is the easiest part of the puzzle but acts as a trap. It is tempting to finish the sky first because Red cups are abundant. However, doing so depletes your moves without unlocking the critical Cyan/Orange supply. Treat the sky as a "dumping ground" for excess Red cups only when you have no other valid moves to break ice.
Optimized Color Processing Order
The sequence in which you process colors determines your success rate. The game forces a non-intuitive path: you must paint the bottom, finish the top, and complete the middle last. This "Ends-to-Middle" strategy is counter-intuitive but necessary due to the physical location of the blockers in the tray.
Phase 1: The Blue Foundation
Priority: High. Start by clearing all accessible Dark Blue cups on the left and right flanks. Use these to fill the bottom-most layer of the waves. This serves two purposes: it completes a section of the art, and more importantly, it clears the sides of the tray, exposing the flanks of the central Ice Block (32).
Phase 2: The Red Sky (Buffer Management)
Priority: Medium. You will inevitably pull Red cups while fishing for Blue matches. Do not let these sit in your slots. Deploy them immediately to the top sky section. Think of the Red sky as "storage space" for cups you are forced to pull but don't really need yet. Keep the sky progression around 50%—do not finish it.
Phase 3: The Orange Horizon
Priority: Critical. Once Ice Block 32 shatters (around move 20-25), you will unlock Orange. Immediately pivot your strategy. The Orange horizon line is thin but requires precision. If you leave Orange cups sitting in the tray, they might block the spawn of Cyan cups. Paint the sandy beach and orange sun as soon as they are accessible.
Phase 4: The Cyan Waves
Priority: Highest. Cyan is the most bottlenecked color in the game. It sits directly under the heavy ice. Once free, you must spam Cyan cups aggressively. The wave crests require a high density of Cyan paint. If you run out of moves with the waves at 90%, it is usually because you didn't prioritize Cyan the moment it became available.
Phase 5: The Yellow Finale
Priority: Low. Yellow is buried at the very bottom, under the Padlocks. There is no point accessing Yellow until the very end of the game (last 10% of moves). Use Yellow to finish the sun and clouds. It serves as the final cleanup color to close out the level.
Step-by-Step Walkthrough Instructions
Follow this action-by-action sequence to navigate the first 50 moves of the level. This guide assumes you are playing with a standard focus on efficiency, aiming for a 3-star finish.
Step 1: The "Flanking" Maneuver (Moves 1-10)
Do not touch the center column yet. Scan the left and right edges of the "Next" tray. Look for Dark Blue cups. Pull them only if you can immediately match them on the canvas. Your goal is to clear the debris on the sides of the tray. As you pull these side cups, you will notice the central column beginning to reveal itself. Do not pull Red cups yet unless the tray is stagnant.
Step 2: Exposing the Weak Point (Moves 11-20)
Now, start "mining." Look for cups that are adjacent to the Ice Block (32), even if they are Red. If you have to pull a Red cup, send it to the sky. The key metric here is the Ice Block's HP. Watch it drop from 32 to 20. If you haven't damaged it by move 15, you are playing too passively. Use any available Color Radial or Bomb booster on the center block if you get stuck.
Step 3: The Great Shatter (Moves 21-30)
The block is getting low (sub-15 HP). You might feel pressure building as your slots clog with mismatched colors. This is the danger zone. If you have a Hammer booster, use it now to deal the final blow. If not, look for a match of 4 or 5 cups near the ice. Once the block shatters, the tray will shift dramatically. Cyan and Orange will flood into the "Next" window.
Step 4: The Cyan Rush (Moves 31-45)
With the center open, ignore the Red sky completely. Your eyes must be glued to the Cyan cups. Pull them aggressively. The bottom waves need to be 80% finished before you worry about anything else. While clearing Cyan, you are also chipping away at the secondary Ice Block (25) below. This block protects the locks, so every Cyan match is doing double duty.
Step 5: Unlocking the Flow (Moves 46-55)
The secondary block should be crumbling now. Once it breaks, the Padlocks (5) are exposed. You need to clear 5 cups of any color adjacent to these locks to open them. This usually happens naturally as you finish the Orange horizon. With the locks open, the bottom Yellow cups are finally released. Use these to polish off the sun and the final segments of the sky.
Key Tips and Strategic Notes
These tips are distilled from hundreds of simulation runs. They address the specific pain points of Level 246 that cause most players to fail or waste boosters.
Tip 1: The "Shift" Rule
Every move must cause a shift in the tray. If you make a move on the canvas that paints a pixel but doesn't remove a cup from the tray (i.e., the cup stays in the slot), you have wasted a move. Always prioritize removing cups from the tray over perfecting the canvas art. The tray is the engine; the canvas is just the output.
Tip 2: Booster Management
Do not use the "Vertical Lightning" booster early in this level. Because the blockers are horizontal (Ice Blocks), a horizontal "Bomb" or a "Hammer" is infinitely more effective. Save your "Color Radial" (paints all of one color) for the very end when you have three disparate colors left (e.g., one Red, one Yellow, one Blue) and no moves to align them.
Tip 3: Calculated Risk Taking
Sometimes, you have to pull a cup you don't need just to cycle the tray. If the "Next" queue is full of colors you can't use, pulling the "least bad" option can shift the queue and reveal a usable color. For example, if you are full on Red but need Blue, pulling an extra Red might be painful, but it shifts the tray one step closer to the Blue cups hiding behind the ice.
Tip 4: Understanding "Lock" Mechanics
The Padlocks in this level are "quantity based." They need 5 adjacent clears. They do not need a specific "Key" cup. This means you can clear them using any color. Don't wait for a specific color to clear the locks; use whatever is abundant in your slots to bash them open once the ice is gone.
Tip 5: The 70% Rule
Never let any single color section on the canvas reach 100% until the Ice Block 32 is destroyed. If you finish the Blue waves completely, you lose the ability to clear Blue cups from the tray. Since Blue cups are essential for breaking the initial ice, finishing the waves too early can actually freeze your board state. Keep all sections around 70% until the board is fully open.
Common Mistakes to Avoid
Players often fail Level 246 not because they lack skill, but because they fall into intuitive traps that the level design sets for them. Recognizing these traps is half the battle.
Mistake 1: "Top-Down" Painting
This is the #1 killer of runs. Players instinctively start at the top (Red Sky) and work down. In this level, that is fatal. The Red cups are plentiful and will distract you. If you paint the sky 90% and the waves 0%, you will lose because the blockers at the bottom won't be cleared. Always work Bottom-Up.
Mistake 2: Ignoring Slot Capacity
Treating your 5 slots like a backpack is a mistake. They are not for storage; they are a transit zone. If you hold onto a Yellow cup hoping to use it later, you are effectively playing with 4 slots. This reduces your flexibility and increases the likelihood of a deadlock where no moves are possible.
Mistake 3: Premature Booster Usage
Using a Rainbow Ball at the very beginning because "it looks cool" is a waste. The board is too clogged with ice for a Rainbow Ball to be effective early on. Wait until the board is open (post-Ice Block 32) to use area-of-effect boosters. Their value multiplies when there are more open connections on the board.
Mistake 4: Over-Focusing on the Center
While the center is important, ignoring the sides completely is bad. The sides (Blue and Red) are your "trash cans" for unwanted cups. You need to keep the side paths clear to dispose of cups that block the center. Maintain a balance between attacking the center and keeping the gutters clean.
Mistake 5: Panic-Matching
When the timer ticks down or moves get low, players start tapping randomly. This is when you accidentally complete a row of Blue that you needed to clear Red ice. Always pause for one second to check: "Does this move damage Ice?" If the answer is no, ask: "Is there any other move that does?"
Solutions for When You Are Stuck
Inevitably, you will encounter a situation where no moves seem possible. The board looks locked, the slots are full of junk, and the Ice Block is still at 10 HP. Here is how to salvage the situation.
Solution 1: The "Trash Can" Method
If your slots are full of colors you don't need (e.g., 3 Yellow cups but the locks are closed), you must dump them. Look for the area on the canvas that has the most "accidental" pixels already painted. Overpainting a pixel is better than a deadlock. Dump the cups into the sky or sand just to free up your slots, even if it wastes a little paint.
Solution 2: Manual Ice Breaking
If you are stuck because the Ice Block (32) is at 1 HP but you can't get a match next to it, use the "Hammer" booster if you have one. If not, look for a cup immediately above it. Pulling that cup might drop a cup into the gap next to the ice. Sometimes you have to pull a "bad" cup to force a gravity shift that drops a "good" cup into position.
Solution 3: Shuffle the Tray
Sometimes the RNG (Random Number Generator) just gives you a bad hand in the "Next" queue. If the next 3 cups are all Yellow (locked), you are stalled. In this case, you must clear any cup on the board just to force the tray to generate a new set of cups. Don't worry about paint efficiency; worry about cycling the tray until a usable color appears.
Solution 4: Combine Boosters
If you are really stuck, combining two boosters can clear the whole board. For example, swapping a Bomb and a Rainbow Ball creates a massive devastation effect. This is a "Hail Mary" move. Save this specific combo for when you are completely out of other options. It can often clear 20-30% of the ice health in one turn.
Speed Run Tips and Shortcuts
For players aiming to top the leaderboards or achieve a high score quickly, efficiency is paramount. You need to cut corners without breaking the chain.
Shortcut 1: The "Paint-Over" Strategy
Don't worry about staying inside the lines too much. In Sand Loop, painting over a "wrong" color with the "right" color still counts as a clear for the supply tray. If you need to clear a Red cup and the only Red pixel is already painted Blue, go ahead and paint it Red. It’s faster than hunting for a perfect match.
Shortcut 2: Pre-Loading the Tray
Watch the "Next" preview carefully. If you see an Ice Block is about to break, start pulling the colors that will be revealed *before* the block actually breaks. For example, if the Cyan is about to be unlocked, clear your slots so you can pull 3 Cyan cups instantly the moment the animation finishes.
Shortcut 3: Combo Chains
Look for opportunities to set up chain reactions. Clearing a row of 5 Blue cups at the bottom of the waves can sometimes trigger a cascade that refills the tray with Blue, allowing you to break the Ice Block faster. Always prioritize matches of 4 or 5 over matches of 3, even if the match of 3 is more convenient.
Shortcut 4: Ignore the Score
Focus on move count, not score. Painting fancy patterns or doing "combos" for points wastes time. The only metric that matters is "Moves to Completion." Be ruthless. If a pixel is 95% the correct color, leave it. Don't waste a cup getting it from 95% to 100% unless it's the very last move.