
Level 259
HARDHow to solve Sand Loop level 259? Get instant solution for Sand Loop 259 with our step by step solution & video walkthrough. Sand Loop 259 tips and guide.
Play Sand Loop Now
Experience the puzzle challenge firsthand
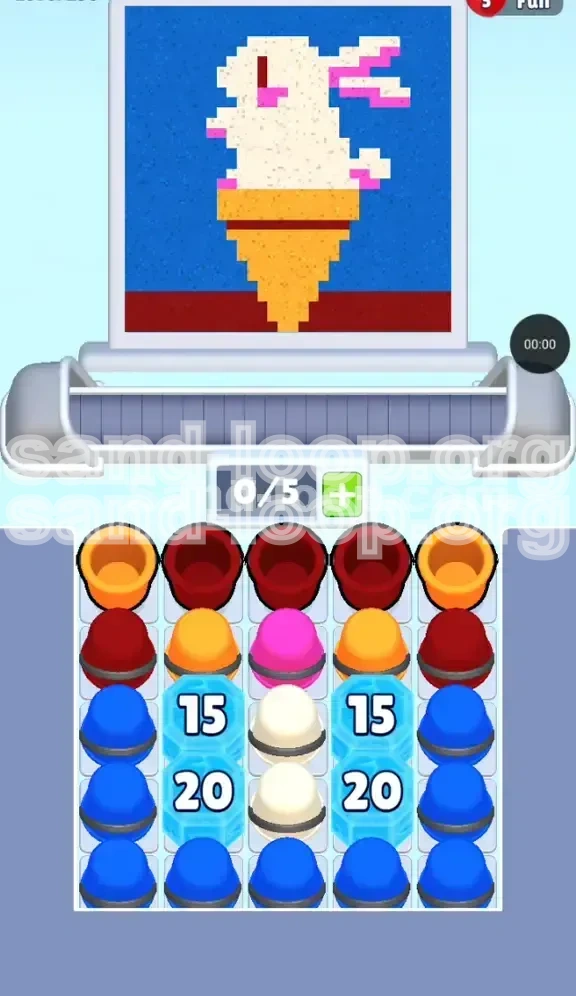
Game Screenshots
Sand Loop Level Guides
Sand Loop Level 259 Walkthrough: Mastering the Ice Cream Bunny Challenge
Level Overview: The Ice Wall Bottleneck
Sand Loop Level 259 is deceptively complex. While the target image—a cute bunny sitting in an ice cream cone—seems simple, the level is designed to test your resource management skills. This is not just a painting stage; it is an inventory management puzzle. The core difficulty lies in the "Ice Walls," two massive columns of ice blocks (with 15 HP and 20 HP) that block access to roughly 50% of your color supply.
The primary challenge you will face is the "Vertical Segregation." The supply tray is divided into three narrow chimneys. The left and right chimneys are packed with Blue (Sky) and Dark Red (Ground), while the center chimney contains the critical White (Bunny) and Pink (Details) cups. If you do not manage your conveyor belt slots perfectly, you will jam the belt with unusable colors while the paint nozzle waits for the specific color needed next.
Primary Objectives for Success
To conquer Level 259, you must balance three conflicting goals: clearing the canvas, breaking the ice walls, and preventing a belt jam. Your priorities are:
- Break the Ice Walls Fast: The 15 HP and 20 HP blocks in the center columns are your biggest obstacle. You must chip these down by clearing adjacent cups to free up the White and Pink supply trapped behind them.
- Maintain Belt Flow: With only 5 slots available on your conveyor belt, you cannot afford to hoard colors. You must adopt a "Use it or Lose it" strategy to prevent the belt from locking up.
- Target the Bunny: The White and Pink pixels are the most difficult to paint because they are locked behind the ice. Prioritizing these over the easy Blue background is essential.
Visualizing the Battlefield: Color Zones and Ice Placement
The Cone Zone (Orange & Yellow)
The bottom third of your painting consists of the ice cream cone. This area uses Orange and Yellow colors.
- Supply Location: The Orange cups are located in the top corners, while the Yellow cups are stacked in the second row, often blocked by the initial Ice setup.
- Strategy: This is your "safe zone." When your belt is full or you are waiting for Ice to break, work on the Cone to keep the conveyor moving without wasting critical colors.
The Sky and Ground (Blue & Dark Red)
The background and the floor of the image represent the largest volume of paint required.
- Supply Location: Dark Red is in the top row corners. Blue is heavily concentrated in the bottom rows but is initially blocked by the Ice Walls.
- Strategy: Do not flood your belt with Blue cups early. The paint nozzle paints from the bottom up. If you fill the belt with Blue before the Cone and Bunny are done, you will block the machine from accepting the specific colors needed for the foreground details.
The Bunny Zone (White & Pink)
This is the critical path. The Bunny is the central figure, comprising the White body and Pink ears/cheeks.
- Supply Location: These are trapped in the Center Column behind the Ice Walls. Pink is a rare single cup in the "Next" row; White is a large stack underneath it.
- Strategy: This is the "Danger Zone." You cannot access these until you break the Ice. If you run out of accessible paint while the belt is full of Blue, you will fail.
The Obstacles: 15 HP and 20 HP Ice Blocks
The Ice Blocks are not just walls; they are a countdown timer. You deal damage to them by clearing cups adjacent to their sides.
- Left Ice Wall: Blocks the Left Blue supply and part of the Center White supply.
- Right Ice Wall: Blocks the Right Blue supply and the rest of the Center supply.
- Math Check: Since adjacent clears deal 1 damage, you need approximately 15-20 successful matches to fully open the level. This emphasizes why you must constantly tap available columns, even if the color isn't immediately needed for the canvas.
Step-by-Step Walkthrough: From Start to Finish
Phase 1: The "Top-Down" Opener
At the very start of the level, do not touch the Blue cups at the bottom. They are blocked by ice and will only jam your belt.
- Action 1: Immediately tap the Dark Red cups in the top corners. This paints the ground strip at the bottom of the canvas and clears space in the tray.
- Action 2: Tap the Orange cups on the far left and right edges of the top row. This starts the cone rim.
- Why? Clearing the top row is the only way to expose the "Next" row, which contains the critical Pink cup and the tops of the Ice Blocks. You cannot deal damage to the Ice until the row above them is gone.
Phase 2: The "Pink Pin" Maneuver
Once the top row is cleared, a single Pink cup will appear in the center of the second row. This is a bottleneck.
- Action: As soon as you have an open slot on the belt, tap the Pink cup.
- Note: Even if the canvas isn't ready for the Pink pixels (cheeks/ears), get this cup on the belt. It is physically blocking the White cups behind it.
- Result: Moving the Pink cup allows the massive stack of White cups to slide forward. You need these White cups on the belt to start damaging the Ice Blocks from the center column.
Phase 3: Grinding the Ice (The Mid-Game)
This is the hardest part. Your belt will likely be full (5/5). The goal is to chip the Ice HP down.
- The Pattern: Alternate tapping between the Left Column (Blue/Dark Red) and the Center Column (White).
- The Risk: If you only tap Blue, the belt fills with Sky color that the nozzle can't paint yet (because it's painting the Cone/Bunny first).
- The Solution: Tap White cups aggressively. Even if the belt moves slowly, getting White cups to the nozzle paints the Bunny body, which is usually the next priority after the ground.
- Target: Focus on the 15 HP blocks first. Once the top ice shatters, the "chimney" effect is broken, and supplies from the left and right can merge into the center, making flow management much easier.
Phase 4: The Flood Zone (End Game)
Once the 15 HP and 20 HP blocks are shattered, the bottom half of the tray turns into a massive ocean of Blue cups.
- Action: Now you can spam-tap the Blue cups.
- Verification: Before you switch to full-speed tapping, ensure the Bunny's face and the Cone are fully painted. Check for any stray pixels.
- Finish: With the details done, flood the belt with Blue to complete the Sky background and finish the level.
Color Order Strategy: Prioritizing the Palette
Priority Tier 1: Dark Red & Orange (The Foundation)
These colors are your "dump" colors. They are accessible immediately and are required for the bottom of the image.
- Dark Red: Use this to clear the top row and paint the floor. It has low utility later in the level, so clear it early.
- Orange: Essential for the cone. It is plentiful but gets buried if you don't clear the top row fast.
Priority Tier 2: White (The Critical Path)
White is the key to the level. It is needed for the Bunny, but it is also your primary weapon against the Ice Blocks because it sits in the center column.
- Rule of Thumb: Always prefer tapping a White cup over a Blue cup, even if the canvas looks like it needs Blue. The White cup helps you access the rest of the level.
Priority Tier 3: Pink (The Bottleneck)
There is very little Pink in this level, but it is crucial.
- Timing: You only need a few Pink pixels. Treat it as a "Key" that unlocks the White supply rather than a primary paint color.
Priority Tier 4: Blue (The Background)
Blue is the trap. There is too much of it, and it arrives too early.
- Strategy: Ignore Blue until the Ice is broken. Only tap Blue when you absolutely need to clear a jam in the belt or to deal damage to the side Ice columns if White is unavailable.
Pro Tips: Mastering the Mechanics
Managing the 5-Slot Belt Economy
The conveyor belt is your most limiting factor. You can only hold 5 cups.
- The "Jam" Scenario: If you have 4 Blue cups and 1 White cup on the belt, and the nozzle needs White, but the White cup is at the back of the line, you are stuck. You cannot paint until the 4 Blue cups clear.
- Prevention: Don't let one color dominate the belt. If you see too much Blue, stop tapping the Blue columns and wait for the nozzle to catch up, or tap the Center (White) to mix the queue.
Ice Breaking Physics
Understanding how Ice breaks helps you plan your taps.
- AoE Damage: Clearing a cup adjacent to Ice deals 1 damage. Clearing a cup that touches *two* Ice blocks (corner piece) can damage both.
- Gravity: When Ice breaks, the cups above it fall down. This can suddenly change which cups are available to tap. Be ready to adjust your tapping pattern instantly when the 15 HP block shatters.
The "Next Row" Preview
Always look at the "Next" row indicator at the top of the screen.
- Peeking: If you see a Pink cup coming up in the Next row, make sure you have a slot open on your belt *before* it lands. If the belt is full, the Pink cup might block the spawn of a critical White cup behind it.
Combining Colors
While Sand Loop mechanics usually require exact color matches, understanding color layering helps.
- Layering: Paint the background (Sky/Blue) last. If you paint the Blue first, you might accidentally cover the edges of the White Bunny with Blue if your aim is slightly off (or if the game's hitboxes are generous). Always paint foreground objects (Bunny/Cone) before background objects (Sky).
Troubleshooting & Speed Run Guide
Common Mistakes to Avoid
Most players fail Level 259 because of impatience.
- Mistake 1: The Blue Flood. Tapping the bottom Blue rows immediately. This jams the belt with 5 Blue cups. The nozzle needs Dark Red for the floor, but it's blocked by Blue. You lose valuable time waiting for the Blue to clear.
- Mistake 2: Ignoring the Top Row. Leaving the corners untouched. The top row must be cleared to access the Ice blocks. If you ignore the corners, you can't damage the Ice, and you stall completely.
- Mistake 3: Premature Pink. Trying to save the Pink cup for perfect detail placement. In this level, Pink is a blocker. Move it as soon as possible.
What to Do When Stuck
If the game feels like it has stopped moving:
- Check the Nozzle: What color is the paint gun currently requesting? If it's asking for White but your belt is full of Blue, you messed up the queue. You have to wait for the Blue to pass.
- Check the Ice: If the Center Column isn't moving, the Ice is likely still intact. Look for any tapable cup adjacent to the Ice, even if it's a "useless" color, just to deal damage.
- Reset Strategy: If you are more than 60 seconds in and the Ice isn't broken, restart. You won't recover the lost time.
Speed Run Strategy (Under 60 Seconds)
To get a 3-star score or complete the level quickly, you need an aggressive tapping rhythm.
- 0-10 Seconds: Clear the top row (Dark Red/Orange) rapidly. Do not think, just tap the corners.
- 10-30 Seconds: The "Grind." Alternate tapping Left-Right-Left-Right to chip the ice. Don't wait for the perfect color. Use the "Useless" taps to break the walls. Your goal is to shatter the 15 HP block before the 30-second mark.
- 30-60 Seconds: Once the center opens up, tap the White/Pink mass furiously to finish the Bunny. Then, swipe the entire Blue bottom section to finish the sky in one final motion.
Advanced Shortcut: The "Side-Balance" Method
For expert players, there is a rhythm to breaking the 20 HP block faster.
- The Trick: Instead of tapping one side until it clears, tap the Left Column once, then the Right Column once, then the Center. This alternating pressure ensures that the belt never gets clogged with a single color type and keeps the damage flow consistent on both Ice Walls.