
Level 264
EXPERTHow to solve Sand Loop level 264? Get instant solution for Sand Loop 264 with our step by step solution & video walkthrough. Sand Loop 264 tips and guide.
Play Sand Loop Now
Experience the puzzle challenge firsthand
Game Screenshots
Sand Loop Level Guides
Sand Loop Level 264: The Sailboat Strategy Walkthrough
Introduction to the Red Sailboat Challenge
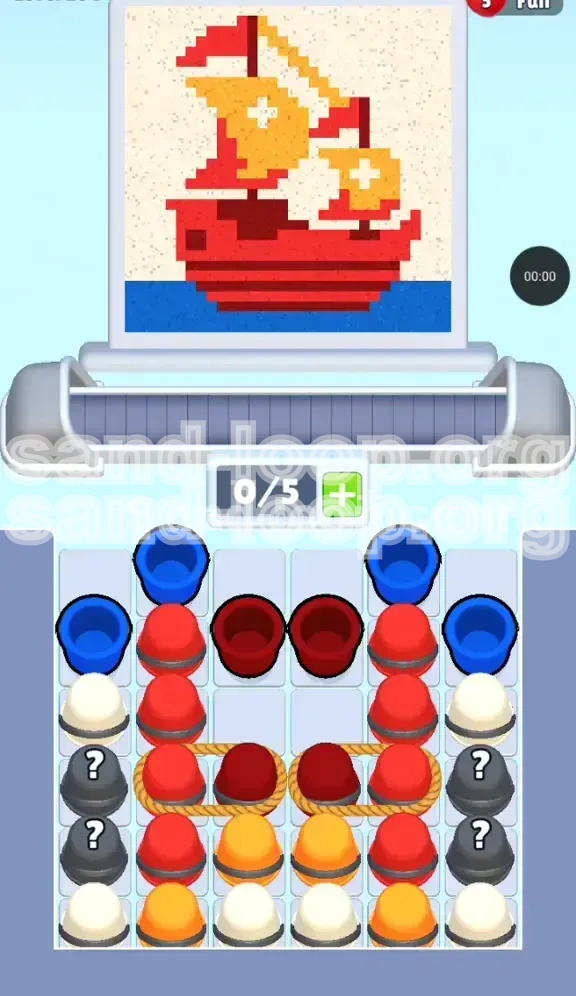
Welcome to the advanced logic puzzle of Sand Loop, Level 264. This stage is visually deceptive; while it presents a vibrant image of a sailboat on the open ocean, the underlying mechanics are a strict exercise in resource management and inventory control. Unlike previous levels where you might rely on quick reflexes, Level 264 demands a calculated, chess-like approach. The primary obstacle here is the "Slot Crisis"—you have a very limited number of available slots on your conveyor belt compared to the density of the color supply tray.
The Visual Canvas Breakdown
Before you touch a single cup, you must understand the pixel art you are trying to construct. The image is divided into four distinct color zones, each requiring a different pouring strategy:
- The Deep Blue Zone (Bottom 15%): This represents the ocean. It is a solid block with no internal details, making it the easiest section to fill but often the hardest to access due to tray positioning.
- The Bright Red Hull (Center 40%): This is the largest color block. It consumes the majority of your red resources. The challenge here is maintaining a steady flow without spilling into adjacent zones.
- The Golden Sails (Upper 30%): A large area requiring precision. The sails are not solid gold; they contain negative space (white crosses) that must be preserved.
- The Sky and Details (Remaining 15%): The background is a soft beige/white, requiring careful filler work to avoid obscuring the ship's details.
Core Mechanics: Ropes and Mystery Blocks
This level introduces two specific mechanics designed to bottleneck your progress: Rope Constraints and Mystery Blocks.
- Rope Constraints: In the central tray, you will notice Red and Dark Red cups tied together with a rope icon. This indicates a "Dependency Link." You cannot pour the tied cup until the cup physically on top of it or adjacent to it (blocking its removal) has been cleared. This forces you to play the level in a specific linear order, rather than picking your favorite color.
- Mystery Blocks (Gray ??): These are wildcards. Located on the flanks of the tray, they block access to lower rows. They typically yield the color you currently need most, but occasionally act as "trap" colors that you have limited inventory space for. They must be cleared to free up movement in the tray.
Level Objectives and Clear Conditions
Primary Goal: Complete the Sailboat Art
Your main objective is to fill the canvas with 100% accuracy. The "Pass" threshold is usually around 95-98%, but given the complex color overlaps (especially the red maroon shading), leaving a single pixel unpainted can result in a failed run. You must ensure the Bright Red hull dominates the center, bordered correctly by the Dark Red shading, and topped by the Golden Sails without bleeding into the white sky.
Secondary Goal: Inventory Management
To succeed, you must maintain a "Low Inventory" state. You have a maximum of 5 slots on your belt. If you allow 4 slots to fill up with random colors, you will create a deadlock where you cannot pick up the specific color required to unlock the next row of cups. Keeping 2 slots open at all times is the golden rule for this level.
The "Rope" Unlock Objective
A critical mini-objective is severing the Rope Constraint. This is achieved by clearing the specific cups "protecting" the tied nodes. Until the rope snaps (visualized by the rope icon vanishing), the middle section of your color supply is inaccessible. Failing to prioritize this leads to a softlock where you have no moves left.
Efficiency Metric: The "Waste" Factor
Unlike other levels where you can pour freely, here you must minimize waste. If you over-pour the Blue water and let it spill into the White Sky zone, you will not have enough White/Beige resources to fix the error later. Every drop of sand must land in its designated pixel bin.
Beat the Clock
While not a timed "speed run" level in the traditional sense, there is a timer. The logic puzzles can take time to solve. If you spend more than 10 seconds staring at the tray deciding what to move, you are likely to run out of time before the pixel art is finished. Quick decision-making is part of the challenge.
Step-by-Step Walkthrough: The Logic Chain
Phase 1: The Top-Row Clear (Moves 1-10)
Focus: Creating space in the tray.
Do not start with the big Red Hull. Start with the top corners. You will see Blue and White cups in the highest tier.
- Identify the Anchor Cups: Look for the Blue cups tucked in the corners. These are blocking the cups underneath them.
- Activate the Blue Dispenser: If the dispenser is currently cycling Blue, immediately tap the top Blue cups. Send them to the belt.
- Pour Strategy: Fill the bottom of the canvas (the water) first. Even though it's visually at the bottom, getting the Blue out of your inventory early frees up crucial slots.
- The White Cup Trap: If the dispenser is NOT white, do not tap the White cups yet. Sending a White cup to the belt when the dispenser is Red will just clog your slots. Wait for the cycle.
Phase 2: Untying the Rope Knot (Moves 11-25)
Focus: Unlocking the central Red/Dark Red supply.
Once the top layer is gone, you will see the "Roped" section. The game will prevent you from clicking the tied Red cups.
- Locate the "Key" Cup: There is usually one Bright Red cup sitting above the rope that is free. Tap this cup first.
- Pouring the Hull: Pour this Red into the large hull section of the boat. Do not fill it to 100% yet; leave room for shading.
- Triggering the Snap: As you pour the available Red cups, the game physics will trigger a "slide," causing the tied cups to shift. Once the rope icon fades, the Dark Red (Maroon) cups become accessible.
- Immediate Action: As soon as the rope breaks, check your belt. Do you have space for Dark Red? If yes, tap them immediately. If no, you must waste a turn pouring something else to make space.
Phase 3: The Mystery Block Reveal (Moves 26-40)
Focus: Dealing with randomness.
With the center cleared, the side columns (which were blocked by Mystery Blocks) are now your focus.
- Tap the Gray Blocks: The "Question Mark" cups on the left and right flanks should be tapped now.
- Analyze the Result: 70% of the time, these reveal White (for the sky/crosses) or Yellow (for sails). 30% of the time, they reveal a color you don't need (like extra Blue).
- Damage Control: If they reveal a color you don't need, you must "burn" it by pouring it into a sacrificial area of the canvas (like a corner of the ocean) just to get it off your belt. Never let an unwanted color sit on your belt; it reduces your capacity to 4/5.
Phase 4: The Sails and Crosses (Moves 41-60)
Focus: Precision detailing.
This is the hardest part. You need to pour Yellow for the sails but leave the White crosses empty.
- Batch the Yellow: Load your belt with 2-3 Yellow cups.
- Tap-Pour-Stop: Pour Yellow into the sail area. Stop before it touches the white cross bars. This requires you to release the tap button slightly early.
- The Cross Fill: Switch to White cups. Pour them specifically into the cross shapes you just saved.
- Gap Filling: Once the crosses are safe, you can dump the remaining Yellow to fill the rest of the sail body, pushing right up against the white borders.
Phase 5: The Final Flush (Endgame)
Focus: Cleaning up the tray.
- Assess the Tray: By now, the tray should be mostly empty. Look for any remaining "straggler" cups.
- Background Fill: Use any remaining White or Beige cups to fill the top 15% of the sky.
- Final Check: Ensure the Dark Red shading inside the hull is distinct from the Bright Red. If the colors blended, use the "Undo" button if available, or restart the level, as you cannot separate blended sand.
Color Processing Order Strategy
Priority Tier 1: The "Gatekeepers" (Blue and White)
Why first? Because they are at the top of the tray layout. You cannot reach the Red or Yellow cups buried underneath without removing the Blue and White cups clogging the "chute." Processing these first is a mechanical necessity, not just an artistic choice. By clearing the top row, you allow the gravity mechanics to slide the lower rows into playability.
Priority Tier 2: The "Dominant Mass" (Bright Red)
Why second? Volume. The Red Hull accounts for nearly 40% of the pixels. If you leave this until the end, you will be frantically trying to manage a full belt of Red cups while also trying to handle the delicate White details of the sky. Clearing the Red "mass" reduces the total number of cups on the screen, making the board less chaotic and easier to read.
Priority Tier 3: The "Shadows" (Dark Red/Maroon)
Why third? Detail dependency. The Dark Red shading is located inside the Bright Red hull. If you pour Dark Red first, and then cover it with Bright Red, you lose the shadow effect. The Bright Red must establish the boundary, and then the Dark Red is applied like an interior accent. This order preserves the visual depth of the 3D ship model.
Priority Tier 4: The "Accents" (Golden Yellow)
Why fourth? Precision risk. Yellow is the most dangerous color because it borders White (Crosses) and Blue (Water potentially). If you pour Yellow too early, you risk overfilling and bleeding into the sky. You want to pour Yellow when your belt is relatively empty so you can micro-manage the flow and stop immediately when the sail is full.
Priority Tier 5: The "Background" (Sky/Beige)
Why last? Filler. The background is the "negative space" of the image. It is forgiving. If you have a few stray pixels of Red or Yellow that landed outside the lines, the Beige/White background sand can often cover up those mistakes. Saving the background fill for last allows you to "erase" minor errors made during the frantic filling of the ship and sails.
The "Slot Equation" Logic
The order is also dictated by the math of the 5-slot belt.
- Scenario A (Bad): You pick up Red, then Yellow, then Blue. You have 3 colors on the belt. The dispenser cycles to Red. You pour Red. Now you are stuck with Yellow and Blue waiting for a dispenser cycle that might take 10 seconds. In that time, your tray is locked.
- Scenario B (Good): You identify that the dispenser is Red. You pick up only Red cups (up to 3 slots). You pour them all rapidly. The dispenser stays or cycles to the next needed color. You keep the belt moving. This is why color batching—processing one color at a time as much as possible—is superior to random picking.
Pro Tips, Common Mistakes, and Troubleshooting
Common Mistake: The "Slot Lock"
The number one reason players fail Level 264 is the Slot Lock. This happens when you fill all 5 slots on your conveyor belt with colors that are not currently active on the dispenser.
Example: Your belt has [Red, Red, Yellow, Mystery, Mystery]. The dispenser turns Blue. You have no Blue. You cannot pick up the Blue cup in the tray because your belt is full. You are stuck waiting for the dispenser to cycle back to Red or Yellow, wasting precious seconds.
Fix: Never let your belt exceed 4/5 slots unless the 5th cup is the color currently being dispensed. Always keep an "Emergency Slot" open.
Common Mistake: Ignoring the Rope Logic
Players often see the Rope and think it's just a visual texture. They try to tap the tied cup repeatedly. This does nothing.
Fix: The rope is a logic gate. Look at the cup above the rope. That cup is the lock. You must pour the cup above to trigger the physics release. If the cup above is White and the dispenser is Red, you are stuck. This is why checking the dispenser color before clearing the top layer is vital.
Key Tip: Pre-loading the Belt
Advanced players use a technique called "Pre-loading." If you know the dispenser is about to switch to Red (based on the cycle pattern shown in the UI), you can tap Red cups onto your belt before the dispenser actually turns Red. This way, the millisecond the dispenser switches, you can start pouring without the delay of tapping the cup. This saves seconds, which is crucial for the 3-star rating.
Stuck Solution: The "Mystery" Gamble
If you are completely stuck and cannot make a move—meaning no cup on the tray matches the dispenser color, and your belt is full—you must take a gamble.
The Fix: You must deliberately "waste" a cup. Pick a cup on your belt that is least useful (e.g., a Blue cup when the water is already 90% full). Pour it into a safe area to remove it from your belt. This opens a slot, allowing you to pick up a new color from the tray, hopefully breaking the deadlock.
Speed Run Tip: Two-Hand Tapping
Level 264 requires rapid inputs. Use two fingers (or thumb and index finger). Keep your left thumb hovering over the "Undo" button (if available/enabled) and your right index finger tapping the cups. This allows you to instantly correct a mis-pour. If you accidentally tap a Mystery block that turns into a color you don't want, hit Undo immediately. That split-second reaction saves the run.
Speed Run Tip: Ignore Perfection (Initially)
For a speed run, do not try to get the White Crosses perfect on the first pass. Pour the Yellow broadly to cover the sail area, filling 90% of it. Then, come back with White and "cut out" the crosses. It is mathematically faster to overfill and correct than to underfill and micro-tap.