
Level 265
HARDHow to solve Sand Loop level 265? Get instant solution for Sand Loop 265 with our step by step solution & video walkthrough. Sand Loop 265 tips and guide.
Play Sand Loop Now
Experience the puzzle challenge firsthand
Game Screenshots
Sand Loop Level Guides
Level Overview: The Blue Dragon Endurance Test
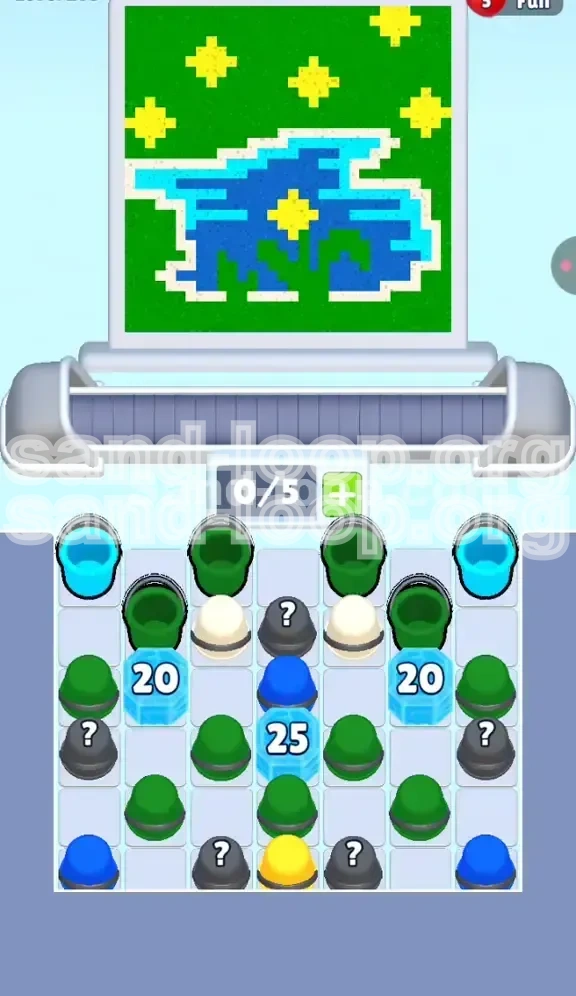
Welcome to the definitive walkthrough for Sand Loop Level 265. This stage represents a significant shift in pace from the previous logic puzzles, transforming into a test of endurance and inventory management. You are presented with a pixel art masterpiece featuring a Blue Dragon Head set against a lush green field, dotted with bright yellow stars. While the art is vibrant, the gameplay is grueling. This level is classified as a "Capacity Management" challenge. Your primary adversary here is not the complexity of the logic, but the physical limitations of your conveyor belt.
The Core Concept: Capacity Management
Unlike standard stages where you can load up your belt, Level 265 restricts you to a maximum of 5 active slots on your conveyor loop. This limitation is the defining factor of the entire level. Every space on that belt is a valuable resource that must be utilized efficiently. If you treat this like a standard level and tap cups indiscriminately, you will hit a "Soft Lock" state where your belt is full of unusable colors, preventing you from picking up the cups you actually need.
The Visual Layout
The pixel art is divided into distinct color zones that dictate your workflow. Approximately 60% of the canvas is dedicated to the Green Background. The Blue Dragon Head and its Cyan mane occupy the central 30%. The remaining 10% consists of the White Outline and the Yellow Stars. Understanding these percentages is crucial; you will be handling Green cups three times as often as Blue ones. The layout forces you to maintain a rhythm that prioritizes the background fill while waiting for the specific windows to paint the dragon.
The Obstacles: The HP Walls
Scattered across the board are three massive Ice Blocks that function as HP walls. You have two side blocks with 20 HP each and a central behemoth with 25 HP. These numbers are not just for show; they represent the number of color matches required to break them. A total of 65 actions are needed just to clear the board. This creates a "grind" mechanic where speed is essential. You cannot be passive here; you must aggressively cycle cups to reduce these counters to zero.
The Difficulty Spike
This level is rated as high difficulty due to the "Jamming" mechanic. The most common failure state isn't running out of moves, but rather running out of belt space. When the dispenser switches colors rapidly, having a belt full of the previous color creates a bottleneck. If you have 3 Green cups on the belt when the dispenser switches to Blue, you have only 2 slots to work with for the dragon, which is often insufficient to maintain the flow required to break the center ice block.
Victory Conditions
To claim victory, you must break all three Ice Blocks to access the lower tier of the supply tray, paint the intricate Blue Dragon without over-spilling, and place the final Yellow Stars. The level ends only when the pixel art is 100% complete and no cups remain on the board. Efficiency is the key to unlocking the "25" block that guards the finish line.
Clear Objectives: Your Roadmap to Success
Before you make your first tap, you need a clear plan. Level 265 is a marathon, not a sprint. Your objectives change dynamically as the ice blocks shatter. We have broken these down into four distinct phases to help you track your progress.
Phase 1: The Green Grind (Ice Breaking)
Your immediate goal is to reduce the HP of the side ice blocks from 20 to 0. During this phase, your painting accuracy is secondary to your cycling speed. You need to generate "actions" or "pours" to chip away at the ice. Focus entirely on the Dark Green cups. Treat the Dragon as an afterthought for now. If you see a Green cup, tap it. Every successful pour of Green brings you closer to cracking the side defenses and revealing the inner tray.
Phase 2: The Border Control (White Line Management)
Once the side blocks shatter, White cups will become available. Your objective here is precision. You must paint the White Outline that separates the dragon from the background without wasting these rare cups on the green field. This phase requires you to ignore the automatic urge to fill the background and instead focus on the thin white lines. Failing this objective usually results in messy edges that are hard to fix later.
Phase 3: The Center Assault (Breaking the 25 HP Block)
The middle of the board is guarded by a 25 HP block that cuts off the bottom of the screen. Your objective is to generate pure speed. This is the most dangerous part of the level. You must cycle cups fast enough to keep up with the dispenser, but slow enough to avoid jamming your belt. The goal is to shatter this block to unlock the bottom apex of the tray, where the critical Yellow cup resides.
Phase 4: The Dragon & The Stars (Final Polish)
With the board fully open, your final objective is detail work. You must alternate between Dark Blue and Cyan to finish the dragon's head. Finally, you must execute a "Yellow Burst" to paint the stars. This phase tests your patience, as you must often wait for the dispenser to cycle around to Yellow again. Rushing this phase is the leading cause of defeat in the final 10% of the level.
Step-by-Step Instructions: The Complete Walkthrough
Follow this exact sequence of actions to navigate the chaos of Level 265. We have broken this down into actionable steps you can perform in real-time.
Step 1: The Setup - Analyzing the Tray
As the level loads, immediately look at the top row of the supply tray. You will see Dark Green cups in the center slots and Cyan cups on the edges. Do not touch the Mystery Cups (the grey ones with question marks) yet. They are traps that will fill your belt with useless colors. Your first move is dictated by the dispenser: if it shows Green, tap the Green cups. If it shows Cyan, tap the Cyan cups. Never start with a Mystery Cup.
Step 2: Cycling for the Side Walls
Start tapping the Dark Green cups. As they pour onto the canvas, watch the counters on the left and right Ice Blocks. Every time a cup is successfully used, the counter drops. Keep a rhythm of "Tap, Pour, Tap." Do not let the belt sit empty. You want a constant stream of Green flowing. If the dispenser switches to Cyan, immediately switch to tapping the Cyan cups at the top corners to work on the dragon's mane, but revert to Green the second it switches back.
Step 3: Managing the Mystery Cups
About 20% of the way through the level, you will be tempted to tap the Mystery Cups. Only tap them if the dispenser is currently showing the color hidden inside. For example, if the dispenser is showing Blue, and you tap a Mystery Cup that reveals Blue, it's safe. However, if the dispenser is Green and the Mystery Cup reveals White, that White cup will sit on your belt taking up space. This is how you lose. Keep 2 slots empty at all times to absorb these random reveals.
Step 4: Breaking the First Ice Layer
Continue the cycle until the "20" counters on the side blocks hit zero. When they shatter, the screen will flash, and new cups will be revealed in the tray. You will now see White cups and more Dark Green. Immediately prioritize the White cups. The dispenser will likely flick to White for a brief moment. You must be ready to tap the White cups now to paint the dragon's border. If you miss this window, the White cups will clog your belt during the Green phase.
Step 5: The Mid-Game Dragon Paint
With the sides open, you have access to the main body of the dragon. The dispenser will now cycle between Green (background), Blue (dragon body), and Cyan (mane). You must be precise. Do not pour Blue on the Green background. Use the Blue cups only when the cursor highlights the dragon's face. Use the Cyan cups only for the mane. If you pour incorrectly, you waste a cup slot and a pour action, delaying the breaking of the center block.
Step 6: The Center "25" Breaker
This is the grind. The center block has 25 HP. Focus purely on volume. If the dispenser is Green, tap every Green cup you see. If it's Blue, tap every Blue cup. Speed is your only weapon here. The faster you pour, the faster the counter drops. Don't worry about perfect pixel placement; worry about cycling the belt. Keep the conveyor moving. You are racing against the space limit on your belt.
Step 7: Unlocking the Bottom (The Yellow Cup)
The moment the center "25" block breaks, the bottom of the tray opens. You will see a single Yellow cup at the very bottom apex. Do not tap it yet! This is the most critical moment. Look at the dispenser. Is it Yellow? If no, ignore that cup. If the dispenser is Blue and you tap the Yellow cup, that Yellow cup will load onto your belt and sit there, useless, for the entire cycle. Wait for the dispenser to turn Yellow, then tap the bottom cup furiously.
Step 8: The Final Clean-Up
With the Yellow cup active and the board open, finish the remaining details. Use the Yellow cup to paint the stars. Use any remaining Blue/Cyan cups to finish the dragon's face. Use any remaining Green to patch the background. The level will complete automatically as you finish the final pixels.
Color Order Strategy: The Logic of the Loop
The dispenser in Level 265 follows a specific economic logic. Understanding the "Color Economy" is the secret to beating the belt limit.
The Dominant Green (High Volume, Low Value)
Green makes up approximately 60% of the background. It is the "filler" currency of this level. The dispenser will spit out Green more often than any other color. You should treat Green as your default action. When in doubt, tap Green. It is always safe to pour Green on the background, and it generates the actions needed to break ice. Don't fear Green; embrace it as your tool for progress.
The Dragon Duo (Blue & Cyan)
These are your "High Value" colors. They appear less frequently but are essential for the main objective. The trick is the distinction between Dark Blue (Body) and Cyan (Mane/Highlights). The game will try to trick you into pouring Cyan into the Dark Blue slots. Always check the target pixel color on the canvas before pouring. If you pour Cyan into a Dark Blue slot, you don't just fail the pixel; you waste a turn, which allows the ice counters to stabilize.
The Rare Whites (Critical Precision)
White is the "Key" color. It appears rarely and usually in short bursts. The moment the dispenser switches to White, you must drop everything else to paint the outline. If you are busy cycling Green cups and miss the White window, the White cups will stack up on your belt. Since White is only needed for the thin outline, having 3 White cups on your belt effectively reduces your capacity from 5 to 2, making the level nearly impossible.
The End-Game Yellow (The Final Key)
Yellow is the "Zone Lock" color. It is physically locked behind the center Ice Block until the very end. However, the dispenser might cycle to Yellow even before the block is broken. You must ignore Yellow when it appears on the dispenser if the block is still intact. There is nowhere to put the paint. Attempting to use Yellow early will result in wasted taps and a jammed belt full of yellow cups you can't use yet.
Key Tips & Common Mistakes
To ensure your victory, we have compiled a list of critical tips and the common pitfalls that plague players in this level.
Key Tip: The "2-Slot" Safety Rule
Never fill your belt to 5/5 if you can avoid it. Try to keep at least 2 slots open (3/5 capacity). Why? Because the dispenser can change colors instantly. If you are at 5/5 with Green, and the dispenser switches to White, you have no room to pick up the White cups. You are forced to watch the White dispenser cycle pass by while you wait for your Green cups to clear. Keeping 2 slots open gives you the buffer you need to react to color switches.
Key Tip: Mystery Cup Gambling
The Mystery Cups are a gamble. If you are lucky, they give you the color you need. If you are unlucky, they give you a color you don't need (like Yellow when you need Green). A good rule of thumb is to only tap Mystery Cups if your belt is relatively empty. If your belt is half-full, the risk of a "bad color" clogging your machine is too high. Only gamble when you have the space to absorb a bad roll.
Common Mistake: The "Yellow Tap" Error
This is the #1 way players lose at the 90% mark. As soon as the center block breaks, players see the Yellow Cup at the bottom and tap it immediately. But the dispenser is often still on Blue or Green from breaking the block. That Yellow cup enters the belt and loops around and around, doing nothing, while the dispenser cycles through colors. By the time the dispenser actually hits Yellow, your belt is jammed. Wait for the dispenser color to match the cup before tapping.
Common Mistake: Ignoring the White Outline
Many players focus so hard on the Dragon and the Background that they ignore the thin White line separating them. This line is crucial for the "Complete" status. If you leave the White Outline for the very last second, you might find the dispenser refuses to give you White again, forcing you to waste 20+ moves cycling through other colors just to get one White cup. Paint the White lines as soon as the side blocks break.
Stuck Solutions & Speed Run Tips
Are you stuck on a specific part, or looking to optimize your time? This section covers troubleshooting and advanced techniques.
Solution: Belt Jammed at 5/5?
If your belt is completely full and the dispenser is showing a color you don't have, you are in a "Soft Lock." Do not panic. Look at your active cups on the belt. Is there *any* place on the canvas that color can go? Even if it's not the "perfect" spot, can you pour it to free up a slot? If yes, pour it immediately. If no, your only option is to wait for the cups to cycle through the dispenser area. Pray that a Mystery Cup reveals a usable color, or wait for the canvas to accept a color you currently have. This highlights the importance of never filling your belt to 100% in the first place.
Solution: Dispenser Won't Give Me Blue
Sometimes, the dispenser gets stuck on a "Green Loop" or "Cyan Loop" and refuses to give you the Dark Blue you need for the dragon's face. This is usually because there are no valid Dark Blue pixels currently highlighted by the game's auto-targeting system. Manually tap the Dark Blue part of the Dragon's face on the screen (the artwork itself) to force the game to acknowledge that area needs paint. This often forces the dispenser to switch to the required color.
Speed Run Tip: Pre-Loading
Advanced players can "Pre-Load" their belt. If you know the dispenser is about to switch from Green to Blue (based on the pattern), try to time your taps so your belt is emptying just as the switch happens. If you have 5 Green cups on the belt when the switch happens, you lose precious seconds clearing them. Try to have only 1 or 2 cups riding the belt during transition zones to minimize the lag between color changes.
Speed Run Tip: The "Star" Finish
Don't paint the stars one by one as you get Yellow paint. Wait until you have broken all blocks and the board is fully open. Then, wait for the dispenser to hit Yellow. Once it does, tap the bottom Yellow cup and paint all stars in a single, rapid burst. This is much faster than painting one star, waiting for the dispenser to cycle back to Yellow, and painting the next one.