
Level 267
EXPERTHow to solve Sand Loop level 267? Get instant solution for Sand Loop 267 with our step by step solution & video walkthrough. Sand Loop 267 tips and guide.
Play Sand Loop Now
Experience the puzzle challenge firsthand
Game Screenshots
Sand Loop Level Guides
Level Overview: The Moonlit Sky Challenge
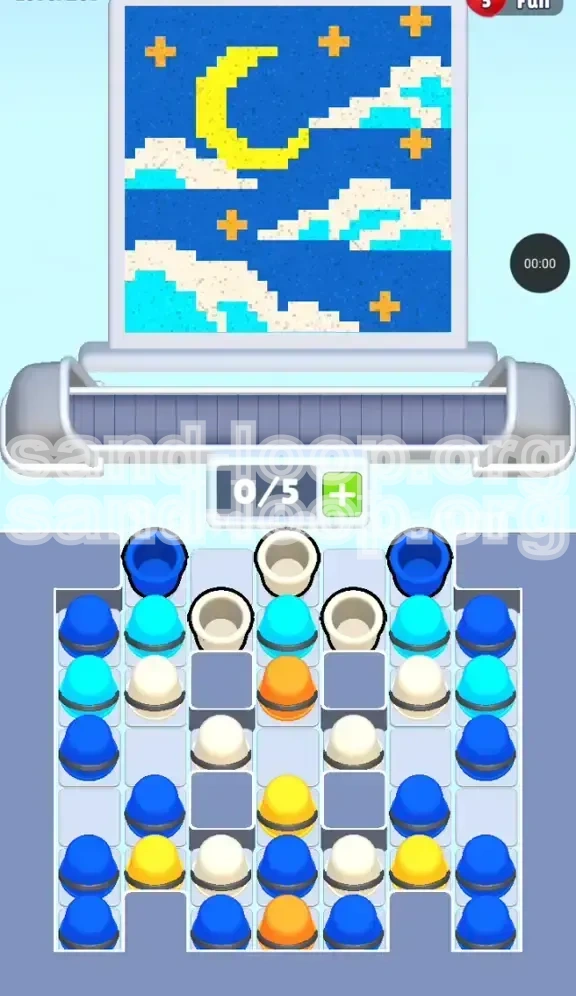
Welcome to the walkthrough for Level 267, known as the "Starry Night" challenge. Unlike the high-speed ice races you may have encountered earlier, this level is a test of inventory management and patience. The objective is to paint a serene night scene: a vast dark blue sky, pixelated white and cyan clouds, a bright yellow crescent moon, and scattered orange stars.
The primary difficulty in this stage lies in the verticality of the sand tray. The colors you need for the smallest, most intricate details—the Orange Stars and the Yellow Moon—are buried deep beneath layers of "Cloud" colors (White and Cyan) and "Sky" colors (Dark Blue). With only 5 available slots on your conveyor belt, letting the wrong colors stack up will cause a bottleneck, forcing a restart. This guide focuses on surgical extraction rather than frantic tapping.
Level Statistics and Metrics
- Stage Type: Digging / Puzzle (Not a Speed Run)
- Canvas Dominance: ~55% Dark Blue, ~25% Clouds (White/Cyan), ~15% Yellow Moon, ~5% Orange Stars.
- Difficulty Spike: High (Inventory Management)
- Constraint: 5-Slot Conveyor Belt Limit
Visual Breakdown of the Canvas
- The Background: A deep Dark Blue that covers the majority of the area. It is forgiving but time-consuming.
- The Moon: A large, solid Yellow crescent shape located centrally. It requires a continuous pour.
- The Clouds: Pixelated patterns using White and Cyan. These act as the primary obstacles blocking your path to the good colors.
- The Stars: Small, cross-shaped Orange dots scattered widely. These are the "danger zones" for running out of sand.
Core Mechanic: The Buried Supply
The critical mechanic here is the "Buried Core." The game puts the colors you need least (Sky Blue) on top and the colors you need most (Orange and Yellow) at the very bottom of the tray piles. If you simply tap cups from top to bottom randomly, you will fill your belt with useable cups that cannot be poured yet because the canvas isn't ready for them, blocking you from digging further.
Why This Level Fails Most Players
Most failures occur because players tap the White and Cyan cups too early. Since the clouds only cover about 25% of the image, but the trays are stacked with 70% White and Cyan, you will end up with a full belt of cloud colors while the Orange cups remain trapped under the stack, unable to enter the conveyor. This guide prevents that by strictly ordering your taps.
Clear Objectives: Your Mission Goals
To conquer Level 267, you need to shift your mindset from "painting" to "excavating." You are an engineer trying to clear a landslide to get to the supplies below. Here is exactly what you need to achieve to clear the stage.
Objective 1: Establish the Sky Foundation
Your first goal is to create physical space in the sand trays. The Dark Blue cups are abundant and usually located on the far left and right edges. By processing these first, you safely reduce the total number of cups on the screen without risking a belt overflow. You need to clear the "wings" of the tray to let the inner columns shift and settle.
Objective 2: Surgical Cloud Removal
You must remove the White and Cyan cups sitting on top of the inner columns. However, you cannot remove them all at once. If you process all clouds before the moon is ready, you waste belt slots. The objective is to remove just enough cloud cups to expose the Yellow cups underneath, while keeping a small reserve of cloud sand to actually paint the clouds later.
Objective 3: Expose the Center Core
The center of the tray contains the most critical item: The Orange Cup. It is buried under a White cup in the exact middle column. Your objective is to clear that specific White cup immediately to free the Orange sand. The Orange stars are scattered and take a long time to paint, so this sand needs to be on the belt and traveling to the nozzle as early as possible.
Objective 4: The Moon and Stars Finale
Once the heavy lifting is done, you must finish the level by painting the Yellow Moon (which is a large, quick fill) and the Orange Stars (which are a slow, tedious fill). The challenge here is ensuring you have cleared enough belt space to accept the Yellow cups when they finally arrive at the top of the stack.
Objective 5: Conveyor Belt Management
Maintain a strict "3-Cup Rule." Never let more than 3 active cups sit on the conveyor belt waiting to be poured. Always leave 2 empty slots for "digging." This ensures that when you tap a buried cup, it has a place to slide into. If 5 cups are waiting, physics jams, and you lose.
Step-by-Step Walkthrough: The Execution Phase
This section provides the actionable, chronological steps to beat the level. Follow this order precisely to avoid getting stuck.
Phase 1: The "Wing" Clipping (Start Here)
As soon as the level starts, do not touch the center columns. Look at the far left and far right of the sand tray.
- Action: Tap the top Dark Blue cups on the extreme edges (Columns 1 and 7).
- Why: These are safe taps. The sky is huge, so you can't "over-pour" blue.
- Tip: Tap 2 Blue cups, then stop. Wait for the nozzle to finish pouring. This clears physical space in the tray.
- Result: The outer stacks lower, and the inner columns (holding the good stuff) become more accessible.
Phase 2: The Center Strike (Unlocking Orange)
Immediately after clearing the initial Blues, look at the dead center of the tray (Column 4).
- Action: Identify the top cup in the center stack. It is likely White or Cyan. Tap it.
- Target: Your goal is to expose the Orange Cup hiding 2nd or 3rd from the top in this specific stack.
- Warning: Do not tap the Orange cup yet if your belt is full. Just expose it so it is ready.
- Priority: High. The Orange stars are the hardest part of the level. Getting this sand flowing early is key.
Phase 3: The Balanced Strip (Mining for Yellow)
Now you need to reach the Yellow cups buried in the inner-left and inner-right columns (Columns 3 and 5).
- Action: Tap the top Cyan and White cups on these inner columns.
- Strategy: Alternate taps. Tap one Cyan, then one White.
- Reasoning: The clouds are made of both colors. If you clear all Whites and leave Cyans, you will paint half-clouds and have useless sand clogging the belt later.
- Goal: You are stripping the roof off the inner columns to reach the Yellow cups at the bottom.
Phase 4: Activating the Stars (The Orange Pour)
Once the Orange cup is exposed and the belt has some room:
- Action: Tap the Orange Cup.
- Behavior: The nozzle will likely jump between tiny star pixels. This takes a long time.
- Multi-tasking: While the Orange sand is slowly pouring the stars, do not stop digging. Use this downtime to tap more Dark Blue or White cups to clear the tray stacks.
Phase 5: The Moon Reveal
By the time the stars are 50% done, you should have stripped enough layers to see the Yellow Cups.
- Action: Tap the Yellow Cups (usually found in the 3rd and 5th columns, deep down).
- Execution: The moon is large and contiguous. It will fill up very fast compared to the stars.
- Follow-up: Immediately after tapping Yellow, look for remaining Dark Blue cups to finish the empty corners of the sky.
Color Order and Processing Strategy
Understanding the priority of colors is vital. Not all colors are equal in this level. Here is the hierarchy of operations for Level 267.
1. Dark Blue (The Filler)
Priority: Low (Logistics) / High (Volume)
Dark Blue is your "dump" color. It covers the most area but is the easiest to handle. You process this first not because it's urgent, but because it clears the tray. Use Blue to fill time while you wait for other colors to travel on the belt. It should occupy the background of your attention.
2. Orange (The Bottleneck)
Priority: Critical
Even though the surface area of the Orange stars is small, the travel time for the nozzle is high. The nozzle has to move pixel-to-pixel across the whole screen. Because of this, the Orange cup takes forever to empty. You must tap this early to avoid a timeout failure.
3. White & Cyan (The Obstacles)
Priority: Medium
These are your "bridge" colors. You need them to finish the painting, but their primary function in the first half of the level is blocking your access to Yellow. You process these only to maintain balance—don't let one color run out while the other is piling up.
4. Yellow (The Finale)
Priority: Late Game
The Yellow Moon is a large, solid shape. It pours fast. If you tap Yellow too early, it might finish painting before you have finished clearing the tray, leaving you with a clogged belt and no canvas space to put the sand. Save Yellow for the last 30% of the level.
Processing Sequence Summary
- Early Game: Dark Blue (Tray Clearing) -> Orange (Star Prep).
- Mid Game: White/Cyan (Alternating) -> Orange (Pouring).
- Late Game: Yellow (Moon) -> Dark Blue (Corner Polish).
Key Tips and Pro Strategies
Here are the professional tips that separate a clear from a failure. These points address the specific physics and mechanics of Sand Loop Level 267.
Tip 1: The "Nozzle Travel" Awareness
The most common reason players lose is running out of time because they are watching the tray, not the nozzle. The Orange stars cause the nozzle to fly from the top left to the bottom right repeatedly. While the nozzle is flying, you are not painting. You must account for this travel time. Start Orange early so the nozzle can travel while you dig for other colors.
Tip 2: The 50% Inventory Rule
Never let your 5-slot conveyor belt get more than 50% full (3 cups) with "active" colors. If you have 3 cups waiting to be poured, and you dig out a 4th, you risk jamming the stack. Always keep a buffer of 2 empty slots to allow the physics engine to shift cups into the belt.
Tip 3: Recognizing the "Pixelated" Pattern
The clouds in this level are pixelated, meaning they aren't solid blocks. They have holes. This means the White and Cyan sand will fall through to the layer below if you aren't careful. Make sure the Dark Blue background is mostly finished before doing heavy detail work on clouds, or you might accidentally paint Blue sand over your White clouds.
Tip 4: Don't Fear the Overflow (Blue Only)
It is okay to "waste" a little bit of Dark Blue sand. If you have a Blue cup ready and the sky is 99% done, just pour the rest out onto the completed sky to get rid of the cup. Clearing that cup is more valuable for your tray management than saving 2% of a Blue cup.
Tip 5: Timing the Yellow Moon
The Yellow Moon is visually distinct. Wait until the clouds (White/Cyan) are at least 80% finished before tapping the Yellow cups. If you pour Yellow while clouds are still messy, you might not have the precision to place the moon correctly without overlapping the clouds.
Common Mistakes and How to Avoid Them
Learn from the errors of others. This section highlights the specific traps built into Level 267.
Mistake 1: The "Top-Down" Tapping Frenzy
The Error: Tapping every visible cup from left to right as fast as possible.
The Consequence: You end up with 5 cups on the belt (2 Blue, 2 White, 1 Cyan). The Yellow cup you need is buried under the Cyan cup in the tray. You cannot tap the Cyan cup because the belt is full. You are stuck waiting for Whites to finish, wasting precious time.
The Fix: Pause after every 2 taps. Look at the tray. Ask: "Is the color I need next blocked?"
Mistake 2: Ignoring the Orange Stars
The Error: Focusing entirely on the big Moon and Background, leaving the tiny stars for last.
The Consequence: The stars are small and require high precision. Doing them at the very end often leads to a "Time Over" screen because the nozzle travel takes too long when the clock is ticking down.
The Fix: Start the Orange process as soon as it is uncovered in Phase 2.
Mistake 3: Separating White and Cyan
The Error: Tapping all White cups first, then all Cyan cups.
The Consequence: The clouds look weird (half-finished), and you might run out of one color while the other clogs the machine. This breaks the rhythm of the "Cloud Layer."
The Fix: Always alternate: White, then Cyan, then White.
Mistake 4: Running Out of Belt Space for Yellow
The Error: Letting 4 cups of Blue/White queue up.
The Consequence: When you finally dig out the Yellow cup, it has nowhere to go. It sits in the tray, and you can't pour it to finish the level.
The Fix: Always keep an "Emergency Slot" open on the belt for the moment you uncover Yellow.
Stuck Solutions: Troubleshooting the Level
If you are currently stuck on Level 267, read this section. It provides emergency procedures for common "soft lock" scenarios.
Solution 1: "My Belt is Full and I Can't Dig!"
Scenario: You have 5 cups on the conveyor. The cup you need is buried in the tray under a cup you don't need.
Fix: You have to clear space. Look at the canvas. Is there any area, even a small corner, that can accept a color from your belt? If you have a Blue cup, pour it into a blue corner just to empty it. If you must waste sand, waste it. Clearing belt space is the only way to unjam the physics.
Solution 2: "I Can't Find the Orange Cup!"
Scenario: You have painted everything except the stars, but you don't see Orange in the tray.
Fix: It is buried. Look at the center column. Is there a White cup sitting there? That is the cap. You have to tap that White cup (even if you don't need White sand right now) to free the Orange underneath. You will have to "waste" the White sand or find a cloud spot for it to get to the Orange.
Solution 3: "The Moon is Incomplete and I'm Out of Yellow!"
Scenario: You poured Yellow, but the moon isn't full, and there are no more Yellow cups in the tray.
Fix: Check the tray again. Yellow is usually buried deep in the inner-left and inner-right columns (Cols 3 & 5). You likely didn't strip enough of the top layers (Cyan/White) to reach the bottom Yellow cups. Pause, strip a layer of Cyan/White, and the Yellow should appear.
Solution 4: "I Keep Running Out of Time."
Scenario: You are playing perfectly but hitting the time limit at 90% completion.
Fix: You are being too precise. This level requires you to be messy with the Blue background. Don't wait for the nozzle to perfectly finish a blue section before tapping the next cup. Overlap your pours slightly. It is better to be slightly messy and fast than perfect and slow.
Speed Run Tips: For the Perfect Score
If you are aiming for a 3-Star rating or a personal best time, use these advanced tactics to shave seconds off your run.
Tip 1: Pre-Loading the Tap
While the nozzle is pouring a large Blue section, hover your finger over the next cup you need to tap (usually the Center White). The moment the current pour finishes, tap immediately. Don't wait for the sand to settle. Minimize the downtime between pours.
Tip 2: The "Blue Dump" Maneuver
Since the Blue background is so large, you can pour Blue sand while the nozzle is moving to a new location. Don't wait for the nozzle to center over a blue patch. Tap the Blue cup while the nozzle is in transit; the game will auto-correct the stream, saving you 0.5 seconds per pour.
Tip 3: Ignoring Small Cloud Mistakes
In a speed run, perfectionism is the enemy. If a cloud pixel is slightly off-color (e.g., a tiny bit of White on a Cyan cloud), leave it. Fixing it takes time. The game's passing threshold is forgiving. Focus on the big blocks: The Moon and the Stars.
Tip 4: Batch Processing
Try to group your taps. Tap all 3 outer Blues in a row, then switch to the inner columns. This "batching" reduces cognitive load and lets you predict the physics movements of the tray stacks more accurately than alternating single taps.