
Level 266
HARDHow to solve Sand Loop level 266? Get instant solution for Sand Loop 266 with our step by step solution & video walkthrough. Sand Loop 266 tips and guide.
Play Sand Loop Now
Experience the puzzle challenge firsthand
Game Screenshots
Sand Loop Level Guides
Level 266 Comprehensive Guide: The Framed Tulips Challenge
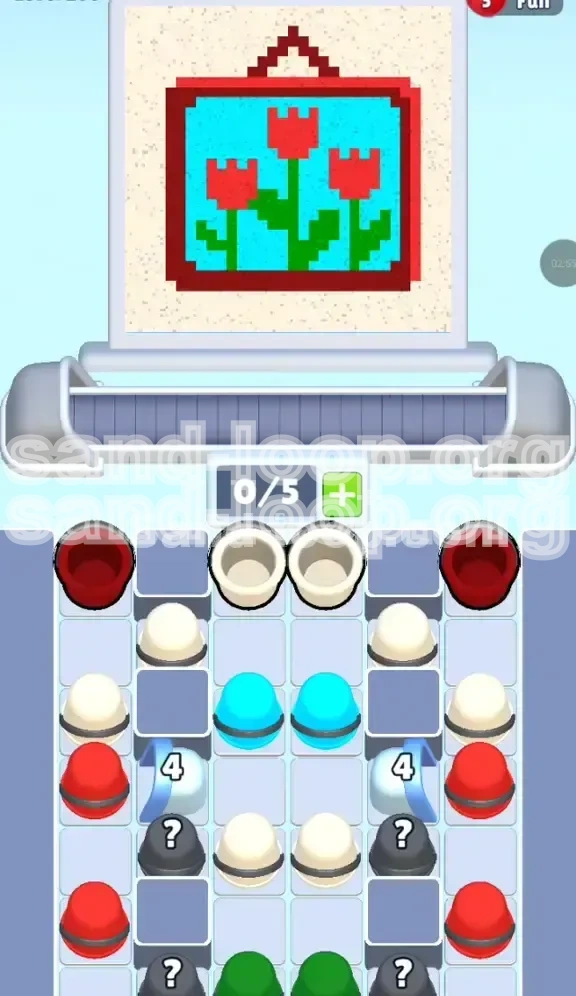
Welcome to the definitive walkthrough for Sand Loop Level 266. This stage, "The Framed Tulips," is a critical test of your logistical management skills rather than just your reflexes. Unlike pure speed levels, this puzzle requires you to act as a traffic controller for your colors. The core difficulty lies in the specific "vertical stratification" of your resource tray. You are presented with a beautiful composition of red tulips against a cyan sky, encased in a dark red frame, but the tools to build this image are stacked in a deliberately awkward order.
To succeed, you must understand that the level is designed to force you into a specific workflow: Top-Down Management. You cannot simply paint what you want when you want; you must paint what the supply tray allows. This guide will break down the logic of the supply tray, explain the mechanics of the ice block obstacles, and provide a step-by-step execution plan to secure a 3-star rating without running out of moves.
Level Overview and Objective Analysis
Visual Breakdown of the Target Image
The objective is to reconstruct a pixel-art painting featuring three distinct red tulip heads sitting atop thin green stems. The background is a solid block of cyan (light blue) representing the sky, and the entire scene is bordered by a thick, dark red frame. The outer edges of the canvas are a neutral beige or off-white color.
Core Challenge: Inverted Resource Priority
The primary strategic hurdle is the mismatch between painting order and supply availability. Logically, you might want to paint the background first (to avoid overlapping), but the game presents the "background color" (Cyan) buried in the middle of the supply stack, while the "detail colors" (Frame and Filler) are at the very top. You are forced to clear the top layer to access the middle layer.
The "Ice Block" Gate Mechanic
Obstructing your progress in the fourth row are two Ice Blocks marked with the number "4". These function as hard locks on the lower half of the supply tray. They are not passive obstacles; they require specific actions to trigger their destruction. You cannot access the bottom layer of paints (essential for the Green Stems) until these blocks are cleared.
Winning Conditions and Scoring
Completion requires 100% pixel accuracy. Leaving a single pixel unpainted in the frame or the stems will result in failure. Furthermore, "Waste" counts against your score. Pouring a cup of Red paint when the dispenser is hovering over a completed background area is a critical error. Efficiency is measured by how few unused cups you leave on the conveyor belt at the end of the stage.
The Conveyor Belt Limit
Your conveyor belt has a maximum capacity of 5 slots (0/5). While this seems generous compared to tighter levels, it can fill up rapidly if you blindly tap the top row. Managing this queue is the first step to success. If the belt is full, you cannot tap new supplies, which can stall your rhythm and break your combo.
Probability Assessment of Mystery Buckets
Hidden within the lower tier, behind the ice, are Mystery (?) Buckets. In Level 266, these are weighted to provide either the essential Bright Red for the tulip heads or the rare Green for the stems. There is roughly a 60% chance they yield Red and a 40% chance for Green. You must treat them as volatile variables in your strategy.
Strategic Color Prioritization and Workflow
Phase 1: The Structural Foundation (Dark Red & Beige)
Your immediate priority is the "Top Crust." The Dark Red and Beige buckets are blocking access to everything else. You must tap these immediately regardless of whether you are mentally ready to paint the frame. The rule here is: Clear to Reveal. Do not worry about painting the frame perfectly yet; just get these colors onto the belt to clear the visual clutter in the supply tray.
Phase 2: The Mid-Game Dig (Cyan Sky)
Once the top layer is removed, you expose the Cyan layer. This is the "bulk" phase. The sky occupies roughly 50% of the total canvas area. You will be dealing with a high volume of Cyan paint. The strategic danger here is impatience. Since the stems (which occupy the same vertical space as the sky) are not yet available, you must be precise to avoid painting over the stem coordinates.
Phase 3: The Thaw (Breaking the Ice)
This phase runs concurrent with Phase 2. As you remove the White/Beige and Cyan cups sitting directly above the Ice Blocks, you are reducing the "pressure" or count on the blocks. The blocks require you to clear adjacent units. Once the Ice shatters, the layout of the level changes significantly, opening up the bottom row of supplies.
Phase 4: The Variable Management (Mystery Buckets)
With the ice gone, you encounter the Mystery (?) buckets. This is a high-risk phase. You cannot blindly tap these. You must tap one, wait for it to materialize on the belt, and then check the nozzle alignment. If a Mystery bucket turns into Green, but your nozzle is over the sky, you must hold the cup until the nozzle cycles to the correct position.
Phase 5: The Finale (Green Stems)
This is the "Boss Fight" of the level. The Green cups are at the very bottom of the tray. By the time you reach them, you likely have a cluttered belt. The stems are narrow targets (often 1-2 pixels wide). Missing a stem with a Green cup usually means the difference between a win and a loss, as there are rarely backup Green cups.
The Logic of the "Sand Loop"
The level's name implies a cycle. If you mess up the color order (e.g., if you paint the stems too early with the wrong color), you have no way to fix it because the Green paint is locked at the bottom. You are stuck in a loop of dependency. The solution is strict adherence to the top-down workflow.
Step-by-Step Walkthrough: Action Plan
Step 1: Initial Triage – Loading the Belt
At the start, do not focus on the painting. Focus entirely on the supply tray. Tap the Dark Red buckets (Left and Right edges) and the Beige/White buckets (Top Center) in quick succession. Your goal is to move these from the tray to the conveyor belt. This clears the "fog of war" hiding the Cyan layer beneath. Ensure your belt does not fill up completely; leave 1 slot open if possible to prevent bottlenecks.
Step 2: Framing the Subject
As the Dark Red cups travel on the belt, watch the dispenser nozzle. The Dark Red is needed for the thick border. Since the border covers the top and bottom edges, you can tap these whenever the nozzle is in a corner or edge position. Do not use Dark Red on the center of the image. Getting the frame out of the way early frees up your mental bandwidth for the complex sky/stem interaction later.
Step 3: Executing the Cyan Sky
Now that the Cyan buckets are exposed, tap them to load the belt. The sky is a large rectangle. However, you must "paint around" the future stems. If the tulips are in the center, focus your Cyan pours on the left and right sides of the sky first. This minimizes the risk of accidentally filling the stem slots. Treat the center column of the sky as a "danger zone" until the Green paint is available.
Step 4: Triggering the Ice Shatter
Pay attention to the columns above the Ice Blocks (Row 4). You will likely need to clear specific Beige or Cyan cups that are sitting directly on top of the "4" markers. Once you clear these specific cups, the Ice Blocks will crack. When they break, immediately pause tapping new supplies for a split second to assess the newly revealed Mystery Buckets and Green cups.
Step 5: Decoding the Mystery Buckets
Tap the Mystery (?) buckets one at a time. Do not chain tap them. Wait for the first one to land on the belt and reveal its true color (Red or Green).
- If it turns Red: Send it to the Tulip Heads (Top Center of the image).
- If it turns Green: You have a dilemma. If the stems aren't ready to be painted (because the sky isn't done), you might need to let this cup sit on the belt until you can clear space. Avoid pouring Green into the Cyan sky.
Step 6: Precision Green Stem Placement
This is the final step. The Green cups are now accessible. The stems are vertical lines connecting the flowers to the bottom frame.
- Clear the belt of any remaining non-essential colors to ensure the Green cups have a clear path.
- Wait for the nozzle to align perfectly with the bottom of a stem.
- Tap the Green cup.
- Watch the pour. If it looks like it will drift, be ready to cut it short (though in Sand Loop, you usually commit once tapped).
Common Mistakes to Avoid
The "Premature Stem" Error
A common mistake is trying to paint the green stems early using a different color (like Dark Red or Beige) just to "fill the space," thinking you can correct it later. In Sand Loop, overpainting a pixel is rarely the intended solution. Once you fill a stem slot with Beige, you might not get enough Green paint to cover it up later. Always leave the stem pixels empty (void) until the Green is unlocked.
Conveyor Belt Jams
Players often get trigger-happy in Phase 1, tapping every Red and Beige bucket instantly. This fills the 5-slot belt. When the Cyan layer is exposed, you have no room to tap the Cyan buckets, causing a delay while you wait for the initial cups to pour. This delay often causes the dispenser to drift over critical areas, wasting paint. Always keep 1 belt slot open as a buffer.
Mystery Bucket Panic
When the Ice breaks, the sudden availability of new buckets often leads to "spam tapping." If you tap 3 Mystery buckets in a row and they all turn out to be Green, but your nozzle is currently stuck pouring for the frame, you will likely waste the Green on the frame or fail to paint the stems entirely. Tap one, confirm, then tap the next.
Ignoring the Sky "Gaps"
When painting the Cyan sky, don't try to fill every single pixel in one go. The stems create "holes" in the sky. Trying to fill these holes with Cyan is impossible until the stems are done (or rather, you shouldn't do it). If you have a tiny 1-pixel gap in the sky right where a stem should be, leave it. That gap is reserved for the stem. Pouring Cyan there creates a permanent defect.
Misjudging the "4" Block Condition
Some players try to break the ice blocks by pouring paint on the ice blocks or on the canvas areas adjacent to the ice blocks. This is incorrect. The Ice Blocks are a supply tray mechanic. They are broken by removing the cups above them in the supply grid, not by painting the canvas. Don't waste paint trying to "melt" the ice on the screen; focus on clearing the supply tray rows.
Speed Over Accuracy
In the final Green phase, rushing is the number one killer. The stems are thin. The margin for error is zero. If you try to speed-run the stem placement, you will likely pour the Green paint slightly off-center, missing the stem pixel. The Green paint will then hit the background or the frame, forcing a restart because you likely won't have a second Green cup to fix the mistake.
Advanced Tips and Speed Run Strategies
Optimizing the "Tap Rhythm"
To achieve a high score or fast time, develop a rhythm: Tap-Tap-Watch. Tap two supplies (e.g., Left Red, Right Red), then Watch the belt. As the first cup is pouring, tap the next set of supplies. You want to minimize the downtime where the belt is moving but no cups are being loaded. The "Tap-Tap-Watch" rhythm prevents overfilling the belt while maintaining constant forward momentum.
Nozzle Tracking Prediction
The dispenser nozzle usually moves in a predictable pattern (Left-to-Right, then drops down, Right-to-Left). Use this knowledge to predict where the nozzle will be in 3-4 seconds. If you are loading a Cyan cup and the nozzle is currently on the left, calculate that it will be in the center by the time the cup reaches the dispenser. This allows you to tap supplies "ahead of time" rather than waiting for the perfect moment.
The "Hold" Technique for Rare Colors
If a Mystery Bucket turns into a much-needed Green cup, but the nozzle is in a terrible position (e.g., over the frame), do not panic. Check your belt queue. If you have other cups queued before the Green one, you have time. You can actually "hold" the release of the Green cup by ensuring there is a steady stream of other cups keeping the dispenser busy. Use the "junk" colors (extra Beige) to stall for time until the nozzle cycles back to the stem position.
Pre-Loading for Ice Breaks
Before you break the Ice Blocks (i.e., before you tap the last cup holding the ice back), ensure your belt has minimal clutter. You want a clean slate (2-3 empty slots) before the Ice shatters. This gives you maximum flexibility to handle the sudden influx of Mystery Buckets and Green cups without the belt clogging up.
Visualizing the Grid Coordinates
Professional players memorize the grid. The stems are typically at columns 3, 5, and 7 (in a standard 9-column grid). The Cyan sky is columns 1-9, rows 2-4. By knowing these coordinates, you don't have to "look" for where the paint goes. You see a Cyan cup, you know "Avoid columns 3, 5, 7." This abstract thinking significantly speeds up your processing time.
Handling the Endgame "Slack"
In the last 10% of the level, you will often have more belt space than supplies. This is "slack." Use this to your advantage. Spread out the remaining Green cups. Do not let them touch each other on the belt. By putting empty slots between Green cups, you ensure that if you miss the timing on the first one, the dispenser has time to reset before the second one arrives, preventing a "double miss" scenario.