
Level 272
HARDHow to solve Sand Loop level 272? Get instant solution for Sand Loop 272 with our step by step solution & video walkthrough. Sand Loop 272 tips and guide.
Play Sand Loop Now
Experience the puzzle challenge firsthand
Game Screenshots
Sand Loop Level Guides
Level Overview: The "Pixel Squirrel" Challenge
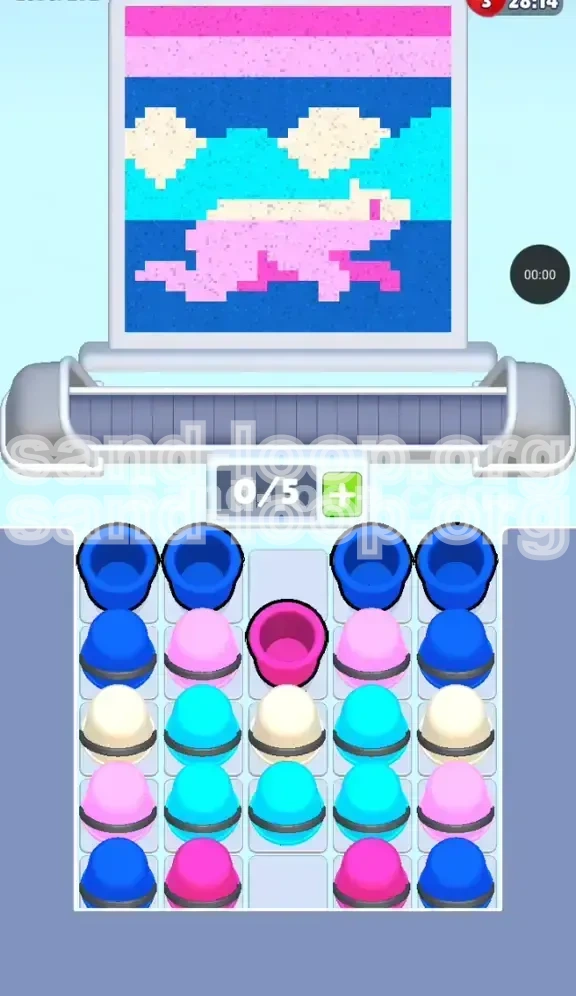
Welcome to the comprehensive walkthrough for Sand Loop Level 272. This stage represents a significant jump in logic-based puzzle difficulty, moving away from reflex-based mechanics and requiring strict resource management. The level presents you with a beautiful pixel art illustration of a running squirrel (resembling a cat) set against a vibrant sky.
However, the beauty of the image hides a complex stacking nightmare. The primary challenge lies in the "Heavy Blue Wings" formation in your supply tray. You are not fighting time or ice blocks here; you are fighting gravity and cup density. The tray is physically choked by Deep Blue cups that obscure your access to essential colors like Magenta and White. If you do not manage your belt space perfectly, you will inevitably create "holes" in the pixel art that become impossible to fix later in the level. This guide will break down exactly how to dismantle the tray layer by layer.
Clear Objectives: What You Need to Achieve
1. Decipher the Color Hierarchy
Your first objective is to understand the painting's requirements. This is not a free-form art piece; it requires specific colors in specific zones. You must identify that Deep Blue is the foundation, Dark Pink (Magenta) is the critical accent, and Light Pink serves a dual purpose for both the creature and the sky. Misidentifying these roles leads to immediate failure.
2. Manage the "Winged Stack" Inventory
You must clear the obstructing Deep Blue cups without flooding your processing belt. The objective is to maintain a "rhythm" of 3 to 4 cups on the belt at any given time. Allowing the belt to hit maximum capacity (5/5) with the wrong colors will cause a deadlock where you cannot access the cups buried underneath the blue stacks.
3. Prevent "Dead Pixel" Zones
The most critical objective is to prevent gaps in the squirrel's feet and the top sky strip. These are the hardest areas to fix once the surrounding colors are set. You must prioritize the specific Dark Pink cups for the feet early, or the Blue background will permanently seal those gaps.
4. Execute the Top-Down Unloading
You must resist the urge to clear the tray from top to bottom randomly. Instead, you need to unload the tray in a specific geometric pattern: Top-Center first, then Top-Corners, followed by the mid-layer support columns. This ensures that vital colors (White and Cyan) are unlocked exactly when the painting is ready to receive them.
Step-by-Step Instructions: The Action Plan
Phase 1: The Foundation Move (Steps 1-3)
The beginning of the level is the most volatile moment. If you tap the wrong cup here, the entire run is doomed.
- Step 1: Locate the Dark Pink (Magenta) cup. It is located in the exact center of the top row of the tray. Tap this first. This sends the color for the squirrel's feet to the belt immediately.
- Step 2: Look at the top-left and top-right corners. You will see two Deep Blue cups. Tap the Left Deep Blue cup. This begins the floor background.
- Step 3: Tap the Right Deep Blue cup.
- Status Check: Your belt should now have 3 cups moving: Magenta, Blue, Blue. The sand will pour to create the floor and the feet simultaneously. Stop tapping for a moment. Let these cups clear about 50% of their content.
Phase 2: Unlocking the Core (Steps 4-6)
Once the initial Dark Pink is gone, you have revealed the "spine" of the tray. This is a vertical column containing White and Cyan cups.
- Step 4: Identify the newly exposed White cup in the center stack. Tap it. This prepares the color for the clouds.
- Step 5: Look at the "wings" (the side stacks). You should now see Light Pink cups peeking out from the second row. Tap one Light Pink cup from either the left or right side.
- Step 6: Add one Cyan cup from the center stack to the mix.
- Status Check: Your belt is now diverse. It contains Blue, Magenta, White, Light Pink, and Cyan. This mix is safe. It allows you to paint the squirrel's body while simultaneously building the sky background.
Phase 3: The Great Cyan Flood (Steps 7-9)
As the squirrel's body (Light Pink) and clouds (White) are established, the painting's demand will shift heavily to the background sky.
- Step 7: Aggressively tap Cyan cups from the center of the tray. The middle-to-lower section of your tray is a goldmine of Cyan. You want to establish the sky background before the squirrel is fully finished.
- Step 8: Intermittently tap Deep Blue from the bottom corners to finish the lower background, but do not let Blue dominate the belt. Keep the ratio at roughly 60% Cyan / 40% Blue during this phase.
- Step 9: Watch the Head of the squirrel. It requires Light Pink. If you run out of available Light Pink on the belt, immediately stop tapping Cyan and dig out the remaining Pink cups from the side stacks.
Phase 4: The Final Sky Strip (Steps 10-12)
This is where 90% of players fail. The very top of the image is a strip of Light Pink sky.
- Step 10: Before you finish the main background, look at the very bottom of your side stacks. There are buried Light Pink cups. You must clear the Blue or Cyan cups sitting on top of them.
- Step 11: Deliberately leave one Light Pink cup in reserve on the tray. Do not tap it until the very last second.
- Step 12: As the belt finishes the main body, tap the final Light Pink cup. This ensures the top strip of the sky is painted without leaving a frustrating 1-pixel gap at the end.
Color Order Analysis: Processing Strategy
The "Bottom-Up" Dependency Logic
In Level 272, colors are not independent; they rely on each other physically in the tray. You cannot process Light Pink until you have removed the Deep Blue cups acting as a "lid" on the side stacks. This is a physical dependency. You must clear the obstructing colors first, even if you don't immediately need them on the canvas, just to unlock the colors you do need.
Dual-Purpose Colors: The Light Pink Trap
The most dangerous aspect of this level is the utility of Light Pink. It is used for the Squirrel's Body (which takes up 40% of the image) and the Top Sky Strip (which takes up 5% but is critical). If you process all your Light Pink cups during the "Body Phase" (Steps 4-6), you will have zero Pink left for the sky at the end. The game will not give you more. You must artificially ration this color.
The Magenta "Key"
Dark Pink (Magenta) is used for less than 10% of the image (just the feet). However, its position in the tray—dead center on top—makes it the "Key" to the level. Removing it is the trigger that unlocks the White and Cyan columns underneath. Treat Magenta not as a paint color, but as a key to open the rest of the level.
Background Timing
The Deep Blue and Cyan backgrounds are "bulk" colors. They are plentiful. The strategy here is to process them late but steadily. Do not dump them all at once. Use them as a filler while you wait for the more critical Light Pink and Magenta cups to become accessible.
Key Tips for Success
The "3-Cup Rule" for Belt Management
Never let the belt reach full capacity (5 cups) in the first half of the level. Keep it at 3 or 4 cups maximum. Why? Because if the belt is full, you cannot react. If the painting suddenly needs Magenta for a foot, but your belt is full of Blue, you are forced to wait. By keeping one slot empty, you maintain the flexibility to grab that critical Magenta cup the instant it is uncovered.
Visualizing the "Foot" Anchor
Always look at the bottom of the squirrel. The feet are the anchor points of the image. If you mess up the Blue background there, the feet will float. Ensure the Dark Pink hits the canvas at the same time as the first wave of Deep Blue. This "synchronizes" the layers.
The "Reserve" Strategy
When you see you have 3 or 4 Light Pink cups available, stop tapping them. Switch to Blue or Cyan. Force yourself to use the background colors first. You must mentally save the Pink cups for the end of the level. It feels counter-intuitive to ignore the color you need for the main character, but it is the only way to win.
Recognizing the "Cloud" Interference
White cups (Clouds) are mixed in the center column. They are scarce. Do not waste them. If you accidentally tap a White cup when the painting doesn't need a cloud, you have wasted a belt slot and blocked access to the Cyan underneath. Only tap White when you see the specific cloud pattern forming on the canvas.
Common Mistakes to Avoid
The "Blue Spam" Error
This is the #1 cause of failure. Players see the huge stacks of Deep Blue on the sides and tap them all immediately. This floods the belt with Blue, burying the other colors. By the time the Blue clears, you have missed the window to paint the squirrel's feet, leaving permanent gaps in the pixels.
Ignoring the Top Strip
Many players finish the squirrel and the main sky and think they are done. They stare at the screen wondering why the level isn't clearing. It's because they forgot the thin strip of Light Pink sky at the very top. Always check the top 5% of the image before you finish your color processing.
Breaking the Stack
If you tap cups randomly from the left, then the right, then the center, you create an unstable stack. You might reveal a Dark Pink cup on one side but be unable to reach it because a Blue cup is teetering on top. Always clear the tray in "layers"—top to bottom—rather than jumping around.
Running Out of Belt Space
If you have 4 cups on the belt and the 5th is about to be a color you don't need, you are stuck. You have no choice but to watch the wrong color pour. Avoid this by tapping faster—keep the belt moving to clear slots, or stop tapping entirely to let the belt drain before adding more.
Solutions for When You Are Stuck
Scenario: "I have huge gaps in the squirrel's feet."
Diagnosis: You started with Blue and ignored the center Magenta cup.
Fix: You cannot fix this in the current run. Restart the level. Make a mental note: Magenta First. The feet pixels are isolated; once the floor is painted blue, you cannot repaint the feet pink on top of it easily without wasting massive amounts of time.
Scenario: "I am out of Pink, but the squirrel isn't finished."
Diagnosis: You used your Light Pink cups too early or on the sky background instead of the body.
Fix: Check the tray. Are there Pink cups buried under Blue? If yes, tap the Blue cups on top to free them, even if it means adding more Blue to the belt. If there are absolutely no Pink cups left, you have likely soft-locked the level. Restart and be more conservative with Pink usage in the first half.
Scenario: "The belt is full of Blue, but I need Cyan."
Diagnosis: You tapped the side stacks too aggressively.
Fix: You must wait. Do not panic tap. Let the Blue cups pour out. As soon as one slot opens, tap the center stack immediately to get a Cyan or White cup into the queue. You have to ride out the wave of Blue.
Scenario: "I can't reach the White cups."
Diagnosis: The center column is blocked by the Magenta cup or the initial layer of side cups.
Fix: Trace the vertical column in the center. Is there a Magenta cup blocking it? Tap it. Is a Blue cup from the edge overlapping? Tap the edge cup to clear a path. You must clear the "rubble" before you can access the "treasure" (White/Cyan).
Speed Run Tips & Shortcuts
The "Double Tap" Start
For experienced players looking to optimize time, you can perform a "Double Tap" at the start. Tap the Center Magenta and the Left Blue almost simultaneously. The game allows you to queue up commands slightly faster than the sand pours. This gets your initial mix onto the belt about 1 second faster.
Pre-Calculating the Sky
You don't need to watch the paint dry to know what comes next. The sky strip (Light Pink) is always the final step. As soon as you see the squirrel's head finishing, you should already be digging for the final Pink cups in the tray. Don't wait for the canvas to tell you it's ready.
Ignoring the Cloud Details
For a speed run, precision on the White clouds is less important than flow. If you have a White cup, tap it. If you don't, don't go hunting for it immediately. A few missing pixels in the clouds won't fail the level, but a stalled belt will. Prioritize the continuous flow of the main body colors (Pink/Cyan) over the perfection of the cloud details.
Bulk Processing Mid-Game
Once you have established the feet (Magenta) and the head (Pink), the middle of the level is just a race to fill the background. Here, you can safely tap 4 or 5 cups in rapid succession from the bottom of the tray (Blue/Cyan). This is the only time you can "spam" clicks without risking the intricate pixel structure of the character.