Level 277 Overview: The Sunset Sailboat Challenge
The Visual Objective
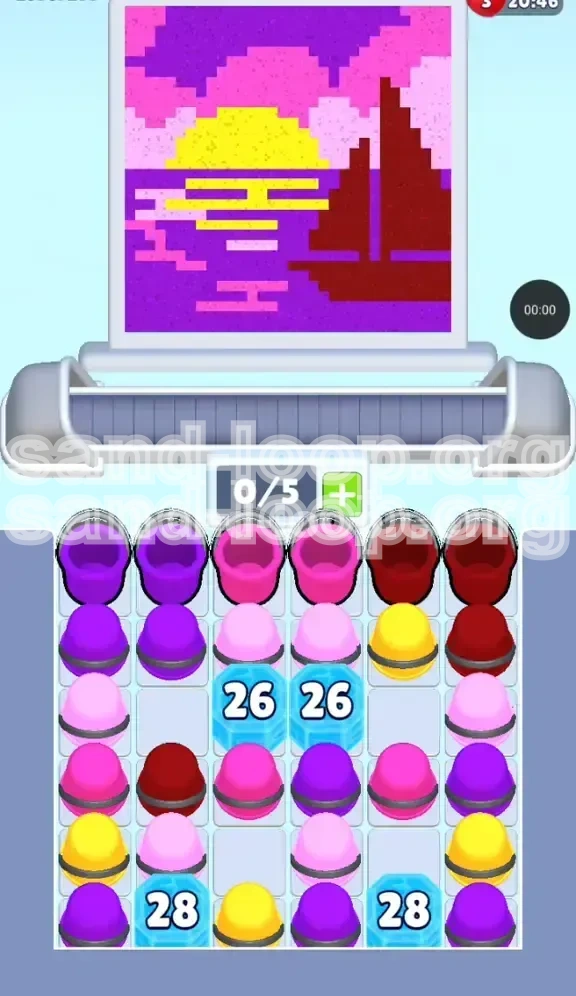
In Level 277, your goal is to reconstruct a vibrant pixel art scene depicting a sailboat navigating calm waters under a setting sun. The image is defined by high-contrast silhouettes and a gradient sky. You will need to layer Deep Purple water against a warm sky transitioning from Magenta to Light Pink, with a solid Dark Red boat interrupting the horizon and a bright Yellow sun reflecting off the water surface. The challenge lies not just in matching colors, but in maintaining clean lines between the reflection stripes while managing a restrictive tray layout.
The Core Obstacle: Global Count Ice
The defining mechanic of this level is the "Global Count Ice" system locking your central resources. Unlike standard levels where resources are immediately available, here you must grind volume. The numbers 26 and 28 are not just suggestions; they are hard locks. You cannot access the bulk of your Magenta, Light Pink, or Yellow reserves until you have successfully poured 26 and 28 cups respectively. This turns the first half of the level into a frantic race to clear space using only the available outer columns, requiring you to prioritize volume over perfect pixel placement initially.
Why This Level Is Difficult
The difficulty spike in 277 comes from resource starvation. You will often find yourself needing Yellow or Light Pink, but the cups are frozen behind the ice counters. Simultaneously, the game spawns a complex "Reflection" pattern at the bottom left of the canvas. This pattern requires alternating horizontal stripes of Yellow and Purple. If you queue these colors too tightly on the conveyor belt, the sand physics will cause the colors to bleed into each other, resulting in a muddy, undefined reflection that fails the precision check. You must balance high-speed pouring with micro-management of the conveyor belt timing.
Estimated Completion Time
For an average player, this level takes approximately 3 to 5 minutes to complete. However, if you get stuck waiting for the ice to break because you made poor pour choices early, it can drag on significantly. Speedrunners aim for sub-90-second times by optimizing the "churn" phase—processing cups rapidly without regard for final placement just to lower the ice counters. Understanding the difference between the "grind phase" and the "detail phase" is crucial for maintaining a steady pace.
Key Resources Distribution
Your resources are unevenly distributed. Columns 1 and 6 (the far left and right) are your lifelines for the first 26 moves. Column 1 typically feeds the Dark Red boat and Deep Purple sky, while Column 6 often holds the initial Yellow for the sun. The middle columns (2, 3, 4, and 5) are frozen solid. Relying on the middle columns early is a guaranteed failure state. You must train your eyes to scan only the available outer columns during the initial phase to avoid wasting cognitive load on frozen resources.
Success Metrics
Success in Level 277 is measured by your ability to avoid "clogging." Clogging occurs when your 5-slot tray is full of cups you cannot use yet (e.g., holding three Purple cups when the boat needs Red), preventing new cups from spawning. Keeping the tray fluid is the primary metric. If you can maintain a flow where a cup is picked up and poured within 3-4 seconds of spawning, you will break the ice in record time. Secondary success is defined by the cleanliness of the water reflection—pure stripes without color bleeding.
Strategic Color Order and Objectives
Phase 1: The "Volume Grind" (Pours 1-26)
Your primary objective in the first phase is purely mechanical: break the first set of ice blocks. Do not worry about perfect pixel placement yet. Focus on processing the Dark Red and Deep Purple cups available in the outer columns. The boat (Dark Red) is a "safe zone"—it is a large, solid block of color. Pouring here is low-risk and high-reward because it clears cups quickly. Similarly, the top corners of the sky (Deep Purple) are large open areas. Dump sand here rapidly to clear your tray slots and decrement the global counter. Avoid touching the complex sun reflection until the second phase.
Phase 2: The Mid-Game Transition (Pours 27-45)
Once the 26-count ice shatters, you gain access to the Magenta and Light Pink cups. This changes the objective from "clearing space" to "sky gradient management." The sky needs to transition smoothly from Purple to Magenta to Light Pink. The danger here is confusing Magenta (Darker Pink) with Light Pink. Magenta belongs in the upper cloud layers, while Light Pink sits right on the horizon. Use this phase to clear out any remaining Dark Red cups, as you will need the tray space for the upcoming Yellow flood.
Phase 3: The Reflection Challenge (Pours 46+)
After the 28-count ice breaks, you unlock the remaining Yellow and Purple reserves. Now the objective becomes precision. You must address the "Reflection Striping" in the bottom left quadrant. This requires alternating Yellow and Purple lines. The order is strictly: Yellow (Sun reflection), Purple (Water line), Yellow (Sun reflection). Any deviation here results in a messy blend. You must slow down your tapping rhythm to ensure the dispenser nozzle fully switches colors before sending the next cup.
Priority Color Hierarchy
To optimize your tray management, follow this hierarchy:
1. **Dark Red (Boat):** Always pour immediately if the boat is unfinished. It's the easiest target.
2. **Deep Purple (Top Sky/Water):** Pour to clear tray slots.
3. **Magenta/Light Pink (Sky):** Pour only when the nozzle matches the specific sky band you are filling.
4. **Yellow (Sun/Reflection):** Pour with extreme caution. Only queue Yellow when you have a clear visual path to the sun or reflection area.
Tray Management Logic
Never hold onto a cup for a "perfect spot" if a "good enough" spot exists. In Sand Loop, efficiency is king. If you have a Yellow cup and the only spot available is a corner of the sun that is already 80% full, pour it there to clear the slot. Holding out for the perfect pixel often leads to a full tray and a deadlock. The only exception to this rule is the Reflection Striping—here, you must wait for the perfect alignment to avoid color bleeding, but you should ensure your tray has empty slots to accommodate this wait time.
Understanding the Color Bleed Risk
The reflection area is a trap for unwary players. The lines are thin (often 1 pixel high). When you pour Yellow, the sand physics have a "spread" value. If you pour Purple immediately after while the Yellow sand is still settling, the Purple will merge with the Yellow, creating a dirty brown-orange line. To mitigate this, you must visually watch the cup on the conveyor belt. Ensure the previous cup has entered the nozzle and the sand flow has stopped (or the color indicator has flipped) before tapping the next conflicting color.
Detailed Walkthrough: Step-by-Step Instructions
Step 1: The Initial Tray Assessment
As the level loads, immediately scan the top row of your tray. Identify the Dark Red and Deep Purple cups. Ignore the middle columns for now. Pick up the Dark Red cups first. Locate the sailboat silhouette on the right side of the canvas. It is the largest contiguous area of color. Pour all available Dark Red cups into the boat. This is not just about filling the art; it is about reducing the ice counter from 26 to 23 or 24 rapidly while freeing up tray slots for the incoming stream of Purple cups.
Step 2: Clearing the Top Corners
With the boat paint underway, shift your focus to the top two corners of the canvas. These areas require Deep Purple. Since these corners are isolated from the rest of the art, you can pour aggressively here without worrying about messing up adjacent details. Grab every Deep Purple cup from the top row of the tray and empty them into the top corners. If you run out of Purple in the top row, check Column 1 (far left) for respawns. Your goal is to keep the tray cycling—empty slot, new cup, pour, repeat.
Step 3: Triggering the First Ice Break
Continue the cycle of grabbing Dark Red and Deep Purple. You will notice the numbers on the ice blocks decreasing. As you approach the count of 24-25, start preparing mentally for the "flood." The moment the counter hits 26, the center blocks will shatter. Do not let the new flood of Magenta cups distract you. Finish the pour you are currently holding. Once the current cup is poured, quickly assess if any Dark Red remains. If yes, clear it. If no, immediately pause and look at the sky gradient.
Step 4: The Sky Gradient Execution
With the middle ice broken, you now have access to Magenta and Light Pink. Look at the horizon (bottom of the sky). The strip just above the horizon is Light Pink. The strip above that is Magenta. The top is Purple. Fill the Light Pink strip first. Why? Because it is adjacent to the Yellow sun, which you haven't finished, and it's safer to finalize the bottom-up. Pour Light Pink into the horizon band. Then move up to the Magenta band in the upper clouds. Be meticulous here; do not pour Magenta into the Light Pink zone or vice versa.
Step 5: The Reflection Zone Setup
Now, look at the water directly below the sun. You will see a pattern of alternating colors. The game wants you to fill Yellow, then Purple, then Yellow again. Before you start, ensure your tray is not clogged. If you have more than 3 cups in hand, pour some "safe" colors into the larger water areas (Purple) or the boat (Red) to free up space. You need manual dexterity for the next step, and a full tray limits your reaction time.
Step 6: Executing the Reflection Stripes
This is the hardest mechanical step. Tap a Yellow cup. Watch it travel on the belt. It will enter the dispenser. The sand will flow. Wait for the cup to disappear and the dispenser nozzle to flip back to neutral. **Pause for a split second.** Now tap the Purple cup. Wait for it to enter. **Pause.** Tap the Yellow cup. By leaving a "beat" between taps, you prevent the sand streams from overlapping. If you tap Purple while Yellow is still dispensing, the colors will mix in the air or on the canvas, ruining the reflection. Continue this staggered rhythm until the reflection is complete.
Step 7: Finalizing the Water and Hull
With the reflection done, the rest is easy cleanup. You likely have a surplus of Purple cups now. Fill the remaining deep water areas. Check the far right edge of the boat hull—it's a common spot to miss a single pixel. If the boat is done and the water is full, scan the canvas for any "fuzzy" edges or pixel gaps. Use your remaining cups to fill these holes. Once the canvas is 100% covered and the colors are correct, the level will end.
Common Mistakes and How to Avoid Them
The "Premature Reflection" Error
A common mistake is trying to fill the yellow sun reflection too early, specifically before the 26-count ice breaks. Players see a little bit of yellow available in Column 6 and try to finesse the reflection lines. However, because you lack the volume of Purple needed to complete the alternating pattern, you end up with a half-finished reflection that blocks your flow. Always prioritize breaking the ice first. Fill the main body of the sun (the circle) early, but leave the striped reflection for the end game when you have full access to both Yellow and Purple reserves.
The "Pink Confusion" Trap
Visually, Magenta and Light Pink can look very similar under the game's lighting, especially if you are playing on a smaller screen or with the brightness low. A frequent error is pouring Magenta into the Light Pink horizon strip. This creates a jarring dark line across a soft sunset gradient. To avoid this, zoom in (if possible) or look closely at the hue. Magenta has a slightly blue/purple undertone, while Light Pink leans towards peach/white. If you are unsure, check the nozzle color indicator on the dispenser—it shows the exact hue of the cup you are holding.
Tray Deadlocking
Deadlocking happens when you have 5 cups in your tray, but none of them match the currently available pour spots. For example, your tray holds 3 Yellow cups, but the only open spots on the canvas are Purple water. You cannot discard cups, so you are stuck. To avoid this, never let your tray fill up to 5/5 slots unless you are 100% sure the next cup will clear a slot. Keep 1 or 2 slots open as "buffer space." If you see the dispenser spawning a color you don't need (e.g., Yellow when you need Purple), do not tap it. Let it pass by on the belt to keep your tray flexible.
Overlapping Consecutive Colors
This ties into the reflection striping issue but applies generally. When pouring large blocks of color, players often tap the next cup as soon as the previous one is tapped. While this works for the same color (e.g., Purple followed by Purple), it fails for different colors. The game's physics engine has a slight delay where the nozzle "drains" the previous sand. If you introduce a new color during this drain window, they mix. Always check the nozzle. If it's still dripping the previous color, wait to tap the next cup.
Ignoring the "Safety Valve" Areas
The "Safety Valve" refers to the large, non-critical areas of the canvas like the deep water or the main body of the sun. When players get focused on the detailed clouds or the boat mast, they forget these easy dump zones. If you make a mistake or get a cup you don't need, dump it in the deep water (if it's purple) or the sun (if it's yellow) immediately to fix the error. Don't try to "save" a cup for a perfect spot if it risks clogging your tray. Use the safety valves to maintain flow.
Misjudging the Ice Counter
Players often stop pouring aggressively when they see the counter hit "20," thinking they are close. They start slow, careful pours. This is a mistake. The efficiency required to break ice is high. You must maintain the "churn" pace (rapid pouring) right up until the counter hits 25. Only slow down for the final few pours if you are about to overshoot a specific area. Remember, every second you spend hesitating is a second the ice remains locked, prolonging the level.
Stuck Solutions and Speed Run Tips
What to Do If You Are Color Locked
If you are staring at a tray full of colors you don't need (e.g., full of Red but the boat is done), you are in a "soft lock." The solution is to find the *smallest* possible pixel of that color on the canvas to dump the cup, or intentionally "overfill" a slightly filled area. Overfilling is safer than leaving the cup in the tray. Pour the sand onto an existing patch of the same color until the cup empties. It might waste a few seconds, but it unclogs your tray, allowing new colors to spawn. Do not wait for a new spot to open up; force the issue by overfilling.
Dealing with Resource Starvation
If you absolutely run out of a specific color (e.g., you need Light Pink but the ice isn't broken yet), you have to grind. Look for *any* valid move on the board, even if it's a single pixel. If there are literally no moves for the available colors, you might have made a placement error earlier. Double-check the corners of the canvas. Often, a single pixel of Purple is missed in the top corner, which prevents the game from registering the area as "complete" and cycling the resources. Fill every single hole you can find to trigger the resource refresh.
Speed Run Strategy: The "Blind Fill" Technique
For speed runners, the "Blind Fill" technique is essential for the first 20 pours. Do not look at the canvas. Look only at the tray and the dispenser. As soon as a cup appears, if it's Red or Purple, tap it. Then, without watching the belt, immediately flick your finger to the approximate area of the boat or sky. Muscle memory allows you to hit these large targets without visual confirmation. This keeps your eyes on the resource stream, reducing the time between spawns. Only start looking at the canvas when the counter hits 20 and precision becomes necessary.
Optimizing Conveyor Belt Timing
Understanding the belt mechanics can shave seconds off your time. The belt moves at a constant speed, but the "tap zone" is specific. You don't need to wait for the cup to be perfectly centered. You can tap a cup the moment it enters the screen (the "early tap"). This queues it up faster. Conversely, if you need to delay a pour (to avoid color bleeding), you can tap a cup early to pull it into the tray, holding it there as a placeholder while you wait for the dispenser to clear. This "holding" strategy is useful for managing the timing of the Yellow/Purple reflection without stopping your input flow.
Shortcuts for the 277 Grind
There is a psychological shortcut: ignore the count. If you internalize the number "26," you play slower. Instead, play until the *visual* cue of the ice shattering occurs. Adopt a rhythm of "Tap-Pour-Tap-Pour" like a metronome. Treat the level as a rhythm game. By disconnecting from the anxiety of the countdown and focusing purely on the rhythm of clearing slots, you often break the ice faster than if you were stressing over the specific numbers. This flow state is the fastest way to clear the grind phase.
Final Checklist for Perfection
Before you finalize the level, do a quick "Corner Check."
1. Top Left: Is the Deep Purple fully filled?
2. Top Right: Is the Magenta cloud gradient solid?
3. Bottom Right: Is the Dark Red boat hull touching the water line?
4. Bottom Left: Are the reflection stripes crisp?
5. Center: Is the sun circle perfectly round?
Scanning these 5 zones in 2 seconds ensures you didn't leave a single stray pixel that will cost you a "Perfect" rating or force a retry.