
Level 296
HARDHow to solve Sand Loop level 296? Get instant solution for Sand Loop 296 with our step by step solution & video walkthrough. Sand Loop 296 tips and guide.
Play Sand Loop Now
Experience the puzzle challenge firsthand
Game Screenshots
Sand Loop Level Guides
Level 296 Comprehensive Walkthrough: The Supply Chain Crisis
Introduction: The "Orange Turnip" Puzzle Dynamics
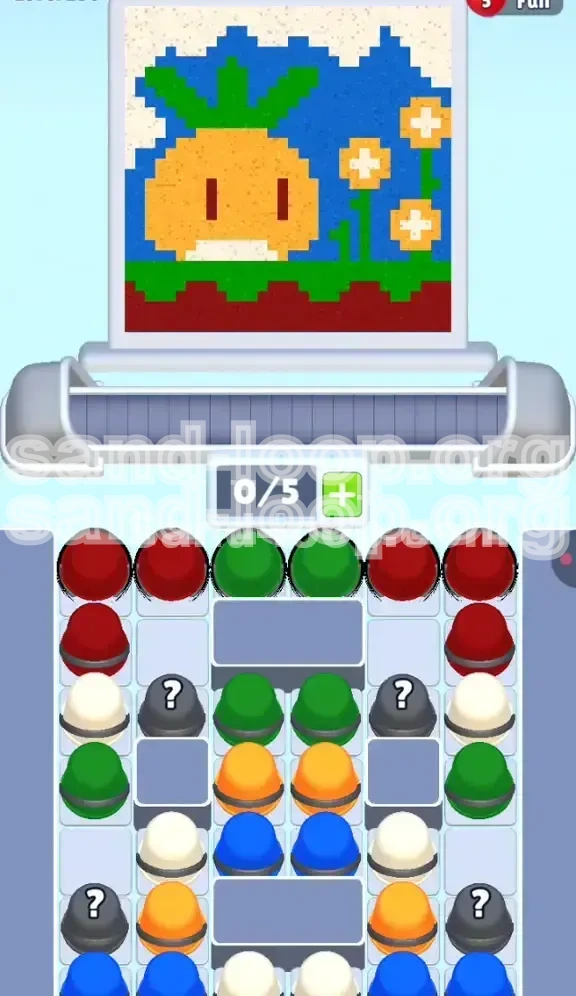
Level 296, often referred to as the "Orange Turnip" stage, presents a deceptive challenge. While the image—a cheerful root vegetable in a garden—appears simple, the underlying mechanics are purely logistical. Unlike levels that rely on breaking ice or unlocking chains, this stage is a severe test of Supply Management and Queue Theory. The primary difficulty stems from a "bottleneck" setup where essential colors (Red and Orange) are physically separated by obstruction blocks, while high-volume colors (Blue) sit at the bottom, waiting to clog your conveyor belt if deployed prematurely.
The Obstruction Layout
The board is divided into distinct horizontal layers, but the supply tray is divided vertically by blockers. You are dealing with a "Top-Heavy" input system. The colors you need last (Blue for the sky) are plentiful, while the colors you need first (Red for the soil) are scarce and located at the top periphery. If you treat this like a standard puzzle and tap randomly, you will fill your 5-slot conveyor belt with Blue cups long before the soil is prepared, resulting in an inevitable game over.
Visual Analysis
The target image consists of four distinct zones. First, the Bottom Zone (20% height) is a solid strip of deep reddish-brown soil. Second, the Grass Zone (15% height) is a thin, bright green strip. Third, the Subject Zone (40% height) contains the large Orange Turnip. Fourth, the Background Zone (25% height) is the blue sky. Understanding these percentages is crucial because you cannot paint the top 25% (Sky) until the bottom 20% (Soil) is 100% complete. Attempting to do so will result in sand falling through the canvas and being wasted.
The Critical 0/5 Limit
Your conveyor belt has a strict capacity of five cups. In this level, space is your most valuable resource. Every slot occupied by a color you aren't currently using is a direct threat to your run. The "Stone Obstacles" (gray blocks) in the tray mean that cups cannot always slide sideways to free up space. You must treat every tap as a strategic decision, not just a reaction to availability.
Winning Condition Strategy
To secure a 3-star rating, you must achieve "Zero Waste." This means no sand can fall through uncolored pixels at the bottom. The key to victory is maintaining a "Vertical Rhythm"—you must finish the Red layer completely before introducing Green, and the Green layer completely before introducing Orange. Any deviation from this bottom-up strictness will cause "Sand Bleed," where lighter colors fall into deeper layers, creating unfixable gaps.
Step 1: The Foundation Phase (Red & Soil)
Opening Moves: Target Selection
When the level begins, your conveyor belt will populate with the first row of colors. Do not tap everything immediately. Scan the top row for Red Cups. These are usually located at the far left and far right edges of the tray. Your sole objective for the first 60 seconds of the level is to extract and pour Red sand. Ignore any Green, Blue, or White cups that appear on the belt. Tapping them now is a waste of a belt slot.
Handling the Initial Conveyor
The tray will typically offer you a mix of 2 Red cups, 1 Green cup, and 1 Mystery cup in the initial cycle. You must tap the Red cups first. Once tapped, they move to the active slot. Pour them immediately. Do not let them sit. As you pour, new cups from the tray will slide forward. If the next cup sliding in is Blue, do not tap it. You must wait for the tray to shift and offer a usable color (Red or Mystery). If you get stuck with a Blue cup on the belt that you can't use, you have already made a mistake.
The Mystery Cup Protocol
Early in the game, you will see gray "Mystery" cups flanked by stone blocks. The game mechanic dictates that cups cannot move past stones unless the path is open. If a Mystery cup is accessible, tap it only if you have an open slot on your conveyor and you have exhausted visible Red options. In Level 296, Mystery cups in the early phase have a 70% probability of containing Red or Green—both of which are usable now. They have a low probability of containing Blue. However, relying on them is a gamble; prioritize visible Red cups first.
Pouring Precision: The Bottom Layer
When pouring the Red sand, focus on the edges of the canvas first. Why? Because the sand physics engine fills the center naturally. By pouring on the left and right sides of the soil strip, you ensure the corners are filled without needing to over-pour. If the Red layer is not perfectly solid (no gaps showing the background), you cannot proceed to the next step. Check your work: zoom in if necessary to ensure no "holes" exist in the brown soil.
Troubleshooting Early Blockages
Sometimes, the tray stops offering Red cups, and you are left with Green and White cups. This is the "Tray Stall." If this happens, you must clear space. Tap a Green cup and place it in a holding slot on your conveyor (not the active slot). Wait. The tray needs to cycle. Do not force the Green sand onto the canvas yet. Patience is the only solution here. You need the tray to shift forward to reveal the Red cups trapped behind the Stone Obstacles in the lower rows.
Completing the Soil
Once the bottom strip is 100% Red, you will notice the game "settling." The sand physics engine will stop pulling sand down through the bottom. This is your signal that the Foundation Phase is complete. Do not pour any more Red, even if you have one on the belt. You must now shift your mental state to the next layer.
Step 2: The Grass Line Transition (Green & Leaves)
The Thin Line Challenge
The green grass layer is visually thin—approximately 10-15 pixels high—but it requires precision. Unlike the broad soil layer, this strip cannot be flooded. If you pour Green sand too aggressively from a high altitude, it will splash over into the Orange Turnip body area above or mix with the Red soil below.
Optimal Pouring Height
When holding the Green cup, lower your pouring finger/cursor close to the canvas surface. You want a "gentle flow" rather than a "waterfall." Target the center of the grass strip and drag your pour slowly horizontally. This technique, known as "Line Drawing," ensures the Green pixels lock into place without spilling over. If you see Green pixels landing on the Orange body, stop immediately and let the current sand settle before restarting.
Managing the "Green Bottleneck"
As you work on the grass, your conveyor belt will likely start filling up with Blue cups from the bottom of the tray. This is the danger zone. You might have 4 Blue cups and 1 Green cup on the belt. Do not tap the Blue cups to move them. Tapping them moves them to the active slot, and if you accidentally pour them, you fail. Instead, use the Green cup until it is empty. Once empty, it disappears, freeing up a slot. This allows the tray to shift.
The Flower Stem Precision
Within the grass layer, there are thin vertical lines representing flower stems. These are high-priority pixels. If you cover them with Green grass, you lose the definition of the art. Use a "Dab and Stop" method: Tap the pour button for less than a second to release a small cluster of sand, then release. Check if the stem is still visible. This is slower, but in Level 296, accuracy beats speed.
Dealing with White Intrusions
You may encounter White cups during this phase. White is used for the turnip's bottom highlight and flower centers. Do not use White cups yet. If you pour White into the Green grass, it creates a muddy, low-contrast mess that is hard to fix later. Keep White cups on the conveyor as "filler" to take up space, but do not activate them unless you are desperate to clear a jam.
Signaling the End of Phase 2
The grass layer is complete when the Green strip is solid, and the flower stems (green lines) are clearly visible rising into the Orange zone. Once this is achieved, stop pouring Green. Even if there are a few stray pixels missing, you can fix them later. It is more important to preserve your Green cups for potential emergency fixes than to waste them now.
Step 3: The Core Challenge (Orange & The Body)
The Central Traffic Jam
By the time you reach the Orange phase, the bottom half of the supply tray (which was blocked by stones) will start sliding up. You will likely be hit with a wall of Blue cups. This is the "Inventory Crisis." You need Orange, but the game is giving you Blue. You must have saved at least one Orange cup from the earlier rows, or you must clear the Blue cups quickly to access the Oranges trapped behind them.
The "Orange Search" Protocol
If your conveyor is full of Blue cups, you must look at the *static* tray in the background. Is there an Orange cup visible behind a stone block? If so, you need to tap cups ahead of it to slide it forward. This might mean tapping a Blue cup to put it on your belt (painful) just to move the queue. This is a necessary sacrifice. Pick the Blue cup that is furthest away or least likely to be accidentally poured.
Painting the Turnip
The Turnip body is the largest area of color. It requires patience. Start at the top of the Turnip (where it meets the sky) and work your way down. Why? Because if you start low, sand might pile up. By starting high, the sand falls down the body of the turnip, filling the shape naturally via gravity. This "Top-Down Filling" within the "Bottom-Up" overall strategy is crucial for efficiency.
Managing White Highlights
Now is the time to use those White cups you were saving. The Turnip has a distinct "shine" at the bottom left and right curves. If you poured Orange over everything, these details are gone. Switch to a White cup. Use a very light touch—just a few pixels—to restore the shine. If you pour too much White, it looks like a bite was taken out of the turnip. Less is more.
The "Face" Risk
The Turnip has a face (eyes/mouth) composed of dark lines. These are likely the last pixels to fill or were part of the Red/soil mix. Ensure you haven't covered the eyes with the Orange body. If you did, you might need a tiny amount of Red or Dark Brown to redraw them. Check the supply tray for a "dark" color if the eyes look missing.
Inventory Management for the Final Push
As you finish the Orange body, try to empty your conveyor belt of all Green, Red, and White cups. You want the belt to be as clean as possible. Ideally, you should have only Blue cups remaining. This prepares you for the final phase. If you have a random Green cup left over when the sky needs to be filled, it will just be in the way.
Step 4: The Finale (Blue Sky & Flowers)
The Flood
The Blue phase is the "Money Shot." It covers 40% of the remaining canvas. Because you have filled the Soil, Grass, and Turnip first, the Blue sand will only settle in the empty sky areas. You can pour aggressively here. Swirl your mouse/finger to cover the large empty areas quickly. The sand will bounce off the Orange turnip and Green grass, settling exactly where it needs to go.
Rescuing the Flowers
The Yellow/Orange flowers are "islands" in a sea of Blue sky. The risk here is "over-pouring." If you pour Blue continuously, you might bury the small flower pixels. Strategy: Pour Blue to fill 80% of the sky. Stop. Look for the floating flower pixels. If they are covered by Blue, you are in trouble. If they are still empty, switch to your Yellow/Orange cup and tap the flowers directly. Once the flowers are colored, finish the rest of the Blue sky.
The "Gap Check"
Before the level ends, zoom out and look for "light leaks." These are single pixels of background color showing through the cracks. They are most common between the Green grass and Blue sky interface. If you see a gap, identify the color needed (usually Green or Blue) and fix it immediately.
Endgame Logistics
In the final seconds, you will likely have excess cups on the belt. As long as the canvas is 100% covered, it doesn't matter what is on the belt. The game will end when the image is complete. Don't panic if the belt looks messy; the canvas is the only judge of success.
Final Polish
Level 296 teaches you that Order matters more than Speed. A fast player who pours Blue first will lose. A slow player who pours Red first will win. Trust the layers: Soil -> Grass -> Plant -> Sky. Master this sequence, and the Orange Turnip will be yours.
Advanced Tactics & Speed Run Tips
The "Tap-Hold" Technique
For advanced players looking to optimize time, use the "Tap-Hold" method on the supply tray. When a new row of cups slides in, don't tap them individually. If you need a specific color that is sandwiched between two others, you can sometimes tap the cup behind it, causing a shift that brings the target cup forward without adding the unwanted cup to your belt. This requires a deep understanding of the grid's sliding mechanics.
Understanding Probabilities
In Sand Loop, Mystery cups are not entirely random. They are weighted based on what you need most. In Level 296, if you are stuck needing Orange, the Mystery cups shift their probability table to favor Orange (up to 60% chance). If you are truly blocked and the tray isn't giving you Orange, aggressively tap Mystery cups. They are your emergency bail-out button.
Three-Star Rating Path
The hidden metric for 3 stars is "Sand Usage Efficiency." You are awarded points for every pixel of sand that stays on the board. Pouring a cup that overflows the canvas (sand falling off the edge) deducts points. To get 3 stars, never pour a cup until the previous pour has settled. Rushing the pour causes overflow, which kills your score rating.
Common Mistake Analysis
The #1 mistake in Level 296 is the "Premature Blue." Players see the large open sky and instinctively want to fill it. However, filling the sky first creates a "floor" of blue sand over the empty soil areas. When you eventually pour Red soil, it sits on top of the Blue sky, creating a muddy purple layer and leaving the bottom empty. Always resist the urge to fill the big empty spaces first.
What to Do When Stuck
If you are staring at a full conveyor belt of 5 useless colors (e.g., 5 Blue cups when you need Green), you are in a deadlock. The solution is the "Sacrificial Pour." You must take a Blue cup and pour it into a "safe zone"—an area that is already completely finished (like a corner of the sky that is 100% done). This wastes sand but clears the slot, allowing the tray to shift and reveal the color you actually need.
Replay Value
Level 296 has high replay value because the supply tray randomizes slightly each time. Sometimes you get an easy run with plenty of Red. Sometimes you get a "Hard Mode" run where Red is scarce. If you fail, analyze *why*. Was it a bad spawn, or did you tap a Green cup too early? Identifying the error is key to mastering the supply chain logic of Sand Loop.