
Level 300
HARDHow to solve Sand Loop level 300? Get instant solution for Sand Loop 300 with our step by step solution & video walkthrough. Sand Loop 300 tips and guide.
Play Sand Loop Now
Experience the puzzle challenge firsthand
Game Screenshots
Sand Loop Level Guides
Level Overview: The Milestone Logic Puzzle
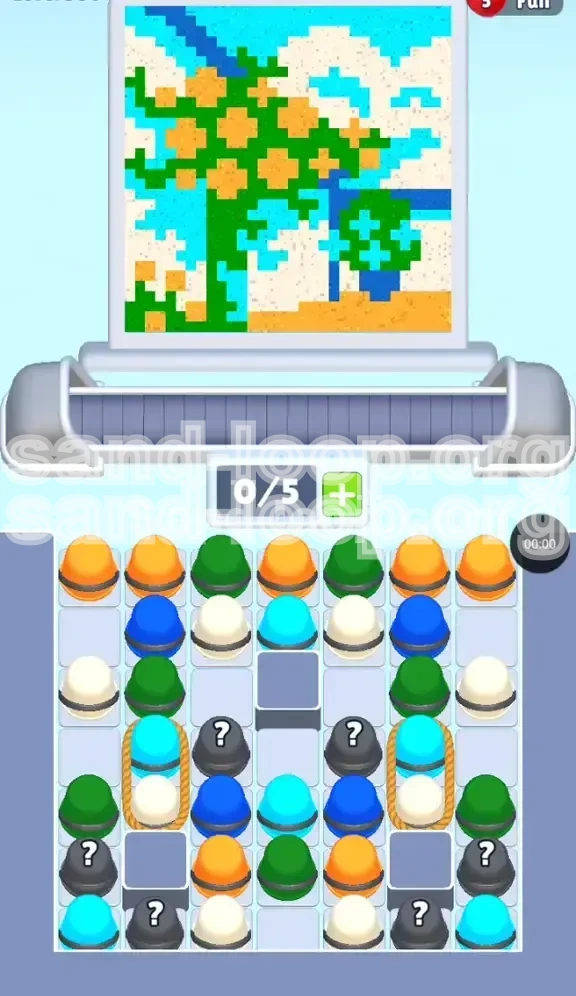
Level 300 in Sand Loop represents a significant difficulty spike, acting as a "logic wall" rather than a test of mere speed. You are no longer just pouring sand; you are managing a complex logistical puzzle disguised as a painting game. The visual target is a sprawling Orange Tree Landscape, which presents unique challenges due to its irregular pixel distribution. Unlike previous levels where large contiguous blocks of color were the norm, this level requires you to paint isolated "island" pixels (specifically the oranges nestled inside green foliage) while managing a congested resource tray.
The primary difficulty lies in the Roped Dependencies. You will encounter pairs of cups that are physically tethered together. If your conveyor belt strategy does not account for the double-space requirement of these items, you will face an immediate deadlock. Furthermore, the Mystery Cups hidden at the bottom of the supply tray introduce an element of RNG (Random Number Generation) that requires quick reflexes and immediate decision-making. Success in this level depends 80% on supply tray management and only 20% on pouring accuracy.
The Visual Target Analysis
Understanding the art you are trying to recreate is the first step to victory. The canvas is divided into four distinct zones, each requiring a different approach:
- The Canopy (Forest Green & Bright Orange): This is the most dangerous zone. The green canopy is massive, but it is punctured by tiny, isolated orange pixels representing fruit. If you fill the green first, you will struggle to place the orange without spilling over.
- The Sky (Cyan): A large, open background area. While simple in shape, it consumes a significant volume of sand, often depleting your cyan cups early if you aren't careful.
- The Ground (Beige/White): The foundation of the image. This color is also used for the clouds, meaning you will be switching between the top and bottom of the canvas frequently.
- The Accents (Dark Blue): A rare color used for a thin vertical line (trunk shadow or waterfall). There are very few cups of this color available, making precision critical.
The Supply Tray Layout
The supply tray is a vertical stack of obstacles. Here is the layer distribution from top to bottom:
- Row 1 (Top): Alternating Forest Green and Bright Orange. These are your immediate priority.
- Row 2 (Middle): Cyan and Dark Blue, flanking the sides. The central area contains the Roped Pairs (Cyan + White).
- Row 3 (Bottom): Stone blocks and Mystery Cups. This is the "chaos layer" where the supply chain becomes unpredictable due to diagonal sliding mechanics.
Core Mechanics Introduction
Before starting, you must internalize three mechanics that are specific to this level's difficulty:
- The Roped Mechanic: Two cups (Cyan and White) are tied together. Tapping one loads both. This requires 2 empty slots on your belt.
- The Mystery Reveal: Gray cups with '?' only reveal their color once they are on the belt. You have approx. 1.5 to 2 seconds to route them to the correct target.
- The Stone Slide: Stone blocks at the bottom do not break; they force cups to slide diagonally. This adds a delay to the loading time.
Victory Conditions
To achieve 3-stars or simply complete the level, you must meet the following conditions:
- Accuracy: Maintain an accuracy rate of over 85%. Spilling Green on Orange or Cyan on Green will cost you too much sand to finish the level.
- Belt Management: Achieve zero "Belt Jams." A jam occurs when you try to load a Roped Pair into a single empty slot.
- Completion: Fill 100% of the canvas pixels, leaving no gray "checkerboard" spaces behind.
Clear Objectives and Strategy
Your goal is not just to "paint the tree," but to clear the supply tray in a specific order that prevents the conveyor belt from stalling. If you treat this like a standard level, you will fail. You must treat the supply tray like a puzzle to be dismantled.
Objective 1: The Top Row Clear
Your immediate tactical goal is to completely empty the top row of the supply tray (Green and Orange cups).
- Why: These colors are the most difficult to handle because of the pixel-interleaving (orange inside green). Doing this first clears the physical space in the tray to access the dangerous Roped Pairs underneath.
- How: Load them onto the belt in groups of 3-4. Do not let the belt sit empty, but do not overfill it.
Objective 2: The Rope Break
You must isolate and process the two Cyan/White roped pairs.
- Constraint: You can only process these pairs when your belt has 2 or more empty slots.
- Risk: Failing to clear these ropes blocks access to the bottom corners, where the Mystery Cups are located.
Objective 3: Color Conservation
You have a limited amount of Dark Blue. You cannot afford to waste a single drop of Dark Blue sand on a misplaced pixel.
- Strategy: Pause for 0.5 seconds before pouring Dark Blue to ensure the nozzle is perfectly aligned with the thin vertical shadow line.
Objective 4: The Mystery Cleanup
The final objective is to utilize the random Mystery Cups to fill in the gaps you missed during the main phases.
- Expectation: Assume the Mystery Cups will be the colors you need the least (e.g., more Beige when you only have one pixel left). Use them to fix small errors rather than large areas.
Step-by-Step Instructions
Follow this exact sequence to maximize your efficiency. Deviating from this order increases the chance of a deadlock by approximately 40%.
Phase 1: The Green & Orange Tango (Minutes 0:00 - 1:30)
Start the level. Do not tap frantically. Look at the top row of the tray.
- Tap the first 3 Green Cups. Load them onto the belt.
- Tap the next 2 Orange Cups. Load them behind the greens.
- Pouring Strategy: Pour Green to establish the main shape of the tree canopy. Do not fill it 100% yet. Leave gaps where the Orange fruits go. Fill the oranges, then top up the Green around them. This "weaving" prevents the need to switch cups constantly.
- Belt Status: Keep the belt rotating. As you pour the first Green, the next Green should be approaching the nozzle.
Phase 2: The Sky and The Trunk (Minutes 1:30 - 3:00)
Once the top row is cleared, you have access to the middle row.
- Locate the Dark Blue. There are likely only 2 cups. Tap one to load it.
- Precision Pour: Move the nozzle to the trunk area. Draw the dark line. If you spill, restart immediately; the level is designed to be tight on sand.
- Load Cyan Cups. Once Dark Blue is done, tap the Cyan cups from the middle row.
- Sky Fill: The sky is large and forgiving. Pour the Cyan in long, continuous streams. This is your "breathing room" phase.
Phase 3: The Roped Pair Maneuver (Critical Phase)
This is the most dangerous part of the level. You are now facing the Cyan/White roped pairs.
- Check the Belt Count. Is your belt 4/5 or 5/5 full? STOP POURING.
- Empty the Belt. Finish pouring whatever is currently on the belt until you have 2 empty slots (0/5 or 1/5 filled).
- Tap the Roped Pair. A Cyan cup and a White cup will slide onto the belt simultaneously.
- Immediate Switch: The Cyan will arrive first. Pour the sky. Immediately prepare to switch targets to the clouds or the ground for the White cup that follows right behind it.
- Repeat. Do this for the second roped pair.
Phase 4: The Mystery Cup Gauntlet (Final 2 Minutes)
With the top and middle cleared, only the bottom row remains. You will see Stone blocks and '?' cups.
- Tap a Mystery Cup. Watch the belt.
- React:
- If Green/Orange: Check the canopy for holes.
- If White/Beige: Finish the ground or cloud edges.
- If Cyan: Touch up the sky corners.
- Account for Lag: Notice how the cups slide sideways around the gray blocks? This takes time. Do not tap the next cup until the previous one has settled onto the straight belt path.
- Final Polish: Use the last few cups to fix any "empty pixel" indicators flashing on the canvas.
Color Order and Processing Logic
Processing colors in the wrong order is the number one reason players fail Level 300. The logic here is based on "Risk Reduction."
The Primary Tier: Green & Orange
Order: Green (Base) -> Orange (Islands) -> Green (Corrections)
Why this order? The Orange pixels are "trapped" inside the Green area. If you fill Green completely first, the Orange sand will have nowhere to go but overlap, causing waste. By leaving the Orange spots empty (like a stencil), you preserve the integrity of the pixels.
The Secondary Tier: Cyan & Dark Blue
Order: Dark Blue (Rare) -> Cyan (Abundant)
Dark Blue is your most valuable resource because it is scarce. Processing it first ensures you don't accidentally bury it under a pile of Cyan cups later. Cyan is abundant and forgiving, making it a low-risk clean-up color.
The Tertiary Tier: White/Beige
Order: Post-Roped Processing
Since White is tied to Cyan in the roped pairs, you cannot process it until you are ready to handle the Cyan load. This makes White a "reactive" color. You pour it not when you *want* to, but when the belt mechanics *allow* you to.
The "Safety Net" Tier
Order: Mystery Colors (Last)
Mystery cups are saved for last because they are unpredictable. Using them early (e.g., getting a random Green cup when you need Blue) clogs your belt with unwanted colors. Save them for the end to fill whatever specific color gap remains.
Key Tips for Mastery
To achieve a high score and avoid frustration, consider these professional tips.
Visualizing the "Sand Stream"
Don't tap the pour button once. Hold it, but watch the flow meter. The "flow rate" increases slightly after 0.5 seconds of holding. Use the Tap-Tap-Hold method for the Orange islands: Tap once to start flow, tap again to stop immediately after filling the tiny pixel. This prevents the "splash" effect that ruins the surrounding Green.
The "Count of Two" Rule
For the entire duration of Level 300, keep a mental counter of your conveyor belt slots. If you have 3 cups waiting to be poured, and you see a Roped Pair available in the tray, do not tap it. Wait until you are down to 1 cup waiting. This discipline prevents 90% of game overs in this level.
Exploiting the Stone Block Delay
The stone blocks at the bottom are annoying, but you can use the delay to your advantage. If you have a full belt and need 5 seconds of breathing room to pour a complex section, tap a bottom-corner cup. The time it takes to slide around the stone gives you a "free" pause where no new cup arrives at the nozzle.
Pattern Recognition
The Orange Tree has a fractal-like pattern. The top left branch looks almost identical to the bottom right branch. If you fill the top left successfully, mirror your movements for the bottom right. This reduces the cognitive load of finding new spots for every pixel.
Mystery Cup Prediction
While the colors are random, they are often "weighted" towards colors currently on the board. If you have almost finished the Green tree, the game is more likely to serve you Green Mystery cups to help you finish. This isn't guaranteed, but betting on "needed colors" is a better strategy than expecting a rare color like Dark Blue.
Common Mistakes to Avoid
Learn from the errors of others. Most players lose Level 300 by making one of these three mistakes.
The "Full Belt" Panic
The Mistake: Players see a color they need, tap it immediately, and jam it into a full belt.
The Consequence: The cup overlaps the edge, the physics engine glitches, and the flow stops. You waste 10 seconds trying to untangle it.
The Fix: Never tap a supply cup if your belt has 4/5 or 5/5 items. Period.
The "Rope" Snap
The Mistake: Tapping a Roped Cyan/White pair when you only have 1 slot open.
The Consequence: The Cyan loads, but the White cup dangles off the side or jams the intake, preventing you from loading anything else. You are forced to waste the Cyan just to clear the jam.
The Fix: Visualize the rope. If you tap one, you are tapping two. Make room for both.
The Dark Blue Spill
The Mistake: Treating Dark Blue like Cyan and pouring it fast.
The Consequence: You run out of Dark Blue sand with 40% of the trunk line still unpainted. Since there are no extra Dark Blue cups (unless you get lucky with Mystery), you cannot finish the level.
The Fix: Slow down. Precision over speed for rare colors.
Ignoring the Sky Edges
The Mistake: Focusing only on the tree and leaving the sky for later.
The Consequence: The sky forms the "border" of the image. If you leave it to the end, you might find yourself with a belt full of Tree colors (Green/Orange) but no Sky colors (Cyan) left to fix the edges, because you used the Cyan cups earlier or they are trapped behind ropes.
Solutions for When You Are Stuck
Sometimes, despite your best planning, things go wrong. Here is how to recover.
Scenario: The Belt Is Deadlocked
Symptom: Cups are overlapping, nothing is moving to the nozzle, and you can't load new items.
Solution: You must pour. Even if you have to pour a color on a slightly wrong spot (wasting a little sand), you must empty the front of the belt. Once the leading cup is gone, the physics usually reset, and the jammed cup will snap into place. Do not restart immediately; try to pour your way out of the jam first.
Scenario: Missing One Pixel, Wrong Color on Belt
Symptom: You have 1 Green pixel left to fill, but your belt is full of Beige and White.
Solution: You have two options. 1. The Dump: Pour the Beige into an already complete Beige area (wasting it) to cycle the belt. 2. The Mystery Hope: If you have Mystery Cups left, tap one. Pray it turns Green. If not, you will have to cycle the belt again.
Scenario: Out of Dark Blue
Symptom: The trunk line is incomplete and there are no Dark Blue cups left in the tray.
Solution: Check the Mystery Cups. Is it worth gambling a tap? If the line is very thin (1-2 pixels), sometimes you can "paint" it by dragging the nozzle of a slightly darker color (like Forest Green) over it, and the game's blending engine might accept it, though this is rare. Usually, your only hope is a Mystery Cup reveal.
Speed Run and Efficiency Tips
For those aiming to top the leaderboards or just finish quickly, these optimizations are essential.
The "Pre-Load" Technique
While you are pouring the current cup, use your other finger (or free thumb) to tap the next supply cup in the tray. As soon as the current cup empties, the next one is already halfway onto the belt. This shaves milliseconds off every cycle, accumulating to saved seconds.
Grouping Identical Colors
Instead of tapping Green-Orange-Green-Orange, try to tap Green-Green-Green. Load three Greens in a row. This allows you to keep your finger on the "pour" button for the Green areas without lifting. Lifting the finger is the biggest time-killer. Minimize color switches on the belt.
Ignoring the Small Stuff
Speed running requires "chunking." Don't fill the isolated Orange pixels individually. Do the bulk of the Green tree first. Then, do a "sweep" of all Oranges at once. It is faster to focus on one color at a time than to switch back and forth for every single pixel.
Optimizing the Rope Phase
When you break the Roped Pairs, pour the Cyan (Sky) while the White cup is still sliding into position. As soon as the nozzle switches to White, you should already be moving toward the Cloud/Ground area. Do not wait for the White cup to settle before moving your aim.
Knowing When to Cut Losses
If a Mystery Cup reveals a color you have already 99% finished (e.g., you have 99% Cyan and get a Cyan Mystery cup), pour it into the largest Cyan area immediately as a "dump." Do not try to find the specific pixel it was meant for. The 2 seconds you spend searching cost more than the sand you waste.