
Level 301
HARDHow to solve Sand Loop level 301? Get instant solution for Sand Loop 301 with our step by step solution & video walkthrough. Sand Loop 301 tips and guide.
Play Sand Loop Now
Experience the puzzle challenge firsthand
Game Screenshots
Sand Loop Level Guides
Sand Loop Level 301 Complete Walkthrough: The Winter Shop Strategy Guide
Understanding the "Winter Shop" Architecture
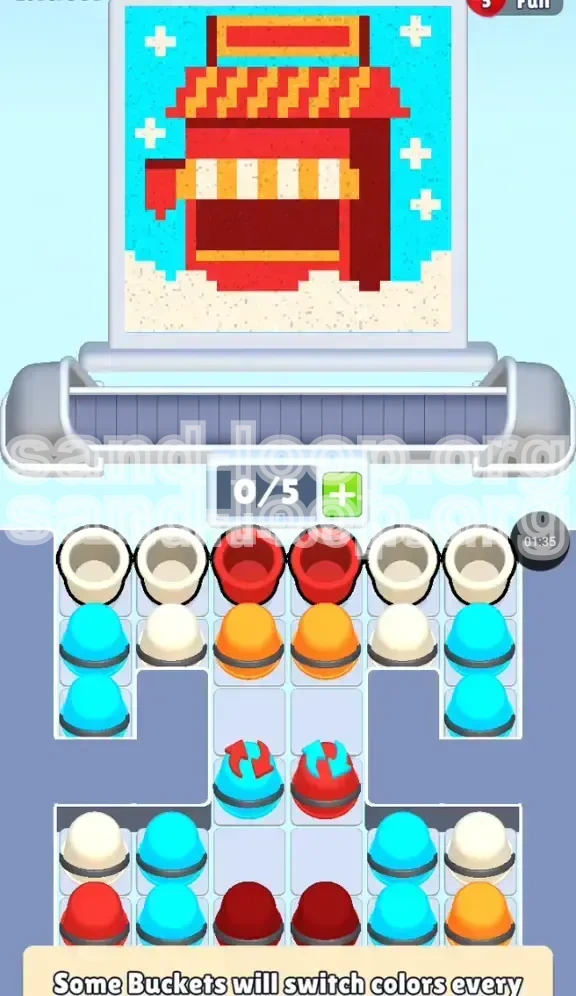
Welcome to Level 301, a stage disguised as a cozy holiday scene but functionally a rigorous test of vertical stacking logic. The "Winter Shop" is not a level where you can rely on random tapping; it requires you to act as a digital architect. The canvas depicts a festive stall with a snowy foreground, a complex striped awning, and a winter sky. The challenge lies in the strict "bottom-up" physics of the game. You cannot paint the sky before you build the roof, and you cannot build the roof without first securing the foundation.
Identifying the Core Challenge: The Dual-Role White Sand
The primary reason players fail Level 301 is the mismanagement of the White sand resource. In this level, White sand serves two distinct and conflicting purposes: it creates the jagged "Snow Base" at the very bottom of the screen, and it forms the detailed stripes of the awning in the middle. If you accidentally pour all your White sand into the snow base early in the level, you will not have enough left to complete the awning stripes later. This dual-role mechanic turns White sand into your most valuable resource.
The "Gatekeeper" Mechanic Explained
Unlike previous levels where you could simply clear cups from the top down, Level 301 introduces "Gatekeeper" buckets. Located in the middle rows, these buckets block access to the colors stored beneath them. To reach the Cyan sky color at the bottom, you must first clear the Red and Orange layers above. This forces a specific build order: you are physically blocked from accessing the sky colors until the shop structure is built.
Victory Conditions and Progress Metrics
To achieve a 3-star rating on this level, you need to maintain a flow state without causing a jam. Efficiency is measured by how quickly you can alternate between the Awning colors without triggering a "Pour Conflict." A successful run typically involves clearing the bottom 30% of the canvas (Snow) within the first 10 seconds, leaving you ample time to micro-manage the difficult center section.
Strategic Objectives and Color Priorities
Primary Objective: Establish the Foundation (White & Red)
Your first goal is to create a stable base for the shop. The physics engine of Sand Loop prevents sand from floating; it must stack. Therefore, your initial focus must be on filling the White "Snow Base" at the bottom. Do not be tempted by the Red or Orange cups higher up. If you build the roof before the ground, the sand will fall through the empty space and ruin your layering. You must secure the bottom 15% of the canvas before moving up.
Secondary Objective: The Awning Interleave Pattern
The most distinct visual feature of the Winter Shop is the striped awning (Orange-White-Orange). This is your secondary objective. You cannot pour the Orange and White cups simultaneously; they must be "interleaved" on the conveyor belt. Your objective here is to queue the cups so that an Orange pour is immediately followed by a White pour, creating the perfect stripe effect without muddying the colors.
Tertiary Objective: Managing the Color Switchers
Scattered in the middle rows are Color Switcher buckets. These act as dynamic obstacles that change color (usually cycling between Red and Cyan). Your objective is to time your interactions with them so they transform into the color required for the current layer you are building. Ignoring these or activating them at the wrong time will introduce "contamination"—colors that bleed into sections where they don't belong.
Final Objective: The Cyan Sky Fill
Once the structure is built, the final objective is the background fill. This is the easiest part but requires patience. You must clear the remaining cups from the top rows to unlock the Cyan buckets trapped at the bottom of the stack. The goal here is a "Flood Fill"—rapidly deploying Cyan cups to complete the top 40% of the image in one fluid motion.
The Optimal Build Order: Step-by-Step Instructions
Phase 1: The "Snow Dump" (Opening Moves)
As soon as the level starts, scan the top row for White cups. You will typically find White cups on the far left and right wings.
- Action: Immediately tap the White cups located at the top-left and top-right.
- Reasoning: Sending these to the conveyor first fills the "Snow Base" at the bottom.
- Note: Do not touch the center Red cups yet. If you pour Red while the White is still settling, the Red sand will land on top of the snow, ruining the pure white base layer needed for the contrast.
Phase 2: The Red Structure Build
With the snow base solidifying, look at the center of the top row. You will see Red cups.
- Action: Tap the Red cups in the center.
- Goal: This builds the main walls and the solid roof sections of the shop.
- Tip: Wait for the White cups to finish pouring before you queue the Red ones. You want a hard line between the snow and the walls, not a gradient blend.
Phase 3: The "Z-Pattern" for the Awning
This is the most critical step. You now need to create the stripes. Look for Orange cups in the second row and any remaining White cups.
- Action: Tap an Orange cup. Wait 1 second. Tap a White cup. Wait 1 second. Tap an Orange cup.
- Visualizing: Imagine a "Z" pattern across your screen. You are essentially braiding the conveyor belt.
- Warning: Do not queue two Oranges in a row. This will result in a solid Orange block instead of a stripe, forcing you to restart the level to get the details right.
Phase 4: Unlocking the Cyan Reservoir
By clearing the Red and Orange cups from the top two rows, you will finally expose the bottom row of cups, which are predominantly Cyan.
- Action: Rapidly tap all remaining Cyan cups.
- Goal: This fills the "Winter Sky" background.
- Timing: Only do this after the shop structure is 100% complete. If the sky pours while the roof is still "open" or unfinished, the blue sand will leak into the shop interior, turning your cozy stall into a messy puddle.
Phase 5: The Detail Polish
Sometimes, specific tiny details (like the white snowflakes in the sky or window panes) are reserved for the very end.
- Action: Keep a single White cup in reserve (don't pour it during Phase 1). Use this final cup to touch up any specific white details in the sky or upper structure after the main colors are down.
- Strategy: This "Save One" strategy is what separates a clear from a perfect clear.
Advanced Tactics: Key Tips for Efficiency
The "Gap Method" for Belt Management
When loading the conveyor belt for the awning stripes, physical spacing matters. The game's physics engine determines where sand falls based on the cup's position on the belt.
- Tip: When alternating Orange and White, try to leave a visible gap between the cups on the belt line.
- Benefit: This prevents the "Pour Spout" from mixing colors mid-air. If the cups are touching, the sand streams can collide, creating a muddy brown mix that fails the puzzle accuracy check.
Switcher Rhythm Gaming
The Color Switchers in the middle row operate on a loop (e.g., Red -> Blue -> Red).
- Tip: Watch the switcher for one full cycle before tapping. Do not tap on impulse.
- Tactic: Count the seconds. If it switches every 3 seconds, time your tap so the cup arrives at the pour point exactly when the color aligns with your target layer. Treat it like a rhythm mini-game.
Preventing "Column Bleed"
Column Bleed occurs when you pour a color into a section that isn't ready for it yet, causing it to spill into adjacent columns.
- Tip: Always verify that the layer *below* is 100% solid before pouring the layer *above*.
- Check: Look for any "holes" in the Red structure. If you see a gap, fill it with Red before moving to the Awning phase. If you don't, the Orange sand will fall right through the roof and ruin the floor.
Resource Banking for the Endgame
It is tempting to clear the board as fast as possible, but in Level 301, hoarding is better.
- Tip: If you have a full 5-slot conveyor belt, leave a slot empty if possible.
- Reasoning: This gives you the flexibility to grab a "Save Me" cup if a switcher spawns the wrong color. An empty slot is a safety valve that prevents a Game Over due to a jammed belt.
Troubleshooting: Common Mistakes and Fixes
Mistake #1: The "Early Sky" Error
The Problem: Many players panic when they see Cyan cups available in the top rows and pour them immediately to get them out of the way.
The Consequence: The Cyan sand lands on the empty space where the shop roof should be. Since the roof isn't built yet, the sand falls to the ground, turning the snow blue.
The Fix: Ignore the Cyan cups until the very end. Treat them as if they are locked. Focus 100% of your attention on Red, Orange, and White until the building structure is visually complete.
Mistake #2: The "Blended Awning" Disaster
The Problem: Tapping all Orange cups first, then all White cups.
The Consequence: You get a half-orange, half-white block, or the colors swirl together. The puzzle requires distinct stripes.
The Fix: Reset your rhythm. Force yourself to tap one color, wait for it to pass the dispenser, then tap the other. Patience is the only cure for blending.
Mistake #3: Switcher Contamination
The Problem: Tapping a Color Switcher to clear a jam without checking what color it currently holds.
The Consequence: You drop a "Dark Red" sand into a "Blue Sky" section, creating a permanent ugly blotch that cannot be covered up later.
The Fix: If a Switcher is the wrong color, do not tap it. Instead, tap other cups on the board to shift the conveyor belt, moving the switcher out of the way or waiting for it to cycle to the correct color. Never tap a switcher just to clear space.
Mistake #4: Running Out of White for Details
The Problem: Using all your White sand on the bottom "Snow Base" because it looks satisfying to fill.
The Consequence: When you reach the awning, you have no White left for the stripes, forcing a restart.
The Fix: Stop pouring White on the ground once the base looks 90% full. Leave the remaining 10% and the rest of your White cups for the intricate awning work. You can always top up the snow base at the very end if you have leftovers, but you cannot recover wasted White sand.
Speed Run Guide: Finishing Under 60 Seconds
The "Burst" Start Strategy
For a speed run, the first 10 seconds are critical. Do not watch the sand fall.
- Action: Tap all available White cups (Top Left/Right) immediately.
- Follow-up: Without pausing, tap the Red center cups.
- Result: This queues the foundation and the structure simultaneously. While the Red is pouring, the White is settling. This overlap saves about 5-8 seconds compared to waiting for one to finish before starting the other.
Pre-Loading the Awning Sequence
Advanced players can "pre-load" the belt during the structure phase.
- Technique: While the Red cups are pouring (which takes a while), look ahead to the second row. Identify the Orange and White cups needed for the awning.
- Action: As soon as the Red pour finishes, instantly tap the Orange/White sequence. Do not let the belt run empty. An empty belt is wasted time.
The "Sky Flood" Shortcut
Don't tap Cyan cups one by one.
- Technique: Once the shop is done, look for a cluster of 3-4 Cyan cups.
- Action: Swipe or tap them in rapid succession (1-2-3-4).
- Result: This creates a massive combined sand stream that fills the sky in seconds rather than the slow drip of individual cups. This is the key to shaving off the final 15 seconds of the clock.
Ignoring Visual Perfection
Speed running requires prioritizing "Completion" over "Aesthetics."
- Tip: If a pixel is slightly out of place but the level logic accepts it, move on. Do not retry a pour to get a "perfect" line. The game's hitboxes for completion are generous; use this to your advantage. If the "Success" chime triggers, stop pouring immediately, even if it looks messy.
Anticipating Switcher Cycles
Don't wait for the switcher to hit the right color.
- Tip: If you know the switcher cycles Red-Cyan-Red, and you need Red, tap it the moment it turns Cyan. By the time the cup travels down the belt and reaches the dispenser, it will have cycled back to Red. This anticipation saves valuable seconds compared to waiting for it to turn Red before tapping.