
Level 324
HARDHow to solve Sand Loop level 324? Get instant solution for Sand Loop 324 with our step by step solution & video walkthrough. Sand Loop 324 tips and guide.
Play Sand Loop Now
Experience the puzzle challenge firsthand
Game Screenshots

Sand Loop Level Guides
Level 324 Overview: The Tropical Cove Expedition
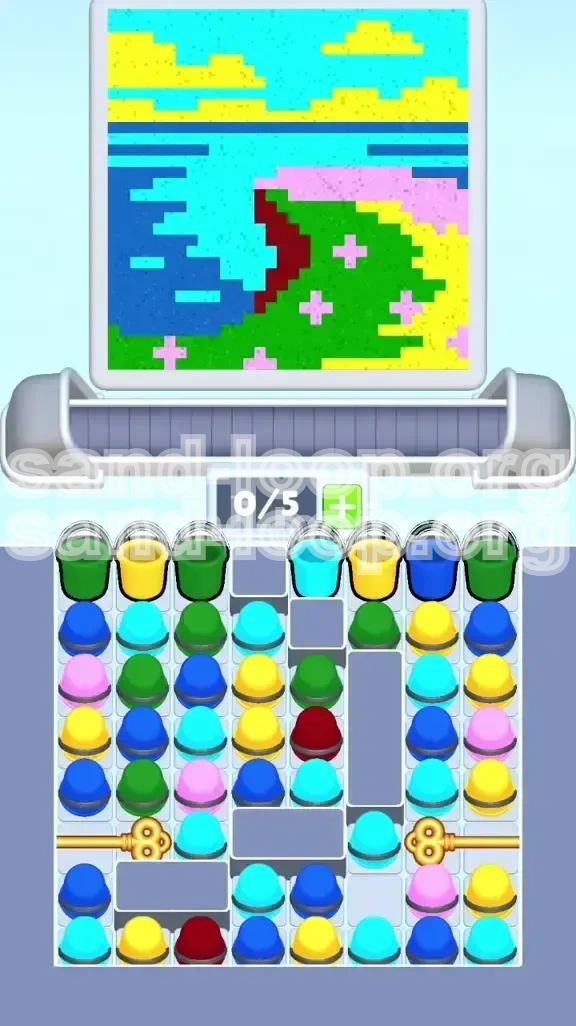
Sand Loop Level 324, titled "The Tropical Cove," is a complex puzzle that tests your ability to manage resource congestion rather than your speed. Unlike traditional levels where paint flows freely, this stage is a digging expedition. You are presented with a vibrant, layered artwork featuring a yellow sky, cyan-tinged clouds, a deep blue ocean, and a detailed central island. However, the path to completion is blocked by a unique "bunker" layout.
The primary challenge in this level is spatial management. The board is cluttered with vertical Grey Blocks and two buried Gold Keys located deep within the tray (Columns 2 and 7). These keys lock away the bottom rows of the tray, which contain the critical reserves of Cyan and Yellow needed to finish the sky. If you treat this as a standard level and fill evenly, you will run out of tray space (Deadlock) long before you reach the keys. This guide focuses on the surgical precision required to tunnel through the board, unlock the reserves, and paint the cove without getting stuck.
Visual Analysis and Color Distribution
Understanding the artwork is the first step to victory. The canvas is divided into four distinct zones, each hungry for specific colors. Analyzing these zones helps you decide where to dump excess paint to keep your tray flowing.
- The Sky Zone (Top 30%): A vast, hungry area requiring Yellow as the base and Cyan for cloud accents. This zone acts as a massive sink for light colors but is useless for Blue or Green.
- The Ocean Zone (Left 25%): Dominated by Dark Blue with horizontal stripes of Cyan. This is your primary dumping ground for mid-game Blue buckets.
- The Island Core (Center/Right): The most complex area. It features a Dark Red cliff face acting as a container for Green vegetation. Inside the green are small Pink plus-sign flowers.
- The Obstacles: Two Gold Keys buried at depth 6 (rows) in Columns 2 and 7, and a large Vertical Grey Block in Column 6 that disrupts the flow of buckets on the right side.
The "Bunker" Layout Strategy
The defining feature of Level 324 is the "Bunker" layout. This means essential resources (the bottom rows) are locked behind Grey Blocks that only open when the buried Gold Keys are activated.
The danger here is the Tray Capacity Crisis. You only have 5 active slots. If you fill the top half of the canvas evenly, you will fill your tray with colors that don't match the bottom layers, leaving no room to dig down to the keys. You must prioritize creating a vertical shaft (a tunnel) to the keys immediately, rather than painting the canvas horizontally.
Resource Prioritization Table
Not all buckets are created equal in this level. Use the prioritization table below to decide which buckets to tap first and which to leave in the tray.
| Priority Tier | Color | Reasoning |
|---|---|---|
| Tier 1 (Critical) | Dark Red, Green | Required to build the "container" for the island. If you don't paint the Red cliff first, Green sand will spill incorrectly, wasting paint. |
| Tier 2 (Tunneling) | Cyan, Yellow | Useful for clearing the top rows, but save 30% of your reserves for the final unlock phase. |
| Tier 3 (Situational) | Dark Blue | Only needed for the left side. If you have too many Blue buckets, use the Ocean zone to dump them immediately to free tray slots. |
| Tier 4 (Danger) | Pink | High risk of waste. Only tap when the Green vegetation is fully established and the flower slots are clearly visible. |
Why the "Left-Side" Strategy Works
While there are keys on both the left and right, the "Left-Side Tunnel" strategy is statistically safer. The right side of the board is plagued by a Vertical Grey Block in Column 6. This block creates a "dead zone" where buckets can get stranded because they cannot slide left to fill empty spaces.
By focusing your digging efforts on Columns 1, 2, and 3 (the Left Key), you ensure that gravity works in your favor. Clearing the left side allows buckets from the top-center to slide down into your digging shaft, keeping the flow consistent. Trying to tunnel to the Right Key often results in a clogged tray and isolated buckets that you cannot reach.
Primary Objectives and Success Metrics
To beat Level 324, you need a clear set of goals. Don't just tap randomly; follow these objectives to guide your gameplay session.
Objective 1: Establish Tray Flow
Your first goal is to prevent the dreaded "Deadlock" (where your tray is full and you can't make a move). You must never let your tray reach 5/5 capacity during the first 10 seconds of the level.
Actionable Target: Keep your tray at 3/5 or 4/5 capacity. Always ensure you have at least one empty slot to allow buckets to slide. If you are full, you stop digging. If you stop digging, you never reach the keys.
Objective 2: The Surgical Tunnel
You are not trying to paint the picture yet. You are trying to reach the bottom of the screen.
Actionable Target: Ignore the Sky and the Ocean details initially. Focus 80% of your taps on the central columns (specifically Column 2) to create a vertical hole. Your aim is to expose the Left Gold Key within the first 15-20% of the level progress.
Objective 3: Unlocking the Reserves
The buried keys are the gatekeepers of this level. They are the only things preventing you from accessing the bottom rows.
Actionable Target: Once the Left Gold Key is visible, prioritize tapping it over everything else. Do not finish painting the island. Do not finish the sky. Tap the key, shatter the Grey Blocks, and release the "Emergency Reserves" of paint hidden in the basement of the tray.
Objective 4: Precision Pink Placement
The Pink flowers are the final detail. Rushing them is the number one cause of failure in the late game.
Actionable Target: Wait until the Green vegetation is 100% complete and the "plus sign" outlines are clearly visible on the canvas. You should have zero Green buckets in your active tray before you start tapping Pink.
Objective 5: The Final Sky Fill
The sky is deceptive. It looks like it needs a lot of paint, but it's actually the last thing you should finish.
Actionable Target: Use the paint released from the bottom reserves (post-unlock) to flood the sky. This paint is usually perfectly balanced with the Yellow and Cyan needed to close out the level.
Step-by-Step Walkthrough
This is the core of the guide. Follow these steps in order to ensure a smooth victory. We have broken the level into four distinct phases.
Phase 1: The Vertical Descent (0% - 25% Progress)
Goal: Reach the Left Gold Key in Column 2.
At the start, the tray is a mix of Green, Yellow, Blue, and Cyan. The board layout suggests you should paint the ocean or the sky. Resist this urge.
- Scan the Tray: Look for Green and Dark Red buckets.
- The Center Drop: Tap Green and Red buckets and direct them to the center of the canvas (the island). The Green needs to fill the "V" shape of the island grass, and the Red needs to outline the cliff.
- Clear the Top: If you have Yellow or Cyan, tap them only if they are blocking Green or Red from sliding down. Send them to the top (Sky) just to get them out of the way.
- Tunnel Vision: Focus your taps on Column 2. You are digging a hole. The faster you clear Column 2, the faster the Left Gold Key rises to the top of the pile.
- Capacity Check: If your tray hits 4/5, dump paint into the largest available area (usually the Sky or the Island body) to create space. Never stand still.
Phase 2: The Key Extraction (25% - 50% Progress)
Goal: Unlock the Grey Blocks and release the bottom reserves.
By now, you should see the Gold Key shimmering under the buckets in Column 2. The right side of the board might be messy due to the Vertical Grey Block in Column 6. Ignore the mess.
- Isolate the Key: You will need to clear the buckets immediately touching the Gold Key. These are likely to be Blue or Cyan.
- The Ocean Dump: Send these Blue/Cyan buckets to the Ocean Zone (Left side). The ocean needs horizontal stripes, so it's a perfect place to dump paint without worrying about precision.
- Tap the Key: The moment the Gold Key is the top-most item in its column, tap it. Do not wait for a "better time." There is no better time.
- Observe the Shatter: Watch the bottom Grey Blocks disappear. A new wave of buckets will slide up from the bottom of the screen. This is your lifeline.
- Inventory Check: Do not immediately tap the new buckets. Pause for a second to see what colors have been released. This dictates your strategy for Phase 3.
Phase 3: The Canvas Completion (50% - 85% Progress)
Goal: Fill the Island and Ocean completely.
With the bottom reserves released, you now have access to the specific amounts of paint needed to finish the details. The board is now fully "open."
- Finish the Island: Return your focus to the Center Island. Use the Dark Red to crisp up the cliff edges. Use Green to fill any remaining gaps in the grass.
- The Right Side Cleanup: Now that the board is open, you can address the buckets trapped on the right side of the Vertical Grey Block (Column 6). Use the Dark Blue to finish the Ocean depth.
- The Pink Protocol: Look for the Pink buckets. Are the Green Plus Signs visible? If yes, send the Pink. If the Green is still patchy, finish the Green first. Tip: Send one Pink bucket, wait for it to settle, then send the next. Do not queue them.
- Sky Filling (Partial): You can start working on the Yellow sky, but leave the top 15% of the sky empty. You will need that space for the final paint dump.
Phase 4: The Final Polish (85% - 100% Progress)
Goal: Close out the level without running out of space.
You are in the endgame. The tray is likely filling up with the last bits of color.
- The Sky Flood: Take all remaining Yellow and Cyan buckets. Flood the top of the screen. The sky is the most forgiving area because it handles large amounts of paint easily.
- Final Flower Check: If there are stubborn Pink spots remaining, make sure your tray is clear of other colors (especially Green) before tapping them. You don't want a Green bucket to accidentally spill into your final Pink flower.
- Grey Block Check: Ensure that the Grey Blocks on the right (Column 6 divider) haven't trapped any single buckets. If they have, use a nearby color to clear the block and free the trapped bucket.
- Victory Lap: As the canvas hits 100% coverage, the level will end. If you followed the tunnel strategy, you should have zero deadlocks and a clear picture of the Tropical Cove.
Color Order and Processing Logic
Understanding the sequence in which to process colors is vital for maintaining flow. The physics engine in Sand Loop dictates how colors interact, and this level exploits those interactions heavily.
The Primary Sequence: Red -> Green -> Blue
This sequence is based on the "container" logic of the artwork. The Tropical Cove is built from the inside out or the bottom up.
- Dark Red (The Cliff): Always process Dark Red first (or second to Green). The Red cliff acts as a physical barrier in the artwork. If you paint the ocean or sky before the cliff, you risk the Green sand (which is heavier) spilling over the areas where the cliff should be. By establishing the Red outline early, you create a "bowl" for the Green vegetation to sit in.
- Green (The Vegetation): Process Green immediately after Red. Green is the "filler" for the island. It is abundant and takes up a lot of space. Getting Green out of the tray early is crucial for preventing Deadlocks. However, you must ensure the Red "bowl" is there, or the Green will spread into the ocean or sky areas, wasting paint.
- Dark Blue & Cyan (The Water): Process these third. The Ocean is on the far left, separated from the island. It is a safe zone. Once the Island is stable, you can aggressively dump Blue and Cyan here to clear your tray. The horizontal stripes of the Ocean are forgiving; minor overfilling here doesn't hurt the level completion percentage.
The Secondary Sequence: Yellow -> Pink
These colors are for the background and the details, respectively.
- Yellow (The Sky): Yellow is a "panic" color. If your tray is full and you have no other matches, tap Yellow and send it to the sky. The sky is huge and needs a lot of paint, so it is very hard to overfill the Yellow zone early on. Save about 20% of your Yellow for the very end to patch up any holes.
- Pink (The Flowers): Pink is the "finishing move." It is the smallest area on the canvas (targeting the small plus-sign flowers). If you process Pink too early, it will likely be overwritten by the Green grass expanding. Only process Pink when Green is 100% complete and the flower "molds" are empty.
The "Gap" Technique for Pink
The conveyor belt physics in Sand Loop can cause colors to mix if tapped too quickly. This is fatal for the Pink flowers.
The Technique: When you see a Pink bucket followed immediately by a Green bucket on the conveyor belt, do not tap the Pink, then the Green. Instead: Tap Pink -> Wait 1 Second -> Tap Green.
This "Gap" ensures that the Pink sand has time to settle into the small flower slots before the heavy Green sand starts pouring. If you queue them back-to-back, the Green will pour over the Pink slot, filling it with Green and rendering the flower unpaintable (or forcing you to waste precious Pink later to correct it).
Pro Tips, Common Mistakes, and Stuck Solutions
Even with a strategy, things can go wrong. This section covers the nuances that separate a good run from a great one, and how to recover when the board looks hopeless.
Speed Run Tips (For High Scores)
If you are aiming for a 3-Star score or a fast completion time, efficiency is everything.
- The "3-Tap" Rhythm: Develop a rhythm of tapping three buckets rapidly, then pausing to check the canvas flow. This prevents over-filling your tray and allows the physics engine to catch up, reducing lag.
- Pre-Loading the Island: While digging for the key, if you have a split second, send Green paint to the general center area. Don't aim for the specific "V" shape yet; just dump it in the center. This pre-loads the area so that when you finally paint the Red cliff, the Green is already there, waiting to be contained.
- Ignore the Right Key: For a speed run, completely ignore the Right Gold Key. It is faster to tunnel down the left side, unlock the bottom reserves, and let the new paint slide over to the right side than it is to dig out both keys individually.
- Batch Processing: Don't tap one Green, wait, tap one Blue. Instead, tap all Greens in the tray, then all Blues. Batching taps reduces the time your finger spends moving and increases your overall Actions Per Minute (APM).
Common Mistakes to Avoid
Level 324 is designed to trick you into making these specific errors. Avoid them to save yourself a restart.
- The "Even Spread" Fallacy: The biggest mistake is trying to paint the Sky, Ocean, and Island all at once. This fills your tray with three different color types (Yellow, Blue, Green) simultaneously. You will deadlock. Fix: Be a specialist. Focus on one color family at a time.
- Ignoring the Vertical Divider: The Grey Block in Column 6 is not just an obstacle; it's a trap. If you clear buckets to the left of it but leave buckets on the right, the ones on the right are stranded. Fix: Always clear the column directly above the Vertical Grey Block before moving to another part of the screen.
- Premature Pink Usage: Tapping Pink as soon as it appears. This is almost always a waste because the Green isn't ready. Fix: Pretend the Pink buckets are Grey Blocks (obstacles) until the Island is 80% green.
- Filling the Sky Too Early: If you fill the sky to 100% before unlocking the keys, you will have nowhere to put the excess Yellow/Cyan paint that comes from the bottom reserves. Fix: Always keep the top 10-15% of the sky empty until the very end of the level.
Stuck Solutions: "What do I do if...?"
Sometimes the RNG (Random Number Generator) gives you a bad bucket spawn. Here is how to recover.
- Situation: "My tray is full (5/5) and I haven't reached the key yet."
Solution: This is the "Full Tray Panic." Look at your canvas. Is there any color that is 90% complete? If the sky is mostly yellow, dump a yellow bucket there to finish it and remove that color from the cycle. If the ocean is full, dump a Blue. You must sacrifice a "perfect" paint job to create one slot of tray space. Once you have one slot, the buckets will slide, and you can dig deeper. - Situation: "The Pink flowers won't fill up, they keep getting overwritten."
Solution: This means the Green vegetation isn't acting as a tight enough container. Stop tapping Pink. Go back and tap Dark Red or Green to widen the boundaries around the flowers. You need to build a "dam" of Red or Green around the flower slot so the Pink has nowhere to spill but into the flower. - Situation: "I unlocked the keys, but I still ran out of paint."
Solution: This means you were inefficient with your dumping earlier in the level. You likely overfilled the Ocean or Sky with "wrong" colors (e.g., putting Green in the Sky). In a retry, focus on strict color segregation. Keep Blue in the Ocean, Green in the Island, and Yellow in the Sky. Never mix them unless absolutely necessary to clear a jam. - Situation: "Buckets are stuck on the right side of the Grey Block."
Solution: You have to clear the "dead zone." Stop looking at the left side. Tap specifically on the buckets in Column 7 and 8. Even if it feels like a waste, send that paint to the right side of the island. Once the Vertical Grey Block is no longer supporting weight from above, you can usually clear the stragglers.