
Level 325
HARDHow to solve Sand Loop level 325? Get instant solution for Sand Loop 325 with our step by step solution & video walkthrough. Sand Loop 325 tips and guide.
Play Sand Loop Now
Experience the puzzle challenge firsthand
Game Screenshots


Sand Loop Level Guides
Level 325: Comprehensive Strategy Guide for the Synthwave Summit
Welcome to the ultimate walkthrough for Level 325, commonly known as the "Synthwave Summit." This stage is a significant difficulty spike in Sand Loop, presenting a visual spectacle that hides a ruthless logistical puzzle. Unlike previous levels where you could rely on quick reflexes, Level 325 is an exercise in patience, slot management, and forecasting. You are painting a retro-futuristic landscape, but the game intends to bury you in ice blocks and mismatched colors before you can finish the sunset. This guide will dismantle every obstacle, providing you with a mathematical approach to clearing the stage.
Section 1: Level Overview and Core Mechanics
The Visual Deception
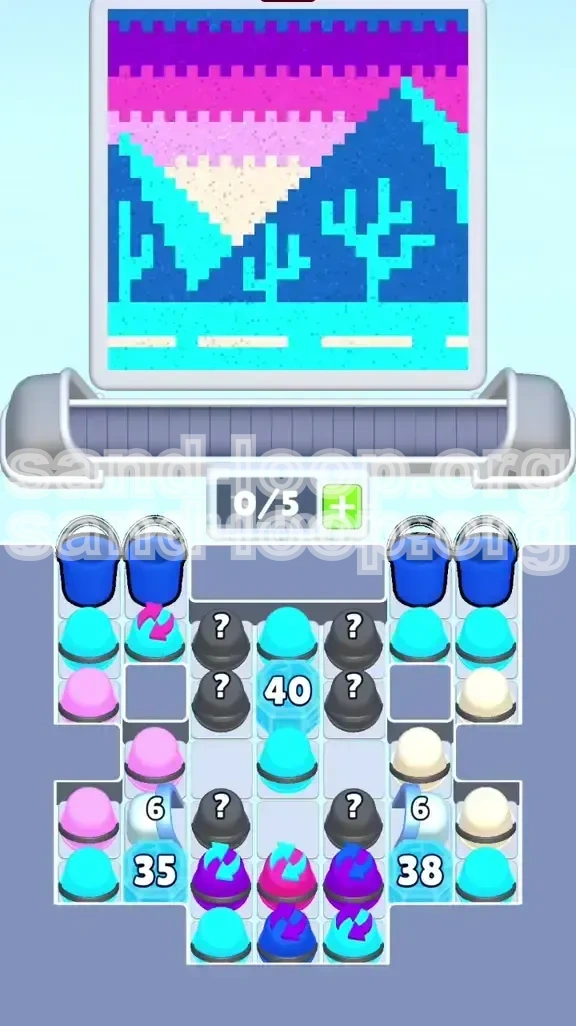
At first glance, Level 325 appears to be a relaxing art task. The image is divided into horizontal stripes: a cyan ground, dark blue vegetation, cream mountain peaks, and a complex magenta/purple sky. However, the horizontal layering is a trap. The game generates colors based on these layers, forcing you to process massive blocks of single colors (Cyan) before moving to intricate details (Dark Blue). Do not be fooled by the beauty; the attrition rate here is high.
The Attrition Mechanic
This level is defined by "Attrition." You have a limited number of conveyor slots (typically 5), and the input stream of cups is relentless. The objective is not just to paint, but to survive the volume. You will be forced to process cups that feel "useless" just to keep the conveyor moving. If your slots stagnate, the game ends.
The Ice Block "40" Barrier
The central mechanic of this level is the massive Ice Block labeled "40" located in the center of the board. This number represents a countdown. Every time a cup is successfully filled and cleared from the board, this number drops by 1. You must physically clear 40 cups from the peripheral lanes before the center of the board unlocks. This creates a "bottleneck" phase where you are forced to play inefficiently.
The Side Locks (6)
Flanking the main stage are two secondary locks labeled "6." These act as mini-bosses. While you are grinding the main counter, you must also specifically target cups located above these side locks. Ignoring them early will leave you with no playable moves in the mid-game. The "6" counter usually drops only when specific "Key Cups" (marked with a lock icon) are filled, or when cups directly above them are cleared.
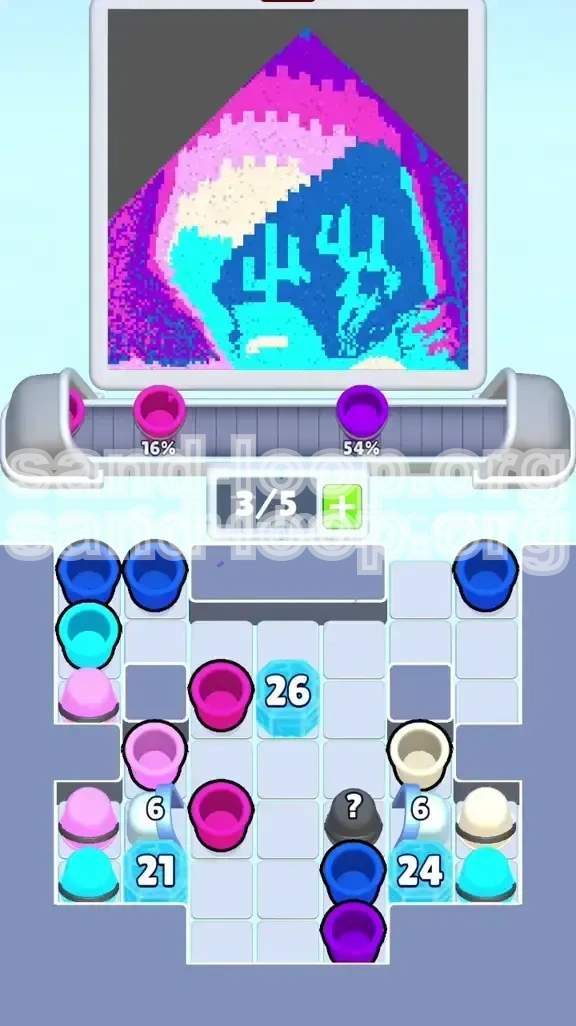
Dynamic Color Shifts
The nozzle (the pouring machine) in this level changes colors with a specific rhythm. It cycles between Cyan, Cream, Pink, Magenta, and Purple. Understanding this cycle is more important than speed. If the nozzle is set to Purple (sky color) but you have a conveyor full of Cyan (ground color), you are in immediate danger of a deadlock.
The "Synthwave" Palette
Master the color hierarchy. Cyan is the most abundant color (ground level). Dark Blue is the rarest but most dangerous (cactus details). Cream represents the mountain highlights. Pink/Magenta/Purple are the late-game gradient colors. Prioritizing Cyan in the early rounds is crucial to freeing up space for the complex sky gradients later.
Section 2: Step-by-Step Walkthrough
Phase 1: The Peripheral Grind (Count 40 to 30)
When the level starts, the center is frozen. You will see two columns of active cups on the far left and far right.
- Action: Immediately tap all available Cyan cups on the right side.
- Secondary Action: Tap Pink cups on the left side.
- Ignore: Do not waste time on the Dark Blue cactus details yet. They are too small and will clog your conveyor.
- Goal: Focus purely on volume. You need to reduce the central Ice Block counter from 40 down to roughly 30 to unlock the next phase of movement.
Phase 2: Cracking the Side Locks
While grinding the center, you must address the locks at the bottom labeled "6".
- Locate: Look for cups positioned directly above the locks. These are usually Cream (right) and Pink (left).
- Strategy: You need to clear 6 cups specifically in these columns to shatter the locks.
- Timing: Do this while the main counter is ticking down. If you wait until the center opens, your conveyor will be too full to manage the side locks.
- Risk: If the nozzle turns to a color not present in the side columns, switch immediately to the peripheral columns to keep the flow moving.
Phase 3: The Thaw (Count 30 to 0)
Once the side locks are gone, you gain access to the "reservoir" cups below.
- Expand: You now have access to more cups on the left and right extremes.
- Efficiency: Now you can spam Cyan and Cream more aggressively.
- Monitoring: Keep a close eye on the central counter. As it approaches 10, the Mystery Cups in the center will begin to reveal themselves.
- Preparation: Try to leave at least 2 empty slots in your conveyor before the center block fully breaks.
Phase 4: The Core Reveal
The center explodes open, revealing a column of Mystery Cups (?) and Switch Cups.
- Assessment: Pause for a split second. Do not tap wildly.
- Identification: Identify the Switch Cups (cups with circular arrows). These will toggle between two colors when tapped or poured.
- Priority: The Mystery Cups are likely Sky Gradient colors (Purple/Magenta). These are your end-game goal.
- Caution: This is where most players fail. The sudden influx of new colors can deadlock a conveyor that is full of leftover Cyan.
Phase 5: The Sky Gradient Execution
The final stretch involves painting the top third of the image.
- Order: Pink (bottom of sky) -> Magenta (middle) -> Purple (top).
- Method: You must manually toggle Switch Cups to match the nozzle.
- Flow: If the nozzle is pouring Purple, find a cup that is Purple or can become Purple. If you have a non-Purple cup blocking the slot, you must clear it or lose the level.
- Patience: Do not fill your slots. Keep 1 slot open to maneuver unwanted cups out of the way.
Section 3: Detailed Color Order Analysis
The Cyan Dominance (Early Game)
Approximately 40% of the level's volume is Cyan. The ground layer is thick and requires constant filling.
- Strategy: Always keep Cyan cups moving. They are your "bread and butter."
- Warning: The Cyan background is broken up by thin Dark Blue lines. Overfilling Cyan is dangerous because it can wash over the Dark Blue pixels if not carefully managed, but in this specific level, the danger is mostly slot clogging rather than pixel overflow.
The Cream Interlude (Mid Game)
The mountain highlights appear in blocks of Cream/Off-White.
- Trigger: These usually appear right as the center block is melting.
- Placement: They are located on the upper-right and center-right.
- Tip: If the nozzle is Cyan, and you see a Cream cup, do not tap it unless you have a plan to switch the nozzle soon. A Cream cup sitting in your conveyor during a Cyan pour is a wasted slot.
The Gradient Trio (Late Game)
The sky consists of Pink, Magenta, and Purple. This is the hardest sequence.
- Pink: The least problematic of the three. It acts as a bridge between the ground and sky.
- Magenta: Heavily used in the Mystery Cups. Often requires Switch Cup manipulation.
- Purple: The final boss color. Deep Purple cups are scarce. You will likely need to use Switch Cups to generate enough Purple volume to finish the top stripe.
Understanding the Nozzle Cycle
The nozzle follows a predictable pattern: Cyan -> Pink -> Cream -> Magenta -> Purple.
- Forecasting: If the nozzle is on Cyan, you know Purple is coming up soon. This is the time to clear non-Sky cups from your conveyor.
- Buffering: Use the Cyan phase to fill easy cups and empty your slots in preparation for the complex Sky phase.
The Dark Blue Trap
Dark Blue is used sparingly for the cacti.
- Frequency: Less than 5% of the total cups.
- Advice: Unless the nozzle is actively pouring Dark Blue, treat these cups as obstacles. Do not fill your conveyor with Dark Blue cups anticipating the color change, as the nozzle stays on Sky colors for a very long time in the late game.
Section 4: Key Tips and Strategy Notes
Slot Management Theory
Never fill all 5 slots unless every single cup matches the *current* nozzle color. In Level 325, the nozzle changes frequently. Keeping 1 or 2 slots open gives you the flexibility to cycle through mismatched cups without stopping the flow. Think of your empty slots as "buffer zones" for bad RNG.
The "Rhythm Tap" Technique
Don't stare at the whole board. Pick a quadrant (e.g., Top Right) and process it fully before moving your eyes. Constantly scanning the entire board leads to "Tunnel Vision," where you miss easy taps right in front of you. Rhythm tapping reduces cognitive load.
Switch Cup Mathematics
Understand the toggle logic. A Switch Cup usually toggles between its "Primary" color (what it looks like) and a "Secondary" color (often the background color).
- Example: A Purple Switch Cup might toggle to Cyan.
- Tip: If you need Purple, but the cup is showing Cyan, tap it once to turn it Purple, *then* drag it to the nozzle (if the nozzle allows) or wait for the nozzle to align. Never drag a Switch Cup to the nozzle if it is currently showing the wrong color.
The "Ice Block" Focus
Visualize the number 40. It is your heartbeat. Every tap should feel like it is contributing to lowering that number. If you find yourself making moves that don't clear cups (e.g., just staring at the board), you are wasting time. Aggressive, high-volume tapping is the only way to melt the center.
Pre-Game Preparation
Before you hit "Start," clear your mind. This level requires about 2-3 minutes of uninterrupted focus. It is not a level you can pause and come back to easily, as the color state is hard to remember if you break your flow.
Utilizing the "Quite Bottom"
The text mentions "Switch Cups at the quite bottom." These are the most valuable cups in the late game. They are your lifeline when the main Mystery Cups run dry. Do not waste these switches early on. Save them for the final Purple push.
Section 5: Common Mistakes and Troubleshooting
The "Full Board" Deadlock
The Mistake: Filling all 5 conveyor slots with Cyan cups right before the nozzle switches to Purple.
- Result: You have no Purple cups, and no empty slots to accept new Purple cups. The game pours paint on the floor, and you lose.
- Fix: Always leave 1 slot open when a color change is imminent (e.g., moving from Ground to Sky).
Ignoring the "6" Locks
The Mistake: Focusing entirely on the center "40" block and ignoring the side locks.
- Result: When the center opens, you are swamped with Mystery Cups, but you have no auxiliary slots from the side reservoirs to manage the overflow.
- Fix: Alternate your focus. 5 taps on the center, 2 taps on the side locks. Keep them balanced.
Misreading Switch Cups
The Mistake: Tapping a Switch Cup to change its color, but then accidentally dragging it to the nozzle while the nozzle is still on the *old* color.
- Result: The cup fills with the wrong color, wasting space.
- Fix: Wait for the visual confirmation of the cup's color change *and* the nozzle alignment before committing to the pour.
Speed vs. Accuracy
The Mistake: Trying to tap as fast as humanly possible.
- Result: Fatigue. By the time you reach the Sky Gradient, your hands are tired, and you make sloppy mistakes on the color switches.
- Fix: Find a sustainable rhythm. Speed is useless if you are inaccurate.
Premature Sky Attempt
The Mistake: Trying to fill the top Purple stripes while the center Ice Block is still at 10.
- Result: You don't have enough volume or slots to manage the complex gradient. The Ice Block mechanics force you to finish the ground first.
- Fix: Respect the phases. Finish the Cyan/Cream ground completely before worrying about the Purple sky.
Section 6: Speed Run and Advanced Tactics
The "Turbo Tap" Start
For advanced players looking to optimize time:
- Technique: As the level loads, immediately spam tap the Cyan cups on the right edge.
- Why: The game logic usually favors the initial input. By clearing 3-4 Cyan cups in the first 3 seconds, you reduce the "40" counter to 36 immediately, giving you a massive head start on the mid-game.
The "Switch Save"
This is a pro-level tactic for the final 10% of the level.
- Setup: If you have a Switch Cup in your slot that is Cyan, and you know Purple is coming, do not discard it.
- Action: Keep it in the slot. When the nozzle turns Purple, tap the cup to turn it Purple, and immediately pour it. This saves you from waiting for a new cup to spawn.
Nozzle Anticipation
Learn the visual cues of the nozzle. The liquid inside the nozzle changes color slightly *before* the stream changes.
- Tactic: Watch the nozzle glass, not just the stream. If you see the liquid turning from Pink to Magenta, stop tapping Pink cups and immediately look for Magenta targets. This saves crucial milliseconds.
Optimal Slot Layout
End-game slot configuration should be:
- 1 x Empty Slot (Buffer)
- 2 x Mystery Cups (Gradient)
- 2 x Switch Cups (Emergency Backup)
- Reasoning: This mix gives you the highest probability of having the right color available without needing to scroll the conveyor.
The "Ignore Blue" Rule
In a speed run, completely ignore the Dark Blue cactus details until the very end.
- Reasoning: They are worth few points and break your flow. If you finish the main gradient and have 10 seconds left, go back and dot the cacti. If the timer runs out, the level usually counts the main image as complete even if the fine details are missing.
Reset Strategy
If you don't get a "Turbo Tap" start (i.e., the first cup spawn is unlucky), reset immediately.
- Why: In a short level like this, losing the first 5 seconds to bad RNG can cost you the 3-star rating. A fast reset is faster than a slow recovery.