
Level 369
HARDHow to solve Sand Loop level 369? Get instant solution for Sand Loop 369 with our step by step solution & video walkthrough. Sand Loop 369 tips and guide.
Play Sand Loop Now
Experience the puzzle challenge firsthand
Game Screenshots
Sand Loop Level Guides
Level Overview: The Cozy Cabin Logic Puzzle
The "Sand Loop" Physics Engine
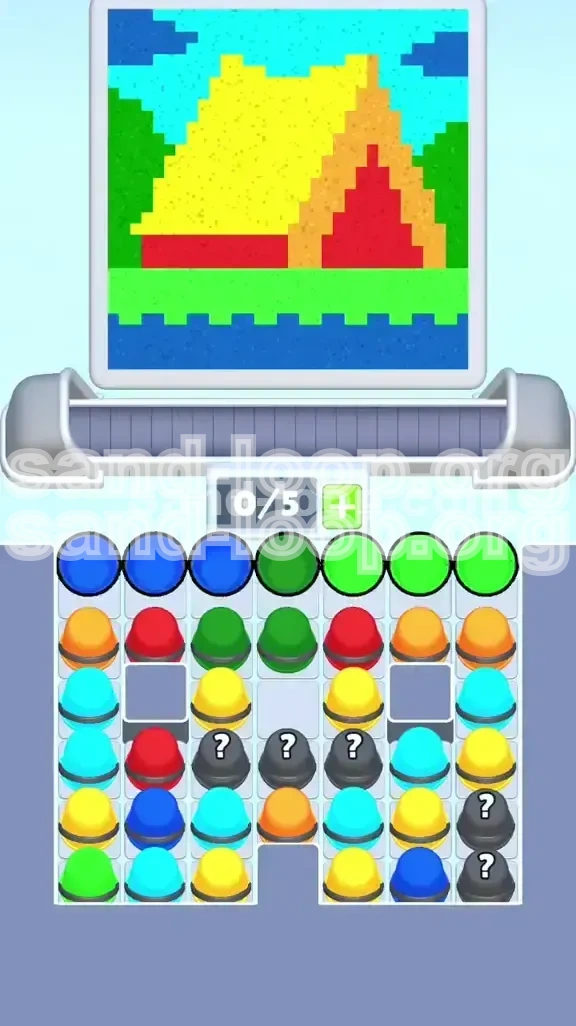
Level 369 is not a test of reflexes; it is a masterclass in fluid management and spatial reasoning. The core mechanic of Sand Loop dictates that liquids flow based on gravity and pixel collision. In this level, the game generates a scene featuring a cabin, a shoreline, and a sky. Your input comes from a supply tray (a grid of color cups) and a processing belt (a 5-slot queue). The challenge arises because the supply tray is organized inversely to the painting order: the colors you need last are stacked on top, blocking access to the colors you need immediately.
Analyzing the Three Visual Zones
The canvas is strictly divided into three horizontal layers that must be addressed in a specific sequence to avoid "color bleeding" (where one color contaminates another).
- The Aquatic Zone (Bottom 25%): This section requires Dark Blue. It acts as the foundation. Because it is at the bottom, any overflow from above will land here. If it isn't full, subsequent colors will leak into the empty space, causing a failure.
- The Terrestrial Zone (Middle 40%): This Green zone represents the grass and hills. It features a jagged, pixelated edge (the shoreline) that interlocks with the water. This jagged edge is the primary cause of failure; if the Green is poured before the Blue is fully settled, the Green liquid seeps into the "teeth" of the water layer, creating an ugly teal sludge.
- The Structural Zone (Top 35%): This area contains the cabin (Red, Orange) and the Roof (Yellow). These colors are blocked by the Mystery Cups in the tray.
The Supply Tray Bottleneck
The supply tray is a 5x4 grid. In Level 369, the layout is designed to induce queue jams.
- Top Row (The Barrier): Contains the essential Blue and Green cups, but also the "Mystery Cups" (Grey blocks with '?' marks).
- Mystery Cup Mechanics: These cups hide random colors. Tapping them adds a cup to your belt, but you often don't need that color yet. They exist to consume valuable slot space in your 5-slot queue.
- Bottom Row (The Prize): Contains the bulk of the Red, Orange, and Yellow cups needed for the cabin. You cannot access these until the top rows are cleared.
The 5-Slot Queue Constraint
You can only have 5 active cups on your pouring belt at any one time. This is the critical resource management aspect of the level. If you fill your belt with 5 cups of Blue, but the water zone is already full, you cannot add more cups. You are stuck waiting for the Blue to finish pouring (which takes time) while the clock ticks down. Efficient rotation of these 5 slots is the key to a high score.
Clear Objectives for Victory
Objective 1: Execute the "Bottom-Up" Protocol
Your primary directive is to fill the canvas from the lowest pixel to the highest. You cannot paint the roof (Top) before the ground (Bottom). Gravity ensures that liquid from the roof will drip down. If the ground isn't already painted with its correct color, the roof drips will contaminate it. You must secure the bottom 25% of the screen with Blue before any other liquid touches those pixels.
Objective 2: Manage Queue Capacity (The Flow State)
You must maintain a rhythm where you are never waiting for a cup to pour, and never jamming the belt.
- The Ideal State: As one cup finishes pouring (emptying a slot), a new cup should just be arriving from the tray.
- The Forbidden State: Having 5 full cups sitting on the belt while the canvas is already full of that color. This indicates you tapped too early and wasted time.
Objective 3: Decode and Neutralize Mystery Cups
The Grey Mystery Cups are obstacles. Your goal is not necessarily to *use* the paint inside them, but to *remove* the cup from the tray to access the layers below. You must reveal their contents and send them to the belt without letting them clog your workflow. Treat them as "trash" that must be taken out to reveal the treasure (Red/Yellow) underneath.
Objective 4: Prevent Color Contamination
Level 369 has a strict purity requirement. If Blue touches Green before Green is finished, or if Red touches Yellow, the level may register an error or simply look messy, potentially voiding a "Perfect" rating. You must ensure distinct boundaries between zones, particularly the shoreline.
Objective 5: Clear the Grid Efficiently
Victory condition is not just filling the canvas, but emptying the supply tray. Often, players fill the screen but leave 3 cups stranded in the tray because they ran out of time or belt space. You must aim to have an empty tray and a full picture simultaneously.
Step-by-Step Walkthrough Guide
Phase 1: The Foundation (Water & Sand)
The start of the level is slow-paced. Do not rush. The supply tray presents you with stacks of Dark Blue and Green immediately.
- Step 1: Scan for Dark Blue. Look at the top-left sector of the tray. Identify the Dark Blue cups.
- Step 2: Initial Tapping. Tap 2 Dark Blue cups. Send them to the belt. Do not tap more than 2 yet.
- Step 3: Monitor the Fill. Watch the water zone at the bottom. It will begin to fill. Wait until the first Blue cup is approximately 40% poured before you look for Green.
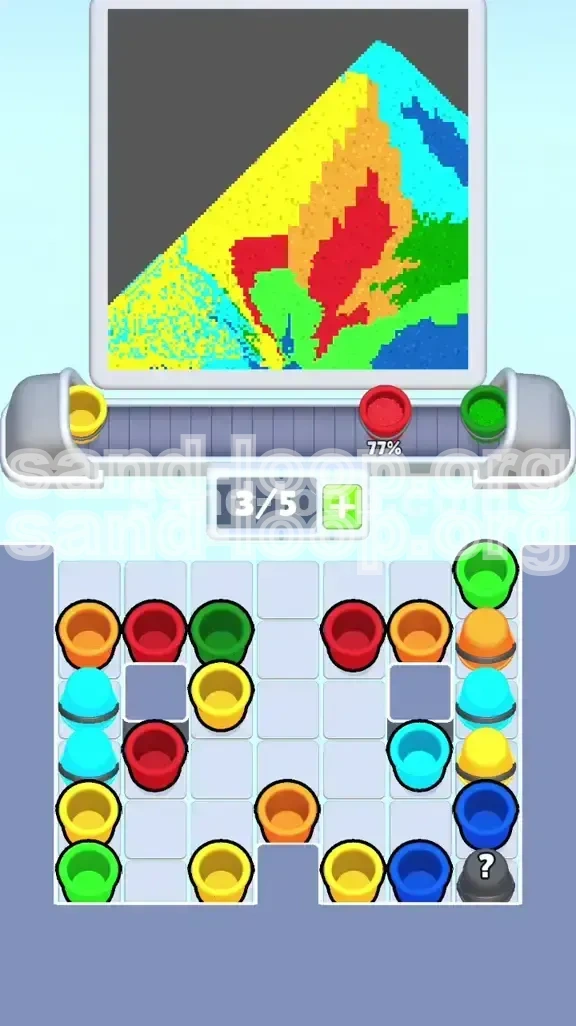
Phase 2: The Critical Shoreline (Grass Management)
This is the most dangerous phase of the level. The transition from Blue (water) to Green (grass) is where 90% of failures occur.
- Step 4: Identify Green Stacks. Locate the Green cups, usually on the right side of the top row.
- Step 5: The Staggered Pour. Tap only ONE Green cup initially. Watch the belt. As the Blue finishes and the Green starts pouring, observe the shoreline.
- Step 6: The "Teeth" Check. As Green hits the Blue, it forms a zigzag pattern. Ensure the Green liquid sits *on top* of the Blue without dripping *into* the Blue reservoir. If you see dripping, stop tapping immediately and let the liquid settle. Once stable, tap the remaining Green cups.
Phase 3: Cracking the Center (Mystery Cups)
With the bottom two zones stable, the top row of the tray is now clear, revealing the Grey Mystery Cups in the center.
- Step 7: Assess Your Belt. You should have 2-3 slots opening up as the Green cups finish.
- Step 8: The "Trash" Clear. Tap the Grey Mystery Cups. They will reveal colors (often Cyan or duplicate Red).
- Step 9: Flow Control. If the revealed color is Cyan (Sky), it is safe to queue but pour it slowly. If it is a color you don't need (like extra Blue), just let it pour; the goal is to remove the physical block from the grid so the Red/Yellow cups below can rise up.
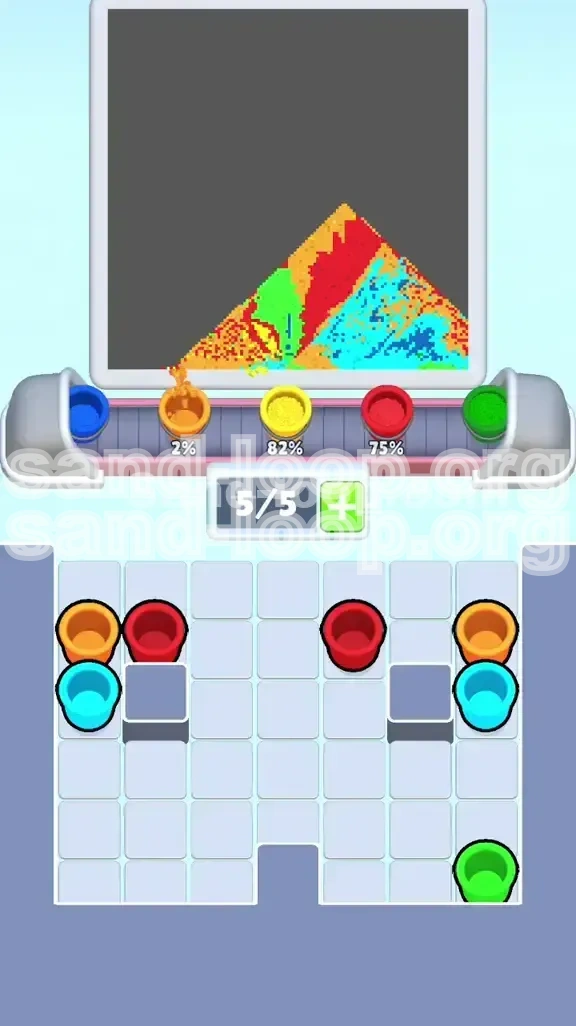
Phase 4: Constructing the Cabin (Walls & Roof)
Once the Mystery Cups are gone, the bottom layers of the tray shift up, revealing the structural colors.
- Step 10: The Orange Trim. Locate the Orange cups. These are usually low-volume. Tap them now. They fill the small window/door frames quickly.
- Step 11: The Red Walls. Tap the Red cups immediately after Orange. The Red wall sits above the Green grass. Since Green is solid, Red is safe.
- Step 12: The Yellow Roof. This is the final major block. Tap all available Yellow cups. The roof has a high capacity, so it will take time to pour. This is a good moment to breathe and scan the tray for stragglers.
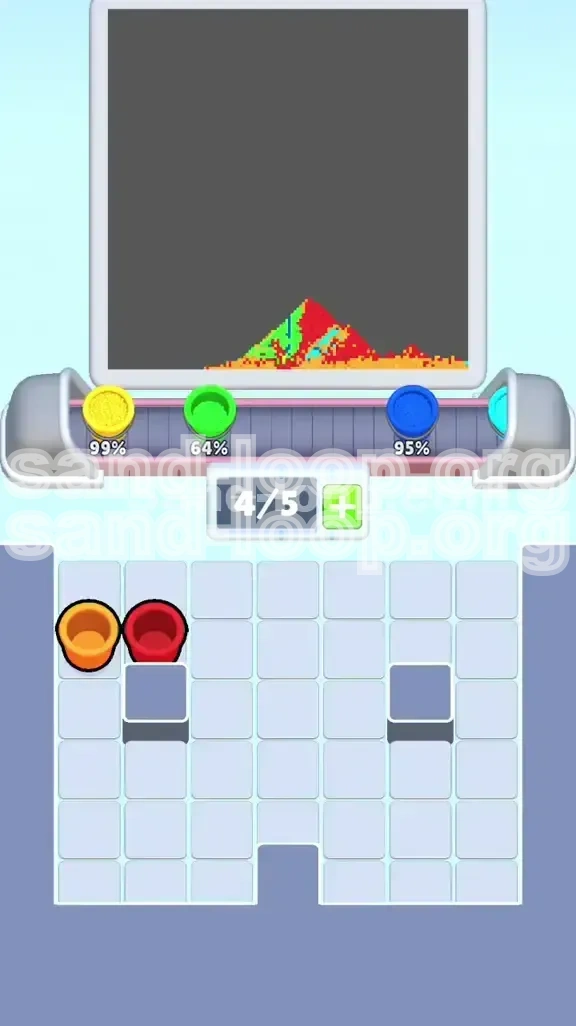
Phase 5: Final Polish (Sky & Cleanup)
The house is done. The only remaining empty space is the sky (Cyan).
- Step 13: Cyan Scavenging. Look for Cyan cups. They are often hidden at the very bottom of the tray or were revealed from Mystery Cups earlier.
- Step 14: The Final Fill. Pour the Cyan. It acts as a background, filling the gaps around the roof and cabin.
- Step 15: Verification. Ensure no pixels are moving. If the liquid is still shifting, the level isn't done. Wait for the "Level Complete" check.
Color Order and Logic Analysis
The Hierarchy of Liquids
Why can't you do the roof first? In Sand Loop physics, liquids are dynamic. They settle, but they are affected by gravity.
- 1. Dark Blue (Priority Alpha): Lowest elevation. Acts as a "catch basin" for any minor overflows.
- 2. Green (Priority Beta): Must sit on Blue. It is heavier than sky colors but lighter than structure.
- 3. Red & Orange (Priority Gamma): These are the "structure." They define the shape of the cabin.
- 4. Yellow (Priority Delta): High volume, top structure. Must be solid to support the sky.
- 5. Cyan (Priority Omega): The filler. It fills the negative space around the structure.
Volume Management Strategies
Different colors have different "viscosities" and fill rates in this game engine.
- High Volume Colors: Blue and Yellow. These cover large areas and take the longest to pour. You should queue these first to ensure they are pouring while you are looking for other colors.
- Low Volume Colors: Orange and Red. These cover small details. They pour fast. Queue them last to avoid "idle belt" time where the belt is empty but the picture isn't full.
The "Mystery Cup" Variable
The Grey cups introduce a random element (RNG) to the supply tray.
- Scenario A: You get Cyan. This is good; it fills the belt while you wait for Red.
- Scenario B: You get a duplicate Green. This is bad; it wastes a slot.
- Strategy: Assume the worst (Scenario B). Always leave 1 empty slot on your belt when tapping a Mystery Cup if possible, so you aren't locked out of a critical color that appears immediately after.
Key Tips for Success
Master the "Tap-Wait" Rhythm
Do not spam-tap the screen. The optimal speed is: Tap -> Watch Belt Move -> Wait for Pour Start -> Tap Next. This ensures you never accidentally queue a 6th cup (which is impossible) or queue a color you don't have room for.
Visualizing the Pixel "Teeth"
The shoreline isn't a straight line. Train your eyes to look for the "steps" or "teeth" in the graphics. When Green is pouring, imagine it sliding down a staircase. If you pour too fast, it jumps the railing and lands in the water (Blue). Slow down specifically for this transition.
The "Outside-In" Tray Scan
When a new layer of cups is revealed, always check the four corners of the tray first. In Level 369, the "Trap" colors (the ones you need to save for last, like Cyan) often spawn in the center, while the "Structural" colors (Red/Orange) spawn on the edges. Prioritize clearing the edges.
Utilizing "Pour Time" for Planning
While a cup is pouring (e.g., the slow Yellow roof), you are idle. Use this 5-10 second window to frantically scan the remaining tray layout. Plan your next 3 taps. Do not wait until the belt is empty to decide what to do next.
Audio Cues and Feedback
The game provides audio feedback when a cup finishes pouring (a "clink" or distinct sound). Learn to recognize this sound. It allows you to keep your eyes on the tray rather than the belt, significantly increasing your speed.
Common Mistakes to Avoid
The "Premature Green" Error
This is the #1 cause of restarts. Players tap all Green cups immediately after the Blues. Because the Blue liquid is still "wet" and settling, the Green liquid mixes with it, turning the shoreline into a muddy, teal-colored mess.
- The Fix: Count to two after the last Blue cup starts pouring before you tap the first Green cup.
The "Belt Jam" Panic
You have 4 cups on the belt. You see a Red cup you need, but you also see a Mystery Cup. You tap the Mystery Cup, and now you have 5 cups. The Red cup is now trapped behind a wall of other cups in the tray, and you can't retrieve it because the belt is full.
- The Fix: Never fill the 5th slot with a "maybe" color (Mystery). Keep the 5th slot open for "sure" colors (Red/Orange) or leave it empty to let the belt cycle.
Ignoring the Small Details
Players often focus on the big blocks (Water, Roof) and leave the Orange trim (windows/doors) until the very end. By then, the belt is clogged with Cyan, and the Orange cups are stranded in the tray.
- The Fix: Orange is usually a low-volume cup. Clear it as soon as the Mystery cups are gone. It's a quick "clean up" task that shouldn't wait.
Overfilling the Sky
Cyan (Sky) is often abundant. Players tap all Cyan cups early. This fills the sky, but then they have no space on the belt for the Yellow Roof cups they forgot about.
- The Fix: You only need enough Cyan to fill the top 15% of the screen. Stop tapping Cyan once the sky looks mostly blue and switch focus to the roof.
What to Do When You Get Stuck
Troubleshooting a "Stuck" Belt
Sometimes, despite your best planning, the belt stops moving because you have 5 cups that aren't pouring (maybe the canvas for that color is full, but the cup is still there).
- The Diagnosis: This happens if you queue a color that isn't needed yet.
- The Solution: You must wait. There is no "discard" button. You have to wait for the liquid to slowly find a pixel to fill, or for the level to register the fill. Use this time to plan your next move, but do not panic-tap.
Recovering from a Bad Mix
If you notice the Green and Blue have mixed at the shoreline, creating a 10-pixel-wide streak of teal:
- Can I fix it? Usually, no. The physics engine has already blended the pixels.
- The Decision: If the mix is small (less than 5% of the shoreline), you might be able to cover it with the Red Wall later (if the wall is low enough). However, if the mix is in the water, you must restart. Do not waste 2 minutes trying to "fix" physics errors with more paint.
Finding Hidden Cups
You have filled the house and water, but the level won't end. You are missing 2% completion.
- The Scan: Look closely at the supply tray. Is there a Grey cup hiding at the very bottom edge? Is there a single pixel of Cyan cup obscured behind a stack?
- The Action: Zoom in (if your device supports it) or tilt your screen to see shadows. Sometimes a cup is "off-screen" or behind the UI. Clearing the last row often reveals the straggler.
Speed Run Strategies
The "Chain Reaction" Opening
For advanced players looking to break the 45-second mark.
- The Move: As the level starts, tap Blue, Blue, Green, Green in rapid succession (approx 0.5 seconds apart).
- Why it works: The first Blue will be pouring by the time the Greens arrive on the belt. If you timed it right, the Blue finishes just as the Green belt slot becomes available, minimizing downtime. This requires perfect rhythm.
Mystery Cup "Pre-loading"
Instead of waiting for Mystery Cups to be revealed to tap them, anticipate them.
- The Move: As the last Blue cup is pouring, hover your finger over the location where the Mystery Cups *will* appear. The moment the tray shifts, tap immediately.
- The Benefit: This shaves off the 0.5 seconds of reaction time per cup. In a speedrun, every millisecond counts.
Parallel Processing
Do not watch the paint dry.
- The Concept: While the Yellow roof is pouring (which takes 5+ seconds), you should already be locating the Cyan cups for the sky finish.
- Execution: Your eyes should be on the tray, not the canvas. Listen to the audio cues of the pouring to know when to switch focus back to the belt.
Skipping Perfection for Speed
In a standard run, you wait for 100% fill. In a speedrun, you accept 95% fill if the game allows it.
- The Risk: Leaving tiny 1-pixel gaps in the corners of the Sky (Cyan) or the edges of the Roof (Yellow).
- The Reward: Beating the level timer. If the level completion logic is lenient, you can finish the level before the paint is technically "settled," provided the bulk is there.