
Level 376
HARDHow to solve Sand Loop level 376? Get instant solution for Sand Loop 376 with our step by step solution & video walkthrough. Sand Loop 376 tips and guide.
Play Sand Loop Now
Experience the puzzle challenge firsthand
Game Screenshots

Sand Loop Level Guides
Level 376 Master Guide: The Christmas Cat Strategy
Visual Breakdown & Layout Analysis
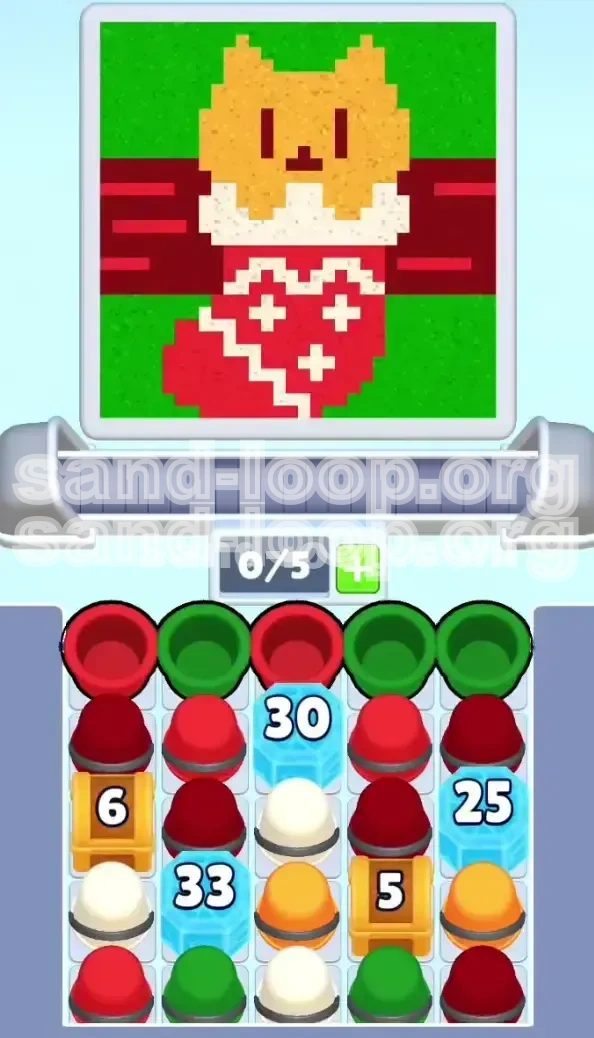
Level 376, "The Christmas Cat," is a complex pixel art puzzle that requires you to paint a yellow cat head emerging from a red stocking, set against a green background. The visual composition is deceptive; while it looks cute, the layout is a "Blockade Maze." The board is vertically split into three distinct sections: the top access layer, the middle blockade zone, and the bottom supply depot. The most critical visual element to recognize immediately is the central "Keystone"—an Ice Block with 30 Hit Points (HP) sitting directly in the center of the board. This block acts as a dam, holding back the White and Yellow sand required for the final details.
The Core Mechanic: The Funnel Effect
Unlike standard levels where you can paint from top to bottom freely, Level 376 utilizes a "Funnel Effect." This means all gravity-fed sand flows must pass through the central choke point. The difficulty here is not pixel perfection, but resource management. You are forced to use your opening "paint" colors (Red and Green) as "ammunition" to shatter the board's defenses. If you attempt to paint the background corners before breaking the center, you will run out of moves. The 30-HP Keystone must be your sole focus for the first 15% of the game.
The Conveyor Belt Constraints
Your conveyor belt has 5 slots. In this level, "Belt Clog" is the primary cause of failure. Because the early game requires you to pour colors into "wrong" spots to break ice, your belt will fill up with cups you can't use immediately. You must maintain a strict "3/5 Rule"—never let more than 3 cups sit on the belt if they aren't immediately useful. A full belt prevents new cups from spawning, which halts your ammo supply against the Ice Blocks.
Win Conditions vs. Fail States
To achieve victory, you need a 95% accuracy match to the target image. However, the "Game Over" triggers are specific. You lose if the conveyor belt accumulates 5 unusable items (cups you cannot pour anywhere). You also lose if you run out of moves before the "Yellow Cat" phase is triggered. The margin for error is tight: you generally have about 55-60 moves total, which means you cannot waste more than 5 moves on bad pours.
Why This Level is Different
Most "Sand Loop" levels allow for "Paint-overs" (fixing mistakes later). Level 376 punishes this because the White and Yellow colors are locked behind the Ice Blocks. If you paint the top of the stocking Green or Red while waiting for the block to break, you can fix it. But if you accidentally spill White into the Red zone before the Cat is placed, you often cannot fix it because White is a scarce resource. This level demands "Pre-planning" rather than "Correction."
Essential Objectives: Your Mission Checklist
Mission 1: Shatter the Central Keystone (0-30% Progress)
Your first and only priority in the opening turns is the destruction of the Central Ice Block (30 HP). This block seals off the bottom half of the board where the White and Yellow cups are located. You cannot touch the cat or the furry cuff until this is gone. Treat Red and Green sand purely as weapons to chip away at this block's health bar.
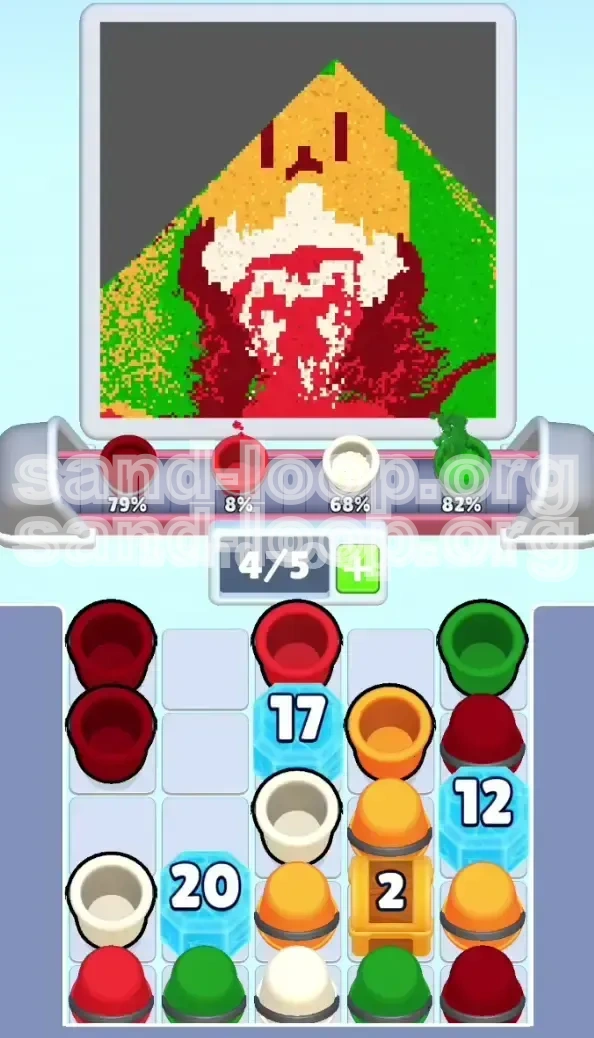
Mission 2: Breach the Side Supply Crates (30-50% Progress)
Flanking the center are Locked Crates. The Left Crate requires 6 color matches to open, and the Right Crate requires 5 matches. These crates usually contain secondary colors or power-ups needed to clear the bottom row of Ice Blocks (33 HP and 25 HP). Do not ignore the side crates; opening them accelerates the board clearing process significantly.
Mission 3: The "Fur Cuff" Precision Phase (50-70% Progress)
Once the bottom row is liberated, you will gain access to White sand. This phase requires high precision. You must paint the white furry cuff at the top of the stocking and a zigzag trim near the foot. The challenge here is volume control—White sand comes in large cups, but the painting areas are thin lines.
Mission 4: Isolate and Paint the Cat (70-100% Progress)
The final objective is the Yellow Cat head. This must be done last. The cat sits directly on top of the White cuff. If you paint the Yellow before the White cuff is finished, the White sand will bleed into the Yellow face, turning it a muddy greenish-brown. The yellow head is a solid block, making it the easiest part to paint, provided the foreground is ready.
Hidden Objective: Background Filling
While focusing on the center, you must also ensure the Green background is filled. This acts as your "dumping ground" for excess Green cups. If your belt is full of Green and you need Red, look for background corners to pour the Green into. Keeping the background 80% filled throughout the early game prevents a panic situation in the final 10 moves.
Color Order Strategy: The Ammo Hierarchy
Phase 1 Colors: Red & Green (The "Ammo")
In the first 20 moves, color correctness does not matter. Only impact matters. You should aggressively load Red and Green cups regardless of where they land. Pouring Green onto a spot that is supposed to be Red is acceptable if it deals damage to the Ice Block. Do not wait for the "perfect" color match. Clearing the path is more important than a pretty picture at this stage.
Phase 2 Colors: The "Keystone" Whites
White is your most valuable and dangerous resource. It unlocks after the central blockade falls. The strategy for White is "Micro-Management." Never load more than one White cup at a time. Because the dispenser pours at a fixed rate, loading two or three White cups will inevitably lead to overflow, spilling white sand onto the red stocking body and ruining the contrast.
Phase 3 Colors: The "Finale" Yellows
Yellow is the "Safe Zone" color. It represents the final 15% of the level. Once White is 100% complete, you can flood the center with Yellow. The Cat Head is a large, contiguous pixel area. You can load 2-3 Yellow cups safely here. There is no risk of bleeding because the surrounding areas (White Cuff and Green Background) are already finished and won't be touched again.
The "Sacrifice" Color Protocol
Sometimes, the game will give you a color you don't need (e.g., Dark Red when you only have Green spots left). This is the "Sacrifice" protocol. If the belt is clogged, you must find a sacrificial corner to dump the unwanted color. A wasted turn is better than a "Game Over" due to a full belt. Look for pixels that are already 80% filled; overfilling them is less visible than spilling on a new area.
Timing the Color Switch
The most critical transition point is moving from "Blockade Breaking" (Phase 1) to "Detail Painting" (Phase 2). The signal to switch is when the bottom Ice Blocks (33 HP / 25 HP) shatter. At that exact moment, stop pouring Red and Green immediately. Clear your belt of non-essential colors to make room for the incoming White cups. Do not start the White phase until the board is physically open.
Step-by-Step Walkthrough Guide
Phase 1: The "Center Crush" (Moves 1-15)
The board is locked tight. Your only interaction point is the center.
- Load the Belt: Grab every Red and Green cup available. Fill your slots (3/5 or 4/5).
- Target Center: Pour all these cups into the central column. Do not worry about painting the stocking body yet.
- Breaker Logic: Even if a cup is Green and the spot is Red, pour it. Every grain of sand reduces the Ice Block's 30 HP.
- Goal: You must reduce the center block to 0 HP before move 15, or you will run out of moves.
Phase 2: The "Supply Line" Unlock (Moves 16-30)
The center is open, revealing the bottom crates and ice blocks.
- Identify Targets: Look at the side crates. Left needs 6 matches, Right needs 5 matches.
- Efficient Pouring: Pour Red into the stocking body (where it belongs) while simultaneously hitting the Right Crate. Pour Green into the background while hitting the Left Crate.
- Monitor the Belt: If you see White cups spawn in the preview, do not load them yet! Finish breaking the bottom ice (33 HP) first.
- Unlock Success: Once the crates break, you will have a clearer path to the bottom of the board.
Phase 3: The "Clean Slate" Preparation (Moves 31-45)
This is the transition phase where most players get stuck.
- Belt Purge: Finish pouring any remaining Red/Green cups. You want an empty belt for the White phase.
- Background Check: Ensure the Green background is at least 90% filled. You won't have time to come back to it later.
- Red Body Finish: The main red part of the stocking must be 100% complete before you touch White. If you have to pour Red after you start White, you risk splashing Red on the White cuff.
Phase 4: The "White Line" Execution (Moves 46-55)
Precision mode is now active. Speed is less important than accuracy.
- Load One White: Pick up exactly one White cup.
- Pour the Cuff: Gently pour it onto the white furry band at the top.
- The ZigZag: If you have leftover White, hit the zigzag pattern on the foot.
- Reassess: If the Cuff isn't white enough, load a second cup. Do not load a third until the second is poured.
- Stop: As soon as the white areas are solid, stop using White. Switch immediately to clearing the belt.
Phase 5: The "Yellow Cat" Finale (Moves 56+)
The final sprint. The board should be mostly complete.
- Flood the Center: Load 2-3 Yellow cups.
- The Head: Pour them all into the cat's head area.
- Cleanup: If there are any tiny gaps in the Green background or Red stocking, use your last moves to fix them. Yellow is usually safe because it's isolated in the center.
Pro Tips: Mistakes to Avoid
Mistake #1: The "Perfectionist" Trap
The Error: Spending moves 1-10 trying to keep the Red stocking perfectly red and avoiding Green spillage.
The Fix: Accept the mess. In the first phase, the Ice Block is your enemy, not the wrong colors. You can paint over Green spots with Red later (Phase 2 or 3), but you cannot progress if the Ice Block remains. Prioritize damage over aesthetics.
Mistake #2: The "White Queue" Disaster
The Error: Loading 3 White cups as soon as they appear because "I'll need them eventually."
The Fix: This is the #1 cause of failure. The White Cuff is a very small area. Three White cups contain enough sand to fill the whole stocking. If you queue 3, you will overflow, and the excess will spill onto the Red body, creating a pink stain that is impossible to remove without restarting.
Mistake #3: Premature Yellow Usage
The Error: Seeing the Yellow cups and pouring them immediately because "the cat is the main character."
The Fix: Yellow is "contaminated" easily. If you pour Yellow first, and then try to paint the White Cuff around it, the White sand will blend with the Yellow edges, blurring the cat's face. The White cuff acts as a border; you must build the frame (White) before the painting (Yellow).
Mistake #4: Ignoring Belt Mechanics
The Error: Letting the belt fill up to 5/5 with "useless" colors while waiting for a specific one.
The Fix: This is "Belt Death." If the belt is full, the game stops giving you new options. If you have 5 cups and none match your immediate target, pick any cup and pour it into a "sacrifice" zone (like a filled background corner) just to free up a slot. New, better cups will spawn immediately after.
Speed Run & Advanced Troubleshooting
Speed Run Strategy: The "Chain Break" Method
For players aiming for a high score or 3-star rating, timing is everything. You can "Chain" your moves to break multiple blocks at once.
- The Combo: Aim to break the Central Keystone (30 HP) using the last drop of a cup.
- The Reload: As the board shakes from the break, a new cup will slide into the slot immediately.
- The Flow: If you time your pours so that Red is immediately followed by Green, you prevent "wet sand buildup" in the nozzle, allowing for faster succession pouring.
Problem: "I'm out of moves with 50% left."
Diagnosis: You were too careful in the beginning. You likely spent too much time fixing background colors that didn't matter.
Fix: On your retry, ignore the top-left and top-right corners entirely. Treat the game as if only the center 3 columns exist for the first 20 moves. Break the ice first, paint the background later. The "Funnel" mechanics mean you can easily flood the background in Phase 2 once the blockers are gone.
Problem: "The Cat's Face is Ugly/Mixed Colors."
Diagnosis: You painted the White Cuff after the Yellow Cat.
Fix: You cannot erase sand, only cover it. If you have spare Yellow cups, pour them over the cat to "reset" the yellow base. Then, finish the White cuff completely before touching Yellow again. If you are out of Yellow, you must restart, as you cannot recover the definition of the face.
Problem: "The Belt is Stuck (Jam)."
Diagnosis: You have 5 cups on the belt, but the board needs a color that isn't there.
Fix: Find the "least damaging" spot to pour a wrong color. Usually, this is a corner of the Green background that is already 90% full. Pouring the wrong color there is better than a Game Over. Once the slot is empty, the game cycles the belt, potentially bringing the color you need to the front.