
Level 375
HARDHow to solve Sand Loop level 375? Get instant solution for Sand Loop 375 with our step by step solution & video walkthrough. Sand Loop 375 tips and guide.
Play Sand Loop Now
Experience the puzzle challenge firsthand
Game Screenshots
Sand Loop Level Guides
Sand Loop Level 375 Comprehensive Walkthrough: The Beach Umbrella Strategy
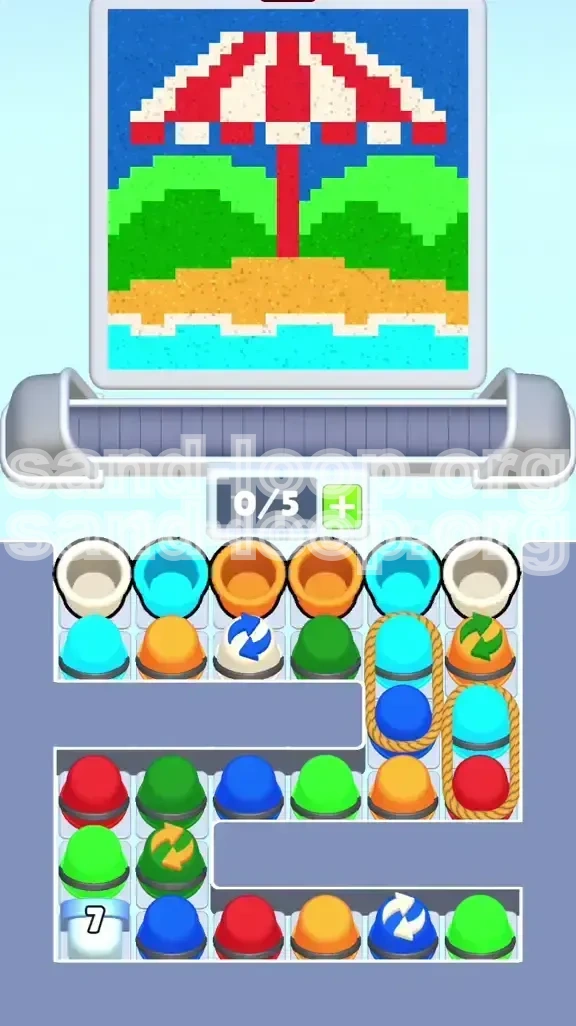
Welcome to the ultimate strategy guide for Sand Loop Level 375, known as "The Beach Umbrella." This level is a significant difficulty spike in the Sand Loop chapter, testing your ability to manage color logistics rather than just speed. Unlike previous ice levels where reflexes ruled, this stage is a logic puzzle that demands strict inventory management and precise color ordering. The visual aesthetic—a calm beach scene with a striped umbrella—belies the chaotic nature of the conveyor belt mechanics you are about to face. In this guide, we will dismantle the level layer by layer, providing you with the exact sequence to clear this challenging stage without getting stuck.
Understanding the Level Layout and Mechanics
Before you tap a single cup, you must understand why this level is difficult. The primary constraint is the 5-slot conveyor limit. You cannot hoard cups. You have a "Rope Lock" mechanism on the right side of the screen that acts as a soft wall, preventing you from accessing essential Deep Blue cups until you clear specific colors. Furthermore, the level introduces an "Ice Block" mechanic on the left side that requires a specific number of cups to be processed before it unlocks a vital generator. You are painting a scene that requires color layering: background sky first, then hills, then sand, and finally details. If you paint out of order (e.g., doing the sky last but pulling the blue paint too early), you will fail. This walkthrough is designed to help you navigate these constraints efficiently.
The Visual Composition: A Layered Puzzle
The canvas in Level 375 is not a flat image; it is a topographical map that dictates your filling order. Analyzing the art reveals why specific colors must be prioritized.
- The Deep Blue Sky (Background Layer): This occupies the top 30% of the canvas. It acts as the container for the rest of the image.
- The Green Hills (Mid-ground Layer): These occupy the central 40% and serve as the foundation for the umbrella.
- The Golden Sand (Foreground Layer): The bottom 20% is pure golden yellow/orange.
- The Cyan Water (Detail Layer): A thin strip separating the sand from the hills, often confused with the sky blue.
- The Red & White Umbrella (Accent Layer): The focal point. This requires precision, as the red pole is thin and easily overfilled.
Primary Objectives for Success
To achieve a three-star rating and clear this level, you must focus on three main goals that go beyond simply "filling the picture."
- Zero Clogging: You cannot afford to have the conveyor belt full (5/5 slots) when a critical color appears. Always keep at least 2 slots open.
- Strategic Ice Breaking: You must clear the "7-count" Ice Block on the left as early as possible to access the White generator hidden beneath it.
- Rope Management: You must deliberately clear the roped cups on the right to free up the flow of the board, even if it means slightly overfilling a color temporarily.
Equipment and Inventory Constraints
You are working with a severely limited inventory system in this stage. The cups are not infinite; they are spawned in batches. The left side features a mix of Green, Red, and the Ice-blocked White generator. The right side is locked behind the Rope Constraint, containing Cyan, Orange, and Red. The Deep Blue cups are buried at the very bottom right, effectively the "reward" for clearing the rest of the board. Understanding this layout is crucial: you will be working primarily from the left side for the first 50% of the level.
Step-by-Step Phase 1: Breaking the Ice and Establishing Flow
The opening moments of Level 375 are the most critical. If you make a mistake here, the snowball effect will make the endgame unbeatable. Your immediate goal is not to finish the painting, but to clear space and unlock your primary resources.
The Critical "Top Row" Clearing Strategy
As the level loads, your eyes will immediately scan the top row of the stack. You will see a mix of White, Cyan, and Orange cups. Your instinct might be to save the White for the umbrella stripes later—ignore this instinct.
You must tap the White and Cyan cups immediately. Even though the White paint is for the umbrella (which is at the top of the visual hierarchy), getting these cups onto the conveyor belt serves a dual purpose: it clears the vertical stack to allow lower cups to slide forward, and it pre-loads your belt with necessary colors. Do not worry about "wasting" the white paint at this stage; the overflow can be managed later.
Targeting the "7" Ice Block on the Left
Shift your focus to the bottom-left corner. You will notice a large "7" marked on an Ice Block sitting atop a generator. This block requires 7 cups of color to be poured to shatter it.
Actionable Advice: Do not rely solely on the cups directly on top of the block. You need to look for "tap chains." Look for vertical stacks of Green or Red cups that can be tapped in rapid succession. Prioritize clearing the cups located directly above the Ice Block first. As you clear these, the weight of the stack shifts, bringing new cups into the play area. Every cup you tap counts toward the "7," regardless of its color. Keep an eye on this counter; your priority in Phase 1 is hitting that "0" mark to free the generator.
Managing the Green "Hill" Foundation
While working on the Ice Block, you will inevitably pull Green cups. This is good. The Green Hills are the largest part of the canvas (approximately 40% coverage).
Strategy: If you have a choice between tapping a Red cup or a Green cup, always choose the Green cup in this phase. The Red umbrella pole is a thin line (only about 5% of the canvas area). If you tap Red too early, you will flood the belt with Red paint that has nowhere to go but the trash (or the hills, where it doesn't belong). Green has a massive "sink" in the hills. Load up on Green to ensure your belt is constantly moving, preventing the 5/5 slot jam.
Ignoring the Rope Lock (Temporarily)
On the right side of the screen, you will see the Rope Lock binding Cyan, Orange, and Red. Do not engage with this yet.
Attempting to clear the rope too early will clog your belt with colors you aren't ready for. You need the space on your belt to handle the Ice Block mechanics. Treat the right side as "out of bounds" until the Ice Block is shattered and the Green hills are roughly 50% filled. Patience here prevents a disastrous traffic jam on the conveyor belt.
Belt Capacity Management (The 3-Slot Rule)
Throughout Phase 1, adopt the "3-Slot Rule." Never let your conveyor belt fill up past 3 cups if possible.
Why? If you have 4 or 5 cups, you lose the ability to manipulate the stack. You cannot tap specific cups to influence the slide mechanics. By keeping 3 or fewer cups on the belt, you maintain "agility," allowing you to react when the Ice Block finally breaks and a flood of new colors becomes available. If you hit 5 cups, stop tapping and just wait for the current cups to pour.
Step-by-Step Phase 2: The Rope Lock and Color Layering
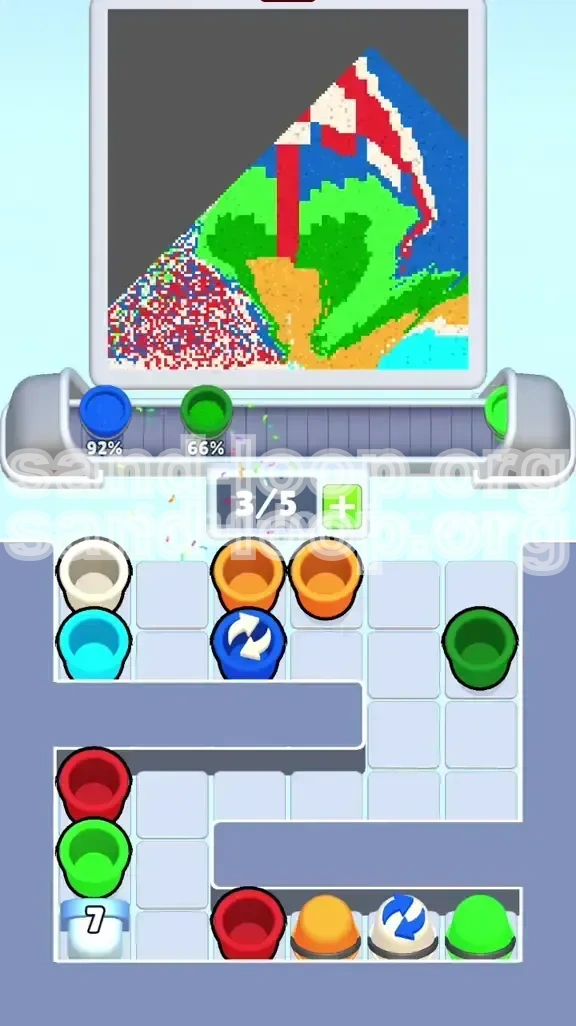
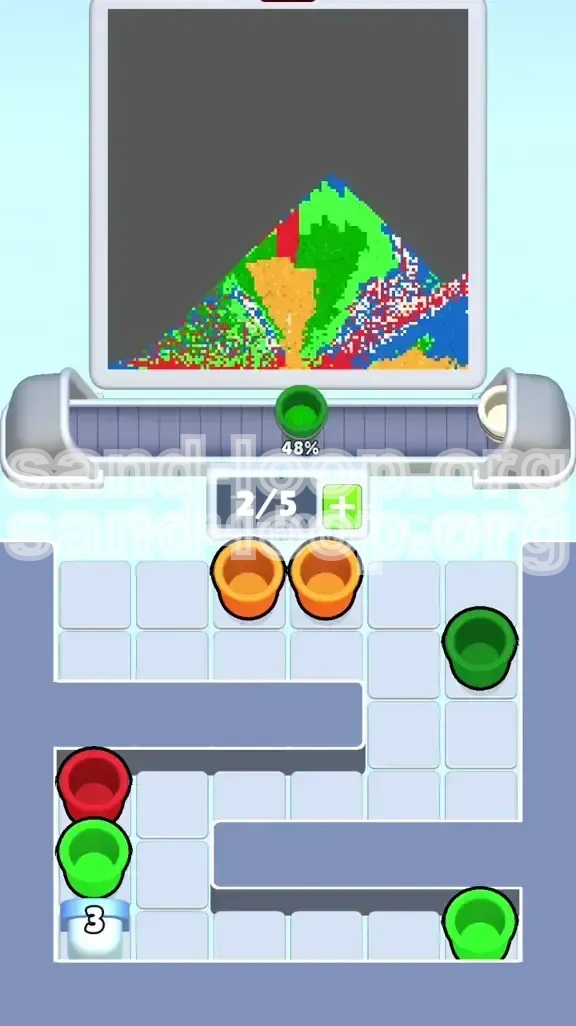
Once the Ice Block shatters (revealing the White generator) and the Green hills are established, the game shifts. You now have access to infinite White, but you are blocked by the Rope Lock on the right. It is time to clear the board.
Executing the Rope Lock Sequence
The Rope Lock on the right is the gatekeeper to the rest of the game. It binds a Cyan cup, an Orange cup, and a Red cup. The mechanism requires you to clear these specific cups to dissolve the rope.
The Order: 1. Check your water progress. If the Cyan water (bottom strip) is not full, tap the Cyan cup in the rope first. 2. Check your sand progress. If the Golden sand is not full, tap the Orange cup next. 3. The Red cup should be last.
By following this order, you are using the "trash" or "blocker" cups to actually fill the canvas, effectively killing two birds with one stone. Do not just tap them randomly; make every drop of paint count.
Deconstructing the "Sand Trap" (Orange)
With the Rope Lock gone, you will have access to more Orange cups. The Sand is a high-capacity area, but it is located at the very bottom.
The Mistake: Players often try to fill the Sand while the Green Hills are only partially done. This leads to paint "drift."
The Fix: Ensure your Green Hills are at least 80% filled before you aggressively tap the Orange cups. The physics engine in Sand Loop causes paint to slide down. If the hills aren't there to catch the overflow, your sand will mix with the water or disappear off-screen. Wait for the green foundation to solidify, then flood the orange.
Handling the Infinite White Generator
Now that the Ice Block is gone, you have an infinite source of White on the left. The Beach Umbrella requires significant white paint for the canopy.
However, you must balance this. If you only tap White, you will miss the opportunity to clear the stack. You must alternate: Tap 2 White cups, then 1 Green/Red cup. This rhythm ensures you are constantly clearing the vertical stacks on the left while steadily filling the umbrella stripes. Do not let the White generator dominate your belt; it is a tool, not the whole job.
The Red Pole Precision Strike
Here is the most dangerous part of Phase 2: The Red Umbrella Pole. It is a vertical line connecting the umbrella to the sand.
Because it is thin, it fills incredibly fast. If you tap 3 Red cups in a row, the second and third cups will likely bounce off because the pole is already full. This causes Red paint to spill onto the Green hills or the Sand, creating "contamination" that lowers your score.
Technique: Tap a Red cup, then immediately switch to a different color (Green or White). Let the Red paint pour. Check the canvas. Is the pole done? If yes, stop tapping Red. If no, tap one more. Never queue up Red cups.
Avoiding the Color Bleed
Be hyper-aware of the boundaries between the Cyan water and the Orange sand.
In the pixel art, there is a hard line between these two. However, if you overfill the Cyan, it will creep into the Orange zone. Since Cyan is "cooler" and Orange is "warmer," the Cyan will visually pollute the Sand, making it look muddy. Stop tapping Cyan the moment the water bar hits 100%. Do not rely on visual approximation alone; look for the "complete" flash or the progress bar fill.
Color Order and Priority Logic
To master Level 375, you need to internalize the hierarchy of colors. Not all colors are created equal, and treating them equally is the path to failure. This section details the exact processing order.
Priority Tier 1: The Structural Colors (Green & Blue)
These are your most important colors because they define the shape of the image.
- Green (Hills): This is your primary workhorse. It has the highest surface area. Whenever you are unsure what to tap, look for Green. It is rarely a wrong choice in the first half of the level.
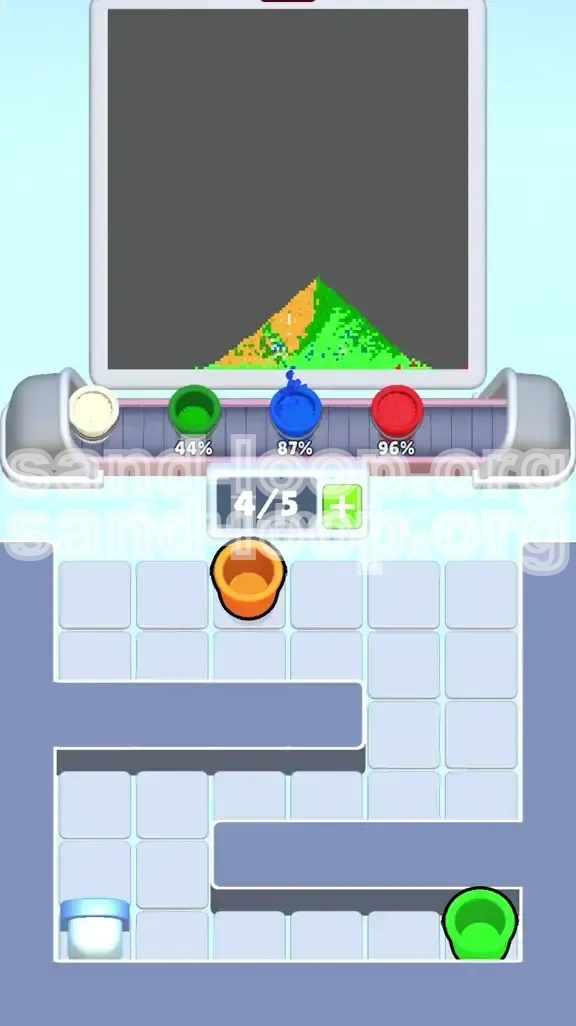
- Deep Blue (Sky): Although it appears last, you must prepare for it. Deep Blue is Tier 1 because it covers the top edge. If you run out of space on the belt before the Sky is done, you lose.
Priority Tier 2: The Foundation Colors (Orange & Cyan)
These colors fill the bottom and are needed to clear the Rope Lock.
- Orange (Sand): Essential for the Rope Lock and the foreground. However, it is Tier 2 because if you fill it too early, it might get covered by falling paint from the hills (if the physics engine gets glitchy) or prevent you from accessing the lower red cups.
- Cyan (Water): A small strip. It is a "utility color"—you mostly need it just to get it out of the way so you can reach other cups behind it. Don't over-prioritize it.
Priority Tier 3: The Accent Colors (Red & White)
These are the "finishing touches" that can ruin your run if mishandled.
- Red (Pole/Stripes): High risk, low volume. The margin for error here is tiny. Treat Red like a volatile chemical. Handle with care.
- White (Stripes): Once the generator is open, this is easy. But early on, White cups are just "belt filler" to help you clear the stack. Don't stress about perfect placement of White until the endgame.
The Processing Algorithm
When the board is cluttered and you don't know what to tap, follow this mental algorithm:
- Is the Ice Block active? -> Tap cups directly above the Ice Block (regardless of color).
- Is the belt full (4+ cups)? -> Stop tapping. Wait.
- Is Green available? -> Tap Green.
- Is the Rope Lock blocking my progress? -> Tap the specific color needed to clear the rope layer.
- Is a Tier 3 color (Red) exposed? -> Tap it ONLY if you have space on the belt and the canvas needs it.
Visualizing the Canvas Layers
Imagine the canvas as a physical 3D model being built from the back to the front.
- Layer 1 (Back): Sky Blue. (Wait until the end to fill this 100%, but clear the cups to make space).
- Layer 2 (Middle): Green Hills. (Fill this first).
- Layer 3 (Front Bottom): Cyan Water and Orange Sand. (Fill these second).
- Layer 4 (Top Detail): Umbrella. (Fill this last, as it sits "on top" of the sky).
If you try to paint the Umbrella (Layer 4) before the Hills (Layer 2), you are just creating work for yourself later.
The "Color Lock" Phenomenon
Be aware of "Color Lock." This happens when you fill a specific section of the canvas (e.g., the water) 100%, but there are still Cyan cups in the queue. These cups are now "dead weight." You must discard them or let them clog your belt while you pour them out. This is why timing the Cyan clearing is so important. You want to clear the Cyan cups just as the water finishes, so you don't have a backlog of useless Cyan cups blocking the belt when you need Red or Blue.
Common Mistakes and How to Avoid Them
Even experienced players fail Level 375 repeatedly because of a few specific traps. Understanding these pitfalls is half the battle. Here are the most common reasons players lose, and how to ensure you don't make the same errors.
Mistake #1: Early Overfilling of the Red Pole
This is the number one cause of failure. The Red Umbrella Pole is a very small target.
Why it happens: Players tap a Red cup, then immediately tap another Red cup because they see it in the stack. The first cup is still pouring, so the second cup has nowhere to go. It bounces, contaminating the Green hills.
The Solution: Adopt a "One-Tap" policy for Red. Tap ONE Red cup. Watch it pour. If the pole isn't full, wait until the pour is 100% finished before tapping the next one. Usually, you will only need 2 or 3 Red cups for the entire pole. Do not queue them.
Mistake #2: Ignoring the Ice Block Counter
Players often get so focused on filling the canvas that they forget about the "7" Ice Block.
Why it happens: You are filling the Green hills and making good progress. Suddenly, you run out of Green cups. The board is clogged with Red and White cups you can't use yet. You lose.
The Solution: The Ice Block is the key to the infinite White generator. If you don't break it, you run out of White for the umbrella. Make the Ice Block your primary focus in the first 30 seconds. If a cup is sitting on top of the block, clear it before you clear a cup on the other side of the screen.
Mistake #3: Mixing Cyan and Deep Blue
The canvas features two types of blue: Cyan (light, water) and Deep Blue (dark, sky).
Why it happens: In the heat of the moment, players see "Blue" and tap. They accidentally pour Cyan into the Sky or Deep Blue into the Water. Because the game is pixel-based, this looks like a hole in the canvas that is very hard to fix.
The Solution: Look closely at the cup icon. - Cyan Cup: Looks like light turquoise. Used ONLY for the bottom strip. - Deep Blue Cup: Looks like dark navy. Used ONLY for the top sky. - Never confuse them. If you pour Deep Blue into the water section, you essentially have to restart the level to get a perfect score.
Mistake #4: Breaking the Rope Too Early
The Rope Lock is tempting. It feels like an obstacle to be removed immediately.
Why it happens: Players clear the Rope Lock in the first 10 seconds. This releases a flood of Orange and Red cups onto a belt that is already full of Green and White cups. The result is an immediate 5/5 jam.
The Solution: Wait. The Rope Lock isn't going anywhere. Keep it locked until you have cleared the top row of "Trash" (White/Cyan) and established a flow with the Green hills. Only unleash the Rope Lock when you have 2 or 3 empty slots on your belt to absorb the new cups.
Mistake #5: Poor Belt Management (The "Domino Effect")
Letting the belt fill to 5/5 and then panicking.
Why it happens: You tap too fast. The belt hits 5 cups. You see a color you need (e.g., Green) appear in the stack, but you can't tap it because your belt is full. You have to wait for 4 other cups to pour before you can grab that Green. In that time, the stack shifts, and the Green cup becomes inaccessible.
The Solution: Never let the belt reach 5/5 if you can avoid it. Stop tapping at 4/5. Watch the pour. Only tap new cups once one has cleared the belt. It feels slower, but it is actually faster because you avoid the "Domino Effect" of missed opportunities.
Advanced Tactics and Stuck Solutions
Sometimes, even following the guide, you might find yourself in a tricky spot. The random generation of cups can create "stuck" states where nothing seems to match. This section provides emergency protocols for when the level goes wrong.
Solution: The "Vertical Clear" Protocol
If you are stuck and cannot find the color you need (e.g., you need Blue but only see Red), stop looking horizontally.
Look for vertical stacks. Find a column where a Red cup is sitting on top of another Red cup. Tap the top one. The one below it will slide up. Sometimes, the cup you need is buried underneath a "bad" color. By clearing the top cup (even if you don't need it), you expose the layer underneath. This is often faster than waiting for the conveyor to cycle.
Solution: Handling the "Cyan Flood"
Scenario: You have filled the water (Cyan) 100%, but there are still 3 Cyan cups on the belt and more in the stack. They are blocking you from getting to the Deep Blue cups.
Fix: You must "dump" them. Tap them onto the belt. Even though the water is full, the game will let you pour them (they will just waste or spill into the sand slightly). It is better to waste a Cyan cup now to clear the belt slot than to let it sit there taking up space for the next 2 minutes. Get the trash out of the way.
Solution: The "Rope Shuffle" Glitch
Sometimes, the Rope Lock mechanism behaves oddly. If you tap the correct color (e.g., Orange) but the rope doesn't dissolve or the cup doesn't move, your game might be desynchronized.
Fix: Tap the cup again. If it still doesn't move, try tapping a cup adjacent to the rope group. Sometimes the physics engine needs a "nudge" to recalculate the weight distribution. This is rare but good to know if you feel the game is bugging out.
Solution: Endgame Color Scavenging
In the final 10%, you will likely have 95% of the canvas filled, but you are missing one specific color (usually a tiny patch of Sky Blue or a sliver of Umbrella Red).
Fix: Do not frantically tap everything. Look at the "Progress" bars on the right side of the screen (if available) or scan the canvas visually. Identify the ONE missing color. Then, hunt specifically for that cup in the stack. Ignore everything else. If the cup isn't on screen, you may need to tap random cups to cycle the stack and force the game to spawn the color you need. This is the "Scavenging" phase—slow, deliberate taps only.
Speed Run and Pro Tips
For players looking to achieve the maximum score or complete the level in record time, here are advanced techniques that go beyond basic survival. These tips focus on optimizing movement and reducing downtime.
The "Pre-Tap" Technique
Advanced players don't wait for the belt to be empty to think.
While the current cup is pouring (the 1-second animation), use that time to visually scan the stack. Locate your next target cup. Hover your finger/cursor over it. The moment the current cup finishes pouring and leaves the belt, tap the pre-selected cup immediately. This eliminates the "reaction time" delay between pours. Shaving off 0.5 seconds per cup adds up to minutes saved over the course of the level.
The "Generator Baiting" Strategy
Remember the "7" Ice Block? You can speed this up.
Focus entirely on the left side for the first 15 seconds. Ignore the rest of the board. By funneling all your attention into the Ice Block, you unlock the infinite White generator earlier. The White generator is your safety net. Unlocking it early allows you to tap White cups whenever you are unsure, preventing you from ever getting "stuck" without a move. Speed runners prioritize unlocking generators over painting the canvas correctly in the early game.
Color Combos for Efficiency
Look for patterns in the stack. The "R-G-W" Combo: If you see Red, Green, and White cups stacked near each other, this is a prime opportunity. 1. Tap Red (for the pole). 2. Tap Green (for the hills—this absorbs the overflow from the Red if you timed it slightly wrong). 3. Tap White (for the umbrella—high capacity area). Processing these three in quick succession clears three different sections of the canvas simultaneously, maximizing your "fill rate" per second.
Optimizing the Right-Side Sweep
The right side of the board (Rope Lock and Deep Blue) is the final boss.
Don't clear the Rope Lock until you are ready to commit to the right side. Once you clear that Rope, the right side becomes a "high traffic" area. Be ready to sweep from top-right to bottom-right. Clear the rope, then immediately sweep down to grab the Deep Blue cups that were buried. Don't let the belt fill up during this transition. It should be a fluid motion: Clear Rope -> Tap Blue -> Tap Blue -> Tap Blue.
Speed Run Route Summary
For the optimal time, follow this route:
- 0:00-0:20: Left Side Only. Smash the Ice Block. Pre-tap White/Green.
- 0:20-0:40: Center Stage. Fill Green Hills to 80%. Clear top row trash.
- 0:40-0:50: The Rope & Sand. Clear the Rope Lock. Flood the belt with Orange/Cyan to clear the bottom half.
- 0:50-1:10: The Sky & Umbrella. Alternate between Deep Blue and White/Red. Finish the canvas.
By sticking to this time-boxed strategy, you ensure you aren't spending too long on any one section. Keep moving, keep tapping, and manage that belt space!