
Level 378
HARDHow to solve Sand Loop level 378? Get instant solution for Sand Loop 378 with our step by step solution & video walkthrough. Sand Loop 378 tips and guide.
Play Sand Loop Now
Experience the puzzle challenge firsthand
Game Screenshots


Sand Loop Level Guides
Level 378 Comprehensive Walkthrough: The "Magic Sprout" Strategy Guide
Introduction: The Logic Puzzle of Level 378
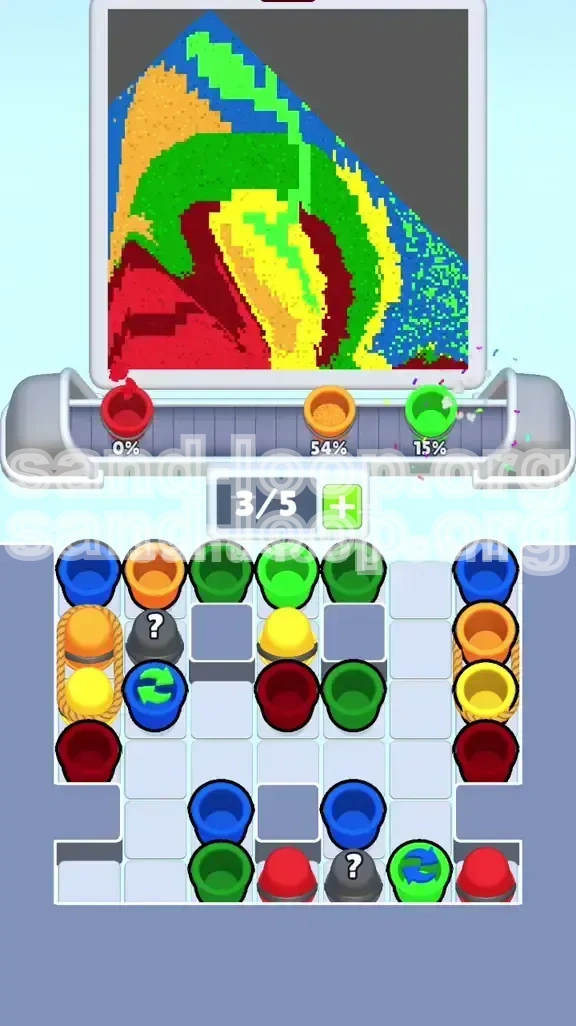
Welcome to Level 378, a stage that functions less like a standard reflex game and more like a complex logic puzzle. In this level, titled "Magic Sprout," the primary obstacle is not a rapidly ticking clock, but a restrictive board layout known as "Roped Stacks." The board is visually divided into three distinct zones: the top "Garbage Layer" filled with Blue and Green, the critical middle layer containing essential Red and Yellow components, and the locked side columns where Orange cups physically trap Yellow cups underneath them. Success in this level depends entirely on your ability to manage resource dependency—recognizing that you cannot access the colors you need (Yellow) until you clear the colors blocking them (Orange), even if those blocking colors aren't immediately needed on the canvas.
Core Objective: Uncovering the Hidden Resources
To achieve a 3-star rating on Level 378, your main objective is to maintain a continuous flow of sand to the conveyor belt without stalling. Stalling occurs when the belt is occupied by colors you do not currently need (e.g., filling the queue with Blue when you need Red), preventing you from loading the necessary colors. The level is won when you successfully clear the side roped stacks to access the buried Yellow paint, which is required to finish the central bean sprout image. If you reach the 50% completion mark and the side stacks are not cleared, you will likely run out of Yellow paint and fail the level.
The "Dependency" Mechanic Explained
The most critical mechanic to understand is the "Roped Stack." You will frequently see Orange cups stacked directly on top of Yellow cups, tied together with a white rope. You cannot interact with the Yellow cup until the Orange cup is removed. This creates a strategic layer where you must load "useless" Orange cups onto the belt simply to unlock the valuable Yellow cups beneath them. Ignoring these stacks to focus on "easy" colors is the most common cause of failure.
Visual Breakdown of the Tray Layout
The tray is not random; it is structured to create bottlenecks. The top row consists mostly of "filler" colors like Blue (Sky) and Green (Grass). The middle section houses your "Gold Mine"—the Dark Red cups required for the soil layer, which accounts for approximately 40% of the level's total volume. The edges contain the locked stacks. Effective gameplay requires constantly shifting your focus between these three zones, ensuring that while you are mining for Red in the center, you are also chipping away at the Orange locks on the sides.
The 50% Progression Rule
A vital metric for this level is the "50% Rule." By the time your completion percentage hits 50%, your tray should look significantly different than it did at the start. The side roped stacks should be completely eliminated, exposing the bottom layer of the tray. If you reach 50% and the sides are still clogged with Orange ropes, you are on a path to failure. At this point, shift your priority entirely to clearing the sides, even if it means temporarily ignoring the central image.
Step-by-Step Instructions: The Opening Phase (0% - 30%)
Phase 1: Assessment and "Garbage" Clearance
As the level begins, do not click randomly. Pause for two seconds to scan the top row. You will see a mix of Light Green, Dark Green, and Blue. Your immediate goal is to clear these "Garbage" colors to expose the "Gold Mine" (Red cups) underneath. Do not touch the roped stacks on the far left and right yet. Identify the Green cups first, as the sprout stem and grass strip are active areas that can accept paint immediately.
Phase 2: Prioritizing the Green Stem
Click and drag all available Green variants (Light and Dark) onto the conveyor belt. The machine is smart enough to blend these for the grass texture. Filling the stem and grass early serves two purposes: it increases your completion percentage safely, and it removes clutter from the tray, giving you better visibility of the critical Red layer beneath. Do not worry about "wasting" belt slots on Green early on; the machine pours small amounts of Green quickly.
Phase 3: Managing the "Dummy" Blues
Once the visible Greens are cleared, you will encounter Blue cups. The Blue sky is the final layer of the image and requires very little attention in the opening phase. However, these Blue cups are physically blocking your access to the Red soil cups underneath them. You must load the Blue cups onto the belt. Think of this as a "Move Cost"—you are sacrificing a belt slot to dig deeper into the tray. Load them, but do not prioritize them over Red.
Phase 4: Exposing the "Gold Mine" (Red)
After clearing the top layer of Blues and Greens, you will reveal the Dark Red cups. This is your most critical resource. The bottom soil layer requires a massive amount of sand (roughly 35-40% of the total level volume). As soon as a Red cup is exposed, load it onto the belt. Ideally, you want a constant stream of Red pouring. If the belt is full, drag a Blue or Green cup off the belt (if possible) to make room for Red.
Phase 5: Early Queue Management
The conveyor belt has 5 slots. A common mistake is filling all 5 with random colors. Try to keep a "rhythm." If you have [Red, Blue, Green] on the belt, you are safe because the Red is pouring. If you have [Blue, Blue, Green, Blue], you are stalled because Red is waiting in the tray. Always ensure a Red cup is either currently pouring or is next in the queue.
Step-by-Step Instructions: The Mid-Game Crisis (30% - 70%)
Phase 6: Identifying the Yellow Shortage
Around the 30% mark, you will notice the central bean sprout stops growing. This is the "Yellow Lock." You have likely depleted all the easily accessible Yellow cups in the main tray area. The game will feel like it has slowed down significantly. Do not panic. This is a designed mechanic. The remaining Yellow cups are trapped under the Roped Stacks on the sides.
Phase 7: The "Force Load" Maneuver
This is the turning point of the level. You must shift your focus from the center of the tray to the far left and right columns. You will see stacks of Orange cups covering Yellow cups. Even if the Orange hills in the background are only 10% filled, you must load the top Orange cup onto the belt immediately. You are not loading Orange to paint the picture; you are loading it to unlock the tray.
Phase 8: Timing the Release
As soon as the Orange cup is removed from the stack, the Yellow cup underneath will shake violently, indicating it is now interactable. Immediately click that Yellow cup. If you have an open slot on the belt, load it. If the belt is full, you must wait for a slot to open, but be ready to click it the millimeter a space frees up. Do not let it sit in the tray, or you risk burying it under another falling cup.
Phase 9: Handling "Gray" Mystery Cups
During the mid-game, you may see Gray Mystery Cups marked with a question mark. Resist the urge to tap them. Tapping a Mystery Cup converts it into a random color. If you tap it now and it turns into a Blue cup, it will clog your belt during this critical Yellow shortage phase. Save Mystery Cups for the very end of the level (90%+) when you only have one specific color left to find.
Phase 10: Dealing with Belt Clogs
In the mid-game, your belt will often look messy: [Red, Orange, Blue, Recycle, Green]. This is acceptable as long as the flow continues. The machine processes the queue in order. The danger zone is if you have 4 "useless" colors queued ahead of a critical Red or Yellow. If you have a Recycle Cup (marked with arrows), use it to destroy the cup currently being poured if it's a color you don't need, effectively fast-forwarding the queue to the good stuff.
Color Order and Processing Logic
Priority Tier 1: Dark Red (The Soil Foundation)
Dark Red is the backbone of this level. The soil layer covers the largest area of the canvas. If you stop pouring Red for more than 20 seconds, your completion percentage will plateau. Treat Red as your "background process"—there should almost always be a Red cup either pouring on the belt or waiting in the immediate queue. Never sacrifice a Red cup to save a Blue or Green slot.
Priority Tier 2: Yellow (The Scarce Resource)
Yellow is high-value but low-availability. Unlike Red, which is abundant in the center, Yellow is scarce and locked behind mechanics. You must treat Yellow as a luxury resource. Every time you free a Yellow cup from a roped stack, consider it a mini-victory. Do not pour Yellow on areas that are already 90% full; direct it precisely to the empty parts of the bean sprout to maximize efficiency.
Priority Tier 3: Green (The Filler)
Green is your "maintenance" color. It is abundant and easy to access. Use Green when you need a brief break from hunting for Red or Yellow. Pouring Green is a good way to keep the belt moving while you scan the tray for the next critical Red or Yellow cup. It fills the stem and grass nicely but is not required for the large volume areas.
Priority Tier 4: Orange (The Key)
Orange is unique because it is often a "Key" rather than a "Paint." You will frequently pour Orange not because the hills need painting, but because an Orange cup is blocking a Yellow cup. However, once the Yellow is free, if you have an open slot and the Orange hills are empty, go ahead and load the Orange. It's better than letting it sit in the tray blocking future spawns.
Priority Tier 5: Blue (The Garbage)
Blue is the lowest priority color for 80% of the level. The Sky layer is thin and doesn't require much paint. However, Blue cups are numerous and clog the tray. You must actively remove Blue cups to get to the good stuff. Think of Blue as "trash" that needs to be taken out (loaded onto the belt) so you can clean the house (the tray).
Special Logic: Mystery Cups
Mystery Cups are a gamble. They are most useful when the board is 90% clear. At that point, tapping a Mystery Cup is likely to yield the specific color you are missing to finish the level. Using them earlier is too risky. If you are absolutely stuck and have no other moves, a Mystery Cup is a valid Hail Mary, but generally, save them for the end-game polish.
Key Tips and Common Mistakes
Mistake #1: Ignoring the Side Roped Stacks
The single biggest reason players fail Level 378 is tunnel vision. Players focus on the center of the tray, filling the soil and grass, and completely ignore the roped stacks on the left and right. By the time they look at the sides, they have no Yellow paint left to finish the bean sprout, and the game is lost. Make a conscious effort to glance at the side columns every 10 seconds.
Mistake #2: The "Blue Bottle-neck"
It feels productive to click fast, but loading 4 or 5 Blue cups in a row is a death sentence. This creates a 30-45 second delay where you can do nothing but wait. Always keep an eye on your queue. If you see more than two Blues queued back-to-back, stop clicking Blues and go hunt for a Red or Yellow cup, even if it means digging for it.
Mistake #3: Premature Mystery Cup Tapping
Tapping a Mystery Cup when your belt is full is dangerous. If you tap it and it turns into a Blue, you now have a useless Blue taking up space while a critical Red cup sits in the tray unable to load. Only tap Mystery Cups when you have at least 2 empty slots on the belt, or when you are in the final 10% of the level.
Pro Tip: The "Shake" Indicator
Pay close attention to the animation of the cups. A cup that is ready to be poured shakes. However, a cup that is trapped under a rope shakes differently—often more vigorously or with a "glint" effect. This visual cue is your signal that a stack is ready to be cleared. If you see a trapped cup shaking, prioritize the cup on top of it immediately.
Pro Tip: Visualizing the Canvas
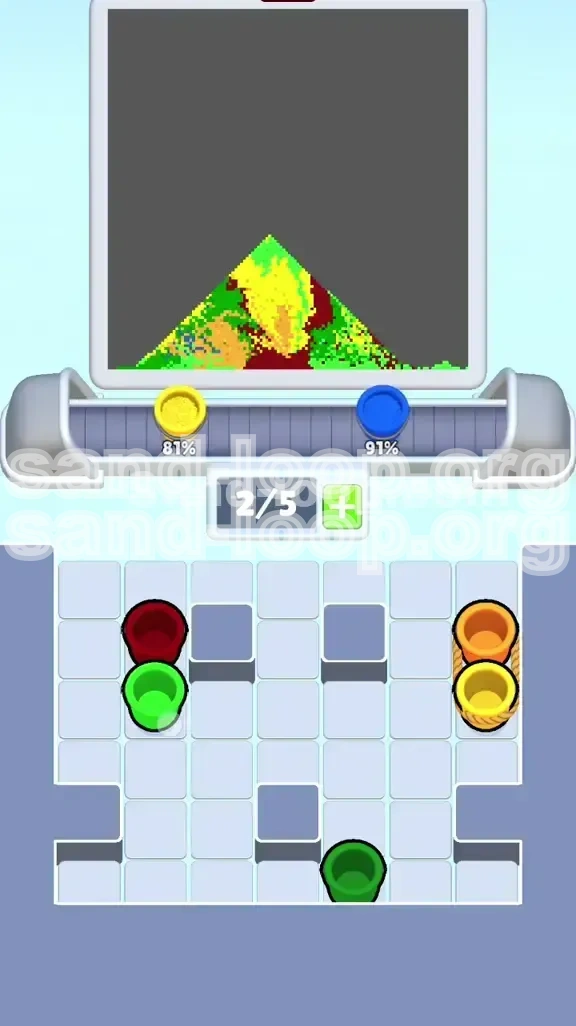
Don't stare at the tray exclusively. Look at the canvas. If the Bean Sprout is 95% full, stop hunting for Yellow. Switch 100% of your focus to digging for Red for the soil, or Orange for the hills. The canvas state should dictate your priorities. If an area is mostly full, that color drops in priority.
Pro Tip: Recycle Cup Strategy
Don't waste Recycle Cups. A Recycle Cup destroys the cup currently being poured. The best time to use it is when you accidentally loaded a Blue (which takes a long time to pour) and you desperately need to get to the Red behind it. Tapping the Recycle Cup skips the remaining Blue pour time, saving you valuable seconds.
Stuck Solutions and Speed Run Tips
Solution: The "End Game" Grind (90%+)
Scenario: You are at 92% completion. The soil, bean, and hills are fully painted. You are stuck with a belt full of Blue cups, and the last bit of Sky is filling agonizingly slowly. The Fix: This is a waiting game. The sand flow rate is fixed. However, you can look for any remaining Mystery Cups. If you tap one and it turns into Blue, it's no loss. If it turns into anything else, it might help fill a tiny pixel you missed. Otherwise, just wait it out; the level is won.
Solution: The "Missing Yellow" Glitch
Scenario: The bean sprout is half-finished, but you swear there are no Yellow cups left on the screen. The Fix: The game is not bugged; you have a "Hidden Yellow." Look closely at the bottom corners of the tray, sometimes partially obscured by the grass strip art on the main canvas. Or, a Yellow cup might be buried under a "Gray" Mystery Cup that you haven't tapped yet. Clear the tray layer by layer to find it.
Speed Run Tip: Pre-Loading During Active Pours
While one cup is actively pouring sand onto the canvas, you are not idle. Use that downtime to dig through the tray. Drag Blue, Green, or Orange cups onto the belt while the Red is currently pouring. This ensures that the millisecond the Red cup finishes, the next cup starts automatically. This "Queue Management" is the difference between a fast time and a slow time.
Speed Run Tip: Ignore Perfection
For a speed run, forget about filling the image perfectly layer by layer. It is faster to have a "mixed" belt (e.g., Red, Green, Orange) than to wait for a perfect "All Red" setup. Let the machine's queue handle the sorting. Your job is to ensure the machine never stops. Keep the belt full. A stalled belt is the enemy of speed.
Advanced: The "Double Tap" Roped Stack
If you have a Roped Stack (Orange on Yellow) and you have an open slot on the belt, you can "Double Tap." Drag the Orange cup to the belt, and immediately click the Yellow cup underneath before the Orange cup even settles on the belt. This queues the Yellow up right behind the Orange, minimizing the time the Orange cup wastes.
Final Checklist for Victory
- Top Row: Cleared of initial Blues and Greens? Yes.
- Red Flow: Is Red continuously pouring for the soil? Yes.
- Side Stacks: Are the Roped Stacks cleared by the 50% mark? Yes.
- Yellow: Did you uncover the trapped Yellow cups? Yes.
- Mystery Cups: Saved for the very end? Yes.
By following this structured approach, Level 378 transforms from a chaotic click-fest into a manageable logic puzzle. Good luck, and keep the sand flowing!