
Level 379
HARDHow to solve Sand Loop level 379? Get instant solution for Sand Loop 379 with our step by step solution & video walkthrough. Sand Loop 379 tips and guide.
Play Sand Loop Now
Experience the puzzle challenge firsthand
Game Screenshots
Sand Loop Level Guides
Level 379 Overview: The Neon Streetlamp Endurance Test
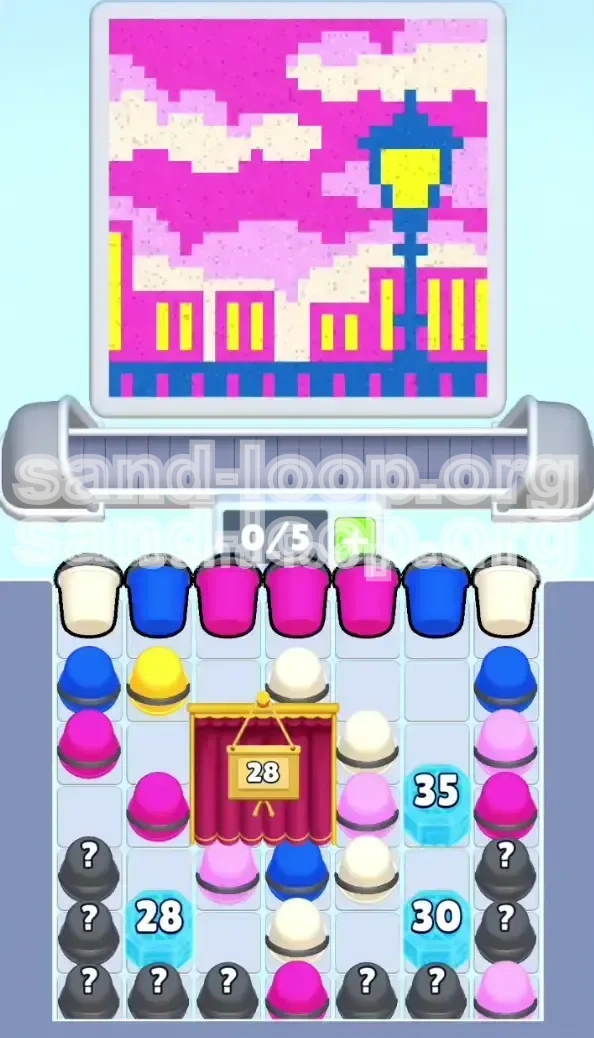
Welcome to the vibrant pixel art challenge of Level 379. This stage is a classic test of endurance rather than a complex logic puzzle. The visual theme is a "Neon Streetlamp City," dominated by a massive Magenta skyline, Deep Blue infrastructure, and critical accents of Yellow and White.
The primary difficulty here lies not in understanding the rules, but in managing your limited inventory against a flood of specific colors. You will face heavily fortified Numbered Ice Blocks that act as damage sponges, requiring precise planning to dismantle without running out of moves.
Unlike previous levels where you could afford to be passive, this stage demands aggressive resource management. You must balance the need to clear obstacles with the necessity of saving specific color hues for the final artistic details. This guide will break down exactly how to prioritize your moves to ensure you don't run out of Blue paint before the streetlamp is finished.
Primary Objectives and Success Metrics
Demolish the Ice Fortifications
Your most immediate goal is to shatter the three Numbered Ice Blocks located in the center and lower sections of the board. These blocks have high HP pools (specifically 28, 30, and 35 health points).
Understand that standard clearing moves will not work here. You must strategically clear adjacent cups to deal damage to these blocks. If you ignore them to focus on the background sky, you will run out of moves before the board is fully cleared.
Conserve Critical Inventory
This level introduces a scarcity mechanic for Blue and Yellow cups. The Blue cups are needed for the streetlamp post and fence, while Yellow cups are essential for the windows and lamp light.
A common failure point is using up all your Blue cups on the fence or ice blocks early on, leaving you with no way to paint the streetlamp post at the end. Your objective is to keep a mental counter of your remaining Blue cups and ensure you have a surplus for the final 10% of the level.
Manage the Curtain Mechanic
There is a "Red Curtain" mechanic in this level with a counter starting at 28. While this adds pressure, it is a passive objective.
You do not need to make special moves to clear the curtain; simply clearing cups to destroy the ice blocks will naturally decrease this counter. Focus entirely on the ice, and the curtain will solve itself.
Prevent Conveyor Jamming
Your conveyor belt has a capacity of 5 cups. With the high volume of Magenta and Blue cups in this level, it is very easy to fill your belt with unusable colors.
Your objective is to maintain at least one empty slot (or two, during the Mystery Cup phase) to ensure you can cycle through new cups. If your belt is full of Pink when you need Blue, you are effectively stalled.
Strategic Walkthrough: Step-by-Step Execution
Phase 1: The Opening Salvo (Turns 1-15)
As the level begins, you will be bombarded with Magenta and Deep Blue cups. Do not be tempted to fill the massive pink sky immediately.
Immediately identify the Ice Blocks with "35" and "28" health. These are your priority. Look for Blue or Magenta cups that are physically touching these blocks. Every move you make in this phase must decrease the health of an ice block. If a cup does not touch an ice block, ignore it unless it is necessary to prevent a conveyor jam.
By turn 15, you should have chipped the 35-HP block down to at least 25. If you find yourself clearing cups that aren't touching the blocks, you are falling behind.
Phase 2: The Yellow Cup Protocol
As you chip away at the ice, Yellow cups will begin to appear on the conveyor. This is a dangerous resource trap.
Yellow is only needed for the small window panes and the lamp head. It is not a primary filler color. If you pick up a Yellow cup and the nozzle is hovering over a large Magenta section, do not pour it.
Hold the Yellow cup in your inventory until the nozzle is directly over a window pane or until you can use it to chip an ice block. Pouring Yellow into the Magenta sky is a permanent waste of a scarce resource that will cause a "Game Over" later when you cannot complete the windows.
Phase 3: The Mystery Cup Crisis
Once the "35" and "30" blocks are shattered, you will expose the bottom rows containing Mystery Cups (marked with a "?").
This is the most volatile phase of Level 379. These cups can turn into any color, often clogging your belt with colors you don't need.
The golden rule for this phase is: Keep 2 slots empty. Never tap a Mystery Cup if your conveyor has 4 or 5 items. If you reveal a color you don't need (like Green, if it appears, or extra Magenta), you need the space to move it to the board or discard it without blocking the intake of new Blue cups.
Phase 4: The End-Game Sprint
With the ice gone and the mystery cups revealed, the board is open. Now you can finally fill the massive Magenta sky.
However, stop and check your inventory before you start mindlessly pouring. Do you have at least 2 Blue cups saved? If not, you must hunt for them on the board or in the remaining queue.
The final 5% of the level is almost entirely the thin blue vertical line of the streetlamp. If you reach 95% completion with no Blue cups left, you have lost. Save the Blue paint for the very last brushstroke.
Advanced Color Theory and Processing Order
The Priority Hierarchy
To maximize efficiency, you must process colors in a specific order, regardless of what the conveyor offers first.
- Deep Blue (Damage Dealer): Use this first to break the right-side Ice Blocks (HP 35). Blue is your most valuable resource because it is needed for both offense (breaking ice) and the final art.
- Magenta (Space Maker): Process this second. Use it to break the left-side blocks (HP 28) and to clear the massive sky background. Magenta is abundant, so you can be liberal with it.
- Yellow (Precision Tool): Process this only when the nozzle is perfectly aligned with a window or the lamp head. Do not use it for "filler" space.
- White (Cloud Filler): Process this last. The clouds are usually isolated, meaning you can paint them without affecting the flow of the other colors.
The "Mag-Cycle" Technique
Because Magenta occupies roughly 50% of the canvas, you will enter a "Mag-Cycle" where you receive three Magenta cups for every one Blue cup.
To handle this, deliberately pour Magenta into "safe zones" (areas already filled with Magenta) to clear the cup from your inventory without expanding your painting area too much. This keeps your options open while you wait for Blue cups to spawn.
Dealing with Color Clumps
The conveyor will often deliver "clumps"—three Magentas in a row, or two Yellows.
If you receive a clump of Yellows and your nozzle isn't on a yellow zone, check if the Yellow cups can be used to chip the Ice Blocks. If not, you may need to temporarily "waste" a turn by pouring into a neutral zone to cycle your conveyor, rather than holding onto the paint and blocking your ability to pick up Blue.
Common Mistakes and How to Avoid Them
Mistake 1: The Premature Sky Fill
Many players see the huge Magenta sky and instinctively start filling it immediately because it's satisfying and easy.
Why it fails: You will run out of moves before you break the ice blocks. The background paint counts for nothing if you can't clear the obstacles blocking the bottom half of the screen.
The Fix: Treat the sky as "storage" for excess Magenta, but focus your active taps on the ice blocks until they shatter.
Mistake 2: The Blue Starvation
Players often use Blue cups to clear the bottom fence tiles early in the level because they are convenient.
Why it fails: The streetlamp post requires a continuous vertical line of Blue. If you used all your Blue on the fence, you have to wait for the RNG (Random Number Generator) to give you more Blue at the very end, which often doesn't happen in time.
The Fix: Ignore the fence tiles until the sky is 90% done. Use Blue exclusively for breaking ice until the late game.
Mistake 3: Mystery Panic
When the Mystery Cups are revealed, players often tap them rapidly to clear the board.
Why it fails: Revealing three Green cups (or another low-demand color) fills your conveyor, preventing you from picking up the Blue cups you desperately need for the final stretch.
The Fix: Slow down. Only tap a Mystery Cup if you have the inventory space to handle the worst-case scenario.
Troubleshooting and Speed Run Strategies
I Am Stuck with Full Inventory and No Moves
If your conveyor is full (5/5) and you cannot pour any of them onto the canvas (e.g., you have Blue but the nozzle is on Yellow), you are in a "Soft Lock."
Solution: You must sacrifice a move. Look for a "trash" zone—an area of the canvas that is already completed or is irrelevant to the current strategy. Pour the unwanted cup there to clear the slot. It is better to lose one move than to stall for five turns waiting for the nozzle to move.
Speed Run Tip: The Ice-Breaker Focus
If you are aiming for a high score or fast time, ignore the aesthetic completion entirely until the ice is gone.
Calculate your moves purely based on damage numbers. If a Magenta cup touches the "35" block, it deals 1 damage. Prioritize that over a Magenta cup that touches the "28" block if the "35" is blocking a larger section of the board. Clearing the high-HP blocks faster opens up more "real estate" for you to pour paint, which speeds up the rest of the level naturally.
Speed Run Tip: Pre-Positioning
Watch the nozzle's movement pattern. If you know the nozzle is about to move over the Yellow windows, hold your Yellow cups in your inventory. Do not pour them early.
By timing your inventory to match the nozzle's position, you avoid the "waiting game" where you have the paint but can't reach the canvas. This synchronization can shave 20-30% off your total time.