
Level 385
HARDHow to solve Sand Loop level 385? Get instant solution for Sand Loop 385 with our step by step solution & video walkthrough. Sand Loop 385 tips and guide.
Play Sand Loop Now
Experience the puzzle challenge firsthand
Game Screenshots
Sand Loop Level Guides
Sand Loop Level 385 Complete Walkthrough: The Sunset Tower Strategy Guide
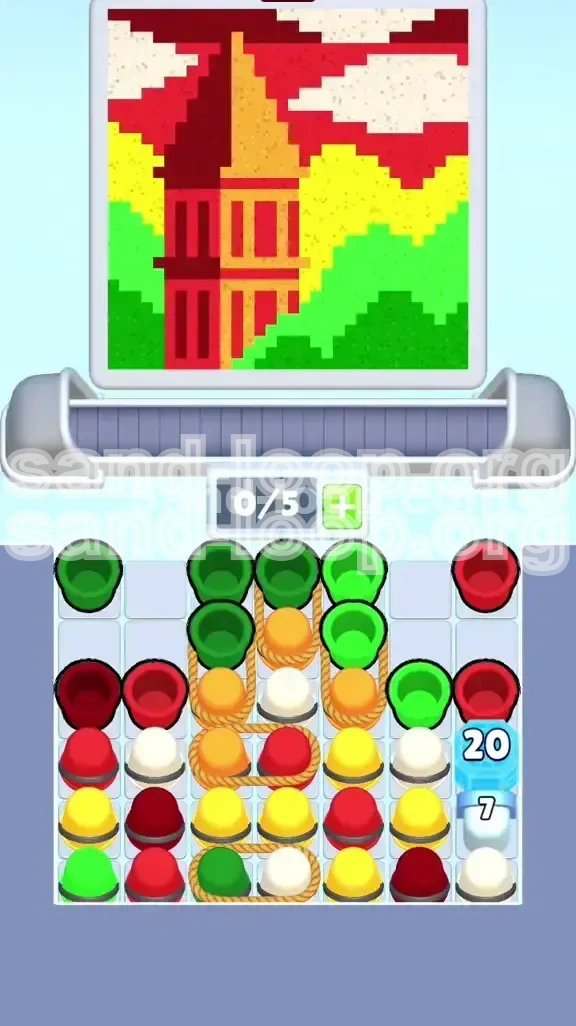
Welcome to the ultimate strategy guide for Sand Loop Level 385, widely known by players as the "Sunset Tower" challenge. This stage represents a significant difficulty spike in the Sand Loop campaign, shifting the focus from pure reaction speed to logistical planning and inventory management. In this level, you are tasked with painting a vibrant medieval landscape featuring a tower, rolling hills, and a sunset sky. However, a complex "Rope Cluster" binds your resources, and a high-health Ice Block guards essential colors.
To succeed in Level 385, you must move away from random clicking and adopt a methodical "layer-by-layer" approach. The central obstacle is not the pixel art itself, but the physical layout of the cups in the tray. This guide will break down exactly how to untangle the ropes, manage your conveyor belt slots, and break through the ice defenses without running out of moves or jamming your inventory.
Level 385: Essential Overview and Core Mechanics
Before you make your first move, it is crucial to understand why this level causes so many players to fail. Level 385 is a logistics puzzle disguised as an art game. The difficulty stems from two main mechanics: the Rope Cluster and the Ice Block.
The Gravity Mound Effect
Unlike standard puzzles where pixels fill uniformly, Sand Loop simulates gravity. When you pour a color, it settles at the lowest available point, creating a mound. In Level 385, the Green hills and the Tower base share the same bottom coordinate on the Y-axis. This means if you overfill the Green hills, you will bury the bottom pixels of the tower, making it mathematically impossible to complete the Red and Maroon sections later. You must balance the fill rate of the ground and the structure simultaneously.
The Rope Cluster Bind
Approximately 60% of the cups in the center tray are tied together in a Rope Cluster. These cups cannot be accessed individually; they must be cleared from the top down. The game presents these cups in layers: the top layer consists of "stopper" colors (Green and Orange), while the precious middle layers contain the high-demand Red and Maroon. If you waste your early moves on the outer edge columns, you will leave the center knot intact, leading to a deadlock where no valid moves remain.
The Ice Block Gatekeeper
On the right side of the tray, you will notice a Blue Ice Block with the number "20" stamped on it. This block covers a stack of White cups (value 7). The Ice Block does not disappear on its own; it loses 1 HP for every cup cleared in its immediate adjacent columns. However, it blocks the White cups required for the clouds. If you reach the sky phase of the painting with the Ice Block still active, you will fail because you cannot access the White paint. Your mid-game strategy must revolve entirely around chipping this block down.
Inventory Management (The 5-Slot Limit)
Your conveyor belt holds a maximum of 5 cups. In this level, "slot efficiency" is more important than speed. A common error is holding onto Yellow or White cups too early. Since the sky is the final step, filling your limited inventory with sky colors in the early or mid-game will clog your belt, preventing you from picking up the Red and Maroon needed for the tower. You must keep your inventory fluid, treating the cups as a "Just-In-Time" delivery system rather than a storage locker.
Visual Analysis of the Sunset Tower
The target image is split into three distinct horizontal zones. The bottom 30% is Green hills mixed with the tower base. The middle 40% is the vertical struggle between Maroon (shadow) and Red (light). The top 30% is a gradient of Yellow to White. Understanding these percentages helps you prioritize: never work on the top 30% (Yellow/White) until the bottom 70% is absolutely finished.
Win Condition Metrics
To achieve a 3-star rating on Level 385, you typically need to finish with 15-20% of your moves remaining. This requires that you never waste a turn on a "filler" cup that doesn't progress the painting. Every click should either advance the art, break the ice, or untie a rope.
Primary Objectives: What You Need to Achieve
To clear Level 385, you must complete three distinct phases of gameplay in a specific order. Trying to rush these phases is the number one cause of failure.
Objective 1: Establish the Base and Green Hills
The first 10-15% of the game is dedicated solely to the Green foundation. You must secure the free Green cups from the left column to begin the mound. However, you must stop pouring Green the moment the canvas requests a transition to the tower colors. If you continue to pour Green while the game asks for Red, you will create a "height mismatch" where the hills are too high, obscuring the tower placement.
Objective 2: The Great Untangling (Mid-Game)
This is the most critical objective. You must dismantle the central Rope Cluster to free the Red and Maroon supplies. This involves a delicate balancing act: you need to clear the top-layer Greens and Oranges to access the inner stack, but you can only clear them if the canvas actually needs Green or Orange at that moment. You are essentially "syncing" your tray clearing with your painting needs.
Objective 3: Destroy the Blue Ice Block
You must reduce the Ice Block's HP from 20 to 0 before the painting enters the "Sky Phase." This usually involves clearing the column immediately to the left of the block repeatedly. You must treat the Red cups on the left-middle section not just as paint, but as "ammunition" to damage the ice. A good rule of thumb is: if the Ice Block is above 10 HP, prioritize clearing adjacent cups over painting fine details.
Objective 4: The Vertical Tower Construction
Once the ropes are loose, you will have access to Deep Maroon and Bright Red. The objective here is precision. The tower is a vertical strip. You cannot use broad strokes; you must alternate colors carefully. Pouring Red into the Maroon shadow zone (or vice versa) creates "color pollution" that is very hard to fix later because the colors touch vertically.
Objective 5: Sky and Cloud Filler
The final objective is the simplest but requires patience. After the Ice Block breaks, you gain access to White. Combined with the Yellow (which should have been ignored or used sparingly until now), you fill the top 30% of the canvas. The challenge here is ensuring you didn't jam your belt with these colors earlier.
Objective 6: Inventory Zeroing
End the level with an empty conveyor belt. Leaving unused cups behind is inefficient and costs you percentage points on your score. Your final moves should involve a calculated "flush" of the remaining colors.
Step-by-Step Walkthrough: The "Outside-In" Method
This section provides the exact script for the first half of the level. Follow these steps in order to build a solid foundation.
Step 1: The Initial Green Sweep
As the level loads, immediately scan the far left column. You will see a stack of Green cups that are not tied by ropes. Load these immediately. Pour them into the canvas to create the base layer of the rolling hills. Do not touch the center column yet. Your goal is to raise the ground level to about 20% of the total canvas height.
Step 2: Assessing the Rope Top Layer
Look at the central knot. The very top cup is likely Green or Orange. Check the canvas. If it is asking for the roof color (Orange/Gold) or more Green, take the cup from the top of the rope cluster. This is the key move: taking from the cluster drops the next cup down, slowly revealing the colors trapped underneath. Never take a free cup if a knotted cup of the same color is available.
Step 3: The Left-Side Maroon Anchor
On the left side, below the initial Greens, you will find the Deep Maroon cups. These are usually free or loosely tied. Load one Maroon cup. Pour it carefully into the left shadow side of the tower base. This "anchors" the tower structure. Do not fill it to the top; just create the distinct dark shadow on the left edge of the tower base.
Step 4: Early Ice Block Chipping
Shift your gaze to the right side. You will see a column of Red cups directly adjacent to the Blue Ice Block. Even if the Red is needed for the tower, prioritize clearing these cups specifically to damage the Ice Block. If the Ice Block HP is not dropping, you are not clearing enough adjacent cups. Aim to get the Ice Block down to 15 HP before you move to Step 5.
Step 5: Managing the Yellow Overflow
As the ropes loosen, the game will flood your tray with Yellow cups. This is a trap. The Yellow is meant for the sky, which you aren't ready for. If your inventory has 3 or 4 empty slots, you can hold one Yellow. If you have fewer than 3 slots, leave the Yellow in the tray. Do not let it clog your ability to pick up Reds or Maroons.
Step 6: The Mid-Game Transition
Once the hills (Green) are 40% done and the Ice Block is cracking, the game will demand more Red. This is the signal to stop looking at the bottom of the screen and focus entirely on the center. You are now entering the precision phase.
Advanced Strategy: The Color Processing Order
Knowing what to do isn't enough; you need to know when to do it. This hierarchy dictates which color takes precedence based on the game state.
Priority Tier 1: Greens and Maroons (The Foundation)
These are your "Tier 1" colors. Green must be cleared from the tray constantly to prevent the hills from stalling. Maroon is scarce and high-value. If a Maroon cup appears in the knotted cluster, make it available immediately, provided you have space on the canvas for the shadow. Never waste a Maroon cup by using it to fill a large area; reserve it strictly for the left side of the tower.
Priority Tier 2: Reds (The Multi-Tool)
Red is the most versatile color in this level. It paints the sunlit side of the tower and damages the Ice Block and forms the upper sunset sky. Consequently, you should treat Red as your "fuel." Always keep 1 or 2 Red cups in your inventory. If you are unsure what to do next, clear a Red cup. It is almost always a valid move.
Priority Tier 3: Orange/Gold (The Transition)
Orange is used sparingly for the roof and the horizon gradient. It is not a high-volume color. If you have an Orange cup, use it quickly to create the transition between the Yellow sky and the Red ground. Do not hoard Orange; it blocks valuable slots needed for the Tier 1 and 2 colors.
Priority Tier 4: Yellow and White (The End-Game)
These are "Tier 4" colors. They are essentially useless for the first 60% of the level. Treat them as toxic waste until the Ice Block is broken and the tower is fully erected. If you are forced to pick them up to free a knot, immediately pour them into a corner of the canvas that won't interfere with the tower, or dump them if the game allows "wasting" moves (though it usually doesn't). Ideally, you shouldn't touch White until the very last 10 seconds of the level.
The "Slot Flexibility" Rule
Your 5-slot conveyor belt should maintain a "Flexibility Ratio." This means you should never have more than 2 cups of the same color in your belt at once, and you should always keep at least 1 slot empty (or filled with a universally useful color like Red). If you have 3 Green cups and 2 Yellow cups, your belt is rigid and you will likely fail. Keep the mix diverse: 1 Green, 1 Maroon, 2 Red, 1 Empty is the ideal balance.
Dynamic Adjustment
The game will occasionally throw a curveball, such as a sudden request for cloud White while the tower is unfinished. In these cases, ignore the request if possible. If the game forces you to clear a White cup to unblock the tray, pour it into the smallest possible valid area to minimize its impact on your color zones.
Common Mistakes and How to Avoid Them
Level 385 is designed to punish specific bad habits. Review these mistakes to ensure you don't fall into the developer's traps.
The "Overpaint" Error
This is the most frequent mistake. Players pour Green or Red with too heavy a hand, filling the pixels beyond their boundaries. Because of the gravity mound, liquid flows sideways. If you pour Red on the tower's right side, it might slide down and mix with the Green hills. To avoid this, use short, controlled taps rather than holding the pour button. Stop the moment the color "locks" into place.
The " premature Ice" Obsession
Some players panic upon seeing the Ice Block and try to break it immediately by spamming the adjacent column. This depletes their inventory of necessary paint colors (Red) before the canvas is ready for them. You must let the Ice Block break naturally as a byproduct of clearing Red cups for the tower. Don't break the ice at the expense of your painting progress; sync them up.
Inventory Clogging (The "Dead Hand")
This occurs when you pick up a Yellow or White cup too early, and it sits in your slot 5 (the last slot). As the game demands Red and Maroon, you are forced to ignore them because you can't pick them up. The game stalls, and you lose. The solution? If a low-priority color (Yellow/White) appears and you don't strictly need it yet, leave it in the tray. Only pick it up if it's blocking a knot or if you have 4 empty slots.
Ignoring the Rope Topology
Players often clear the free columns first because it's easier, leaving the knotted center for later. This is a death sentence. By the time you finish the easy columns, the center knot is still tight, and the game stops giving you valid moves. Always clear from the "tightest" spot (the knot) first. The easy columns are your emergency reserve, not your primary target.
Color Bleed in the Tower
The Maroon and Red sections of the tower are vertically adjacent. It is very easy to pour Red into the Maroon section. Visually, the Maroon is the "shadow" and Red is the "light." If you accidentally bleed Red into the shadow, it is often irreversible without restarting. Be hyper-focused on the X-axis coordinates when painting the tower body.
Panic Pouring
When the conveyor belt starts moving fast or the music tempo increases, players tend to speed up their clicking. This leads to mis-clicks. Level 385 requires a rhythmic, almost meditative pace. If you feel the pace picking up, slow down. Focus on one color at a time. Accuracy > Speed.
Troubleshooting: What to Do When You Get Stuck
Sometimes, even with the best strategy, the RNG (Random Number Generator) of the cup spawn can leave you in a tricky spot. Here is how to recover.
Scenario: The "Frozen White" Lock
Situation: You have finished the tower and ground, but the sky needs White clouds. However, the Ice Block is still at 5 HP, and the White cups are buried.
Solution: Do not wait for the game to give you Red. Look for any color in the column adjacent to the Ice Block. If there are Greens or Oranges touching the ice, clear them immediately. Even "useless" colors are valuable now if they chip the final HP off the block. Once it breaks, the White cups will flow into the tray.
Scenario: The "Full Belt" Jam
Situation: Your 5 slots are full of colors you don't need (e.g., 3 Yellows, 1 Green, 1 Orange) but the canvas needs Red.
Solution: You must perform a "sacrificial pour." Look at the canvas. Is there any spot, even a misplaced one, where you can legally dump one of the Yellows? You must create space in your inventory to pick up the Red. If you absolutely cannot pour, check if you can combine colors in the tray (a mechanic in some versions) or if you can wait for a combo to clear a space. Usually, you have to bite the bullet and pour the Yellow in a less-than-ideal spot to free the slot.
Scenario: The Rope Deadlock
Situation: The ropes are tight, and the top cup of the knot is a color you've already finished painting (e.g., you finished the Green hills, but the knot top is Green).
Solution: You have two options. 1) Check if there are any remaining pixels of that color, even tiny ones, to justify clearing it. 2) If the color is truly 100% done, you are forced to take the cup and pour it into an already-completed area (overpainting). This is the only way to access the layers underneath. Overpainting is better than a soft lock.
Scenario: Tower Misalignment
Situation: You poured the Green hills too high, and now the Maroon tower base has no space to sit.
Solution: You cannot undo gravity. However, you can build the tower "on top" of the hills. Ensure you are using the Maroon to clearly define the left edge. The visual distinction between the Green hill and the Maroon tower base will trick the eye into ignoring the height mismatch. Finish the level as cleanly as possible from that point on.
Speed Run and High Score Tips
For players looking to achieve the leaderboard rankings or 3-star status, efficiency is key. These tips assume you have mastered the basic mechanics.
Optimized Pathing
Minimize the distance your mouse/finger travels. Group your moves by location. Do all the left-column clears, then all the right-column clears, then the center. This reduces travel time by milliseconds per move, which adds up over a 3-minute level.
Pre-Loading Colors
If you know the Green hills are about to transition into the Red tower, anticipate the shift. Start clearing Red cups from the knot *before* the canvas fully finishes the Green section. This way, you have the Red ready in your inventory the moment the Green pixels lock in.
The "Chain Break" Technique
When breaking the Ice Block, try to time your adjacent clears so that they happen simultaneously with a color combo on the canvas. For example, clear a Red cup for the ice at the exact same moment you finish a Red section on the tower. This triggers audio and visual feedback faster, potentially speeding up the spawn rate of new cups.
Ignore Perfection
Speed runners know that a 95% perfect run completed in 2 minutes is better than a 100% perfect run that takes 5 minutes. If a pixel is slightly off-color or a tiny spot remains unpainted but the level progression bar allows you to move to the next phase, move on. Don't obsess over single pixels.
Memorize the Spawn Order
After playing Level 385 three or four times, you will notice the cup spawn pattern is semi-scripted. The Ice Block always breaks at roughly the same time. The Yellow flood always happens after the first rope clear. Use this knowledge. Have your inventory empty *before* the Yellow flood hits so you can buffer them quickly without stopping.
Combo Maximization
Look for opportunities to clear large sections of the canvas in single clicks. The Sand Loop mechanic sometimes allows for "splash" fills if you pour fast enough. Practice pouring the Red tower section in one continuous motion rather than tapping 10 times. This builds your combo meter, which grants score multipliers.