
Level 390
HARDHow to solve Sand Loop level 390? Get instant solution for Sand Loop 390 with our step by step solution & video walkthrough. Sand Loop 390 tips and guide.
Play Sand Loop Now
Experience the puzzle challenge firsthand
Game Screenshots
Sand Loop Level Guides
Sand Loop Level 390: Comprehensive Walkthrough & Strategy Guide
Introduction: The Magician's Hat Challenge
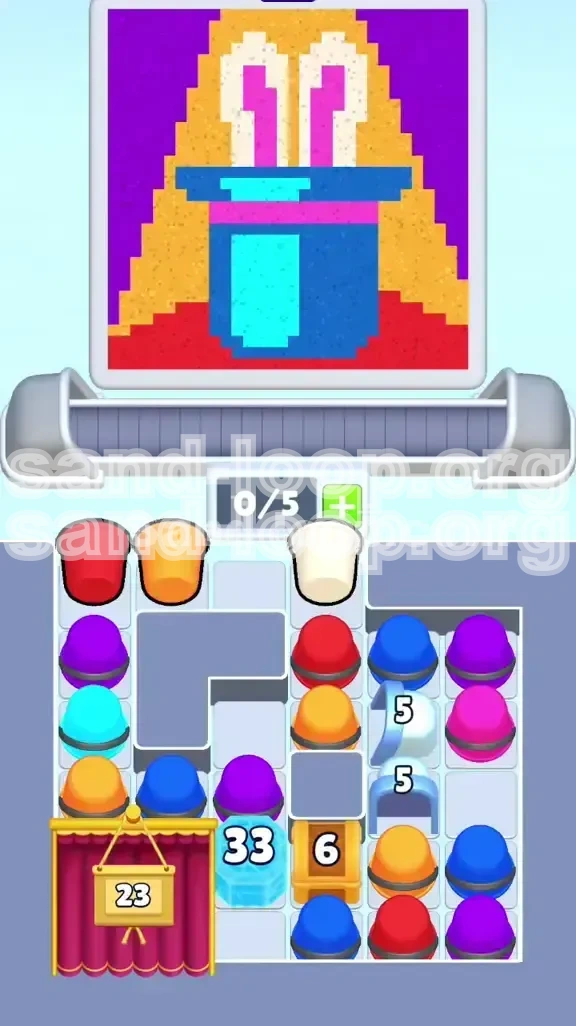
Welcome to the complete strategy guide for Sand Loop Level 390. In this stage, players are tasked with assembling a pixel art masterpiece featuring a white rabbit emerging from a magician’s top hat. Unlike previous levels focused purely on speed, Level 390 is a strict exercise in logic, resource management, and timing. The primary difficulty stems from a heavily congested supply tray where you start with zero available slots, meaning every single move must be calculated to prevent an immediate game-over state.
The visual composition of this level is complex, utilizing a 7-color palette that includes heavy base colors and delicate accent details. You will face the challenge of pouring heavy background sands (Purple, Orange) without contaminating the intricate foreground details (White, Cyan). Success in this level relies less on reflex and more on your ability to visualize the "settling order" of the sand—ensuring that dense bottom layers are established before lighter, top-layer accents are applied.
Level Overview: Deconstructing the Gridlock
Canvas Composition and Color Palette
The target image in Level 390 is visually striking but structurally demanding. The canvas is divided into three distinct depth layers. The Base Layer consists of a deep Red floor and a massive Dark Purple sky, which consumes approximately 40% of the total sand volume. The Middle Layer features the Dark Blue top hat, accented by a single, pixel-thin Cyan vertical stripe and a Pink horizontal band. The Top Layer is the most delicate, consisting of the White rabbit ears and geometric Orange/Yellow triangles floating in the background. The presence of the Cyan stripe is the single largest failure point for players; even a single cup of excess Cyan poured too early will bleed into the Red floor, making the level impossible to complete.
The Zero-Slot Start Dilemma
Level 390 introduces a brutal starting condition: 0/5 available slots in your supply tray. You cannot simply pull cups that you want; you are forced to pull cups that will immediately clear space or be usable. The top row of the tray offers a "safety net" of one Red, one Orange, and one White cup. However, accessing the colors you actually need (Blue, Purple) requires chipping away at high-health obstacles: a 33-hit Ice Block in the center and a 23-hit Curtain on the left. This setup forces a specific play order where you must alternate between feeding the conveyor belt with usable colors and clearing junk tiles to unlock the buried resources.
Obstacle Analysis: Ice and Curtain Mechanics
The supply tray is split into specific zones governed by different mechanics. The 23 Curtain on the left side operates on a "cup pull" counter. Every time you remove a cup adjacent to or above it, the counter decreases. The 33 Ice Block in the center is more restrictive; it requires a combination of adjacent cup pulls and color matching to shatter. Behind these obstacles lie the bulk of your Purple and Blue cups. The right side features 5 Glass Arches and a 6 Chest. The Glass Arches are particularly tricky because they require specific color matches to break, often forcing you to use a Blue cup for breaking rather than pouring, which can disrupt your rhythm if not anticipated.
The 5-Slot Economy Explained
Resource management is the hidden boss of this level. Since you start with a full tray, you must maintain a strict "First-In, First-Out" discipline. If you pull five cups that sit on the conveyor belt without pouring (because you are saving them for later), the game gridlocks. You must maintain at least 1 or 2 empty slots at all times to allow new cups to enter the tray. This means you cannot hoard colors. You must pour them as soon as they reach the nozzle, even if you feel the canvas isn't perfectly ready yet. The flow of the game dictates the art, not the other way around.
Step-by-Step Walkthrough: The Opening Phase
Initial Moves: Clearing the Surface
Your first three moves are scripted. Tap the top-row Red, Orange, and White cups immediately. This is the only way to create space in the tray. Sending these to the conveyor belt reveals the second layer of the puzzle. You will notice a Purple cup exposed on the left and a Red cup on the middle-right. Do not worry about the Purple cup yet; it is too early to pour it. Focus entirely on getting the Red cups onto the belt. Red sand forms the absolute bottom of the image and is the most forgiving color. Pouring Red early reduces your slot count to safe levels without risking the finer details of the art.
Targeting the 6 Chest Strategy
With the top layer cleared, your immediate objective is the right side of the tray. A 6 Chest is blocking vital Orange cups. Orange is required for the background triangles, which sit "above" the rabbit in the visual depth but can be poured relatively early. You need to generate 6 actions on the right side to pop this chest. Pull the newly exposed Red cup and any other accessible cups on the right flank. As you pull these, the Chest counter will tick down. Once it hits zero, the Chest opens, giving you access to the Orange cups stored inside. This is a critical milestone; it unlocks a color that is safe to pour in large volumes.
Managing the First Pour Wave
As your initial Red and Orange cups reach the pouring mechanism (the nozzle), you must execute a "Base Fill." Pour the Red cups first. Watch the pixel grid; the red sand will settle at the very bottom layer. Follow this immediately with the Orange cups. The orange sand is lighter and will settle on top of the red or in the designated background triangle zones. By clearing these cups now, you ensure your conveyor belt is empty for the complex Blue and Cyan pours that will follow later. Do not let the belt get backed up; a full belt stops you from pulling new cups from the tray, which stops you from breaking the Ice Block.
Early Glass Arch Navigation
On the far right, you will encounter the 5 Glass Arches. These act as gates for your White cups. White is critical for the rabbit ears. However, Glass Arches often require a specific color match or a specific number of adjacent clears to break. If a Blue cup is available, pull it to interact with the arch. If the arch requires a match, and you don't have the matching color yet, you may need to use a "disposable" cup (like an extra Red or Orange) to chip away at the hit points. The goal here is not necessarily to pour perfectly, but to mechanically clear the path to the White cups buried underneath.
Step-by-Step Walkthrough: The Mid-Game Grind
The 33 Ice Block Assault
This is the longest phase of the level. The massive 33 Ice Block in the center guards your Purple and Blue reserves. To break it, you need to generate 33 actions. This is done by pulling cups adjacent to the ice. Use your Orange and White cups liberally here. These colors are safe to pour on the canvas while you wait for the block to break. Keep an eye on the "Clean Burst" mechanic; try to pull cups in groups of three to keep the conveyor belt moving rhythmically. Every cup you pull from the center column chips away at the ice. Do not focus on the Purple cups behind it yet; just focus on the mechanics of reducing that counter from 33 to 0.
Timing the Blue Hat Construction
As the Ice Block cracks, you will gain access to Blue cups. This introduces a timing challenge. The Blue hat is the central element, but it is flanked by the Red floor and the White ears. You must pour the Blue cups when the canvas has a defined "valley" for them. Pour Blue steadily but do not flood the belt. The Blue sand is heavy; it will displace lighter sands if poured too fast. Space your Blue cups out by 2-3 seconds of conveyor movement. This ensures the sand piles up neatly inside the hat outline rather than spilling over the edges. If you pour Blue too fast, it will bleed into the Red floor, creating a permanent muddy stain that ruins the score.
The Cyan Stripe Precision Test
The most dangerous moment in Level 390 is the arrival of the Cyan cups. These are needed for a single, thin vertical stripe on the hat. If a Cyan cup reaches the nozzle while you are pouring Blue or Red, it will contaminate the pour. You must isolate the Cyan pour. Ideally, you want the conveyor belt to be empty (or only contain other Cyan cups) when you execute this move. Pour the Cyan in a quick, sharp burst to fill the thin column. Once the stripe is visible, immediately stop pulling Cyan cups from the tray if possible, or let them queue up behind other colors on the belt. Never let Cyan mix with the heavy flow of the background colors.
Left Side: The 23 Curtain and Pink Band
While managing the center, do not ignore the left side. The 23 Curtain hides your Pink cups. The Pink sand is used for the hat band. Unlike the Cyan, Pink is slightly more forgiving, but it still sits on top of the Blue. You should time the Pink pour to occur immediately after the main body of the Blue hat has formed. The Pink sand is lighter than Blue but heavier than White; it will sit snugly on the hat brim. Use the "tap to pull" method on the left side to tick down the Curtain counter while your Blue cups are moving on the conveyor. This multi-tasking is essential for maintaining speed without gridlocking.
Color Order and Layering Logic
Primary Sequence: Red and Purple
The foundational rule of Sand Loop physics is "Heaviest First." In Level 390, the Red base layer is the anchor. It must be 100% complete before you consider pouring background elements. The Purple sky is technically heavy, but because it surrounds the hat, it is often poured last. However, physically, Purple is heavier than White. The logic conflict here is resolved by the "Container" theory: The Hat acts as a container. Therefore, you pour the container's contents (Blue) before the container's surroundings (Purple). Attempting to pour Purple before the Blue hat is established will result in Purple sand filling the area where the Blue hat needs to go, forcing you to overwrite it, which wastes sand and creates muddy edges.
Secondary Sequence: Blue and Orange
The Blue hat and the Orange triangles occupy the middle visual plane. However, they rarely touch each other. The Blue sand should be poured to create a solid pillar in the center of the canvas. The Orange triangles are background elements that float behind the rabbit. You can pour Orange relatively early, provided the Red floor is already there to catch it. If you pour Orange before Red, the Orange will sink to the bottom layer, displacing the Red and creating a color inversion error. Always ensure the "floor" is Red before adding the "furniture" (Orange/Blue).
Tertiary Sequence: White, Pink, and Cyan
These are your "Highlight" colors. They are the lightest physically and visually. White (ears) must be poured last to sit on top of the Blue hat. Pink (band) acts as a cap for the Blue. Cyan (stripe) is a detail within the Blue. The strict order here is: Blue Base -> Pink Band -> Cyan Stripe -> White Ears. Deviating from this sequence causes the colors to mix. For example, if you pour White before Blue, the Blue sand will cover the White ears, turning them grey or blue. You must "save" your White cups in the tray (or on the belt) until the very last moment.
Percentage Filling Strategy
To optimize your score, think in percentages. Aim to have the Red floor at 100% completion by the time you pull your 10th cup. The Blue hat should reach 80% capacity before you introduce the Pink band. The Cyan stripe only needs to be about 5% of the total volume. The Purple background should fill the remaining negative space last. If you find yourself with 50% Purple filled but only 20% Blue filled, you have rushed the background. You must stop pulling Purple and aggressively hunt for Blue cups to balance the ratio.
Key Tips and Mistakes to Avoid
Common Mistake: The "Purple Haze" Error
The most common reason players fail Level 390 is pouring the Purple background too early. When the 33 Ice Block breaks, a flood of Purple cups becomes available. It is tempting to pull them all to clear the tray. Do not do this. If you pour Purple while the hat is still being built, the heavy Purple sand will cascade over the Blue hat outline, burying it. You will then have to pour excessive Blue to "dig" the hat out of the purple sand, which often leads to overflowing the canvas. Wait until the Blue hat, Pink band, and Cyan stripe are fully rendered before unleashing the Purple flood.
Common Mistake: Ignoring the Slot Counter
Players often focus so hard on the canvas that they forget the tray. If the slot counter reads "5/5," you are in immediate danger. Even if you pull the correct color, if there is no slot for it to move into, the game jams. Always keep 1 slot open. If you are forced to pull a cup you don't need (a "junk" pull) just to keep the flow moving, do it. A temporary inconvenience on the canvas is better than a hard lock in the supply tray. Treat the "5/5" warning as a critical alarm that must be resolved within seconds.
Pro Tip: Rhythm Game Techniques
Level 390 is best played with a steady rhythm. Do not tap frantically. Establish a beat: Pull -> Wait -> Pour -> Pull. Watch the cups travel down the conveyor belt. The visual cue of the cup entering the nozzle should trigger your next pull from the tray. By synchronizing your actions with the movement of the conveyor, you minimize the risk of accidentally dumping a Cyan cup into a stream of Red. This rhythmic approach also helps you manage the countdown timers on the Ice Block and Curtain naturally, as you will be clearing cups at a consistent pace.
Stuck Solution: The "Soft Lock" Fix
If you get "soft locked"—meaning you have no matching colors to break a Glass Arch, but the Arch is blocking a color you need—you have to use "Filler" cups. Look for the most abundant color you have (usually Red or Purple). Pour that color onto the canvas, even if it doesn't match the target area perfectly. This gets the cup off the belt and opens a slot in the tray. The act of pulling and pouring that cup might be enough to tick down a nearby Ice Block or Curtain counter, which could unlock the color you actually need. Sometimes, you have to waste a little paint to win the war.
Advanced Tactics and Speed Run Tips
Pre-Loading the Conveyor Belt
For advanced players looking to speed run Level 390, the key is "Pre-Loading." While the Ice Block is still ticking down (around 10/10), start pulling White and Pink cups and sending them to the conveyor belt *before* the block breaks. Even though you can't pour them yet effectively, having them queued up on the belt saves precious seconds later. This creates a "train" of cups. As soon as the Blue hat is done, the Pink and White cups are already at the nozzle, ready to go. This technique requires precise memory of what is on your belt so you don't accidentally mix them up.
The Cyan Snipe
Speed runners often use the "Cyan Snipe" tactic. Instead of waiting for the perfect moment to pour the Cyan stripe, they deliberately clear the conveyor belt of all other colors, creating a 3-second empty window. They then pull the Cyan cup. Because the belt is empty, the Cyan cup hits the nozzle almost instantly. They pour it in a split-second tap and then immediately resume pulling other colors. This minimizes the window of time where a "wrong" color could accidentally mix with the Cyan. It requires fast fingers and absolute confidence in your color selection.
Exploiting the 6 Chest Timer
The 6 Chest on the right doesn't just unlock Orange; it acts as a timer for your early game. If you are too slow, the chest remains closed, and you run out of easy colors to pour. To speed this up, prioritize the right-side cups exclusively for the first 10 moves. Ignore the center Ice Block initially. By hyper-focusing on the right side, you can pop the Chest in under 20 seconds. This early burst of Orange sand allows you to clear the background triangles quickly, freeing up your mental bandwidth to focus entirely on the complex hat mechanics for the rest of the level.
Late Game Optimization
In the final 15% of the level, you will likely have a mix of background colors left. Do not try to pour them one by one. This is the time to "Dump." Pull all remaining Purple and Orange cups simultaneously. Send them all down the belt. Because the main structures (Hat, Ears) are already solidified and hardened (metaphorically, in the game logic), the background sand will flow around them like water around rocks. Flooding the board at this stage is safe and is the fastest way to trigger the "Level Complete" validation check. Trust in the layers you have built and let the sand flow.