
Level 391
HARDHow to solve Sand Loop level 391? Get instant solution for Sand Loop 391 with our step by step solution & video walkthrough. Sand Loop 391 tips and guide.
Play Sand Loop Now
Experience the puzzle challenge firsthand
Game Screenshots


Sand Loop Level Guides
Sand Loop Level 391: Comprehensive Walkthrough & Strategy Guide
1. Introduction: The Sakura Garden Deception
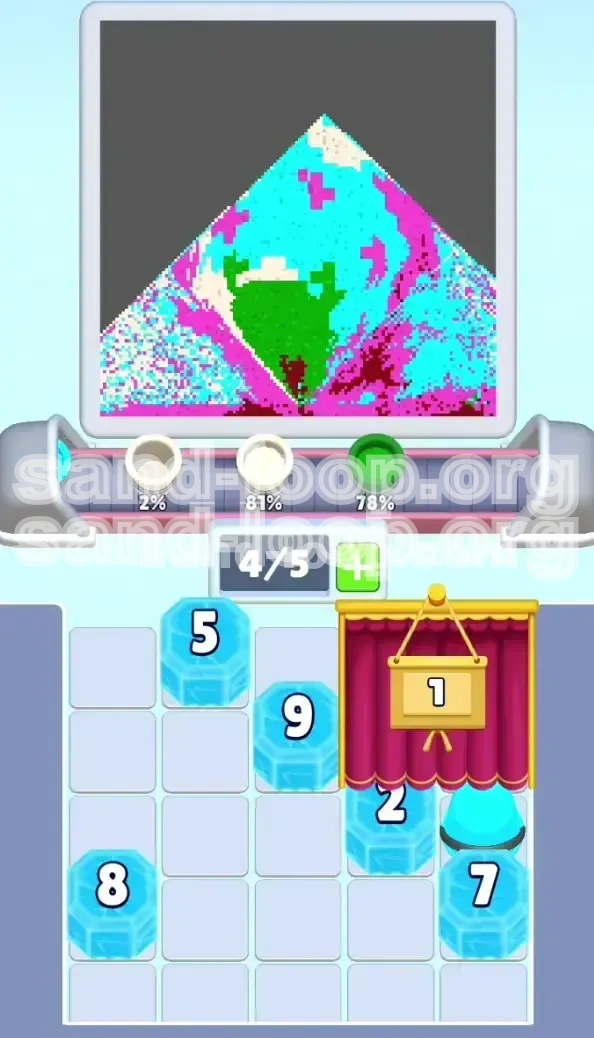
Level 391, titled "Sakura Garden," is a deceptive stage that masquerades as a relaxing, artistic puzzle but functions as a rigorous test of resource management. At first glance, the level appears to be a simple landscape painting task involving a blue sky, pink cherry blossoms, and green grass. However, the underlying mechanics are unforgiving. This level introduces a severe bottleneck in the form of high-volume ice blocks and a restrictive "Red Curtain" gate that holds critical resources hostage. The primary challenge is not the color matching itself, but maintaining the flow of materials (Slot Economy) while breaking through massive ice barriers (up to Ice 22) without causing a conveyor deadlock.
2. Core Challenge: The Ice and Slot Economy
The defining feature of Level 391 is the sheer density of frozen cups. You are not just dealing with single-click ice; you will face Ice 18 and Ice 22 blocks immediately. This creates a high "click cost" for basic resources. If you approach this casually, you will fill your five active slots with slow-pouring, high-volume cups (like Cyan or Green) while your critical ice blocks remain untouched. The moment your conveyor belt hits 5/5 capacity, the game pauses, and you are forced to watch painfully slow pours finish before you can resume chipping ice. Efficiency is not optional here; it is the win condition.
3. The Red Curtain Mechanic
Approximately 40% of your total cup supply is hidden behind a red curtain on the right side of the tray. This curtain functions as a "Pass Gate" with a counter set to 10. The mechanism is simple but brutal: you must successfully process and pour 10 cups from the visible front row to trigger the mechanism that retracts the curtain. This creates a paradox. You need to break the ice to get the cups to open the curtain, but breaking the ice requires cups you haven't accessed yet. Mismanaging your first 10 cups will leave you with an empty tray and a closed curtain, leading to an inevitable soft-lock.
4. Level Objectives and Success Criteria
To complete Level 391 and achieve the three-star rating, players must adhere to a strict hierarchy of operations:
- Conveyor Management: Keep the active slot count between 3 and 4 at all times to allow for emergency ice breaking.
- The Gate Goal: Cycle 10 cups through the belt as rapidly as possible to access the rear reserves.
- Precision Aiming: Achieve 95%+ color accuracy, particularly in the "Sky" region, where over-pouring contaminates the small cloud and petal details.
Strategic Overview: Color Palette Analysis
1. Cyan (The Sky): High Volume, High Risk
Cyan is the most abundant color on the board, comprising roughly 50% of the total pixel area. Because of this volume, you will be processing Cyan cups constantly. The danger lies in the "Staccato" nature of the sky. It is interrupted by white clouds and pink petals. You cannot simply lock on and pour; you must tap rhythmically. If you treat Cyan like a flood fill, you will fail. Strategy: Prioritize Cyan for the "Curtain Counter" since it is abundant, but stop pouring before hitting the cloud boundaries.
2. Pink (Cherry Blossoms): The Jagged Targets
The Pink zones are located on the left and right sides of the upper canvas. They are characterized by irregular, jagged edges. These sections require "Clean Bursts"—short, controlled pours that fill the jagged tips without spilling into the surrounding sky or grass. Since Pink cups are often trapped behind the mid-tier ice blocks, they serve as a secondary resource. Do not go looking for Pink until the curtain is open and you have established a flow of Maroon and Green.
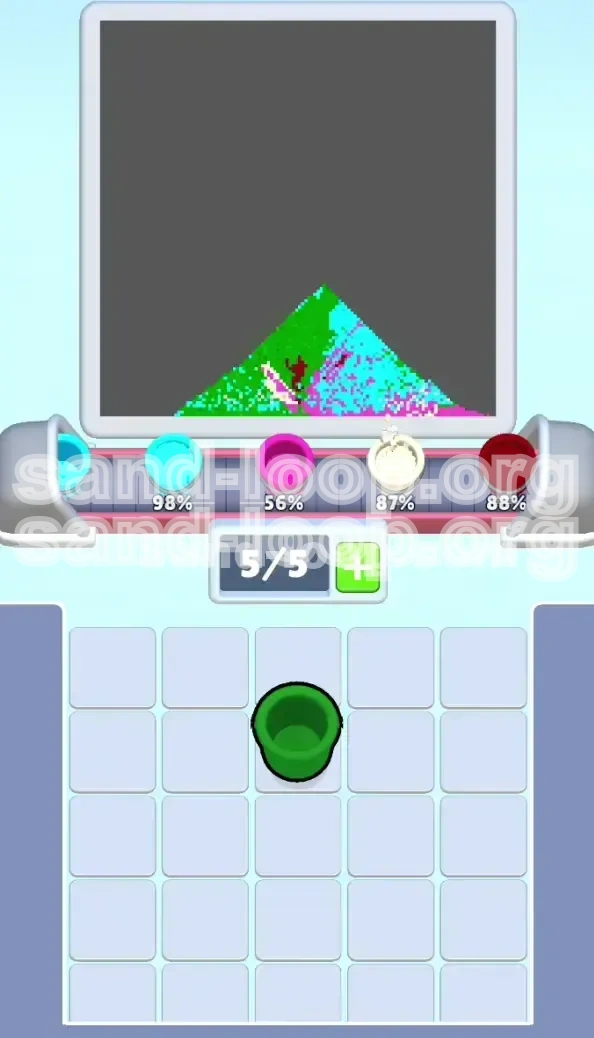
3. Green (Grass): The Buffer Zone
The Green strip runs horizontally across the center. It is the most forgiving section of the painting. It acts as a visual separator between the sky and the ground. Functionally, Green is your "Buffer Color." When you are waiting for a high-volume cup to finish pouring so you can free up a slot, send a Green cup. It is a straight line, easy to aim, and usually available in the front row. Use Green to keep your counter moving toward 10 without risking complex details.
4. Maroon (Earth & Branches): The Endgame Color
Maroon is used for the soil at the very bottom of the screen and the fine branch details within the pink trees. This is your lowest priority color. Physically, filling the bottom of the screen first is a mistake because any subsequent spillage from above (sand falling from the nozzle) will land in the Maroon zone, turning brown soil into a muddy mix of cyan and green. Rule of thumb: Maroon cups stay in the tray until the sky and grass are 100% complete.
5. White (Clouds): The Sparse Resource
White is used sparingly for the clouds and the highlights in the path. The challenge with White is not the volume, but the availability. White cups are often the fewest in number. If you accidentally overwrite a White cloud with Cyan, you may not have enough White sand left to fix it. Always check the tray for White cup availability before starting a complex pour sequence in the sky.
Phase 1: The Opening Sequence & Curtain Breach
1. The "Ice 18" Priority
As the level loads, immediately scan the top row of the tray. You will likely see an Ice 18 or Ice 22 block. Your first action must be to assess the slot economy. If you send cups to the belt immediately, you will clog your slots. Instead, start tapping the Ice 18 block. If it is behind a glass divider, you may need to send one cup to the belt to clear the path, but generally, chipping ice takes precedence over filling the canvas in the first 15 seconds.
2. The "Curtain Count" Strategy
Remember, the Red Curtain requires 10 processed cups. Do not waste these 10 slots on complex colors. Use this phase to clear "easy" colors. Look for Green or Cyan cups that are not frozen. Send these to the conveyor.
Sequence:
- Tap/Queue a Green Cup.
- Tap/Queue a Cyan Cup.
- While they pour, tap the Ice Block.
- Repeat until the curtain retracts.
3. Managing the 5-Slot Limit
This is the most critical mechanical skill in Level 391. Never let the belt reach 5/5. If you have 4 cups pouring and you see a White Cup become available (rare), you cannot grab it because you are full. Always keep one slot "breathing." This means if you have 3 cups pouring, and one is about to finish (indicated by the cup tilting), you can add a 4th. If you add a 5th while the first is only half-done, you have created a deadlock.
4. Unlocking the Mid-Tier Resources
Once the curtain retracts, you will see a new column of cups. This is often where the bulk of your Maroon and Pink supplies are hidden. However, they are usually guarded by Ice 10 or Ice 12 blocks. Do not switch focus entirely to breaking this new ice yet. Finish pouring the active cups on your belt first to clear your slots. Then, dedicate a specific cycle to breaking the mid-tier ice to access the colors needed for the tree details.
5. Handling the Initial Spill
The beginning of the level is messy. You will have sand pouring for the sky while you are aggressively tapping ice blocks. If you accidentally tap a cup you didn't mean to, don't panic. If it's a "safe" color (Green or Cyan), let it pour into a safe zone (like the far edge of the grass or sky corner) to burn the timer, rather than restarting immediately.
Phase 2: The Sky and Petal Precision Phase
1. Deconstructing the Cyan Sky
The sky is not a single rectangle. It is a complex shape with holes. Do not pour Cyan in the center first. The center of the screen contains the White clouds and Pink petals.
The "Side-First" Method: Start pouring Cyan in the top-left and top-right corners. These are safe zones with high capacity. Once the corners are full, move inward. Stop immediately when you approach the center axis.
2. The "Staccato Tap" Technique
For the center sky, you must use the Staccato Tap. Instead of holding the screen, tap it rhythmically (e.g., every 0.5 seconds). This releases small "puffs" of sand rather than a continuous stream. This allows you to fill the narrow gaps between the clouds and petals without overspill. If you hold the pour, the sand stream widens and will inevitably bleed into the White cloud zones.
3. Filling the White Clouds
Before you finish the sky, you must claim the White cloud territory. White clouds are "floating" in the blue. If you fill the blue first, the white sand sits on top, which is fine, but if you overfill the blue, you lose the cloud definition.
Tip: Wait for a White Cup to enter the pouring position. If you don't have one, pause the Cyan pours and break ice until a White Cup appears. Prioritize the clouds. Once the white is down, you can aggressively fill the remaining Cyan gaps around them.
4. The Pink Petal Micro-Management
The pink petals are small "+" shapes floating in the sky. These are the hardest targets to hit. They require "Micro-Bursts." Tap the screen for a split second and release. Do not try to fill a petal in one go. It usually takes 3-4 separate micro-bursts to fill a single petal without overfilling the surrounding area.
5. Avoiding Color Contamination
In Sand Loop, layered sand is a liability. If you pour Cyan into a Pink petal, you have to use even more Pink sand to overwrite the Cyan. This wastes your limited Pink supply. If you make a mistake, decide immediately: is it small enough to leave, or do I need to fix it? In Level 391, with the tight Ice economy, you usually cannot afford to fix small imperfections until the very end.
Phase 3: The Ground, Branches, and Final Polish
1. The Green Grass "Safe Haven"
By Phase 3, the sky is done. Now focus on the Green Grass. This is a large, uninterrupted block. It is the perfect place to "dump" extra sand if you have a cup that is partially full but you need to clear the slot. Fill the grass to 100% early in this phase. It clears the middle of the screen and gives you a clean visual boundary for the bottom soil.
2. The Maroon Soil Protocol
Why is Maroon last? Physics. Sand falls from the nozzle at the top. If you fill the bottom (Maroon) first, any stray sand from the Green or Cyan pours above will fall down into your fresh Maroon layer. This creates "pollution" that requires extra sand to clean up.
Protocol: Keep the Maroon cups in the tray. Do not pour them until the Green above them is 100% dry and full. Once Green is done, the "drip" risk is eliminated.
3. Branch Detailing
The Maroon branches inside the Pink trees are tricky. They are surrounded by Pink. You must use the Staccato Tap technique here as well. If you have a stylus or precise finger control, tap exactly on the branch. If not, pour quickly and stop just before the meter fills completely, relying on the sand's spread to creep into the branch tips.
4. The "Gap Filler" Sweep
In the final 10% of the level, you will have 90% of the canvas filled and a tray full of random leftovers. This is the "Gap Filler" sweep. Pause and look for the color that is most scarce.
- Scenario A: You have 10% Pink left but 3 Pink cups. Use them.
- Scenario B: You have 5% White left but 0 White cups. You must break Ice 22 to get the last White cup.
Do not pour a color you don't need. If you are at 99% completion, only pour the specific color required to finish the puzzle.
5. Clearing the Tray for Victory
As you approach 100% completion, your tray might still have cups in it. This is fine, provided the active belt is empty. The level ends the moment the canvas is full. You do not need to empty the tray. However, if you are stuck at 99%, look for the "hidden" pixel. It is usually a stray unfilled pixel in a Maroon branch or a Pink petal. Zoom in if necessary (visually) to find the gap.
Advanced Tactics & Speed Run Optimization
1. Speed Running: The "Ice First" Variant
For experienced players looking to set a time record, the standard walkthrough is too slow. The Speed Run strategy ignores the "Curtain Count" initially.
The Play: Ignore the conveyor completely for the first 5 seconds. Tap the Ice 22 and Ice 18 blocks as fast as humanly possible. Accept that your slots will fill up. Once the Ice is broken, *then* send the cups. This front-loads the "wait time" into a single block rather than spreading it out. It saves about 15-20 seconds on the clock but requires perfect knowledge of the cup locations behind the ice.
2. The "Maroon Saver" Trick
There is a small exploit in the physics engine regarding "overfill." If you overfill a color slightly, it creates a dome. If you pour a color *on top* of that dome, it spreads further than normal. Use this to your advantage with the Maroon soil. If you are running low on Maroon cups, overfill the Green grass slightly above it. The Maroon sand will spread over the dome, covering more area with less sand.
3. Managing "High Friction" Areas
The "Pink Petals" and "Clouds" are high-friction areas because they are small. Speed runners often skip the Staccato Tap and instead "Swipe and Release." Swipe the cup towards the target, and the moment the sand stream hits, release the drag. The momentum of the sand carries it into the hole, but the release stops the flow instantly. This is faster than tapping but harder to control.
4. Optimal Cup Ordering
Never queue a slow color (Ice 20+) before a fast color (Ice 5) if you need the fast color immediately. The queue is FIFO (First In, First Out). If you queue an Ice 20 Cyan, and then realize you need an Ice 5 White for a cloud, you have to wait for the Cyan to finish. Always queue small, fast ice blocks first to clear the slots for the heavy hitters.
5. Recognizing the "Soft Lock"
A "Soft Lock" is when you have 5 slots full, all are pouring into areas that are already 90% full, and you need a specific color to finish the last 10%. You are stuck waiting. To avoid this, always keep one "utility slot" open. This is a slot reserved specifically for a color you *might* need. If you only have 4 cups pouring, and the 5th is available, don't fill it unless you are sure.