
Level 43
HARDHow to solve Sand Loop level 43? Get instant solution for Sand Loop 43 with our step by step solution & video walkthrough. Sand Loop 43 tips and guide.
Play Sand Loop Now
Experience the puzzle challenge firsthand
Game Screenshots
Sand Loop Level Guides
Sand Loop Level 43: The "Beach Sunset" Master Walkthrough
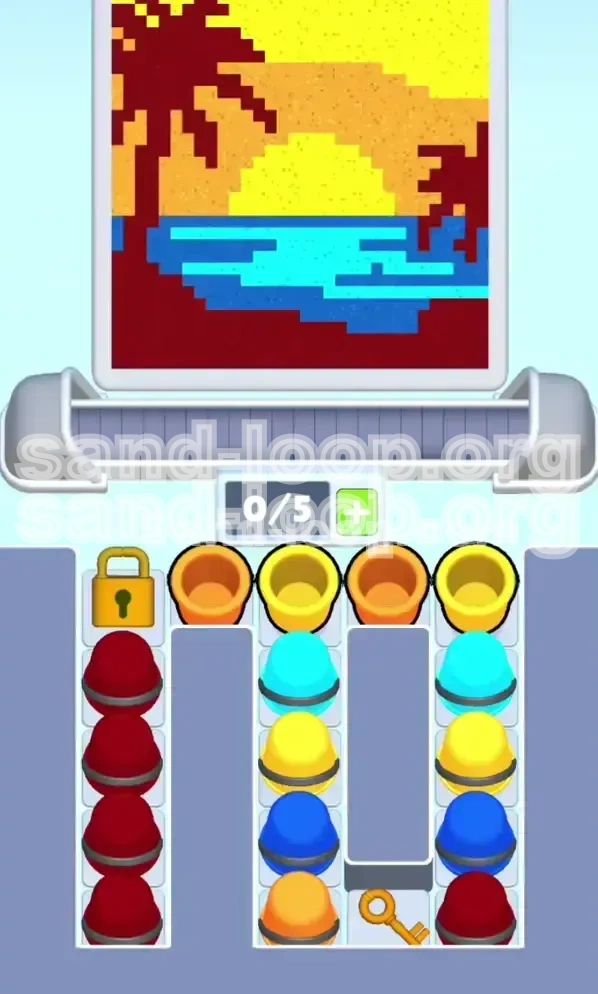
Welcome to the most deceptively relaxing stage in Sand Loop. Level 43, titled "Beach Sunset," presents a pixel art canvas featuring a tranquil ocean scene with a large sun and palm tree silhouettes. While the image looks like a vacation postcard, the gameplay mechanics underneath are a strict logic puzzle that punishes impulsive play.
This level introduces a hard "Lock and Key" mechanic combined with a strict layer-based painting order. Unlike previous levels where you could pick colors at random, this stage forces a linear path: you must paint the background before you can even access the tools to paint the foreground. If you ignore the physics of the conveyor belt and the layout of the tray, you will find yourself stuck with a full belt of useless sand and no way to unlock the critical red color.
In this guide, we will break down the exact color sequence, tray management strategy, and the step-by-step logic to clear Level 43 with a 3-star rating without getting stuck.
1. Level Overview: Understanding the "Beach Sunset" Puzzle
Before you tap a single bucket, you need to understand why this level is difficult. It is not about speed; it is about resource management and spatial reasoning.
The Layout Strategy: A "Locked Cache" Scenario
The defining feature of Level 43 is the separation of resources. The tray is divided into two zones: the "Active Zone" in the middle, containing Sky and Water colors, and the "Locked Zone" on the far left.
The "Locked Zone" contains all the Dark Red (Maroon) buckets necessary for the palm trees. However, a physical padlock covers these buckets. You cannot tap the Red buckets until you find the specific Golden Key hidden elsewhere in the tray. This creates a bottleneck; you cannot finish the level until you solve the problem of the lock.
The Visual Layers: Background vs. Foreground
The target image is composed of three distinct visual layers that dictate your painting order. The bottom layer is the Sun (Yellow), surrounded by the Sky (Orange). The middle layer is the Ocean, split between two shades of blue. The top layer is the Palm Trees (Dark Red).
In Sand Loop physics, painting "top layer" colors over "bottom layer" colors works fine, but you cannot access the top layer colors yet. Therefore, your strategy must shift to completing the background elements first to trigger the game's unlock mechanics.
The "Ghost Key" Mechanic
The Golden Key is not in your inventory; it is buried physically inside the tray, located at the bottom of the middle columns. This is a "Tray Geometry" challenge. The key is blocked by stacks of sand buckets. You cannot simply tap the key to collect it; you must remove the buckets pressing against it to free it.
Many new players make the mistake of trying to click the key immediately. This is impossible. The game engine prevents interaction with the key until the blocking columns (Column 2 and Column 4) are reduced to a certain height. You must view the colored buckets not just as paint, but as physical obstacles blocking your progress.
The Conveyor Belt Limit
Your conveyor belt in this level has a limited capacity of 5 slots. This becomes a major tactical constraint. Because you have to process the colors in a specific order (Sky -> Water -> Trees), mixing them on the belt is dangerous.
If you fill the belt with 3 Orange buckets and 2 Cyan buckets, the dispenser nozzle has to clean itself between every different color drop. This wastes time, reduces your score multiplier, and creates "sand gaps" in the art. Efficient batching is the secret to a high score here.
The Color Palette Breakdown
To succeed, you must memorize the 5 active colors in this level:
- Yellow: Used for the setting sun. Quantity: Low.
- Orange: Used for the sky. Quantity: High.
- Cyan: Light blue water. Quantity: Medium.
- Royal Blue: Deep blue water. Quantity: Medium.
- Dark Red (Maroon): Palm tree silhouettes. Quantity: High (but locked).
2. Clear Objectives: Your Mission Checklist
To complete Level 43, do not focus on "painting." Focus on these sequential goals. Treat them like a quest log.
Objective 1: Drain the Middle Columns
Your primary goal is not to paint the picture, but to clear the center of the tray. The stacks in Column 2 and Column 4 are sitting on top of the Golden Key. You must tap and process these buckets to lower the stack height.
Think of this as an excavation. Every Orange or Yellow bucket you remove is bringing you closer to the prize. Do not worry about making the picture perfect yet; just get those central buckets moving onto the conveyor belt.
Objective 2: Isolate the Golden Key
Once you have processed enough buckets from the top of the middle stacks, the pressure on the Key will be released. The game physics will trigger the Key to slide into a tap-able position.
Your immediate reaction must be to pause your painting and tap the Key. Do not let it sit there. Collecting the Key is the trigger that unlocks the left side of the tray.
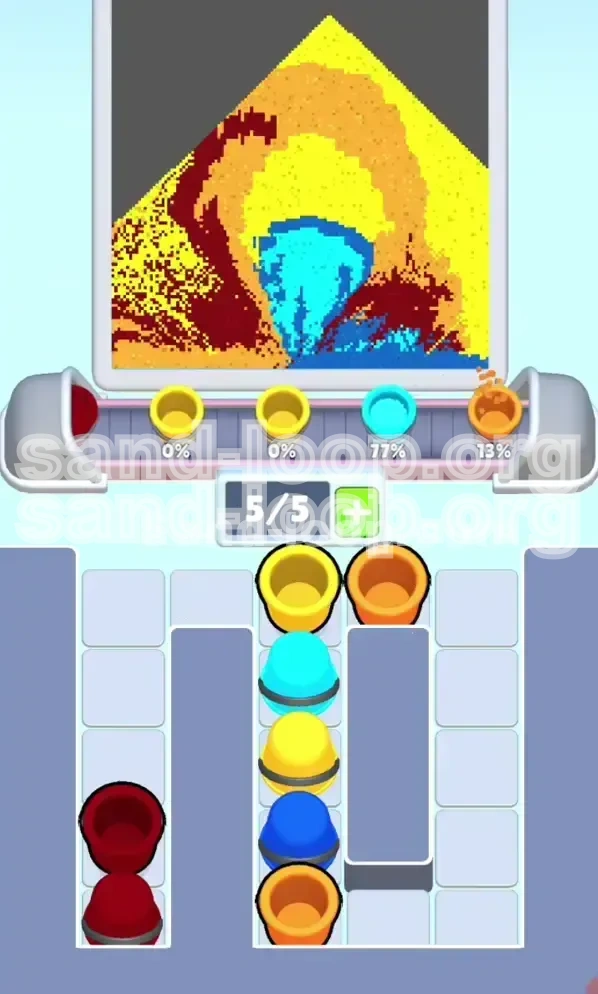
Objective 3: Execute the "Sky-to-Water" Fill
Before you unlock the Reds, you need to have the background ready. Your objective is to fill the top 60% of the canvas (Sky and Sun) and the middle 20% (Water) using only the colors available in the middle and right columns.
Doing this clears space on your conveyor belt. If you unlock the Red buckets while your belt is still full of Blue and Yellow, you will create a traffic jam that is very hard to recover from.
Objective 4: Unlock the Red Cache
Once the Key is collected, the padlock on the far left (Column 1) will shatter. This reveals a massive stack of Dark Red buckets. Your objective here is speed. You now have access to the tools needed to finish the level.
Objective 5: The Foreground Overlay
The final objective is to apply the Dark Red silhouette over the finished sunset. Because this is the top layer, it covers any small imperfections you made while painting the sky and water. This is your "clean up" phase.
3. Step-by-Step Instructions: The Perfect Run
Follow this exact sequence to clear the level without getting stuck. Do not deviate from the order of operations.
Step 1: The "Sun Start" (Yellow Phase)
As soon as the level starts, ignore the water. Ignore the trees. Look for the Yellow buckets. They are usually located at the very top of Column 3 or Column 4.
Action: Tap 2 Yellow buckets and place them on the belt.
Why? The sun is a small area. If you tap too many Yellow buckets, the excess will spill over into the Orange sky, creating a muddy color. You want to fill the Sun meter to 100% before the nozzle moves.
Step 2: Clearing the Sky (Orange Phase)
With the Sun done, immediately switch to Orange. You will see a heavy stack of Orange buckets in the middle columns.
Action: Rapidly tap Orange buckets until the belt is full (4-5 slots).
Tactical Note: Keep the belt "pure." Do not mix Cyan or Blue in yet. Let the dispenser paint the entire sky orange. This clears the Orange buckets out of the tray, which is essential because they are physically blocking the Key from dropping down.
Step 3: The Water Transition (Cyan First)
Once the sky is finished, you will see the Cyan buckets exposed in the middle tray.
Action: Tap Cyan buckets to fill the light sections of the water.
Warning: Look closely at the canvas. The water is striped. Do not fill the whole ocean with Cyan. Stop when the light blue sections are full. If you overfill Cyan into the Royal Blue sections, you will waste precious sand later trying to cover it up.
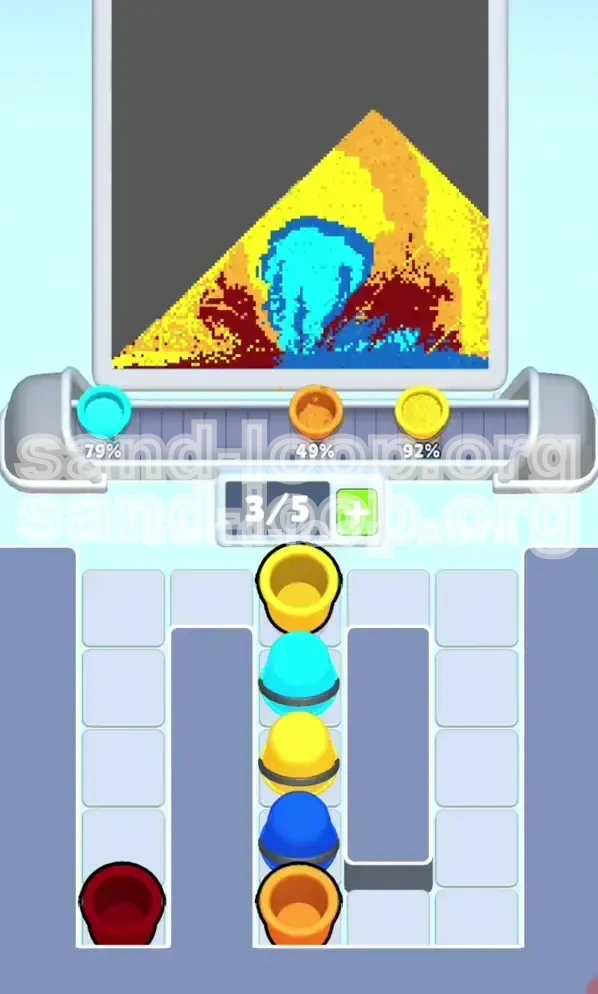
Step 4: The Deep Water (Royal Blue Phase)
Now, tap the Royal Blue buckets. These are often located on the right side of the tray (Column 5).
Action: Fill the belt with Royal Blue.
The Key Moment: As you tap these Blue buckets, look at the bottom of the tray (Column 2/3/4). You should see the Golden Key become visible. It might wiggle or glow.
Step 5: Key Retrieval Protocol
Stop tapping colors. If your belt is full of Blue, wait a second for it to clear partially.
Action: Tap the Golden Key as soon as it is accessible.
Result: A loud click will sound, and the Left Column (Column 1) will unlock, revealing the Dark Red buckets.
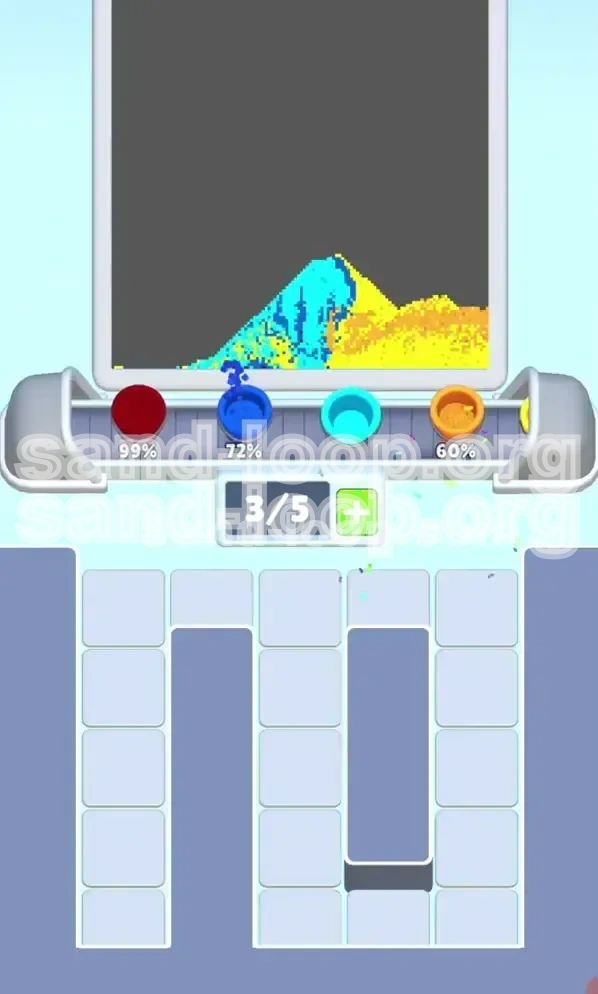
Step 6: The "Rapid Fire" Finale (Red Phase)
Now that the Reds are unlocked, look at your canvas. The background should be 90% done. You might have a few empty pixels in the water or sky—ignore them for now.
Action: Tap the Dark Red buckets in Column 1 as fast as you can. Fill the entire belt with Red.
The dispenser will now paint the palm trees. Because trees are the foreground, they cover everything else. Once the trees are fully painted, the level ends.
4. Color Order Analysis: Processing the Palette
The specific order in which you process colors is the difference between a smooth run and a failed run. Here is the optimal "Color Chain" for Level 43.
Priority 1: Warm Colors (Yellow & Orange)
We process the warm colors first for two reasons: placement and obstruction.
First, the sun and sky are at the top of the image, so they get painted first by gravity. Second, and more importantly, the Yellow and Orange buckets are physically sitting on top of the Key. You literally cannot reach the mechanics of the level until you move these buckets. Processing them first is not just an artistic choice; it is a mechanical necessity.
Priority 2: The "Trap" Color (Cyan)
Cyan is your biggest bottleneck. It looks like it should be used for everything, but it is only for the shallow water.
The Mistake: Players often tap Cyan while they still have Orange on the belt. The dispenser switches from Orange to Cyan, creates a blob of brownish waste, and then switches back.
The Fix: Wait until the belt is empty of Orange before introducing Cyan. Treat Cyan as a distinct phase of the level.
Priority 3: Deep Color (Royal Blue)
Royal Blue is your "bridge" color. It finishes the background and clears the right side of the tray. By the time you are done with Royal Blue, the middle of the tray should be empty enough to grab the key.
Crucially, using Royal Blue last ensures that the contrast between the water and the sky is sharp.
Priority 4: The Foreground (Dark Red)
Dark Red is dead last. Attempting to access it earlier is impossible because of the lock. This works in your favor. By the time you get to Red, you don't need to think about details. You just dump the Red sand onto the belt, and the game fills in the complex tree shapes automatically. It is the most satisfying part of the level, provided you cleared enough space on your belt.
5. Key Tips for Mastery
These tips will help you manage the finer details of the level and avoid common headaches.
The "Gap" Strategy
Don't try to fill every single pixel perfectly as you go. In Sand Loop, it is better to leave a 5% gap in the sky or water than to overflow the wrong color.
For example, if you are 90% done with the Orange sky but run out of bucket space, switch to the next color immediately. The background gaps are small enough that they won't prevent the "Level Complete" trigger when you finish the trees. Prioritize flow over perfection.
Watch the "Nozzle Lag"
The dispenser nozzle takes a fraction of a second to clean itself when switching from a dark color (Blue) to a light color (Yellow).
To avoid this lag, try to group your color changes from light to dark. Go Yellow -> Orange -> Red (Light to Dark) rather than forcing the machine to clean repeatedly. This is why we do the Sky first and the Water second, rather than jumping back and forth.
The Solitary Red Bucket
There is often a single, stray Red bucket located at the bottom of the far right column (Column 5 or 6), separate from the main locked cache.
If you see this bucket while you are working on the water, and you have an empty slot on your belt, tap it. It won't mess up your painting because the Red trees cover the water. Getting this "rogue" bucket out of the way early prevents it from blocking the fall of other Blue buckets later in the level.
Managing the "Full Belt" Panic
If your conveyor belt is full and the color you need is not on the belt, do not panic-tap more buckets.
Stop. Look at the canvas. Is there a small section you can fill with what you currently have? If not, just wait 2-3 seconds for the dispenser to empty a slot. Patience is better than a jammed belt.
6. Common Mistakes to Avoid
Learn from the errors of others. Most players fail Level 43 because of one of these three bad habits.
The "Key Snipe" Attempt
The Mistake: Trying to tap the Golden Key the moment you see it, even if buckets are still blocking it.
The Consequence: You waste time tapping an unresponsive object while your belt runs empty. This causes your combo multiplier to drop.
The Fix: Trust the physics. You cannot touch the key until the columns next to it are lower than the key itself. Keep removing the colored buckets until the key is the highest object in its column.
Color Contamination
The Mistake: Tapping a Cyan bucket while the dispenser is still full of Orange.
The Consequence: The nozzle spits out a mix of Orange and Cyan, creating a dirty brown sludge that ruins the bright blue sky look. You then have to waste Red or Blue buckets to cover up the mistake.
The Fix: "One Color at a Time." Commit to a color, fill the belt with it, and don't switch until you have to.
Ignoring the Tray Geometry
The Mistake: Focusing only on the canvas and ignoring how the stacks are leaning in the tray.
The Consequence: You might clear the Sky perfectly, but leave a single tall stack of Royal Blue in the middle column. This single stack can block the Key from sliding over, forcing you to tap unnecessary Blue buckets just to lower the stack.
The Fix: Always keep an eye on the middle columns. Your goal is to level the tray, not just paint the picture.
7. Stuck Solutions: Troubleshooting Guide
Did everything go wrong? Here is how to recover from specific bad situations.
Problem: "The Key Won't Drop!"
You have painted the sky and water, but the key is still stuck behind a stack.
Solution: Look closely at the columns immediately to the left and right of the key. There is likely a single bucket or a small stack of "waste" color (like a color you already finished) holding it up. Tap those specific buckets to clear the path. Do not worry about where that sand goes on the canvas; just get it off the tray.
Problem: "My Belt is Full of the Wrong Color"
You have 5 slots of Cyan on the belt, but the canvas needs Red.
Solution: You have to "burn" the Cyan. Look for any unpixelated spot on the canvas that accepts Cyan (even small gaps in the water). If there are absolutely no gaps, you have no choice but to wait for the dispenser to slowly process the Cyan. To prevent this in the future, never fill your belt 100% full unless you are 100% sure of the next color.
Problem: "I Can't Get 3 Stars"
You finished the level, but your score is low.
Solution: You probably broke your combo chain. The combo multiplier breaks if the dispenser stops moving. To get 3 stars, you must ensure there is always a bucket on the belt. This requires you to plan ahead: as the last bucket of one color is being picked up, you should already be tapping the next batch of the required color. Seamless transition is the key to high scores.
8. Speed Run Tips (For the Pros)
Once you have beaten the level, come back here to learn how to shave seconds off your time.
Pre-Loading the Belt
While the dispenser is painting the last 10% of the Sky (Orange), you can already start tapping Cyan buckets. If you time it right, the Cyan bucket will arrive at the nozzle exactly as the Orange finishes. This "overlap" saves precious seconds.
The "Bulk Tap" Technique
Don't tap buckets one by one. If you need 4 Orange buckets, tap the stack 4 times rapidly in a rhythm (tap-tap-tap-tap). This queues them up faster than waiting for the belt to move each time. This is especially effective during the "Red Finale" phase.
Ignoring Perfection
Speed runners know that 95% coverage is enough for the game to register a "complete" section. If a pixel is half-painted, move on. The game is forgiving. Trying to get 100% pixel perfection adds seconds to your time that you can't afford. Paint fast, paint messy, and let the trees cover the mistakes.