
Level 55
HARDHow to solve Sand Loop level 55? Get instant solution for Sand Loop 55 with our step by step solution & video walkthrough. Sand Loop 55 tips and guide.
Play Sand Loop Now
Experience the puzzle challenge firsthand
Game Screenshots
Sand Loop Level Guides
Level Overview: The Farmhouse Logic Challenge
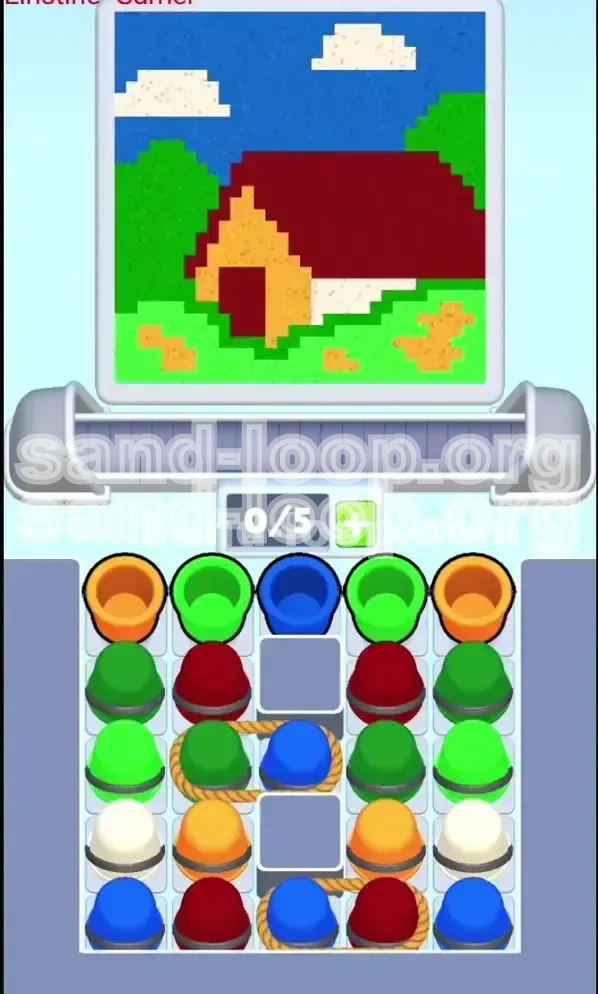
Level 55, titled "The Farmhouse Landscape," represents a significant shift in gameplay mechanics from previous levels. This stage abandons the frantic pace of timed challenges or the destruction mechanics of ice-breaking levels. Instead, it presents a pure logic puzzle that tests your ability to manage queue order and handle complex constraints. The visual target is a serene scene featuring a rustic red-roofed farmhouse, surrounded by vibrant green foliage and set against a clear blue sky with white clouds. However, beneath this calm exterior lies a logistical nightmare of interconnected supplies.
The primary difficulty spike in this level stems from the introduction of the "Rope Bond" mechanic. This isn't just about matching colors; it is about spatial management on your conveyor belt. You are limited to a strict 5-slot capacity (displayed as 0/5). In this level, three of your most critical colors are physically tied together, meaning they occupy three slots simultaneously. If you mismanage your belt space when activating this mechanism, you will face an immediate deadlock, forcing a restart. This guide is designed to help you navigate these constraints, ensuring you pour the right colors at the right time without clogging your system.
The "Key Unlocking" Mechanic
Unlike standard levels where you can pick up any cup at any time, Level 55 functions like a locked door. The "Key" here is not an item, but the alleviation of the Rope Constraint. The game forces you to clear the upper layers of the supply tray before you can access the critical components捆绑 at the bottom. This means you cannot simply rush for the roof or the sky; you must methodically strip away the outer layers to free the core resources.
Visual Analysis of the Target
Success in Sand Loop often depends on reverse-engineering the target image. The Farmhouse consists of distinct color blocks that layer in a specific order. The background is Cyan/Blue (Sky), followed by the mid-ground of White (Clouds) and Green (Foliage), and the foreground of Beige (Walls) and Deep Red (Roof/Door). Understanding this layering is crucial because pouring a foreground color too early can block background pixels, leading to imperfect fills later on.
The Capacity Crisis
The most critical statistic in this level is your conveyor belt capacity: 5 slots. The rope cluster consists of 3 cups (Green, Blue, Red). This means that activating the rope consumes 60% of your total available space instantly. You cannot afford to have "leftover" cups riding the belt when you pull the trigger. You must aim for a 0/5 or 1/5 state before engaging the rope cluster to avoid a "Game Over" due to gridlock.
Physics vs. Logic
This level relies heavily on Sand Loop physics. The sand settles from the bottom up. However, the "Sky" presents a unique challenge. It is a large void at the top of the canvas. If you fill the sky too early, you might create a "ceiling" that prevents subsequent sand from reaching the lower details of the farmhouse correctly. Patience is more valuable than speed here; watching the sand settle is a required part of the strategy.
Clear Objectives: Your Path to Victory
To achieve a three-star rating and complete Level 55, you must move beyond random clicking and adhere to a strict set of objectives. Your goal is not just to fill the canvas, but to optimize the flow of materials so that the rope constraint becomes a help rather than a hindrance.
Establishing the Base Layer
Your first objective is to secure the bottom and middle sections of the canvas. This involves the Green foliage and the Beige structural elements of the house. By prioritizing these, you create a "container" for the rest of the image. If you fail to establish the base first, you risk having floating pixels that refuse to connect with the main image structure.
Managing the Rope Cluster
The central objective of this level is the safe extraction and deployment of the Rope Cluster (Green-Blue-Red). You must clear the supply tray's upper layers to expose this cluster. Once exposed, you must ensure your conveyor belt is empty enough to accept the three-cup load. Failing this objective is the most common reason for failure in this stage.
Perfecting the Sky
The sky is the final boss of this level. You must fill the large Blue background without contaminating the White clouds or obscuring the Red roof. This objective requires timing. You must pour the Blue sand only after the White cloud structures are partially in place, and certainly after the roof is defined, to avoid color bleeding.
Preventing Contamination
A zero-tolerance objective for this level is avoiding "Muddy Colors." If you pour a Dark Red door into a space that should be Beige, or White clouds into a Blue sky that isn't ready, you create grayish slush that ruins the purity of the image. Every pour must be calculated to hit its designated pixel zone.
Efficiency Management
While not a timed level, efficiency is measured by moves. You want to minimize the number of times you shuffle cups on the belt. Ideally, every cup you pick up goes immediately to the canvas. Keeping the belt clear allows for the rapid deployment of the rope cluster when the opportunity arises.
Step-by-Step Instructions: The Execution Phase
This section provides the exact sequence of moves required to beat Level 55. Follow these steps in order, and do not skip ahead. The logic here builds step-by-step, preparing your belt and canvas for the final multi-color burst.
Phase 1: The Strip Down (Top Layer)
When the level starts, look at the top row of the supply tray. You will see two Orange (Beige) cups on the corners and Green cups in the inner positions. There is also a Blue cup in the center, but ignore it for now.
- Action 1: Tap the two Orange/Beige cups first. Send them to the conveyor. Pour them immediately. This creates the dirt patches and the lower wall foundation.
- Action 2: Tap the Green cups located in the top-middle row. Send them to the belt and pour. These will form the bushes and grass base.
- Crucial Check: Ensure your belt is empty (0/5) before proceeding to the next phase. Do not let cups accumulate.
Phase 2: The Structural Build (Middle Layer)
With the top layer gone, you now have access to the Red and White cups that were previously buried. Do not touch the bottom row yet.
- Action 3: Identify the Red cups. These are for the roof. Tap them to send them to the belt. Pour them. The roof is a large, distinct area, so it can accept sand early without much risk of error.
- Action 4: Locate the White cups. These are critical for the clouds. Send them to the belt. Pour them carefully. Try to aim for the upper-center of the canvas to define the cloud shapes before the sky arrives.
- Inventory Check: At this point, your belt should be cycling through Red and White. Wait until the last White cup has poured and your belt reads 0/5 or 1/5.
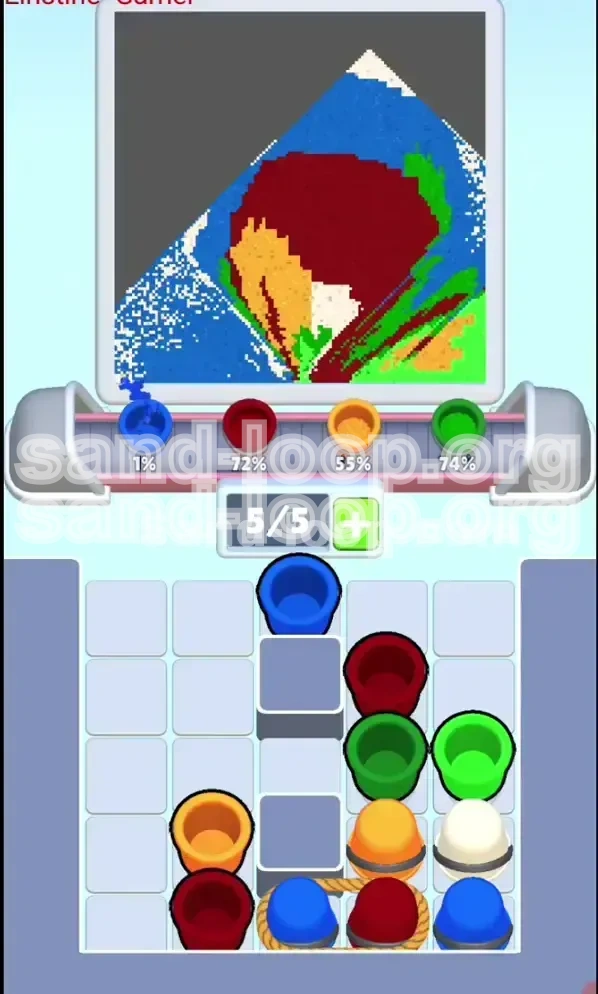
Phase 3: The Rope Trigger (The Critical Moment)
You have now cleared enough of the supply tray to see the "Rope Bond" at the bottom. You will see a Gray block, and looping around it are a Green cup, a Blue cup, and a Dark Red cup, tied by a white rope.
- Pre-requisite: Do NOT tap this cluster if your belt has 3 or more cups. You need 3 empty slots.
- Action 5: Once the belt is clear, tap the Green cup of the rope cluster (or any of them). All three cups (Green, Blue, Dark Red) will fly onto the belt simultaneously.
- Immediate Action: Do not let them sit. Start pouring them as soon as they stop moving on the belt.
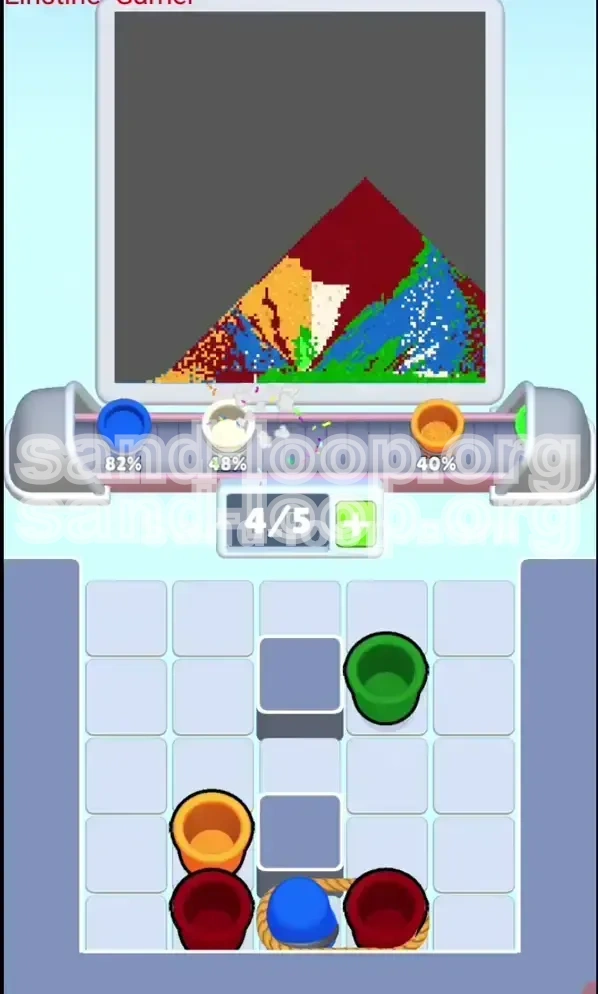
Phase 4: The Final Pour and Cleanup
With the rope cluster emptied, you might have a few remaining cups left in the tray corners, likely Blue or Red stragglers.
- Action 6: Send these final cups up the belt.
- Monitor: Watch the progress bar on the canvas elements. If the sky is at 98%, stop pouring Blue and let the physics settle the sand. The sand might trickle into the remaining gaps naturally.
- Final Polish: If a specific pixel is refusing to fill (usually the door or a window), use a partial pour from a remaining cup to snipe that spot.
Color Order: Processing the Palette
The order in which you process the color palette is the difference between a clean image and a messy one. In Level 55, the physics engine stacks sand based on gravity, but the game logic checks for matches based on pixel placement. Here is the optimal processing hierarchy.
Priority 1: Foundation Colors (Beige & Green)
Always start with the earth tones. Beige (sand/dirt) and Green (grass) represent the ground floor of the image. By pouring these first, you ensure that the bottom of the screen is "locked in." Any subsequent colors that fall (like sand from a roof or sky) will land on top of these, which is physically correct. If you pour the sky first, the green grass has to "displace" the blue sky, which is harder to calculate and can lead to visual flickering or missed pixels.
Priority 2: Structural Colors (Deep Red)
The Deep Red roof is the anchor of the image. It sits in the middle of the canvas vertically. It needs to be poured after the ground but before the sky. If you pour the sky (Blue) before the roof, the roof pixels might blend into the background. The Red color is strong and distinct, so it can easily overwrite the edges of the Green grass, but it needs to be solid before the Blue wash comes in.
Priority 3: Detail Colors (White)
White is tricky. It is used for clouds in the sky but also for highlights on the house. However, its most critical role is the sky. Processing White before Blue allows the clouds to " carve out" their space in the upper atmosphere. If you pour Blue first, the clouds become islands that are hard to form without making the sky look like Swiss cheese.
Priority 4: The Flood Fill (Cyan/Blue)
Blue is always last. It is the background. It represents the empty air. In digital painting terms, you usually do backgrounds first, but in Sand Loop physics, doing the background last acts as a "wash" that fills in all the tiny cracks and pixels you missed with the other colors. Pouring Blue last ensures that 100% of the non-object pixels are filled efficiently.
The Exception: The Dark Red Door
While Red is Priority 2, the Dark Red door is a micro-priority. It is a small object inside the Beige wall. Sometimes, it is best to pour this specific element *after* the main Beige wall is up. If you pour the door too early, the subsequent Beige sand might bury it. However, in Level 55, because the door is tied to the rope cluster with the Sky, you have to pour it late in the game anyway. This timing actually works in your favor, as the wall is already built by the time the door arrives.
Key Tips & Notes for Mastery
To truly master Level 55 and avoid frustration, keep these strategic insights in mind. These tips focus on the nuances of the game engine that aren't immediately obvious.
The "0/5" Rule
Make the "0/5" counter your best friend. Before you make a move that pulls multiple cups (like the rope), glance at the counter. If it says 2/5, you are safe to pull a 3-cup rope (resulting in 5/5). If it says 3/5, you are dead. This simple mathematical check prevents 90% of game overs in this level.
The "Blocker" Strategy
Sometimes, you don't want to pour a cup immediately; you want to use it to hold a slot on the belt while you organize other things. However, in Level 55, space is too tight for this. Instead, think of the cups *in the tray* as blockers. Leave the Blue cup in the tray until the very end. It acts as a placeholder, preventing you from accidentally clicking other cups beneath it or disrupting the rope setup prematurely.
Recognizing "Settling" Lag
The game counts pixels as "filled" only when the sand stops moving. If you pour a massive amount of Green sand, the progress bar might pause at 80% while the sand tumbles down. Do not panic and pour more Green immediately. Wait 3-5 seconds. Letting the physics engine finish its job often saves you from over-pouring, which wastes belt capacity.
The Rope Cluster Physics
When the rope cluster (Green-Blue-Red) hits the belt, the order they sit on the belt matters. Usually, they maintain their relative positions. The game will pour them one by one. You cannot change the order *while* they are on the belt. This is why preparing the canvas is vital. You can't rearrange the rainbow burst; you just have to unleash it and hope the canvas is primed for it.
Identifying "Dangerous" Colors
In this specific level, Blue is the "dangerous" color because it is the most fluid and pervasive. A little bit of Blue sand in a Green bush creates a noticeable dark patch. Be hyper-focused on where your Blue sand is landing. If you see it straying toward the house roof, stop pouring and let the sand divert itself or wait for the roof pixels to block it.
Common Mistakes to Avoid
Even experienced players make errors in Level 55 due to its unique constraints. Here are the most common pitfalls and how to steer clear of them.
Triggering the Rope Too Early
The adrenaline of seeing the "key" pieces often leads players to tap the rope cluster as soon as it is visible. This is fatal. If you tap the rope while your belt is holding 2 or 3 loose cups from the top layer, you will instantly hit the 5-slot limit. The new cups won't load, the old ones won't pour, and you are stuck. Always clear your belt before cutting the rope.
The "Sky Ceiling" Error
Players often try to finish the sky first because it looks like the biggest empty space. However, filling the sky creates a "sand ceiling." If you fill the sky with Blue first, and then try to pour a Red roof, the Red sand has to travel all the way through the Blue layer (or displace it) to reach the bottom. This often results in the roof "floating" or the colors mixing into a muddy purple. Always build foreground to background.
Ignoring the Dark Red Door
Since the Dark Red cup is tied up in the rope cluster, it comes very late in the level. A common mistake is forgetting about it and failing to leave a specific "hole" in the Beige wall for it. If you completely fill the wall with Beige, the door might not render correctly, or it might pop out weirdly. Always keep an eye on the target image to ensure you leave the "doorway" open for that late-arriving Red sand.
Overloading the Conveyor
This is a general mistake, but specific here. Players tap the top row cups (Orange, Green) and then immediately tap the middle row (Red, White) without waiting for the first batch to pour. This backs up the system. In Level 55, you must adopt a rhythmic tapping style: Tap -> Wait for Pour -> Tap. Never "spam tap" in this level.
Wasting the White Clouds
White clouds are subtle. If you pour them too aggressively or while the Blue is active, they disappear. You must pour the White clouds when the canvas behind them is empty (or the base color). If you pour White on top of a fully finished Blue sky, it looks like snow on a blue background, not clouds. The White defines the negative space in the sky; it must be placed with precision.
Stuck Solutions: Troubleshooting
If you find yourself stuck at 90% completion or the game just isn't registering a "win," use these diagnostic steps to find the problem.
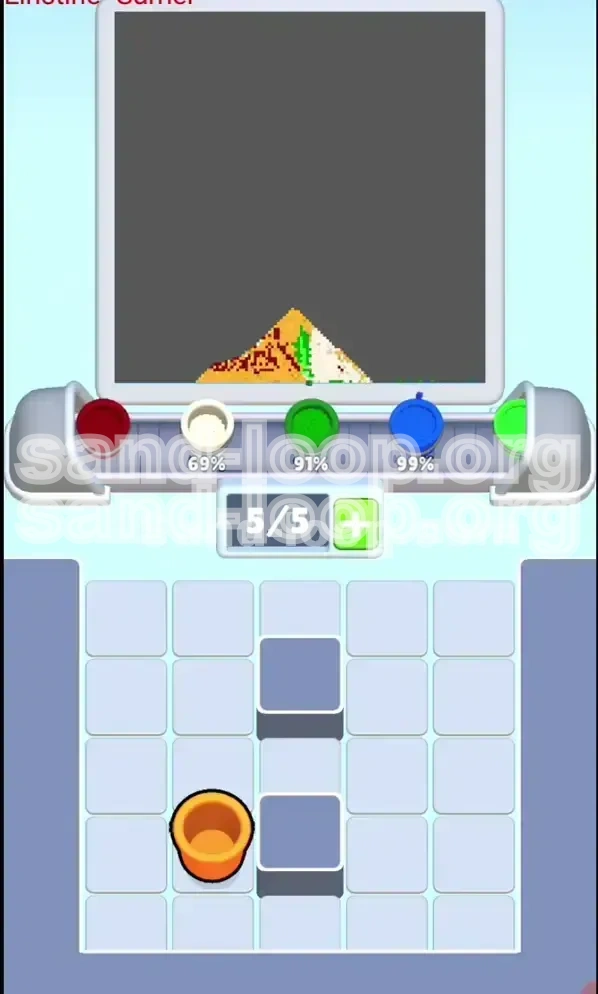
The "Last 1%" Problem
Symptom: You are at 99% completion. Everything looks filled.
Solution: This is almost always a pixel-perfect issue. Zoom in (if the feature allows) or look closely at the edges of the roof or the corners of the screen. There is likely a single pixel gap where the Blue didn't touch the Green. Pour a tiny amount of Blue from a partial cup to fill this microscopic gap.
The "Full Belt" Deadlock
Symptom: Your belt is full (5/5), the cups on the belt aren't pouring, and you can't click anything in the tray.
Solution: You are deadlocked. You have to restart the level. However, to prevent this next time, realize that you likely poured colors that the canvas wasn't ready to accept, causing a backup. The game pauses the pour if the hitbox is full. Next time, pour colors into their correct zones faster to clear the belt.
The "Mixed Color" Disaster
Symptom: Your roof looks purple or your grass looks teal.
Solution: You poured colors in the wrong order (e.g., Blue before Red). You cannot fix this in the current run; the sand has already blended. You must restart. Focus strictly on the "Step-by-Step" order: Earth tones first, then structure, then sky.
The "Rope Won't Move" Glitch
Symptom: You tapped the rope cluster, but only one cup moved or none did.
Solution: This isn't a glitch; it's a layer issue. There is likely a "Ghost Cup" or a small debris cup sitting on top of the rope cluster that you missed. Carefully inspect the bottom row of the tray. Clear any tiny single-cup blockages sitting on top of the Green/Blue/Red trio before trying to pull the rope again.
Speed Run Tips
Once you understand the mechanics, you might want to complete the level faster. Speed running Level 55 is less about fast fingers and more about fast decisions.
Pre-Loading the Belt
As the last cup of the "Top Layer" is pouring, you can click the "Middle Layer" cups. By the time the first cup finishes, the second one is already on the belt. This "chain loading" shaves seconds off your time. Just ensure you don't exceed the 5-slot limit.
Ignoring the Clouds
For a speed run, you can be less precise with the White clouds. As long as you get the White sand generally in the upper area, the Blue sky that follows will fill the rest. Don't waste time trying to sculpt perfect fluffy clouds. Just dump the White and move to the rope.
The "Rope Burst" Finish
The fastest way to finish is to use the Rope Cluster as the grand finale. If you have cleared the top and middle layers efficiently, your belt should be empty. Pulling the rope and immediately emptying all three cups in rapid succession triggers the final fill animations for the sky, bushes, and details simultaneously, allowing the physics engine to settle everything at once.
Memorizing the Tap Zones
Don't read the cups. Memorize where the Orange, Green, and Red cups are in the initial setup. This allows you to start tapping the moment the level loads without analyzing the board. Muscle memory is the speed runner's greatest asset.