
Level 447
HARDHow to solve Sand Loop level 447? Get instant solution for Sand Loop 447 with our step by step solution & video walkthrough. Sand Loop 447 tips and guide.
Play Sand Loop Now
Experience the puzzle challenge firsthand
Game Screenshots
Sand Loop Level Guides
Level Overview: The Magician's Hat Strategy Guide
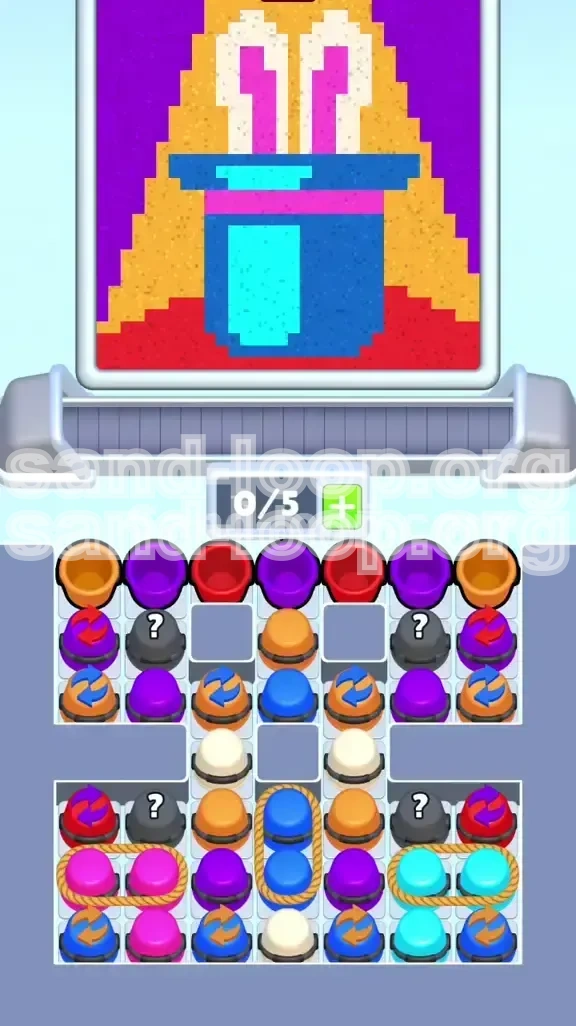
Welcome to the definitive walkthrough for Level 447, "The Magician's Hat." This stage is a significant difficulty spike in the game, designed to test your ability to manage limited conveyor belt space while executing a precise color pouring sequence. The level is visually striking, featuring a pixel-art depiction of a magician’s hat with white bunny ears, set against a backdrop of purple skies and orange triangular elements. However, do not let the charming visuals fool you; the logic required to clear this stage is ruthless.
The core challenge of Level 447 is the "Slot Economy." You are restricted to 5 active slots on your conveyor belt. While this may seem sufficient, the board is packed with "Roped Clusters"—pairs of cups linked together that consume two slots simultaneously. Furthermore, the level features narrow "chokepoints," specifically the Bunny Ears, which are incredibly sensitive to color contamination. If a heavy background color bleeds into the white ears before they are properly filled, a restart is often unavoidable. This guide will break down the exact logic needed to secure a Perfect Clear.
The Visual Layout and Danger Zones
The canvas is roughly divided into three horizontal layers. The top 30% consists of the "Purple Sky" and "Orange Triangles." The middle 40% is the "Royal Blue Hat," and the bottom 30% contains the structural base and the "Red Corners." The most critical danger zone is the "Bunny Ears" area at the very top. These are narrow columns of white pixels. If you pour the Blue Hat sand while these ears are still empty, the blue will physically occupy the space designated for white, making it impossible to finish the ears later without mixing colors.
The "Slot Economy" Constraint
Success in Level 447 is dictated by belt management. A full belt (5/5 slots) means you cannot tap new cups, leading to a deadlock. This level introduces mechanics that aggressively fill your belt. Specifically, the "Roped Clusters" (linked pairs) are the biggest threat. Tapping a roped cluster when you have 4 free slots will instantly fill your belt to capacity (6 cups total), causing a game crash or a forced pour that usually ruins the level. You must always maintain a "buffer" of empty slots to handle these linked pairs.
The "Roped Cluster" Mechanic
Approximately 40% of the cups on this board are "Roped." You can identify them by a white line connecting two cups of the same color. Tapping one cup in the pair pulls both onto the conveyor simultaneously. This effectively doubles the resource cost of that color. A common mistake is treating a roped pair as a single tap. You must mentally calculate: "I have 3 slots open. If I tap this roped pair, I will have 1 slot left." If you miscount, you will clog your belt.
Color Contamination Risks
The physics engine in this level prioritizes "first touch, first claim," but it also simulates weight. Heavier sands (like Blue) will displace lighter sands (like White). If you pour the heavy Blue hat foundation before securing the background and ears, the blue will sink into the bottom corners and bleed upwards into the white ear zones. The level requires a "bottom-up, then top-down" approach to layering colors to prevent this displacement.
Why Logic Beats Speed
Unlike previous levels where fast tapping could solve problems, Level 447 requires a 90% logic, 10% speed approach. The board layout creates an hourglass shape. The top is wide, the middle is narrow (the hat brim), and the bottom flares out again. You cannot brute-force your way through the narrow neck. You must clear the top debris to unlock the bottom mechanics. Rushing will only lead to a clogged belt and contaminated pixels.
Clear Objectives: Mission Goals
To achieve a Perfect Clear (3 Stars) on Level 447, you must abandon the instinct to fill from top to bottom. Instead, you must adhere to a strict "Background First, Details Last" protocol. The game’s physics engine prioritizes "first touch, first claim," but it also simulates weight. Heavier sands will displace lighter sands. Therefore, your goals are ranked by priority below.
Primary Objective: Secure the Background
Your first and most critical goal is to fill the "Purple Sky" and "Orange Triangle" zones. These zones act as the container for the rest of the level. You must achieve 100% completion of the purple and red zones before you even think about touching the blue cups. Failing to do so will result in the purple sand "leaking" into the white bunny ear zones when the canvas tilts later in the level.
Secondary Objective: Construct the Hat Base
Once the background is a solid block of color with no holes, you must switch your focus to the Royal Blue hat. This requires clearing the central "Vertical Blue Cluster." This objective is tricky because the blue cups are buried behind the orange cups. You must clear the path to the blue cups without accidentally spilling them onto the unfinished background.
Tertiary Objective: The Cyan and Pink Accents
The hat features a vertical cyan highlight and a horizontal pink brim. These must be poured immediately after the blue base is established. If you wait too long, the blue sand will dry/settle, and the cyan will not blend correctly, leaving a visible "seam" or gap in the pixel art. The pink brim is particularly sensitive as it sits right on top of the blue; if the blue isn't perfectly flat, the pink will look jagged.
Final Objective: The Bunny Ears Extraction
This is the final 10% of the level. You must fill the narrow white columns and the tiny pink inner-ear details. This requires a steady hand and an empty belt. You cannot afford to have other cups cycling on the conveyor during this phase, as the ears require precise timing to avoid overflow.
Hidden Objective: Managing Mystery Cups
Scattered throughout the level are black "Mystery Cups" marked with a question mark. These cups contain random colors needed for the background. Your hidden objective is to reveal these cups as early as possible to determine if they hold critical colors (like Purple or Red) or if they are filler colors (like extra Blue) that can be ignored until later.
Step-by-Step Instructions: The Execution Phase
This section provides the exact sequence of moves required to beat Level 447. Follow these steps in order. Do not deviate from the sequence unless you are troubleshooting a specific error. This walkthrough assumes a standard, unboosted start.
Phase 1: The Top Row Clear (Moves 1-5)
Start the level by pausing for 2 seconds to scan the top row. You will see a pattern of Orange, Purple, and Red cups. Do not touch the sides yet. Your first move is to tap the Center Purple Cup. Immediately follow this by tapping the Top-Left and Top-Right Red Cups. This accomplishes two things: it starts filling the top background corners immediately, and it clears physical space on the board, allowing the lower cups to shift upward.
Phase 2: The Orange Triangle Build (Moves 6-12)
With the top corners cleared, a column of Orange Cups will be exposed in the center. Tap these in sequence. Do not tap them all at once; tap one, wait for it to load onto the belt, then tap the next. You want to maintain 2 empty slots on your belt at this stage. Pour the orange sand into the designated background zones. The goal here is to create a solid "wall" of orange that will support the hat later.
Phase 3: Revealing and Sorting Mystery Cups
Once the Orange is flowing, look at the "Next" row. You will see black Mystery Cups. Tap them now to reveal their contents. In 90% of playthroughs, these will reveal Purple or Red cups. If they reveal Purple, add them to the belt immediately behind the Orange cups. If they reveal Blue, do not tap them. Leave them on the board. You cannot afford to clog your belt with Blue sand while the background is still incomplete.
Phase 4: The Vertical Blue Cluster Maneuver
This is the most dangerous phase of the level. You will see a large roped cluster of two Blue cups in the center, labeled the "Vertical Blue Cluster." Before you tap this, ensure your conveyor belt has exactly 3 empty slots. You need 2 slots for the blue cluster and 1 buffer slot for the cup that might fall behind it. Tap the cluster. The moment the blue cups hit the belt, stop tapping. Let the background colors (Purple/Orange) finish pouring first.
Phase 5: The Cyan Highlight and Pink Brim
After the Blue base is roughly 50% full, look to the bottom right for the Horizontal Cyan Cluster. Tap this. It is a roped pair, so it will take 2 slots. Immediately switch your gaze to the bottom left for the Horizontal Pink Cluster. Tap this as well. The order is critical here: Cyan must flow slightly before Pink to ensure the highlight blends into the brim. If you pour Pink first, it creates a dam that the Cyan cannot cross, ruining the highlight.
Phase 6: The Bunny Ears Finale
The board should now be mostly empty except for the bottom-most row containing White and Pink single cups. Tap the White Cups first. Pour them slowly into the top ears. Do not overfill; stop pouring the second the pixel art turns solid white. Finally, tap the remaining Pink cups to fill the inner ears. Once the ears are solid, tap any remaining Swap cups or background cups to trigger the victory screen.
Color Order: The Science of the Pour
Understanding the "Weight" and "Flow" of each sand color is essential for advanced strategy. In Level 447, not all sand behaves the same way. The game engine assigns different "weights" and drying times to colors, which affects how they stack.
The "Heavy" Background Trio: Purple, Orange, Red
Treat Purple, Orange, and Red as "Heavy" sands. They have high friction and settle quickly. This makes them ideal for the base layers. The correct processing order is Purple first, then Orange, then Red. Purple fills the widest area and needs the most time to settle. Orange acts as a binder. Red is the heaviest and sinks to the bottom corners, locking the entire composition in place. If you process Red before Purple, the Red will pile up in the corners and prevent the Purple from spreading horizontally across the top.
The "Fluid" Mid-Ground: Royal Blue and Cyan
Royal Blue is a "Fluid" sand. It has low friction and behaves like water. If you pour Blue onto a dry canvas, it will spread rapidly to the edges. This is why you must have the Purple/Orange background already in place; the background acts as a dam to hold the Blue in the shape of the hat. Cyan is even more fluid. It is essentially "water" in this game's physics. It must be poured directly onto the Blue while the Blue is still wet (freshly poured). If the Blue dries (indicated by a slight color darkening), the Cyan will slide right off it.
The "Sticky" Foreground: White and Pink
White and Pink are "Sticky" sands. They have high surface tension and tend to clump together. This is useful for the Bunny Ears, as you want the sand to build up into tall columns rather than spreading out flat. However, this stickiness is a double-edged sword. If you pour White sand onto Purple sand, the White will grab the Purple grains and pull them up into the ear, contaminating the white with purple dots. Always ensure the area under the White cups is cleared of background colors before pouring.
The Interaction Effect: Cyan over Blue
The most visually satisfying moment in the level is when the Cyan highlight hits the Blue hat. The physics engine creates a "blend" effect where the Cyan creates a smooth gradient. To maximize this effect, pour the Cyan slowly. Do not tap the Cyan cup to speed it up. Let it flow naturally onto the Blue. This creates a sharp, crisp line that looks much better than if you dump it all at once.
The Danger of Cross-Contamination
Never process a "Heavy" color (Red) after a "Sticky" color (White). The heavy sand will smash through the sticky sand, destroying the shape you just built. For example, if you have filled the Bunny Ears with White, and then realize you missed a spot in the bottom Red corner, do not pour the Red. The Red sand will travel up the conveyor and fall onto the White ears, turning them pinkish-brown. Fix the Red corners before the ears.
Optimal Pouring Sequence Summary
For a perfect visual result, follow this chemical-like formula:
- Purple (The Canvas)
- Orange (The Backdrop)
- Red (The Foundation)
- Royal Blue (The Structure)
- Cyan (The Highlight - must touch wet Blue)
- Pink (The Separator - must touch dry Blue)
- White (The Detail - must touch nothing but air)
Key Tips: Pro Strategies for Success
These tips are derived from high-level play strategies. They focus on optimizing your clicks and managing the UI elements to give you the best possible chance of winning.
The "Two-Slot" Safety Rule
The single most important rule in Level 447 is: Keep 2 slots empty at all times. Never let your conveyor belt fill up beyond the 3-slot mark if there are Roped Clusters remaining on the board. Roped clusters drop 2 cups instantly. If you have 4 cups on the belt and tap a roped cluster, the game attempts to add a 5th and 6th cup. Since the limit is 5, the 6th cup usually glitches out or forces a reload, wasting precious seconds. Keeping 2 slots open ensures you can always react to a cluster.
Timing the Mystery Cup Reveal
Mystery cups are a gamble. However, you can minimize the risk by tapping them when your belt is full of colors you want to keep (like Purple). If you tap a mystery cup and it reveals a color you don't need (like Blue when you are doing the background), the cup sits on the board. If your belt is full, the game auto-pours the leading cup to make room for the new one. Use this mechanic to your advantage: fill your belt with "safe" cups, then tap the mystery cup. If it's a bad color, you can leave it on the board without it immediately jumping onto your belt and clogging it.
Handling the Swap Cup Scramble
The level features Swap Cups (marked with circular arrows). These cups swap positions with another cup of the same color when tapped. In Level 447, do not use Swap Cups to reorganize your board. The layout is too tight. Instead, use Swap Cups as a Delay Tactic. If you have a color on the belt that you aren't ready to pour (e.g., Blue before the background is done), tap a Swap Cup on the board. The animation takes 1.5 seconds, buying you time for the belt to move and the active cup to reach the pouring point.
The "Chokepoint" Awareness
Visually divide the screen into Top (Background), Middle (Hat), and Bottom (Details). The "Chokepoint" is the transition between Top and Middle. You must clear every single cup in the Top section before you pull a cup from the Bottom section. If you pull a bottom cup (like a White ear cup) while top cups (like Orange) are still blocking the path, the bottom cup will get stuck in the queue. By the time it reaches the belt, you might have forgotten about it, and it will pour at the wrong time, contaminating the canvas.
Dealing with the Vertical Blue Cluster
The Vertical Blue Cluster is the boss of this level. It connects the top background to the bottom details. Do not tap it until you have visual confirmation that the Purple and Orange zones are 100% full. Any gap in the background will be exploited by the Blue sand. The Blue is heavier than the Purple; if there is a hole, the Blue will sink through it and ruin the bunny ears that sit behind the background layer.
Using the Pause Button Strategically
This is a "legal" cheat. Pause the game immediately after the level loads. Memorize the locations of the roped clusters. Unpause and play until the first roped cluster is cleared. Pause again. Assess the board. Using the pause button between every major pour (Background -> Hat, Hat -> Ears) prevents "panic tapping." Panic tapping is when you get overwhelmed by the flow of sand and start tapping random cups, which is the #1 cause of failure in Level 447.