
Level 449
EXPERTHow to solve Sand Loop level 449? Get instant solution for Sand Loop 449 with our step by step solution & video walkthrough. Sand Loop 449 tips and guide.
Play Sand Loop Now
Experience the puzzle challenge firsthand
Game Screenshots

Sand Loop Level Guides
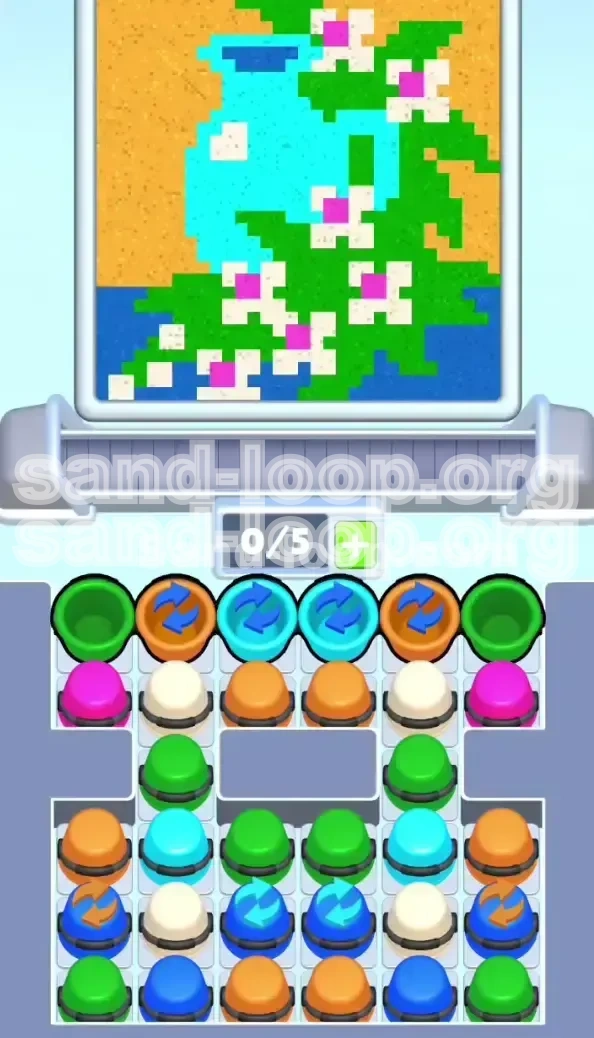
Level 449 Overview: The Cyan Pitcher Challenge
Sand Loop Level 449 stands out as a deceptive logic puzzle that masquerades as a simple artistic task. In this stage, players are tasked with reconstructing a pixel-perfect image of a Cyan Pitcher surrounded by floral elements. However, the challenge is not in the art itself, but in the severe logistical constraints imposed by the game board. You are limited to a mere 5-slot capacity on your processing tray. This limitation turns the level into a high-stakes resource management game where timing is everything. The board layout is designed to tempt you into making early moves that will inevitably lead to a deadlock, blocking your conveyor belt and halting progress entirely.
The primary difficulty arises from the disparity in the volume of sand required for different objects. You have massive structures like the Cyan Pitcher and Green Leaves that need a continuous flow of material, contrasted against tiny details like Magenta flower centers that require very little. If you prioritize the small tasks too early, your belt will clog with cups that have nowhere to pour, while the necessary colors for the main image remain trapped behind blockers. Success in this level depends entirely on your ability to resist the urge to clear small distractions immediately and focus on the heavy lifting first.
The Core Logistics Challenge
The defining feature of Level 449 is the "Slot Economy." You only have five available slots on your conveyor tray at any given time. Once these are full, the belt stops moving, and you cannot access new cups until the current ones finish pouring. In this level, the pouring speeds vary drastically. The Cyan and Green cups pour for a long time due to the size of the objects they are filling. Conversely, Magenta and White cups often pour for just a few seconds because they fill small gaps. If you fill your tray with short-duration cups, they will finish quickly and leave the tray, but if they are blocked by long-duration cups that are waiting for space, you create a bottleneck. Managing this flow—ensuring that long-pouring cups always have priority access to the tray—is the logistical heart of this level.
Visual Breakdown of the Canvas
The target image consists of three distinct layers. The background layer is composed of Orange (sand) and Dark Blue colors, occupying the perimeters. The middle layer features large, broad Green leaves that sit behind the main object. The foreground is dominated by the Cyan Pitcher, a large, bulbous shape that requires the most sand, accented by White flowers with Magenta centers. Understanding this layering is crucial because it dictates the dependency chain. You cannot effectively detail the flowers until the background and main body are established, otherwise, you waste valuable tray space on minor details that should be finishing touches.
The Cycle Cup Mechanic
Scattered across the top of the initial board setup are four "Cycle Cups." These are distinct from standard cups; they are marked with circular arrows and often contain colors critical to the early game (Orange and Cyan). These cups do not just pour sand; they also "loop" or cycle through states, meaning they take up time on the conveyor belt. They act as a physical barrier to the stacks of cups beneath them. A common mistake is treating them like normal cups. If you trigger them without a plan, they occupy slots while their internal mechanics trigger, preventing you from adding other cups to the tray. They are the gatekeepers of the level, and clearing them effectively is the first major hurdle.
The "Small Trap"
Level 449 utilizes a psychological trick known as the "Small Trap." The Magenta flower centers are incredibly small and visually distinct on the board. The human brain is wired to want to "complete" these small, easy tasks first. However, doing so is fatal to your run. Sending Magenta cups to the conveyor early fills a slot with a cup that pours for only 2-3 seconds. Once it finishes, it leaves, but if you had a Cyan cup behind it waiting to pour for 15 seconds, you have just wasted precious time and slot efficiency. The level is designed to punish those who focus on the small details before the big picture is established.
Winning Condition Metrics
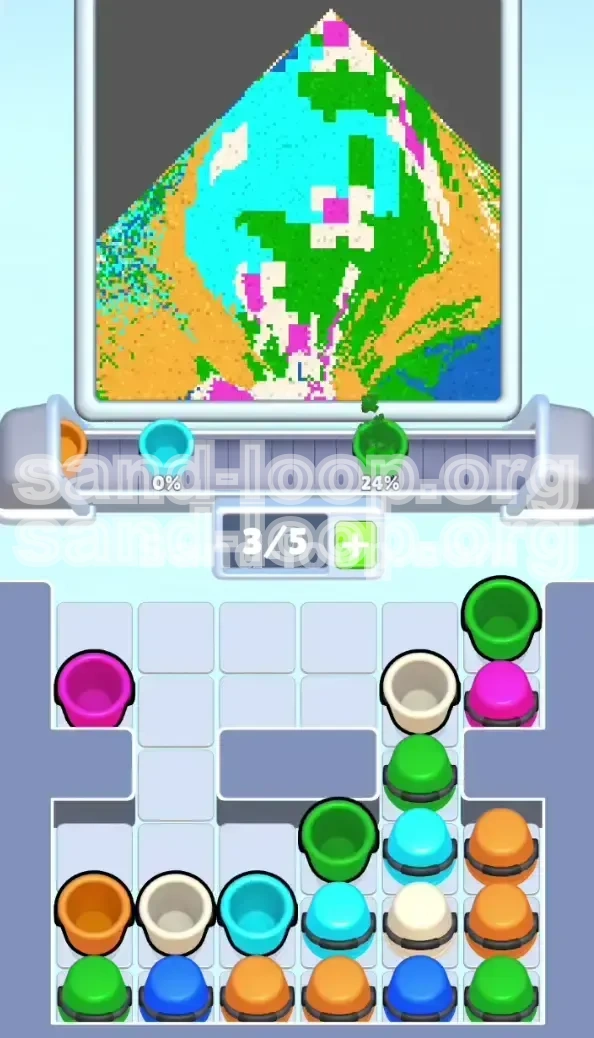
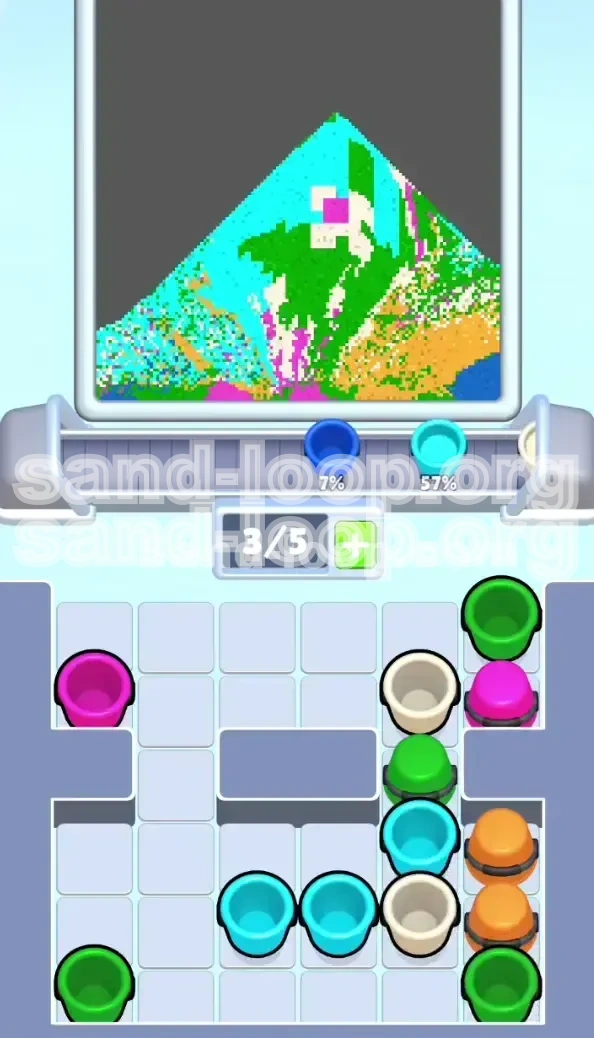
To clear Level 449, you do not necessarily need to fill every single pixel to 100% before the timer runs out, but you must maintain a steady flow of sand such that the auto-clearing mechanics trigger. The "Winning State" is reached when the Cyan Pitcher is approximately 90% full and the Green leaves are fully formed. At this point, the remaining background colors (Orange and Dark Blue) usually fill in rapidly. Your primary metric for success is the "Queue Turnover"—how fast you can get cups off the tray and new ones on. High turnover requires focusing on the large, thirsty objects first.
Strategic Objectives: The Macro Game Plan
Before you tap a single cup, you need a rigid strategy. Level 449 is not a level where you can improvise as you go. The board state is too volatile, and the margin for error with the 5-slot limit is too slim. Your objective is to execute a specific color sequence that maximizes tray efficiency and prevents the conveyor belt from ever becoming a parking lot for useless cups. The following section breaks down exactly what you need to achieve in each phase of the game.
Phase 1: Establish the Heavy Framework
Your immediate goal in the first 10% of the level is to clear space on the board and identify the "Thirsty" objects. The Cyan Pitcher and Green Leaves are your Thirsty Objects. They can accept sand almost indefinitely without backing up. Your first objective is to locate the Green and Cyan cups that are not blocked by Cycle Cups and get them onto the conveyor immediately. You want to build a "buffer" of wet sand on the canvas. This buffer ensures that when you inevitably send a fast-pouring cup later, the canvas has enough open area to accept it without causing a backup.
Phase 2: The Cycle Cup Execution
Once the outer edges are cleared, you must confront the Cycle Cups in the top center. The objective here is not just to remove them, but to time their removal so that the colors they provide (Cyan and Orange) are actually needed on the canvas. You must avoid triggering these cups while the canvas is already saturated with their colors. The strategic goal is to have the Cyan Pitcher at roughly 40-50% capacity before you unleash the main Cyan Cycle Cups. This ensures that when those large cups hit the tray, they pour continuously without stopping, freeing up the slots for subsequent cups.
Phase 3: Managing the Slot Economy
Throughout the middle of the level, your objective shifts to maintenance. You must keep at least 2 slots open on your 5-slot tray at all times. This "Safety Margin" allows you to react to the board as new cups are revealed. If you find yourself at 5/5 slots, and all cups are slowly dripping sand, you have failed the macro strategy. You must prioritize cups that finish quickly to clear slots, or avoid adding cups to the tray until the current ones are done. The objective is a rhythmic flow: Add Big Cup -> Wait -> Add Small Detail Cup -> Wait -> Repeat.
Phase 4: Starving the Small Details
This objective requires discipline. You must intentionally ignore the Magenta cups and some of the White cups until the very end. By "starving" these colors, you leave the board cluttered, which actually helps by preventing you from accidentally tapping them. Your goal is to make the large areas (Cyan/Green) visually disappear (merge into the background) so you can focus on the edges. Only when the main body is solid should you shift focus to the small floral centers. This delay tactic prevents the "Short Pour" deadlock that ruins most runs.
Phase 5: The Background Flood
The final objective is the cleanup. Once the pitcher and leaves are defined, the remaining cups will mostly be Orange (Tan) and Dark Blue. These colors frame the image. The challenge here is that these cups are often buried at the bottom of stacks. Your goal is to have cleared enough of the top and middle layers that these background cups become accessible. If you have managed your slot economy correctly, you will have 3-4 open slots ready to accept a flood of background colors to finish the level.
Step-by-Step Walkthrough: The Cyan Pitcher Solution
This is the tactical execution of the strategy. Follow these steps in order. Do not skip ahead, and do not attempt to multitask by tapping random cups. The sequence is designed to keep the conveyor belt moving while slowly peeling back the layers of the board.
Step 1: The "Green Column" Opener
Start the level by looking at the far left and far right edges of the board. Ignore the center completely. You will see vertical stacks of Green cups. Tap the top-most Green cup on the left edge and the top-most Green cup on the right edge. Send both to the conveyor.
- Why: The Green leaves in the image are large and positioned on the periphery. They can absorb a massive amount of sand immediately.
- Result: This clears the vertical columns, exposing the cups underneath. It also utilizes the "longest pour" strategy right out of the gate, ensuring these cups won't clog your tray later.
Step 2: Clearing the Primary Blockers
After sending the initial Green cups, look at the new layer of cups revealed. You will likely see White or Magenta cups exposed. Do not tap them. Instead, look for any Cyan cups that have become accessible in the upper-middle section, specifically those that are not part of the Cycle group yet. If a standard Cyan cup is exposed, tap it.
- Why: You need to start filling the Pitcher body immediately. The standard Cyan cups are your fuel source.
- Result: The Cyan sand begins to form the core shape of the pitcher.
Step 3: The Cycle Cup Gamble
Now you must address the top row. You will see two Cyan Cycle Cups and two Orange Cycle Cups sitting on top of the central stack. Tap the two Cyan Cycle Cups first.
- Why: These are blocking access to the center of the board. Since the Pitcher is huge (approx 40% of the canvas), it can accept the sand from both cups simultaneously without backing up.
- The Risk: These cups take up slots on your tray. Ensure you have only 2 or 3 cups active before tapping these. If your tray is full (5/5), wait for a cup to clear.
- Result: The Cycle Cups clear the top row, revealing the inner stacks of White and Orange cups hidden beneath.
Step 4: The White Petal Phase
With the top cleared, you now see the "meat" of the level. You will see stacks of White cups (for the flower petals) and more Orange cups (background). Tap one White cup.
- Monitoring: Watch your tray count. If you hit 4/5 cups, STOP TAPPING. Wait for the Cyan cups to finish pouring.
- Why: The White flowers are medium-sized. They don't take as long as the Pitcher, but they aren't instant like the Magenta centers.
- Result: The flowers start to take shape, but you are keeping your tray capacity flexible.
Step 5: The Orange Background Clear
Once the Cyan cups have cleared off the belt (freed up 2 slots), you can tap the Orange Cycle Cups that you ignored in Step 3 (if they haven't been auto-cleared) or the newly exposed Orange standard cups in the center.
- Why: The Orange background is extensive. It needs a lot of sand, but it's less critical than the Pitcher definition. Now that the Pitcher is half-full, you can divert attention to the background.
- Result: The Tan/Orange background begins to fill the negative space around the Green leaves.
Step 6: The "Magenta Sweep" Finisher
At this stage, your board should look mostly filled. The Green leaves are done, the Pitcher is 90% done, and the background is filling in. You will see Magenta cups that have been exposed and sitting there for 90% of the game. Now, you tap all remaining Magenta cups.
- Why: The Magenta centers are tiny. They take 2 seconds to fill. If you do this now, they pour, fill instantly, and leave the tray. It's a quick cleanup.
- Final Action: Finish by tapping any remaining Dark Blue cups at the bottom of the stacks to finish the corners.
- Result: The image completes, and the level clears.
Key Tips for Level 449
Even with a strategy, the devil is in the details. These tips are designed to help you manage the chaotic moments when the board doesn't look exactly like the textbook solution. Level 449 has a high variance in cup stacking, so you must be able to adapt your mindset on the fly.
The "Two-Slot" Rule
This is the golden rule for this level. Never let your tray fill up past 3 active cups if you can help it. Always try to keep 2 slots empty. Why? Because in Sand Loop, revealing new cups often triggers a chain reaction where you need to move a specific cup immediately. If you are at 5/5 capacity, you are stuck watching the conveyor belt, unable to act. By keeping 2 slots open, you give yourself the flexibility to grab a "Blocker" cup the second it is revealed, preventing it from burying the cups you actually need.
Identifying "Thirsty" vs. "Full" Areas
Learn to read the canvas "wetness." If an area is dark and saturated (e.g., the Green leaves are already a deep, solid green), do not send more Green cups there. That is a "Full" area. Instead, look for the "Thirsty" areas—parts of the canvas that are still faint outlines or blank. Sending a cup to a thirsty area ensures it pours fast and leaves the tray quickly. Sending a cup to a full area causes it to back up. Always feed the thirsty parts of the image first.
Managing the Cycle Cup Timing
Do not tap Cycle Cups just because they are available. A Cycle Cup is a timer. Once tapped, it goes to the tray and starts its cycle. If you tap a Cycle Cup, then immediately realize you needed a different cup that was trapped underneath it, you have just wasted 15-20 seconds waiting for the Cycle Cup to finish. Only tap a Cycle Cup when you are 100% sure that the color it provides is the next color you want to put on the canvas.
Speed vs. Accuracy
In Level 449, accuracy is speed. Making a mistake—like clogging your belt—costs you about 30-45 seconds of recovery time. Conversely, taking 5 extra seconds to think about your next move saves you time in the long run. Do not rush the taps. Rushing leads to the "Panic Tap," where players start randomly clicking cups hoping something clears. This always fails. Deliberate, slow tapping is 50% faster than panicked fast tapping.
Using the "Zoom" Feature
If your platform supports it, zoom in on the flower centers to check their fill status. Sometimes the Magenta centers look unfilled from a distance (like dark grey), but they are actually 95% complete. Tapping another Magenta cup to fill that last 5% is a waste of a slot. Zoom in to confirm that a small area is truly empty before dedicating a tray slot to it. This precision prevents micro-clogs that slow down your end-game.
Pre-emptive Cup Selection
As you clear the top rows, look down into the stacks. You can often see the colors of the cups buried 2 or 3 layers down. If you see a critical Dark Blue cup buried under two useless White cups, you know you have a decision to make: do you clear the White cups (wasting time) or wait? Usually, it is better to work on other parts of the board until those buried cups naturally rise to the top. Don't force a stack just to get one specific cup unless it is absolutely critical for progression.
Common Mistakes to Avoid
Players lose Level 449 for very specific reasons. By identifying these common failure points, you can self-correct during the run. If you feel stuck, check if you are making one of these errors.
The "Clear the Center" Obsession
This is the #1 cause of failure. New players see the cups in the center of the board and instinctively want to clear the middle to "open up" the board. In Level 449, the center is a trap. The center is blocked by Cycle Cups and is filled with small-detail colors (White/Magenta). If you clear the center first, you flood your tray with slow-pouring, small-detail cups while the Green leaves on the outside remain untouched. Always work from the outside in.
Feeding the Magenta Trap
You will see the Magenta cups early. They are distinct and look easy to tap. The mistake is tapping them when the Pitcher is only 20% full. The Magenta cup pours, fills the tiny flower center in 3 seconds, and then sits on the tray doing nothing while you wait for the Cyan cup to finish. You have effectively wasted a slot. Solution: Pretend the Magenta cups do not exist until the end of the level.
Ignoring the Slot Count
Many players watch the canvas, not the tray. They tap 5 cups in rapid succession because they all look necessary. Then they stare at the screen for 20 seconds while nothing moves. You must watch the Slot Count. If you are at 4/5 or 5/5, stop tapping entirely. Watch the sand flow. Wait for a cup to leave. Only then tap the next cup. Rhythm is key: Tap, Wait, Tap, Wait.
Misjudging the Cycle Cup Behavior
A common misconception is that Cycle Cups pour faster or behave differently than standard cups. They don't. They just have a different icon. Treat them exactly like standard cups in terms of timing. However, their placement is the key. They are usually placed specifically to block the "good" cups. Don't treat them as special priority items just because they look different; prioritize them only when they are blocking your path to the colors you actually need.
Over-filling the Background
The Orange (Tan) background is deceptive. It covers a large area, so players often tap every Orange cup they see. However, the background does not need to be 100% full to beat the level. It only needs to be ~70-80% full. If you obsess over filling every last pixel of the Tan background, you will waste time that should be spent clearing the Dark Blue corners or finishing the Magenta centers. Know when to say "enough" on the background colors.
Chain Reaction Tapping
This happens when a player taps a cup, and as it moves, it reveals a cup of the same color underneath. The player immediately taps that one too. This creates a "train" of 3 or 4 identical colors on the belt. While this sounds efficient, in Level 449, it creates a uniform block of sand that might not match the canvas's current needs. Stop after one tap. Re-evaluate the board before tapping the revealed cup.
Stuck Solutions and Speed Run Tips
Sometimes, despite your best efforts, the board state gets messy. Maybe you tapped one wrong cup early, and now the flow is choked. Or maybe you are trying to beat the clock for a personal best. This section covers how to recover from a bad state and how to optimize for speed.
Emergency: The Belt is Full (5/5)
If you are stuck with a full belt and nothing is moving:
- Assess the blockers: Look at the cups on the tray. Is one cup a "Short Pour" (Magenta/White) that is waiting for a tiny spot to clear?
- The Sacrifice: There is nothing you can do but wait. However, you can use this time to plan your next 3 taps in your head.
- Prevention: If you notice you are stuck frequently, you are tapping too fast. Force yourself to count to 3 between taps.
Recovering from a "Bad Start"
If you accidentally tapped a Magenta cup early and it's clogging your line:
- Don't panic. Focus entirely on the Green cups. The Green leaves are your savior.
- Send every Green cup you can find to the belt. The Green leaves are so large they will clear the backlog of sand faster than any other color.
- Once the Green cups have cleared the Magenta blockage, resume the standard strategy (Cyan > White > Orange).
Speed Run Strategy: The Green Rush
For advanced players looking to optimize time:
- The Opening: Tap the two outer Green columns before the game even fully loads (buffer the input).
- The Skip: If the Pitcher is ~80% full, skip the remaining Cyan cups. Don't aim for 100% perfection on the Pitcher. The remaining 20% can be filled by the "overspill" or general proximity scoring in some versions of the game. Pivot immediately to the Dark Blue corners to secure the win.
- Bulk Tapping: In the final 10 seconds, when the board is mostly clear, you can spam-tap the remaining background colors. At this stage, the canvas is mostly full, so the sand pours instantly. Speed tapping is safe here.
Dealing with "Buried" Cycle Cups
Sometimes, a Cycle Cup gets buried under a stack of standard cups that you don't need. If you can't reach the Cycle Cup to clear the center of the board:
- You have to "eat" the stack. Tap the top cups to get them out of the way.
- Tip: If these cups are colors you don't need (e.g., extra White cups when the flowers are full), send them to the tray but immediately look away at the other side of the board. Let them pour into the full canvas (they will reject/disperse quickly) just to clear the physical slot on the board.
- This is a "Waste Move" but it is sometimes necessary to unblock the main path.
Visualizing the End Game
When you are stuck at 90% completion and can't figure out why the level isn't ending:
- It's usually the Dark Blue. Players always forget the Dark Blue corners.
- Scan the four corners of the image. Are they dark grey or solid blue?
- If the corners are grey, dig out the Dark Blue cups from the bottom of the stacks. They are the key to the final percentage push.