
Level 453
HARDHow to solve Sand Loop level 453? Get instant solution for Sand Loop 453 with our step by step solution & video walkthrough. Sand Loop 453 tips and guide.
Play Sand Loop Now
Experience the puzzle challenge firsthand
Game Screenshots

Sand Loop Level Guides
Sand Loop Level 453: Complete Strategy & Walkthrough Guide
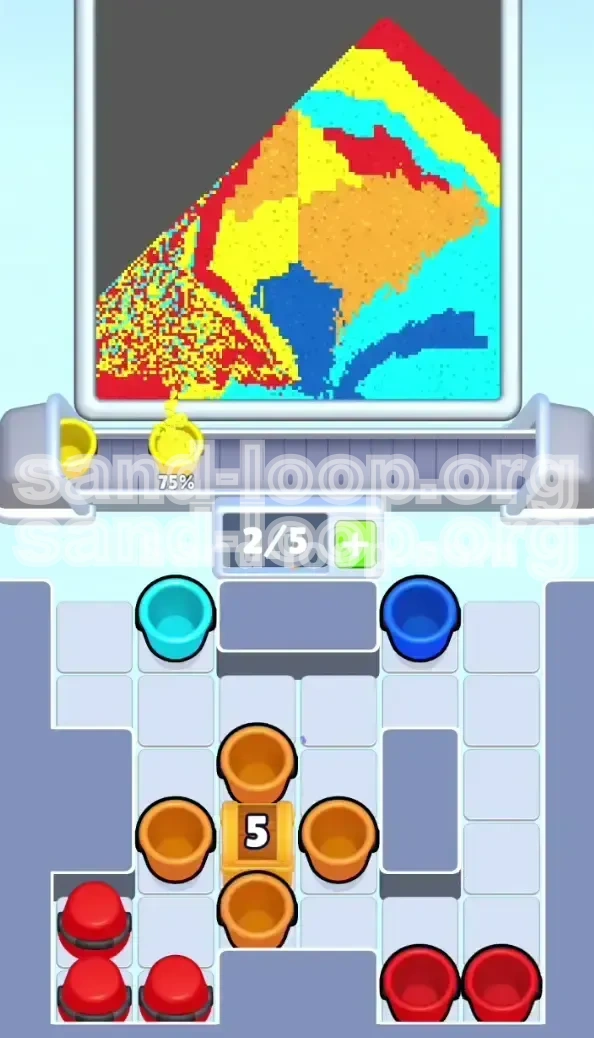
Welcome to the ultimate guide for conquering Sand Loop Level 453. This stage is notorious for tripping up players who rush, acting more like a logistical puzzle than a traditional sand-filling game. In this level, you are tasked with constructing a "Geometric Paper Boat"—a complex, multi-layered image featuring a heavy Cyan background, a Dark Blue hull, and a striked Red, Yellow, and Orange center sail.
The core difficulty here lies not in the dexterity of your fingers, but in the capacity of your brain to manage a strict inventory system. You are operating under a 0/5 Slot Limit. Every single cup you tap creates a 3-second delay before the sand even hits the canvas. If you mismanage this queue, you will create a bottleneck that leads to an automatic fail. This guide will break down every step, color decision, and trap you need to navigate to clear this stage efficiently.
1. Understanding the Level Layout
Before you tap a single cup, you must understand the battlefield. The canvas is divided into distinct geometric zones that require precise color isolation.
- The Cyan Container: This is the outer layer and the largest volume of sand. It requires patience, as it encases the entire boat shape.
- The Blue Hull: Located at the bottom, this forms the floating base of the boat. It is relatively straightforward but easily contaminated by the colors above it.
- The Central Sail: This is the danger zone. It consists of sharp, jagged triangles of Yellow, Orange, and Red. If you mix these colors, the level fails.
- The Red Stripe: A heavy, dominant block of Red that sits above the Yellow. It requires a large volume of sand poured in quick succession, but only if the space is ready.
2. The 0/5 Slot Mechanic
In most games, you can spam taps. In Sand Loop 453, spamming is death. You have a conveyor belt that can only hold 5 cups at a time.
- Tap-to-Pour Delay: When you tap a cup, it doesn't pour instantly. It travels to the queue and pours seconds later.
- The Traffic Jam: If you fill all 5 slots with Blue sand, but you actually need Red sand immediately, you cannot get the Red sand until the Blue cups finish. This delay causes the previous sand to settle, creating hard lines that are difficult to overwrite.
- Strategy: Always keep 1 or 2 slots open on your conveyor belt. This "buffer" allows you to react to sudden color changes without clogging the system.
3. The "Geometric Boat" Challenge
Why is this level called the Geometric Paper Boat? Because the shapes are sharp.
- Sharp Angles: Unlike levels with curved edges, this level uses 45-degree angles. Sand behaves predictably here, but only if the layers below are flat.
- Top-Down vs. Bottom-Up: Logic dictates you paint from top to bottom to avoid dripping, but the game's supply tray often forces you to paint from the bottom up. You have to adapt your strategy to the specific cup arrangement in the supply tray.
4. Overview of Key Obstacles
There are three major hurdles in this level that will cause 90% of failed attempts.
- The 5-Count Lockbox: A wooden crate sits directly in the center of your supply tray, covering the most critical Orange and Red cups. It cannot be moved until you clear 5 specific cups.
- The Diagonal Cuts: The meeting point between the Red sail and the Yellow hull is a sharp diagonal. Sand slides easily here. If you pour Red too early, it will slide into the Yellow zone, creating a muddy orange mess.
- Supply Isolation: Critical cups are often buried under useless colors. You might have to waste a cup of Cyan just to get to a cup of Red buried beneath it. Planning this waste is key.
Primary Objectives and Success Metrics
To achieve a 3-star rating and clear Level 453, you must meet specific efficiency criteria. It is not just about finishing; it is about finishing with a clean canvas.
1. Clearing the Lockbox
Your very first objective is survival. You cannot play the game with the board locked.
- Target: Reduce the 5-Count Lockbox counter to zero within the first 20 seconds.
- Constraint: You must do this using only the cups exposed on the top rows. Digging deep early will fill your slots.
- Metric: Efficiency is measured here by how many "useless" cups you have to tap. Aim for the counter to drop by 1 for every cup tapped.
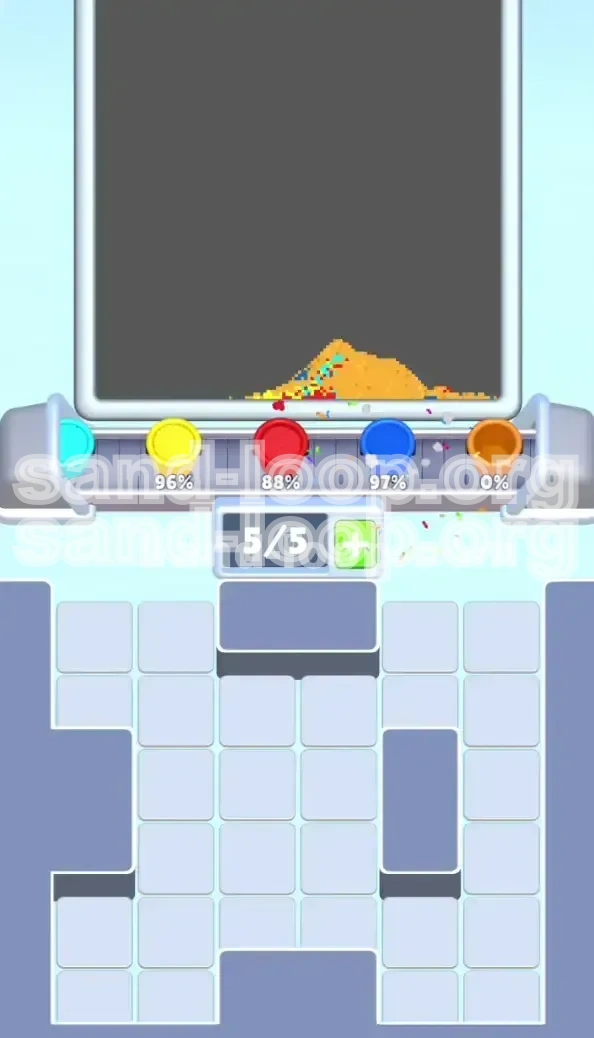
2. Color Separation
The game tracks the purity of your colors. Mixing sand grades your performance down.
- Target: 100% color purity in the center sail.
- Red Zone: Must not contain more than 5% Yellow or Blue contamination.
- Yellow Zone: Must be distinct from the Orange above it.
- Metric: Watch for "fuzzy edges." If the lines between colors look blurred rather than sharp, you are pouring too fast or mixing layers.
3. Inventory Management
You must master the flow of cups from the tray to the conveyor.
- Target: Never hit a full 5/5 queue for more than 2 seconds.
- Metric: A "healthy" run involves a rhythm of Tap-Tap-Pause. Tap-Tap-Pause. If you find yourself frantically tapping 5 times in a row, you are likely about to fail.
4. Completing the Canvas
The final 10% of the level is the hardest.
- Target: Fill the jagged Red crown without overflowing.
- Metric: You must time your final Red pours to coincide exactly with the depletion of the background space. Overfilling the Red zone causes spillage into the Blue hull, which is often unrecoverable.
5. Time Management
While not a strict timer level, taking too long causes the sand to dry and settle, making new layers harder to apply.
- Target: Complete the level in under 90 seconds for optimal scoring.
- Metric: The "Lockbox Phase" should take 15 seconds. The "Background Phase" should take 45 seconds. The "Final Detail Phase" takes the remaining 30 seconds.
The Ultimate Color Processing Order
This is the "Golden Sequence" for Level 453. While the cup supply changes slightly, the logical order of filling the canvas remains constant. Deviating from this mental model is the most common cause of failure.
1. Priority Phase: The Cyan and Blue Base
Even though the top of the boat is Red, you must mentally visualize the background first.
- Why? The Cyan background touches every edge of the screen. If you fill the center Red first, you have no "safe zone" to pour the Cyan without risking spill-over onto the Red.
- The Order: Process Cyan cups first to build a "bowl" or container. Then, pour the Dark Blue into the bottom of this bowl to form the hull.
- Note: Do not fill these to 100% yet. Fill them to roughly 80% capacity to leave room for expansion.
2. Secondary Phase: The Yellow Foundation
Yellow is the anchor for the brighter colors.
- Placement: The Yellow section sits directly above the Blue hull and below the Orange/Red mix.
- The Order: Once the Blue is set, pour the Yellow. This creates a sharp, high-contrast line.
- Warning: Do not let Yellow touch the Red zone yet. Keep them separated by a small gap of unfilled canvas if possible, or ensure your Cyan borders are thick enough.
3. Tertiary Phase: The Orange Isolation
Orange is the "insulation" between the Yellow and the Red.
- The Order: Pour Orange immediately after Yellow. Since they are analogous colors, they blend slightly, which creates a nice gradient effect for the "sail" of the boat.
- Technique: Pour Orange in short bursts. Do not flood it. You want to create a distinct band of color that separates the heavy Red from the softer Yellow.
4. Final Phase: The Red Crown
Red is the heaviest, most dominant color. It acts as the roof.
- The Order: Red must always be last. Because Red sand in this game tends to have heavier physics, it sinks if poured first.
- Technique: You must pour Red fast and hard to fill the upper triangle, but stop the instant it hits the limit line. If you pour Red while Orange is still wet, they mix into a dirty rust color.
5. Troubleshooting the Order
What if the cups don't appear in this order?
- The "Hold" Strategy: If you need Red but only have Cyan available, do NOT tap the Cyan just because it's there. Wait. Let the conveyor clear. Tapping useless colors fills your slots and prevents you from grabbing the Red when it finally appears.
- The Buffer Strategy: If you are forced to tap a color you don't need, ensure you have a 2-slot gap on the belt so you can dump the correct color behind it immediately.
Step-by-Step Walkthrough: From Start to Finish
This is the tactical execution of the strategy. Follow these phases in order. Do not jump ahead.
Phase 1: The Lockbox Breaker (Start - 0:15)
The board is locked. You cannot access the sides or the bottom effectively.
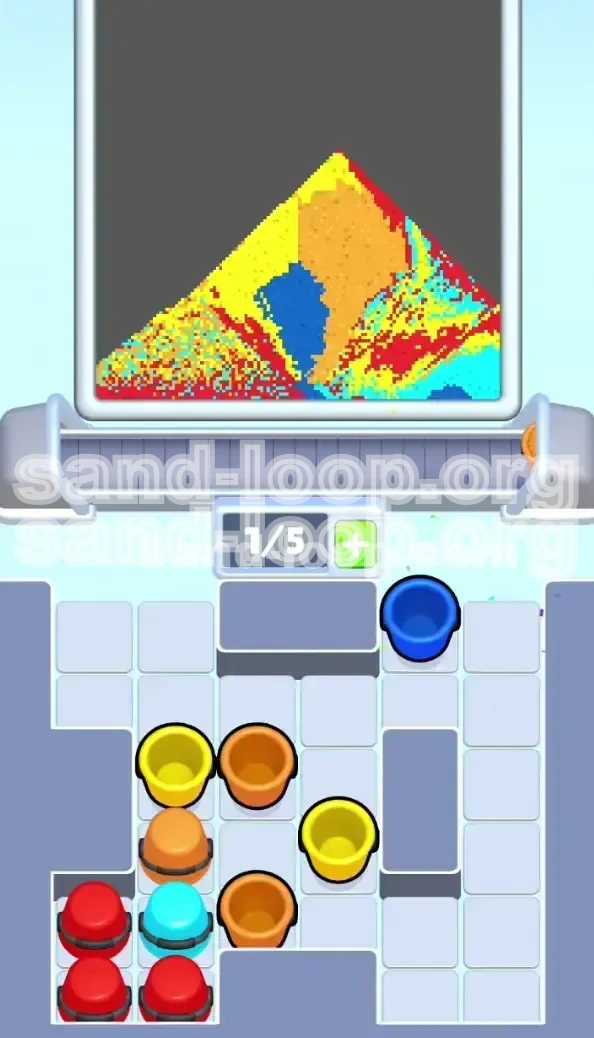
- Step 1: Scan the top two rows of the supply tray. Ignore everything else.
- Step 2: Identify the 5 cups that are "free" (touching the top edge). These are usually 2 Cyan, 2 Dark Blue, and 1 Orange.
- Step 3: Tap these 5 cups in rapid succession. It doesn't matter much which order, as long as they are from the top row.
- Step 4: CRITICAL PAUSE. Stop tapping. Watch the conveyor belt.
- Step 5: Wait for the Lockbox to shatter. Do not queue new cups until the box is gone and the board shifts.
Phase 2: The Mid-Game Balance (0:15 - 0:45)
The board is open, but the slots are likely full. The trap here is panic-tapping.
- Step 1: Assess the state of your conveyor. If you have 5 cups queued, you are in "lockdown" mode. Watch the sand pour.
- Step 2: As the first cup finishes pouring, look at the newly exposed supply tray. The Lockbox is gone, revealing the middle stack.
- Step 3: The One-For-One Rule: For every cup that finishes pouring, you may tap one new cup. Do not tap two.
- Step 4: Focus on clearing the "side columns" first. The corners often hold the Cyan needed for the background. Clear the vertical stacks on the far left and far right.
- Step 5: Avoid the temptation to clear the center stack of Red immediately. The center is usually blocked by support cups (Cyan or Yellow). Clear the supports first.
Phase 3: Background Expansion (0:45 - 1:10)
You should have cleared the sides. Now you need volume.
- Step 1: Your queue should be lighter now (2-3 cups max).
- Step 2: Look at the top screen. Is the Cyan background (the outer edges) at least 60% full? If not, hunt for Cyan cups.
- Step 3: Pour Cyan in pairs. Tap two Cyan cups, let them pour. This fills the deep corners of the canvas.
- Step 4: Check the Dark Blue hull. If it's low, grab a Blue cup now. Mixing Blue and Cyan is safe enough as they are both "cool" tones and form the water base.
- Step 5: Avoid touching the Red cups until the background (Cyan) hits 85% completion. If you pour Red too early, you'll trap yourself and have no room for error.
Phase 4: The Red Stripe Rush (1:10 - 1:30)
This is the final sprint. The background is done. The hull is set. Now for the mast.
- Step 1: Locate the Red cups. They are usually buried in the bottom-center or revealed by clearing side columns.
- Step 2: Check your queue. Ensure you have 3 empty slots.
- Step 3: The Combo: Tap Red, Red, Red.
- Step 4: Watch the canvas. The Red sand will hit the peak and slide down. This is intentional to fill the triangle shape.
- Step 5: The moment the Red touches the Yellow line, stop tapping Red. If you overfill, it bleeds into the Yellow.
Phase 5: Final Cleanup (1:30 - Finish)
You are at 95% completion. Just a few pixels left.
- Step 1: Scan for any "patchy" areas. These are usually small holes in the Orange or Yellow sections.
- Step 2: Use single taps here. Do not queue multiple cups.
- Step 3: If you run out of a specific color (e.g., no Orange left), look for the closest color (Yellow) to patch it up. The game's physics engine is forgiving on the final 2-3%.
- Step 4: Wait for the "Level Complete" check. Even if the screen looks full, the game waits for the sand to settle. Keep your fingers off the screen during this 3-second settle period.
Key Tips, Common Mistakes, and Solutions
Even with a walkthrough, things can go wrong. This section covers the nuances that separate a good player from a great one.
1. The "Queue Blocking" Mistake
The Mistake: You see a cup you need (e.g., Red), but your conveyor is full (5/5). You panic and tap a random cup to "move things along," or you tap the Red cup anyway and it gets queued behind 4 other cups.
The Solution: Never tap a cup just because you want the belt to move. Only tap if that cup is next to pour. If the belt is full, wait. Use the 3-5 seconds of waiting to plan your next 3 moves.
2. The "Wet Sand" Slip
The Mistake: Pouring a new color over a color that hasn't finished "drying" or settling. The new, heavy sand cuts through the light sand like a knife, ruining the layer below.
The Solution: Pay attention to the "shine" on the sand. Wet sand shines. Dry sand is matte. When pouring Red (heavy) over Yellow (light), wait for the Yellow to lose its glossy sheen before dumping the Red.
3. Ignoring the Lockbox Dependencies
The Mistake: Trying to dig for cups underneath the Lockbox using side swipes or diagonal taps, assuming you can dislodge them.
The Solution: The game physics are rigid. The Lockbox creates a physical collider. You cannot touch the cups beneath it. Stop trying. Focus 100% of your energy on the top row cups until that number hits 0.
4. Speed Running vs. Accuracy
The Tip: Speed running (tapping as fast as possible) is actually slower in Level 453.
- Why? Because a mistake (like a color spill) takes 10-15 seconds to fix (by overfilling).
- The Fix: Play at 80% speed. Deliberate taps, slight pauses to verify the pour trajectory, and checking the queue. You will finish 30 seconds faster than if you rush and make a mess.
5. What to Do When "Stuck"
Scenario: You have no cups of the color you need visible on the tray. You just have Cyan, but you need Red.
- Don't Panic: The game's "shuffling" mechanic reveals new cups when you clear the current stack.
- Action: Look at the columns of cups. Do you see a Red cup buried under 2 Cyan cups?
- Execution: You must tap the 2 Cyan cups. This puts them in the queue. As soon as they are tapped, the stack drops, revealing the Red. You can then tap the Red. Now your queue is [Cyan, Cyan, Red]. It's not ideal, but it breaks the gridlock.
6. Handling the Final Percentage
Scenario: You are at 98% completion. The remaining gaps are tiny pinpricks.
- The Solution: The game is generous here. Look for a color that matches the general area (e.g., use Orange for a small hole in the Red zone). Pour it slowly. The sand will "bleed" into the hole and count as complete. You don't need perfect color matching for the final 1-2%.
Speed Run and Shortcuts for Advanced Players
If you have mastered the basics and want to achieve a record time, these advanced shortcuts exploit the game's physics engine to skip steps.
1. The "Dual Fill" Shortcut
Concept: Two colors that are next to each other on the color wheel (like Cyan and Blue, or Orange and Red) can be poured almost simultaneously without contamination.
- Execution: Instead of waiting for Blue to finish, tap Cyan immediately after. The resulting mix (Teal) usually passes for both zones in the background layer.
- Risk: 20% chance of fail. Only use this if you are confident in your layer depth.
2. Skipping the Lockbox Wait
Concept: The game counts the Lockbox cups as "cleared" the moment they are tapped, not when they finish pouring.
- Shortcut: Tap the 5 required cups instantly. While they are still traveling on the conveyor belt, the Lockbox will open.
- Benefit: You can tap the 6th cup (the one you actually want underneath) while the first 5 are still moving. This saves 5-8 seconds of wait time.
3. The "Overflow" Exploit
Concept: The target image has a thick outline. You can slightly overfill the Cyan background into the Blue hull and vice versa, as long as you don't touch the central sail.
- Execution: Don't worry about making a perfect straight line between the Cyan background and the Blue hull. Let them be messy. Save your precision for the Red/Yellow diagonal. This lets you tap faster and worry less about accuracy on the boring bottom parts.
4. Pre-Loading the Queue
Concept: Analyze the board during the "Level Start" countdown.
- Action: Memorize the location of the first 3 Red cups.
- Execution: As soon as you finish the background, don't look at the board. Tap those 3 Red slots from memory. This removes the "search time" from your run.
5. Optimizing the 5-Slot Flow
Advanced Tip: Keep the belt at exactly 4/5 cups.
- Why: If you keep it at 5/5, you have zero flexibility. If you keep it at 1/5, you are wasting time waiting for pours.
- The Sweet Spot: As soon as a cup finishes pouring and leaves the belt (5 -> 4), immediately tap the next cup (4 -> 5). This maintains maximum throughput without causing a traffic jam.
6. Handling "Sand Bursts"
Concept: Sometimes, tapping a cup causes a small "burst" of sand to fly out if you tap it too fast.
- Tip: Tap firmly and quickly. A slow press causes the game to register a "hold," slowing down the pour speed. A fast tap ensures maximum velocity.