
Level 454
HARDHow to solve Sand Loop level 454? Get instant solution for Sand Loop 454 with our step by step solution & video walkthrough. Sand Loop 454 tips and guide.
Play Sand Loop Now
Experience the puzzle challenge firsthand
Game Screenshots
Sand Loop Level Guides
Level Overview: The Inventory Crisis
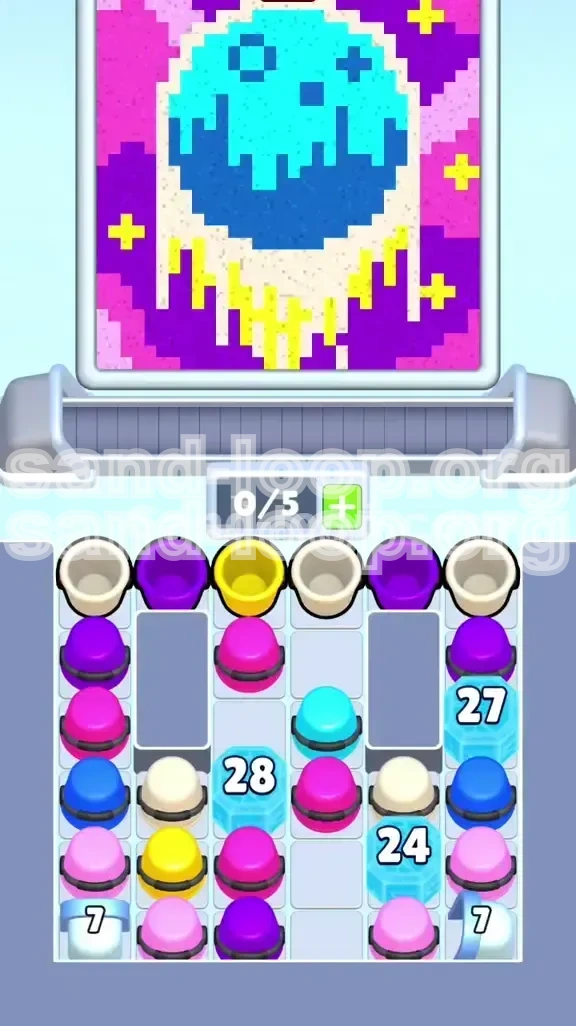
Level 454, titled "The Frozen Moon Paradox," represents a distinct pivot in the game's design philosophy. Unlike previous stages where resources were plentiful and the challenge was precision, this level is a brutal exercise in resource management and logistics. The visual presentation—a psychedelic blend of magenta voids and a melting cyan moon—serves as a distraction from the real gameplay layer: a gridlocked inventory system.
The Aesthetic Trap
The canvas is dominated by large, inviting areas of purple and magenta, occupying nearly 40% of the total surface area. In a standard level, you would prioritize filling these large zones first to build momentum. However, in Level 454, this is a death sentence. The "Void" is designed to waste your moves. The game spawns an excessive amount of Purple and Magenta cups early on, specifically to tempt you into clogging your limited 5-slot conveyor belt with "junk" inventory that you cannot afford to hold.
The Ice Block Economy
The core mechanic of this level is the "Ice Block." These are not simple obstacles; they are resource gates. You will encounter high-health ice blocks ranging from 24 to 28 hits located in the center-left and center-right of the supply tray. These blocks physically prevent the columns of cups above them from dropping down. Crucially, the essential Cyan and Dark Blue cups needed to complete the Moon objective are trapped *behind* these ice blocks. You cannot access the necessary tools to win the game until you perform the manual labor of breaking the ice.
The Conveyor Constraint
Your most significant limitation is the conveyor belt capacity, which is capped at 5 slots. Because the bottom half of the tray is frozen, you cannot rely on the natural flow of new cups. You are forced to work with a "closed system" until the ice is cleared. Every cup you pick up occupies a slot that could be used for a critical color. If you fill your belt with 5 Purple cups because you were painting the background, you will have no space to pick up the Cyan cups once the ice finally breaks. This effectively creates a deadlock where you cannot make progress.
The Moon Precision
While the background is forgiving, the "Moon" area (top center) is not. It requires a strict separation of Cyan and Dark Blue. These colors are adjacent and often touch. Because you will be managing a cluttered belt and likely rushing to clear ice, the risk of "dirtying" the moon—pouring Dark Blue into a Cyan zone or vice versa—is extremely high. The Moon represents the "skill check" of the level, requiring controlled pouring amidst a chaotic logistical environment.
Why This Level Fails Most Players
The failure rate for Level 454 is highest within the first 30 moves. This is because the game rewards the wrong behavior. If you play naturally—filling the large empty spaces—you will lose. The level demands a counter-intuitive strategy: you must ignore the vast empty background and focus entirely on the small, frozen obstacles in the supply tray. Success in this level is measured not by how much you paint, but by how efficiently you clear your inventory grid.
Clear Objectives: The Mission Log
To navigate this logistical nightmare, you need to shift your mindset from "painting" to "mining." Your objectives are ranked by priority, and deviating from this order will result in a failed run. Treat this list as your standard operating procedure for the duration of the level.
Primary Objective: The Center Ice Break
Your absolute first goal is to shatter the 28-hit Ice Block on the center-left and the 24-hit Ice Block on the center-right. Nothing else matters until these are gone. These blocks are dams holding back the Cyan and Pink cups required for the Moon. You must treat every cup in your possession as a potential projectile for these ice blocks. Do not use a cup for the background unless you have already maximized your efficiency against the ice.
Secondary Objective: Tray Liberation
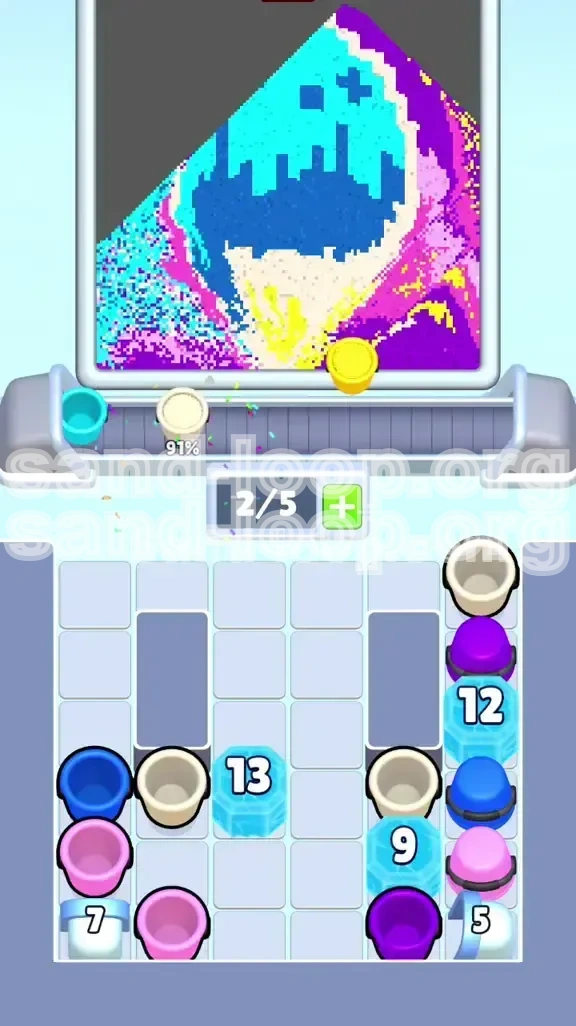
Once the major ice blocks are shattered, the columns of cups will drop down, freeing up the bottom half of the supply tray. Your immediate next goal is to "dig out" the cups that have fallen to the bottom. These are often the specific colors you need to finish the Moon details. You must clear the vertical space to ensure new cups can flow from the top. A cluttered tray leads to missed opportunities.
Tertiary Objective: The Moon Foundation
With the tray cleared, you must shift focus to constructing the Moon. Start with the Cyan top hemisphere. This is the most distinct color on the board and requires a clean pour. Do not attempt to complete the Moon's facial features (Dark Blue) until the main body is set. Failing to establish the base color first often leads to bleeding colors when you try to add details later.
Quaternary Objective: Background Filling
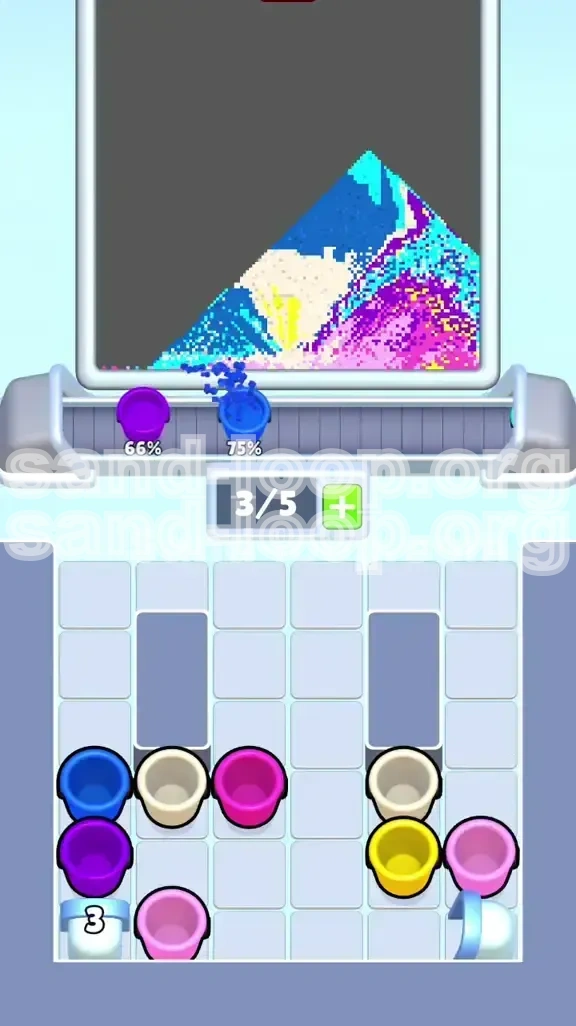
Only after the Moon is 80% complete should you turn your attention to the purple and magenta background. By this stage, the pressure on your inventory should be lower, and you will likely have a surplus of "fodder" colors. Use this phase to cycle through any remaining Purple or White cups that are clogging your conveyor.
Final Objective: The "Melt" and Stars
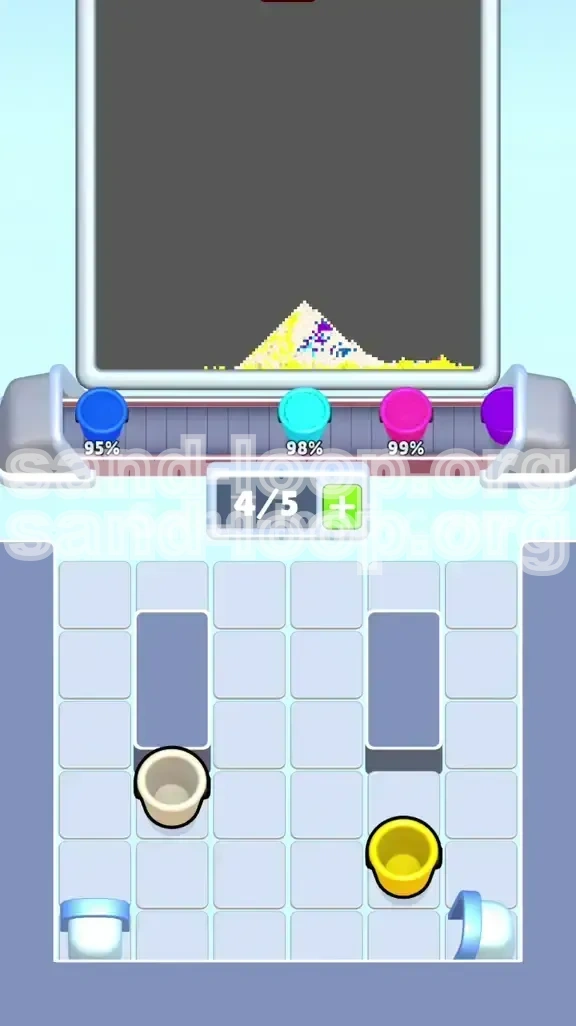
The last 10% of the level involves the "drip" effects at the bottom of the moon and the single-pixel stars in the background. This is the highest difficulty precision segment. You must use Beige and Yellow cups with extreme care. Any spillage here will ruin your percentage score. Ensure you have at least 2 empty slots in your conveyor to maneuver during this final phase.
Hidden Objective: Slot Management
Throughout all these phases, you must maintain the "Two-Slot Buffer." Never let your conveyor fill up with 5 usable cups. If you have 5 cups that you need for the canvas, you have no room to pick up the next color that drops. Always try to keep 2 slots empty or occupied by "trash" cups that you are willing to waste on ice blocks.
Step-by-Step Walkthrough: The Excavation Phase
The first 20 moves of Level 454 are a script. If you improvise here, you will likely die. Follow this specific sequence to break the ice and liberate your resources without deadlocking your screen.
Phase 1: The Initial Salvage (Turns 1-5)
As the level loads, quickly scan the top row of the supply tray. You will see a mix of White and Purple cups. Do not start by filling the background. Instead, tap the White or Purple cups that are sitting directly above the Ice Blocks. These are your "hammers." Load them into your conveyor and immediately pour them onto the center-left (28-hit) and center-right (24-hit) Ice Blocks. Do not worry about aiming; just get the sand flowing against the ice.
Phase 2: The "Fodder" Dump (Turns 6-12)
As you pour your initial cups, more Purple and Magenta cups will become accessible in the top rows. Continue to tap them, but treat them as ammunition. Pour them onto the Ice Blocks. Even if the Ice Block takes 28 hits, you need to apply constant pressure. If you accidentally pour a little Purple on the background, that is acceptable, but do not intentionally fill the background zones yet. Your goal is to reduce the health of the Ice Blocks to zero as fast as possible.
Phase 3: The Cyan Rush (Turns 13-18)
The moment the Center-Left Ice Block shatters, a column of cups will drop. Among them, you will find Cyan cups. Stop everything. Even if you are in the middle of pouring Purple, if the Cyan cup becomes available and you have a slot, grab it. The moment you have Cyan, switch targets to the top-center of the canvas and fill the Moon's body. You must prioritize this color immediately because if you leave it in the tray, it might get buried again or block other essential colors.
Phase 4: The Corner Trap (Turns 19-25)
You will notice two smaller 7-hit Ice Blocks in the bottom corners of the tray. Do not touch these yet. They contain Beige and White cups that are useless to you right now. Breaking them early will release cups you don't need, clogging your conveyor. Only clear these corner blocks if you are completely stuck and have no other moves, or if you have already finished the Moon's main body.
Phase 5: The Mid-Game Stabilization
By the time the center blocks are gone and the Moon is outlined in Cyan, your tray will be a mess of dropped columns. Take a moment to pause. Assess your conveyor. If it is full of Purple, use those cups to finish the Ice Blocks in the corners or fill the far background edges. You need to clear your belt to prepare for the Dark Blue and Pink cups that will be needed for the Moon's face.
Phase 6: The Final Stretch
Once the heavy lifting is done, the level plays like a standard puzzle. Use Dark Blue for the face, Beige for the drips, and Yellow for the stars. The key here is patience. Do not rush the final stars. A single misplaced Yellow drop on a Purple background is nearly impossible to fix and will cost you your 3-star rating.
Color Processing Order: The Logical Flow
The order in which you process colors is the difference between a smooth run and a frustrating restart. You must adhere to a strict hierarchy that prioritizes "locked" colors over "abundant" colors.
Priority Tier 1: Cyan (The Key)
Cyan is the bottleneck of this level. It is the primary color of the Moon and is trapped behind the toughest Ice Block. You must process Cyan the instant it is available. Do not save it. Do not wait until you have a "better spot." If a Cyan cup enters your conveyor, find a place for it on the Moon immediately. Freeing up the Cyan supply tray slot is critical to unblocking the flow of the rest of the level.
Priority Tier 2: Dark Blue (The Lock)
Dark Blue is used for the facial features of the Melting Moon. Like Cyan, it is often buried. Once you have access to it, pour it into the Moon's face. These areas are small and clustered. Filling them early prevents you from accidentally painting over them with background colors later. It is much safer to paint a small Dark Blue zone and then paint the Purple background around it than the other way around.
Priority Tier 3: Pink/Magenta (The Fodder)
These colors are your currency for breaking ice. You will have too many of them. Use them aggressively to clear obstacles. If you need to make a "sacrifice" move—pouring a color just to clear a slot—make it a Magenta cup. The background is large enough to absorb minor overflows of Magenta without ruining the percentage score. Treat Magenta as your "trash" color for inventory management.
Priority Tier 4: Beige (The Melt)
Beige is used for the "melt" effect at the bottom of the moon. This requires a gradient blend. It is a high-risk color because if it touches the Yellow stars or the Purple background incorrectly, it looks muddy. Process Beige only when the Moon is otherwise complete and you have steady control over your stream.
Priority Tier 5: Yellow (The Star)
Yellow is the most dangerous color in the level. It is used for tiny, single-pixel stars scattered across the Purple background. Because the targets are so small, it is very easy to miss and pour Yellow onto the Purple floor, creating a permanent stain. Save Yellow for the very end when you have maximum control and minimal distractions.
The "White" Exception
White cups are tricky. They are often used for highlights in the Moon and the background stars. However, they are also abundant early on. Use White cups aggressively against the Ice Blocks in the first phase. Do not save them for highlights until the late game. Using a White cup to break ice is better than using a Magenta cup if you plan to use the Magenta for the background later.
Key Tips for Success
Mastering the mechanics of the Sand Loop engine is essential for Level 454. These tips focus on the technical aspects of interaction that can save you precious seconds and prevent fatal errors.
Timing the "Sliding Drop"
When a column in the supply tray is emptied (or an ice block breaks), the columns shift. This animation takes about 0.5 seconds. You can exploit this by pouring your current cup *during* the shift. This ensures that the moment the shift finishes, your next cup is ready to be tapped. Never wait for the board to settle before looking for your next move. Optimizing these transitions is the secret to speed.
The "Ice Tap" Precision
Breaking ice requires distinct taps, not long pours. When tapping an Ice Block, aim for the center mass. The hit detection can be unforgiving; if you tap the edge, the game might register a tap on the cup *behind* the block instead. This can lead to accidentally loading a cup you didn't want. Be deliberate. Tap the ice, wait for the shatter sound, then reassess.
Short Bursts for Small Targets
The sand stream in Sand Loop has a "spread" effect at the start and end of a pour. For small targets like the Yellow stars or the Moon's eyes, do not hold the pour. Start your tap slightly before the target and swipe *through* it, lifting your finger immediately. This minimizes the spread and prevents "dirtying" the surrounding pixels. A clean, quick tap is better than a long, messy fill.
Conveyor Belt "Tetris"
Think of your 5-slot conveyor as a puzzle game. You need to queue your tasks. If you have a long pour coming up (like filling the top Moon), make sure the slots *behind* it are filled with cups that are good for short tasks (like chipping ice). Avoid putting two long-pour cups back-to-back, as you will run out of screen space to execute them without spilling.
Audio Cues for Resource Management
The game plays a specific "crash" sound when an Ice Block is destroyed. Learn to recognize this audio cue without looking. When you hear the crash, immediately glance at the tray. That sound means new inventory has just dropped into play. If you don't secure the new cups immediately, you might miss your window to grab them before your current conveyor fills up.
Common Mistakes to Avoid
Level 454 is designed to punish impatience. Being aware of these common pitfalls will save you from restarting the level in frustration.
The "Background First" Trap
This is the #1 killer of new players. The urge to fill the empty purple space is overwhelming. However, filling the background uses up your Purple cups and fills your conveyor with colors you can't use to break ice. Once the background is full, you have no moves left, and the essential Cyan cups are still trapped behind the ice. Rule: Do not fill the background until the center Ice Blocks are gone.
The "Full Slot" Panic
When your conveyor hits 5/5, panic sets in. Players often start pouring randomly to clear space, leading to "dirty" colors (e.g., pouring Yellow into a Purple zone). If your conveyor is full, you have failed the logistics phase. Do not pour randomly. Instead, look for an Ice Block—even a partially broken one—and use a cup to damage it further. This clears a slot without ruining the canvas.
Ignoring the Bottom Corners
While you shouldn't prioritize the bottom corners early, you must not forget them entirely. These corners hold the Beige cups needed for the final phase. If you leave them until the very last second, you might find yourself at 98% completion with no way to get the final 2% because the last Beige cup is stuck behind an unbroken Ice Block.
Mixing the "Melt" Gradient
The bottom of the moon features a subtle gradient from Beige to Yellow. This is not a solid fill. If you pour Beige into a Yellow spot, it creates a muddy brown mess that ruins the aesthetic score. Zoom in (if supported) or look closely at the pixel colors before pouring. Ensure you are matching the exact shade required for that specific drip line.
Stuck Solutions: Emergency Recovery
Sometimes the RNG (Random Number Generation) deals you a bad hand, or you make a misclick. Here is how to recover from specific impossible scenarios.
Situation: Deadlocked Conveyor (5/5 Full)
You have 5 cups, none match the immediate needs, and the tray is frozen.
Solution: You must perform a "sacrifice." Look for a section of the canvas that is already 90% full. Pour your current cup there to waste it, even if it overfills slightly. The penalty for a slight overfill is better than a deadlock. Alternatively, tap an Ice Block that is *not* your primary target just to use up the cup and free a slot.
Situation: Out of Critical Colors
The Moon is 90% done, but you are out of Cyan cups, and the tray shows no Cyan.
Solution: Scan the remaining Ice Blocks carefully. Is there a Cyan cup visible *behind* a block of ice? If so, you must break that ice, even if it means using a valuable Pink cup to do it. If there are absolutely no Cyan cups left in the tray, you may be forced to use an "Undo" item (if available) or restart the level, as the RNG has failed to provide sufficient resources.
Situation: The "Dirty" Star
You accidentally poured Purple on a Yellow star, turning it a dirty brown.
Solution: This is difficult to fix. You cannot pour Yellow over Purple; it just makes mud. The only fix is to "erase" the star. Pour the surrounding background color (Purple) carefully to cover the entire star, effectively resetting that pixel to a blank slate, and then redraw the star with Yellow. This is risky. Often, it is better to accept the 1% score penalty and focus on finishing the rest of the level.
Speed Run Tips and Shortcuts
Once you have mastered the survival strategy, you can optimize for time. Speed running Level 454 is about minimizing the "downtime" spent breaking ice.
The "Double Tap" Ice Break
If you have two cups of the same color (e.g., two Purples), you can speed up the ice breaking process. Start pouring the first cup on the ice, and while the sand is flowing, immediately tap the second cup on the same block. The game allows you to queue interactions. This "double tap" deals damage twice as fast and shaves seconds off the excavation phase.
Pre-Loading the Tray
During the level fade-in (before the "Start" graphic fully disappears), you can tap the top row of cups. If you know you need the top-left cup to start, start tapping immediately as the screen brightens. This "pre-load" gives you a 1-second head start on the ice-breaking race.
Ignore the Perfection
For a speed run, you do not need 100% accuracy on the background. You only need to pass the threshold (usually 85-90%). Feel free to "slurry" your pours on the Purple background. Instead of carefully outlining the Moon, just dump the sand in the general vicinity. The time saved by not being precise outweighs the risk of a slight spill-over in the background zones.
The Bulk Fill Strategy
Do not alternate colors. Group your fills. Do all the Cyan at once. Then all the Dark Blue. Then all the Purple. Constantly switching between target areas forces your brain to re-acquire the target zone every time. By grouping your fills by color, you build muscle memory for the location, allowing you to tap and pour almost subconsciously. This is the fastest way to clear the canvas.