
Level 460
EXPERTHow to solve Sand Loop level 460? Get instant solution for Sand Loop 460 with our step by step solution & video walkthrough. Sand Loop 460 tips and guide.
Play Sand Loop Now
Experience the puzzle challenge firsthand
Game Screenshots
Sand Loop Level Guides
Sand Loop Stage 460: The Pop Art Puzzle Breakdown
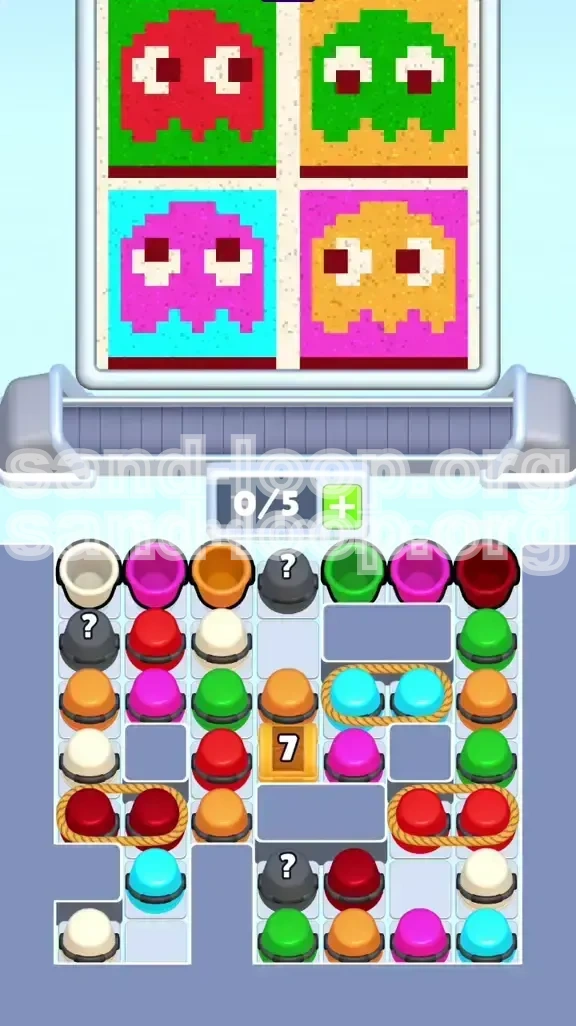
Welcome to the ultimate walkthrough for Sand Loop Level 460. This stage is a significant difficulty spike, testing your logical planning rather than your reflexes. You are presented with a massive, intricate canvas divided into four quadrants, each featuring a pixel-art ghost rendered in a vibrant "Pop Art" style reminiscent of retro arcade cabinets.
The primary challenge here is not the complexity of the art, but the extreme resource scarcity. You begin with a restrictive 0/5 slot capacity on your conveyor belt. This means you have zero margin for error. Unlike earlier levels where you could queue up several colors, here you must process cups with surgical precision. We will break down every mechanism, from the stubborn 7-Box to the deceptive Mystery Cups, to ensure you clear this level on your first attempt.
The 4-Quadrant Layout Analysis
The level is visually split into four distinct squares. Understanding which colors belong to which quadrant is crucial to avoid cross-contamination.
- Top-Left Quadrant: Features a Red ghost set against a Green background.
- Top-Right Quadrant: Features a Green ghost set against a Yellow background.
- Bottom-Left Quadrant: Features a Pink ghost set against a Cyan background.
- Bottom-Right Quadrant: Features a Yellow ghost set against a Pink background.
Understanding the Slot Economy
Your conveyor belt capacity starts at a strict 5 slots. This is your most critical bottleneck. With 7 different colors in play (Red, Green, Pink, Cyan, Yellow, White, Dark Red), you cannot hold "buffer" cups.
- Rule #1: Never pick up a cup unless you are ready to pour it immediately.
- Rule #2: If your belt has 4/5 slots filled, you must pour one out before tapping anything else.
- Rule #3: Treat empty slots as gold. The more empty space you keep, the easier it is to manage the "Mystery" cups.
The 7-Box Mechanic
Located in the direct center of the board is a large, wooden crate labeled "7". This acts as a physical wall, blocking access to the bottom half of the screen where crucial White and Dark Red cups are trapped.
- To destroy it, you must clear exactly 7 cups that are physically touching its sides.
- These cups are usually a mix of Orange, Green, and Pink.
- Warning: The box does not count cups touching its corners, only the direct horizontal and vertical neighbors.
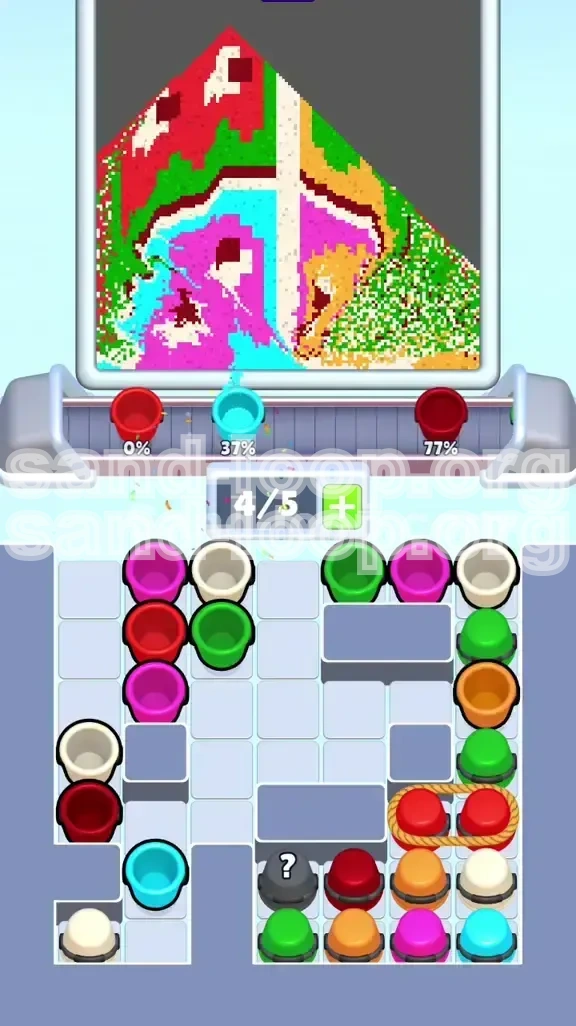
Rope Pair Constraints
You will notice pairs of cups tied together with ropes. In Sand Loop, roped cups move as a single unit. This creates a "Slot Check" mechanic.
- The Constraint: You must have two empty slots on your conveyor belt to pick up a roped pair.
- If you tap a roped pair with only one slot open, the game will buzz, and the cups will not move.
- Strategy: Plan your pours so that you always have 2/5 slots available when you approach the bottom of the board where the roped Red and Cyan pairs reside.
Primary Objectives and Color Strategy
To beat Level 460, you cannot simply pour colors as they appear. You must follow a strict dependency chain. If you pour the background colors before the ghost bodies, you will fail. If you pour the eyes before the backgrounds, you will fail. The order of operations is your sword and shield.
Objective 1: Destroy the 7-Box Blocker
Your immediate, short-term goal is to shatter the central crate. This is the gateway to the rest of the level. Until this box is gone, you cannot access the bottom cups required to finish the level.
- Action: Focus exclusively on the top-center area.
- Target: Identify the 7 cups hugging the box.
- Result: Removing these cups causes the box to explode, clearing the path to the bottom tray.
Objective 2: Establish the Ghost Bodies
With the 7-Box gone, your next major task is to fill the four main bodies of the ghosts. These are the largest reservoirs of sand on the board.
- Target Colors: Red, Green, Pink, Yellow.
- Why First? The bodies act as "walls." By filling the large bodies first, you create barriers that prevent the background colors from spilling over into areas where they don't belong.
Objective 3: Flood the Backgrounds
Once the ghost bodies have substantial mass (about 50-60% full), you switch tactics to the background colors.
- Target Colors: Green (Top-Left), Yellow (Top-Right), Cyan (Bottom-Left), Pink (Bottom-Right).
- The Technique: Pour aggressively. The ghost bodies you just filled will act as dams, keeping the background sand contained within its specific quadrant.
Objective 4: The "Eye" Precision Phase
This is the final and most dangerous phase. Every ghost has eyes made of White sand with Dark Red pupils.
- Timing: Do not touch White or Dark Red cups until the very end.
- The Risk: If you pour Dark Red too early, it will spill onto the ghost's body or background, ruining the color purity.
- Goal: Fill the White eyes first, then quickly drop the Dark Red into the center of the white pool.
Managing the Color Palette
You are juggling 7 colors: Red, Neon Green, Pink, Cyan, Yellow/Orange, White, and Dark Red.
- High Volume Colors: Green, Pink, Yellow, Red. You will process these multiple times.
- Low Volume / Critical Colors: White and Dark Red. These are "end-game" colors. Picking them up early is a death sentence for your slot economy.
Understanding "Cross-Contamination"
The Pop Art design uses high-contrast colors that clash violently. A single drop of Green sand in the Pink ghost body creates a visual flaw that might trigger a "Level Failed" or reduce your star rating.
- Check your aim: Ensure the stream is falling directly into the center of the target color.
- Check the flow: If sand is piling up near the edge of a quadrant, stop pouring and let it settle flat.
Step-by-Step Walkthrough
Follow this exact sequence of moves to navigate the board safely. This guide assumes a standard conveyor belt layout.
Phase 1: The Opening Salvo
Start the level and pause. Look at the cups immediately available near the top-center 7-Box.
- Step 1: Tap the Orange and Pink cups that are loose near the top. Pour them into their respective starting zones if possible, or just clear them to open space.
- Step 2: Identify the specific cups touching the 7-Box. They are likely Green or mixed colors.
- Step 3: Tap and clear these specific cups. Do not touch anything else on the board yet.
- Step 4: Watch the counter on the box. Once it hits 0/7, the box will shatter.
- Step 5: The board will shift. New cups will fall from the top. Do not panic. Pause and assess.
Phase 2: Unboxing and Roping
With the center cleared, you now see the ropes and the bottom layer.
- Step 1: Look for the Cyan roped pair on the right side.
- Step 2: Ensure you have 2 empty slots (e.g., 3/5 full).
- Step 3: Tap the Cyan pair. Pour them immediately into the Bottom-Left background.
- Step 4: Look for the Red roped pairs at the bottom. These are tricky. You might need to use a "Mystery" cup to clear space before picking them up.
- Step 5: Clear the Red pairs and pour into the Top-Left Ghost Body.
Phase 3: The Great Body Fill
Now we build the main structures.
- Step 1: Systematically go through each quadrant. Start with Red (Top-Left). Fill it until it forms a solid base.
- Step 2: Move to Green (Top-Right). Fill the ghost body, avoiding the background area for now.
- Step 3: Move to Pink (Bottom-Left) and Yellow (Bottom-Right).
- Step 4: You should have a lot of empty space on the canvas now. The backgrounds are the only things left empty.
- Step 5: Cycle through your conveyor belt, pouring only the body colors until they are roughly 70% full.
Phase 4: The Background Flood
This is the satisfying part where the art comes together.
- Step 1: Grab all Green cups. Pour them into the Top-Left background. The Red ghost body will stop the sand from leaking.
- Step 2: Grab all Yellow cups. Pour into Top-Right background.
- Step 3: Grab Pink cups for Bottom-Right background.
- Step 4: Grab Cyan cups for Bottom-Left background.
- Step 5: If you run out of a specific color, tap the loose cups on the board or check the conveyor belt loop.
Phase 5: The Eyes Have It
The final stretch. Precision is key.
- Step 1: Retrieve the White cups. They are usually buried or were trapped under the 7-Box.
- Step 2: Pour White into the eye sockets of all four ghosts. Do not overfill. You just need a white base.
- Step 3: Retrieve the Dark Red cups.
- Step 4: Drop a small amount of Dark Red into the center of each White eye. The physics engine should pull the dark sand into the pupil socket.
- Step 5: Finish pouring. The level completes instantly once the last pixel is filled.
Phase 6: Cleanup
Sometimes you have a few random stragglers.
- Step 1: If there are any leftover "Mystery" cups on the belt, tap them only if you have space.
- Step 2: If the Mystery color is something you already finished (like extra Dark Red), just pour it into the overflow area of that color.
- Step 3: Keep the belt moving. Don't let useful colors get stuck behind useless ones.
Key Tips and Mistakes to Avoid
Even with a walkthrough, things can go wrong. Here is how to safeguard your run.
Tip 1: The 50% Rule
When filling the ghost bodies, stop at roughly 50-60% capacity.
- Why: If you fill a body to 100% before doing the background, the background sand might spill over the rim because the "wall" is too high.
- Action: Leave a little margin. The background sand will fill the gaps and level everything out perfectly.
Tip 2: The Mystery Cup Buffer
Never tap a gray "?" cup if your belt is 4/5 or 5/5 full.
- Scenario: You have Red, Green, Pink, Yellow on the belt (4/5). You see a Mystery Cup.
- Danger: If it turns into White, you now have 5 full cups. You cannot use the White, but you can't pick up anything else. You are deadlocked.
- Solution: Only tap Mystery cups when your belt is 2/5 or 3/5 full.
Tip 3: Rope Management
Ropes are the biggest cause of "soft locks" in this level.
- Visual Cue: Look at the knot. If you see a rope, visualize it taking up TWO slots in your hand.
- Preparation: If you see a roped pair you need, pour out one of your current cups *before* you tap the rope. This ensures you have the 2 slots required to grab it.
Mistake 1: Premature Pupil Pouring
This is the most common way players fail Level 460.
- The Error: You pick up a Dark Red cup early and pour it onto a ghost that isn't finished.
- The Result: The Dark Red hits the Red body or the Green background. It looks ugly and might not register as the correct "Pupil" pixel.
- Fix: Pretend the Dark Red cups are glued to the table. Do not touch them until the White is down.
Mistake 2: Ignoring the Box Counter
Don't just randomly tap cups near the 7-Box.
- The Error: Tapping cups that are diagonally adjacent (corners) thinking it counts toward the 7 total.
- The Result: You waste slots moving cups that don't help destroy the box, leading to a clogged conveyor belt.
- Fix: Only tap cups directly touching the flat sides of the box.
Mistake 3: Background Bleeding
Pouring background colors before the body is formed.
- The Error: You try to fill the Green background (Top-Left) before the Red ghost body is there.
- The Result: The Green sand flows into the Red ghost's area, contaminating it.
- Fix: Always establish the "object" (Ghost) before the "environment" (Background).
Advanced Strategies and Speed Running
Once you have beaten the level, you might want to improve your time or score. These sections are for players looking to optimize.
Speed Run Tip: The Pre-Plan
You can save seconds by visualizing the belt order before the level even starts moving fast.
- The Strategy: The level always spawns the same cups in the same order.
- Action: Memorize that the Orange and Pink loose cups are your first moves. Don't read the cups; just tap the top-center instinctively.
- Gain: This saves about 2-3 seconds of decision-making time.
Speed Run Tip: Batch Pouring
Don't pour one cup, wait, check, pour the next.
- The Strategy: Queue your taps. If you have three Red cups in a row, tap them all rapidly to send them to the belt, then pour continuously.
- Action: Use your thumb to rhythmically tap the source cups while your other finger (or the same thumb) drags the pour nozzle.
- Risk: Only do this if you are 100% sure of the color order.
Optimization: Slot Cycling
Keep the conveyor belt moving like a shark.
- The Concept: An empty slot is wasted potential.
- Action: If you have 1/5 slots, and you see a cup you need *now*, tap it. Pour it. Immediately tap the next needed cup. Never let the belt run empty while you are watching sand fall.
Shortcut: Ignoring Small Details
Perfectionism kills speed runs.
- The Insight: You don't need to fill every single pixel to 100% flatness. The game's hitboxes are forgiving.
- Action: Pour until the color meter looks full, then immediately switch to the next color. Don't wait for the sand to settle perfectly flat.
- Exception: The Dark Red pupils must be precise, or they visually disappear into the background.
Pro Tip: Handling "Junk" Colors
Sometimes you get a color you don't need (e.g., an extra Purple cup in a level with no Purple).
- Action: If you have space, pick it up and immediately pour it off-board (into the void/trash) if the game allows, or just pour it into a corner of the quadrant where it won't hurt the purity.
- Benefit: This removes the junk cup from the board, cycling the conveyor belt faster to the colors you actually need.
Stuck Solution: The Nuclear Reset
If the board is a mess and nothing matches, and you have 5/5 slots of useless colors.
- The Diagnosis: You are in a "Deadlock State."
- The Fix: Quit the level and restart. Do not try to force a recovery. With 0/5 slot expansion, recovering from a deadlock is mathematically impossible in most cases. A restart takes 10 seconds; fighting a losing battle takes 5 minutes.