
Level 461
HARDHow to solve Sand Loop level 461? Get instant solution for Sand Loop 461 with our step by step solution & video walkthrough. Sand Loop 461 tips and guide.
Play Sand Loop Now
Experience the puzzle challenge firsthand
Game Screenshots
Sand Loop Level Guides
Sand Loop Level 461: The Neon Pyramid Master Strategy Guide
Welcome to the ultimate walkthrough for Sand Loop Level 461, infamously known as the "Neon Pyramid." This stage is a significant difficulty spike that tests your ability to manage resources rather than just your reflexes. Unlike standard levels where you can simply tap cups in the order they appear, Level 461 functions like a complex inventory management puzzle.
The core challenge here is the discrepancy between your available slots and the board's layout. With only 5 active slots available, you will frequently find yourself needing to move specific colors that are buried under "garbage" colors you don't need yet. If you tap blindly, you will fill your slots with unusable colors, causing a deadlock that forces a restart. This guide is designed to help you navigate the slot economy, decode the color layering, and execute the perfect sequence to build your synthwave masterpiece.
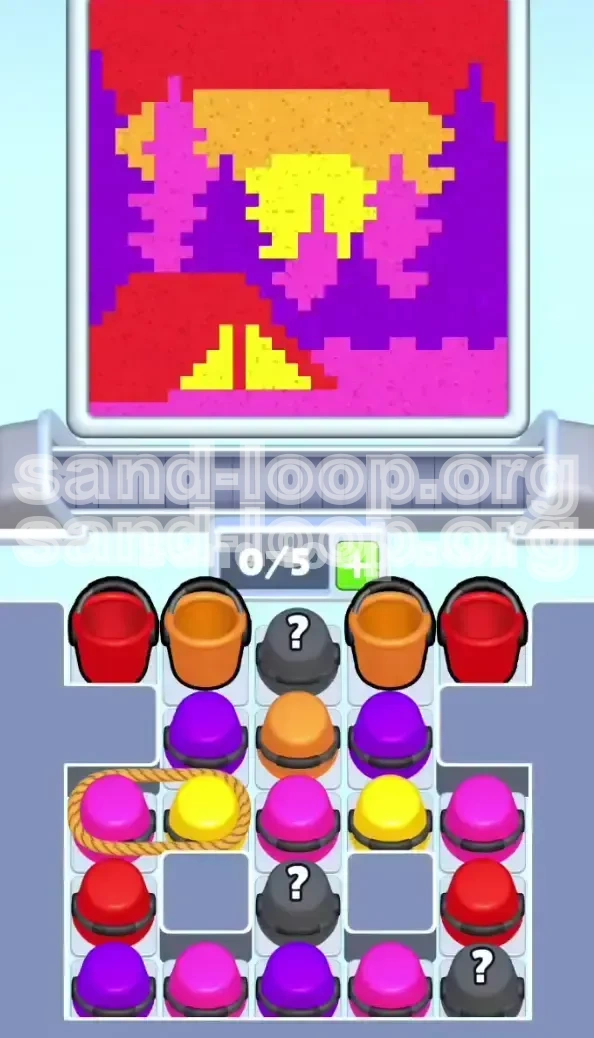
Understanding the 5-Slot Economy
The most critical mechanic in this level is the slot limit. You have a maximum capacity of 5 cups in your processing tray. In many levels, you can tap away freely, but here, overfilling your tray is the primary cause of failure. When your tray is full, the conveyor belt stops moving, and if the next cup in the tray is a color you cannot use yet, you are stuck.
The "Rope" Mechanic Explained
Pay close attention to the left side of the board in the second row. There are two cups, Pink and Yellow, tied together with a rope. This is a trap for impatient players. You cannot move just one; tapping either one pulls both into your active slots simultaneously. This instantly consumes 2 slots. If you tap this pair when you already have 3 or 4 cups in your tray, you will hit the cap immediately, likely paralyzing your board before you've cleared the necessary space.
Gravity and Layering Logic
Remember that sand physics are strictly bottom-up. The colors poured first will settle at the bottom of the canvas, while colors poured later will sit on top. In Level 461, you are building a scene with a background (Red/Orange) and a foreground (Pink/Yellow pyramid). Because the pyramid is at the bottom, Pink and Yellow must be poured first. If you pour the Red background too early, it will bury the base of the pyramid, making it impossible to complete the image accurately.
Identifying the "Garbage" Colors
To succeed, you must distinguish between "structural" colors and "filler" colors. Early in the level, Orange and Purple act as blockers—they sit on top of the colors you actually need (Pink and Yellow). You will need to temporarily take these blockers into your slots just to move them out of the way, a process that consumes precious turns. Learning which cups are merely obstacles and which are essential for the base layer is key to speedrunning this level.
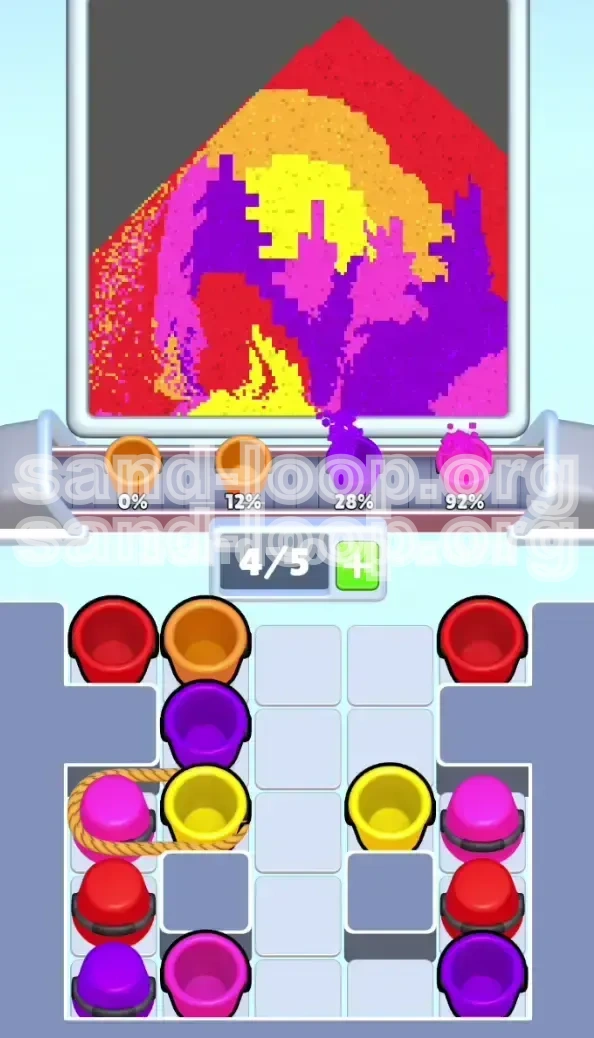
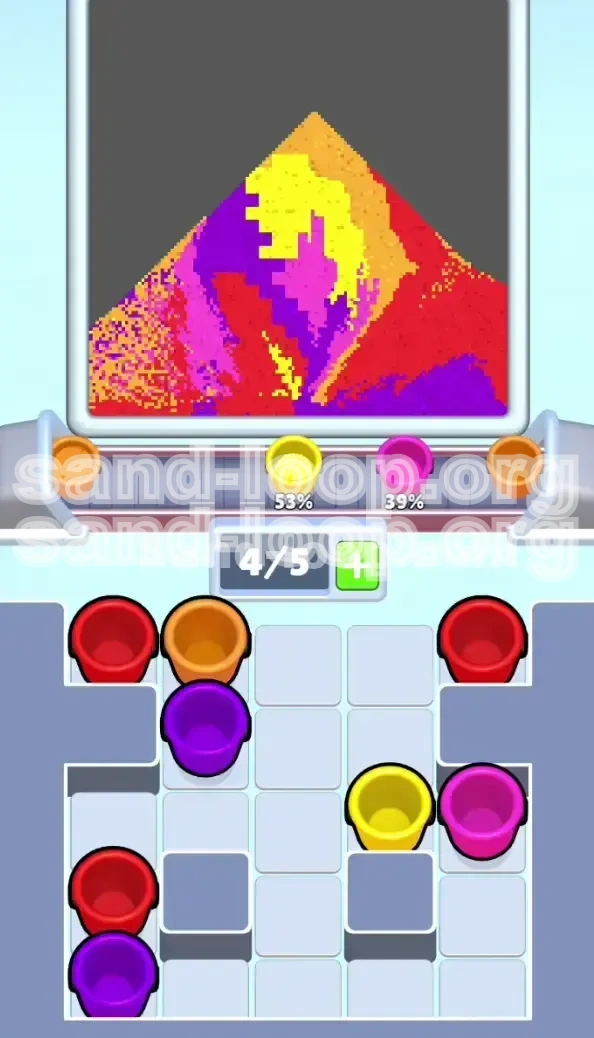
The 100% Fill Rate Goal
Completing this level requires filling specific meters to 100%. The breakdown is roughly: Yellow (Base) needs 53%, Pink (Accent) needs 39%, and Red (Sky) fills the remainder. Your goal is to align the availability of these cups with the capacity of your conveyor. Don't focus on the timer; focus on the flow. Keeping the conveyor moving at a steady pace is far more important than rushing taps and causing a jam.
Primary Objectives: How to Beat Level 461
To clear Level 461, you must approach the board with a rigid set of priorities. Your goal is not just to empty the board, but to empty it in a specific order that prevents the contamination of your color layers. Here are your core objectives for this stage.
Establish the Foundation First
Your immediate priority is to secure and process the Pink and Yellow cups. These colors form the "ground" and the "pyramid" of your image. If the conveyor belt is currently processing a different color, you must wait or manage your existing slots until you are ready to pull the foundation colors. Do not let the conveyor belt sit idle while you clear Red cups; keep the belt moving with the structural colors.
Manage the "Roped Pair" Safely
You must free the roped Pink and Yellow cups on the left side, but you must do it only when you have the inventory space to handle them. The objective is to tap them when you have exactly 0, 1, or 2 empty slots. Tapping them at 3/5 capacity is risky, and tapping them at 4/5 capacity is fatal. Make "freeing the rope" a scheduled event, not a reactive one.
Clear the Upper Blockers
The top row of the board is cluttered with Orange cups that cap the columns. You cannot access the critical Pink and Yellow cups in the lower rows until you remove these Orange caps. Your objective is to systematically drain the top row, sending the Orange sand to the belt (even if it's not the perfect color match) purely to open up the vertical lanes for the colors you actually need.
Prevent Color Contamination
You must avoid the "muddy mix" scenario. If you pour Red sand (the sky) before the Yellow pyramid base is fully formed, the Red sand will slide down the slopes of the pile and mix with the Yellow at the bottom. This creates a dirty orange-brown mix that ruins the crisp lines of the Neon Pyramid. Ensure the bottom 40% of the canvas is fully resolved before you start dumping the heavy volume of Red sand.
Optimize Slot Turnover
Efficiency is defined by how quickly you cycle cups from the board to the belt. Your objective is to maintain an average slot count of 3/5. Keeping your slots completely empty is inefficient because you aren't processing enough sand; keeping them full is dangerous because you can't react to emergencies. Find the rhythm where you are constantly tapping, sending a cup to the belt just as a slot opens up.
Execute the Late-Game Flood
The final 20% of the level is a "flood" stage. Once the geometry is set, you will be left with mostly Red cups. The objective here switches from "precision" to "speed." You must dump the remaining Red cups as fast as the belt can take them to top off the background sky. This is the only time you can aggressively tap without worrying about the intricate layering of the pyramid.
Step-by-Step Walkthrough: Phase 1 (The Setup)
The first phase of the level is purely tactical. You are making moves that don't immediately result in points but are necessary to unlock the board. Follow these steps precisely to avoid early deadlock.
Step 1: Clear the Top-Center Orange Cap
Start by locating the top-center cup. It is an Orange cup sitting directly above a Hidden Cup. Tap this Orange cup immediately. Sending it to the belt serves two purposes: it starts the background fill and, more importantly, it exposes the Hidden Cup beneath it. You need to know what is under that cap to plan your next move.
Step 2: Process the Hidden Cup
Once the Orange cap is gone, the Hidden Cup is revealed. Tap this cup instantly. In most instances of this level seed, this reveals a Purple cup. You want this Purple out of the way because Purple is a "mid-ground" color. You don't need it yet, but you don't want it blocking access to the lower rows. Send it to the belt.
Step 3: Flush the Top Row Oranges
Look at the remaining top-row cups. They are likely Orange or Red. Tap all accessible top-row cups. Do not worry about "wasting" these colors; the top of the canvas is empty and needs filling. By clearing this row, you gravity-feed the lower cups upward, making the Pink and Yellow cups in the second row accessible.
Step 4: Assess Your Slot Meter
Pause and look at your active slot meter. After the previous steps, you might be sitting at 2/5 or 3/5 capacity. This is the perfect "Goldilocks" zone. You have enough in the pipeline to keep the conveyor moving, but enough open space to handle the dangerous move coming up next. If you are at 4/5, wait a few seconds for the belt to process a cup before proceeding.
Step 5: Clear the Middle Row Blockers
With the top row gone, focus on the second row. You will see Purple cups or potentially the roped pair. Identify the Purple cups that are *not* part of the rope pair. Tap these Purple cups now. Your goal is to isolate the roped Pink/Yellow pair so you have a clear path to them, ensuring that when you tap them, you don't accidentally drag along a third cup.
Step 6: Prepare for the Rope Pull
You should now have the roped Pink and Yellow cups exposed on the left, and your slot meter should be low (1/5 or 2/5). If your meter is high, tap a cup on the right side of the board to balance it, but avoid the roped pair for now. We are setting the stage for the massive color dump that defines Phase 2.
Step-by-Step Walkthrough: Phase 2 (The Foundation)
This is the critical turning point of the level. In Phase 2, you will execute the largest transfer of color, building the base of the pyramid. Failure here usually means running out of slots while the board is still full.
Step 7: Execute the Rope Pull
Now that you have prepared your slots (aiming for 2/5 capacity), tap the roped Pink/Yellow pair on the left. This will instantly pull both cups into your tray, jumping your capacity to 4/5. This is safe. If you had tapped this earlier when at 3/5, you would be deadlocked at 5/5 with nowhere to go.
Step 8: The Right-Side Mirror
Immediately after pulling the rope, look at the right side of the board. There is usually a matching set of Pink and Yellow cups here (often stacked vertically). Tap these immediately. You want to flood your conveyor belt with Pink and Yellow. The goal is to have the machine process 100% Pink and Yellow for the next 30-45 seconds. This builds the pyramid base up to the 50% mark.
Step 9: Monitor the "Yellow" and "Pink" Meters
Keep your eyes on the progress indicators. You want the Yellow meter to hit approximately 53% and the Pink meter to hit 39%. Do not stop tapping Pink and Yellow cups until you hit these numbers. Even if the board looks cluttered with Red cups, ignore them. Red is the sky; it can wait. If you switch to Red now, you will bury the unfinished pyramid.
Step 10: Clear the "Garbage" Overflow
While you are feeding Pink and Yellow, the conveyor will occasionally spit out a processed cup back into the main tray (if you are playing a variant with recycling mechanics) or simply free up a slot. If a slot opens, check the board. Are there any remaining Purple cups blocking the bottom row? If yes, and you have a free slot, tap one Purple to clear the path.
Step 11: The Bottom-Row Access
Once the mid-layer Purple is gone, the bottom row is fully exposed. Here you will find the final reserves of Pink and Yellow, and potentially some Red blockers. Aggressively tap the remaining Pink and Yellow in the bottom row. You are trying to empty the board of all "foreground" colors. The board should look increasingly desolate, populated mostly by Red cups.
Step 12: Verify the Base
Look at the canvas. The bottom half should be a vibrant mix of Pink and Yellow, forming the pyramid and the desert floor. There should be no Red touching the bottom of the glass. If the base looks solid, you are ready for Phase 3. If the base looks thin (holes in the sand), keep hunting for stray Pink/Yellow cups on the board.
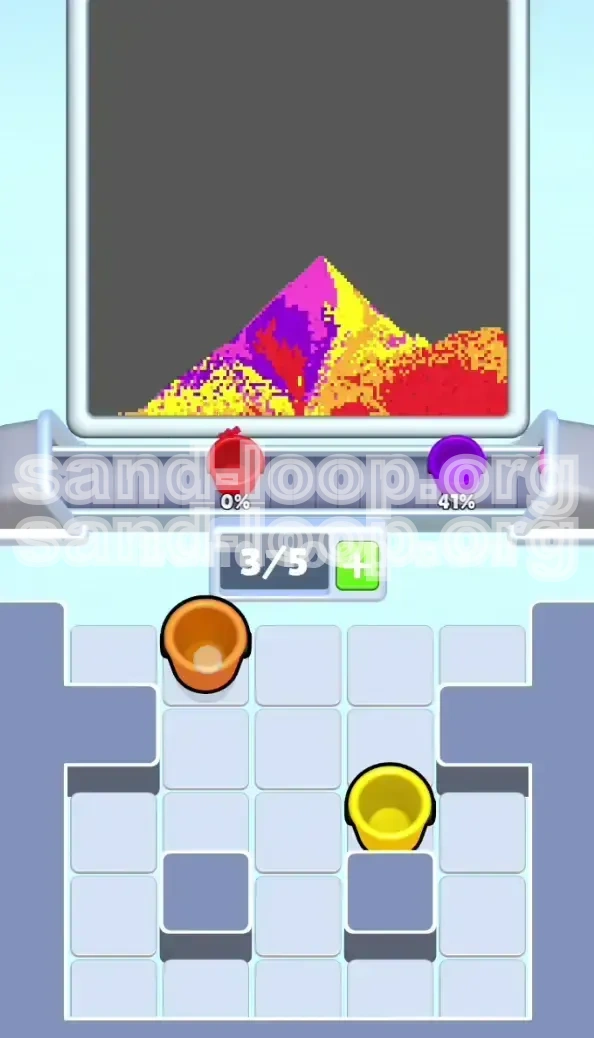
Step-by-Step Walkthrough: Phase 3 (The Sky & Finish)
The danger is over. Phase 3 is the victory lap. The complex logic is done, and now you just need to fill the empty space in the sky with the remaining Red and Orange colors.
Step 13: Clear Remaining Blockers
You might have a Purple cup or two lingering, specifically in the bottom-left or bottom-right corners, potentially hiding a final Red cup. Tap these Purple cups immediately. You need the board to be nothing but Red and Orange. Since the sky is at the top, and the canvas is already filled to the middle with the pyramid, pouring Purple now won't hurt the image, but you need it gone to access the Red.
Step 14: Expose the Hidden Reds
In the bottom-right column, there is often a "Hidden Cup" trapped beneath a Red cup. Tap the top Red cup to move it to the slots, then tap the now-exposed Hidden Cup. It is almost always a Red or Dark Orange variant. Send it to the belt.
Step 15: The Red Flood
Now, tap every single Red cup remaining on the board. Don't wait for the slots to clear perfectly. Since the pyramid is already solid, any Red sand you pour now will simply sit on top of the background layer. You can run your slots at max capacity (5/5) during this phase because you are just filling the void.
Step 16: Monitor the Total Fill
Watch the total completion percentage climb from 60% to 100%. As the canvas fills up, the sand will take longer to settle because it has to pile up. Be patient with the taps. Don't spam so fast that the game glitches; let the physics engine catch up.
Step 17: Final Color Polish
Occasionally, you might be left with a single Orange cup when the board is otherwise empty. Pour it. If the level requires a specific "Sun Glow" effect (Orange spot in the Red sky), this cup will provide it. If not, it just adds texture. Either way, it must be poured to clear the board.
Step 18: Victory Condition
Once the board is empty and the canvas is full, the level will end. If you followed the steps, your Neon Pyramid should have crisp edges, a solid Pink/Yellow base, and a smooth Red gradient sky without any muddy mixing at the bottom.
Pro Tips: Color Theory and Shortcuts
To truly master Level 461 and achieve a high score or fast time, you need to understand the logic behind the layout. These tips go beyond the basic walkthrough and explain *why* the strategy works.
Tip 1: The "Red Sky" Rule
Never pour Red while there is still empty space at the bottom of the glass. Gravity causes sand to flow to the lowest point first. If you pour Red while the bottom is empty, the Red will flow underneath where the Pink/Yellow needs to go. This creates a permanent stain that you cannot fix. Always ensure the bottom 20-30% of the canvas is filled with your base colors before touching a Red cup.
Tip 2: Analyzing the Start
The level setup is somewhat static, but the Hidden Cups can vary. Always tap the top-center cup first. By identifying the Hidden Cup color immediately, you can decide if you need to pivot your strategy. If it's Pink, you are lucky—you have early access to a base color. If it's Purple, you must treat it as a tax turn—a move made solely to clear the board.
Tip 3: Slot Juggling
Advanced players use a technique called "Slot Juggling." If you have 4/5 slots full and the belt is processing a Pink cup, but you need to tap a Red cup to clear a blocker, you can tap the Red cup the *millisecond* the Pink cup leaves the slot. This requires precise timing but allows you to effectively hold 6 cups in a sequence, maximizing your efficiency.
Tip 4: The Rope is a Timer
Think of the Rope Pair as a countdown timer. The longer you leave them on the board, the longer they block access to the bottom row. However, tapping them too early kills your run. The "safe zone" to tap them is when you have exactly 2 empty slots. This brings you to 4/5, leaving one slot open for an emergency tap if something goes wrong.
Tip 5: Speed Running the Endgame
Once you hit Phase 3 (The Sky), stop looking at the canvas. Look only at your tray. Tap the cups in a rhythmic 1-2-1-2 cadence. The physics engine handles the rest. Since the layering doesn't matter anymore (everything is going on top), you can tap as fast as your fingers allow. This is where you make up for the slow, deliberate pace of Phase 1.
Tip 6: Handling Deadlocks
If you mess up and find yourself with a full tray (5/5) but the next cup in line is unusable (e.g., you need Yellow but the next cup is Red), you are in a "Hard Deadlock." The only solution is to restart immediately. Do not wait for the belt; the belt is already jammed by the logic flow. Recognizing a lost run saves time. A good run means never hitting 5/5 unless it's the final Red flood.