
Level 463
HARDHow to solve Sand Loop level 463? Get instant solution for Sand Loop 463 with our step by step solution & video walkthrough. Sand Loop 463 tips and guide.
Play Sand Loop Now
Experience the puzzle challenge firsthand
Game Screenshots
Sand Loop Level Guides
Level 463 Comprehensive Walkthrough: The Cool Chick Strategy
Level Overview: A Test of Logic Over Speed
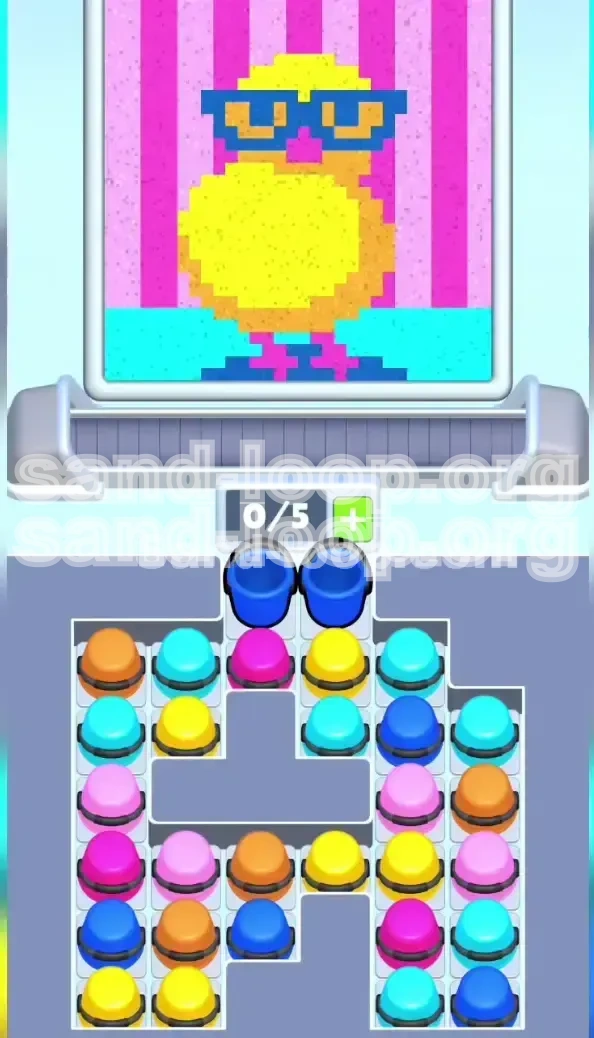
Sand Loop Level 463 introduces players to a high-difficulty logic puzzle centered around precise resource management. Unlike previous levels where rapid tapping might suffice, this stage is a strict "Slot Economy" challenge. You are tasked with painting a pixel-art chick wearing blue sunglasses, but the obstacle layout—the massive central T-Blocker—makes accessing the necessary colors difficult. The primary challenge here is not the accuracy of your pouring, but the management of your queue capacity. With a restrictive limit of 5 active slots, filling your conveyor belt with the wrong colors at the wrong time will cause an unrecoverable deadlock, forcing you to restart the level.
Mission Objective: Paint the Pixel Chick
Your goal in Level 463 is to complete a pixel-art canvas featuring a yellow chick. The requirements are specific and demand attention to detail. You must fill the main body and head of the chick with Yellow, add contouring with Orange, and carefully place the Blue sunglasses. The background is complex, requiring alternating vertical stripes of Light Pink and Magenta, followed by a Cyan floor base. The challenge is to execute this layering without contaminating the small details, such as the magenta legs or the blue glasses, with the massive volume of yellow sand required for the body.
The Critical Slot Economy
The defining mechanic of this level is the 5-slot capacity limit on your conveyor belt. This is your most valuable resource. Every time you tap a cup, it occupies a slot. If you tap 5 cups and none have finished draining, your belt jams, and the game is effectively over. Therefore, your objective shifts from "pouring sand" to "managing flow." You must time your taps so that you are always loading a new cup just as an old one finishes, maintaining a rhythm of 3 to 4 active cups at any given moment to allow for movement and error correction.
Analyzing the T-Blocker Obstacle
A massive gray T-shaped blocker sits immovably in the center of the grid. This obstacle splits the playing field into two distinct vertical lanes: the far left and the far right. It physically blocks access to the bottom layers of the grid where the crucial Yellow cups are located. You cannot simply reach the Yellow sand; you must first clear the top layers of the grid. This forces a specific order of operations: you must process the background colors located on the top periphery to "dig" down to the essential body colors trapped underneath the T-Blocker.
Understanding the Visual Output
The final image is a deceptive mix of broad strokes and fine details. The chick takes up the central 60% of the canvas, meaning precision is required only at the borders. The background stripes act as a frame. Understanding this helps in prioritizing: the Yellow body is the "mountain" you must build, while the background stripes are the "roads" leading to the mountain. Do not focus on the prettiness of the sand falling; focus entirely on the queue management at the bottom of the screen.
Winning Conditions
To secure victory, you must achieve 100% completion of the pixel art. This means every pixel of the Yellow body is filled, the Blue sunglasses are distinct and not mixed with Yellow, and the background stripes are solid. The game will not advance if there is even a 1% mismatch in color boundaries. The level ends only when the last grain of sand settles into the correct color zone.
Color Order and Layering Guide
Phase 1: The Foundation (Yellow and Orange)
The logic of this level dictates building from the biggest masses to the smallest details. The Yellow body and the Orange belly shadow form the "pyramid base" of your sand sculpture. If you attempt to draw the background details first, you will inevitably mix them when you inevitably have to pour the large volume of Yellow sand later. Securing the Yellow and Orange zones first creates a physical buffer on the canvas, preventing later background pours from bleeding into the main subject. Ensure these colors are established before moving to the intricate details.
Phase 2: Fine Details (Blue Sunglasses)
The Blue sunglasses are high-risk targets. Because they are surrounded by the large Yellow body area, they are susceptible to contamination. The recommended strategy is to pour the Blue frames for the sunglasses immediately after the main Yellow body is established but before the background is flooded. This minimizes the time the Blue sand sits exposed. If you leave the Blue cups for the very end, you risk spilling background Cyan or Pink into the eye sockets, ruining the pixel art definition. Treat the Blue sunglasses as a "bridge" layer between the foreground body and the background.
Phase 3: Vertical Stripes (Light Pink and Magenta)
The background features alternating vertical stripes of Light Pink and Magenta. These colors are located primarily on the top rows of the grid, acting as the "roof" over the Yellow cups below. You must process these methodically. Do not pour all Light Pinks then all Magentas. Instead, alternate them or pour them in small clusters to ensure they drain distinctively. These colors are required to dig down the sides of the T-Blocker. Since they are background elements, they are less critical if they touch the body, but they must be kept separate from each other to maintain the striped pattern.
Phase 4: The Base (Cyan)
The Cyan sand serves as the floor for the composition. It is scattered in the middle-right and bottom-right clusters. This should be your final layer. Pouring the Cyan floor too early risks having it mix with the Magenta vertical stripes, creating a muddy purple-brown sludge at the bottom of the canvas. By saving Cyan for the end, you ensure that the bottom border is clean and sharp, sealing the artwork. This order—Body -> Details -> Top Background -> Bottom Floor—is the only sequence that guarantees a clean separation of colors.
Why Order Matters
Gravity is the enemy of disorder. If you pour light, low-volume colors (like the Blue or Pink) first and then try to dump heavy, high-volume Yellow on top, the heavy sand pushes the light sand out of its lane. This "sand displacement" physics means you must build the heavy anchors (Yellow) first to act as a dam, holding the lighter colors in place. Reversing this order guarantees a muddy, failed canvas.
Visualizing the Layers
Think of the canvas as a 3D space. The Yellow body is the "ground floor." The Blue glasses are the "first floor" balcony. The Pink/Magenta stripes are the "roof," and the Cyan is the "foundation." You cannot build the roof before the ground, and you cannot pour the foundation after the interior is decorated. Adhering to this construction logic prevents the "floating sand" glitch where colors hover incorrectly.
Step-by-Step Walkthrough Instructions
Step 1: The Immediate "Eye" Opener
Upon starting the level, do not touch the sides yet. Look directly at the top center of the grid, jutting out above the main T-Blocker. You will see two Blue cups. These are the sunglasses. Tap them immediately. They are unobstructed and will begin the pour for the most delicate detail. By starting these first, you ensure that the "Danger Zone" of the blue glasses is being addressed while your conveyor belt is completely empty, giving you maximum control over the queue as these cups drain slowly.
Step 2: Clearing the Lanes (Top Left and Right)
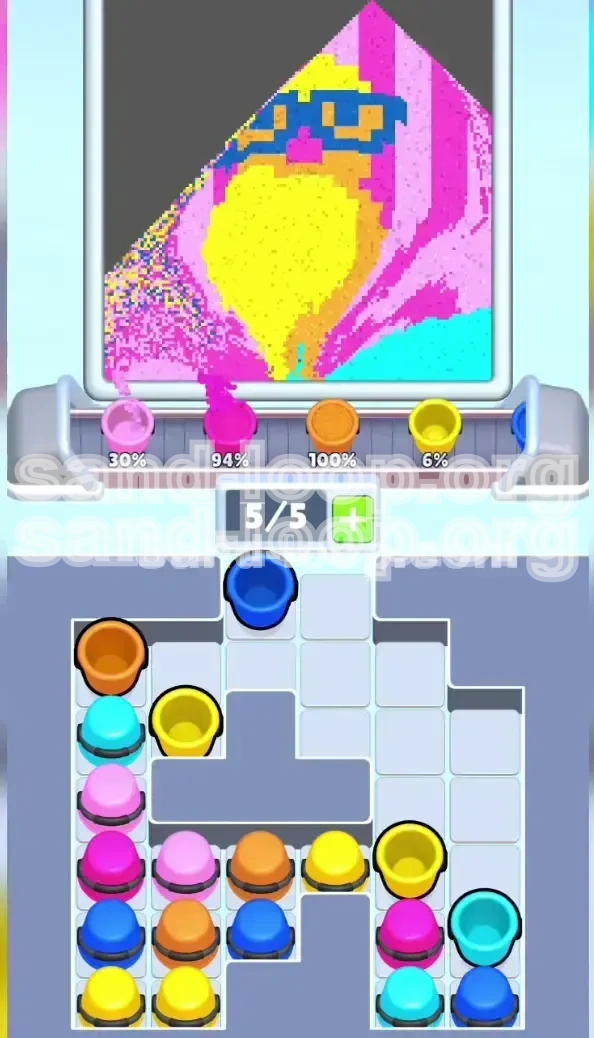
With the Blue cups draining (and taking up 2 slots), turn your attention to the top-left and top-right corners. You need to clear the debris to reach the sides of the T-Blocker. Tap the top-left Orange cup. Immediately follow by tapping the top-right Cyan cup. At this point, you will have 4 cups on your belt (2 Blue, 1 Orange, 1 Cyan). Stop tapping. Let these ride. Do not be tempted to clear the rest of the row yet. You are intentionally creating a traffic jam to force yourself to wait for the first batch to drain, preventing you from flooding the belt.
Step 3: The "Dig Down" Maneuver
As the Orange and Cyan cups from Step 2 finish draining, your slots will free up. Watch the grid closely. Removing the top cups will expose the next layer: Light Pink and Magenta cups on the left and right sides. These are blocking your path to the Yellow goldmine at the bottom. Tap the newly exposed Light Pink cups on the left and the Magenta cups on the right. Add them to the queue one by one as the previous cups empty. Your goal here is simply to remove the top layers of the "sandwich" to get to the filling inside.
Step 4: Securing the Yellow Core
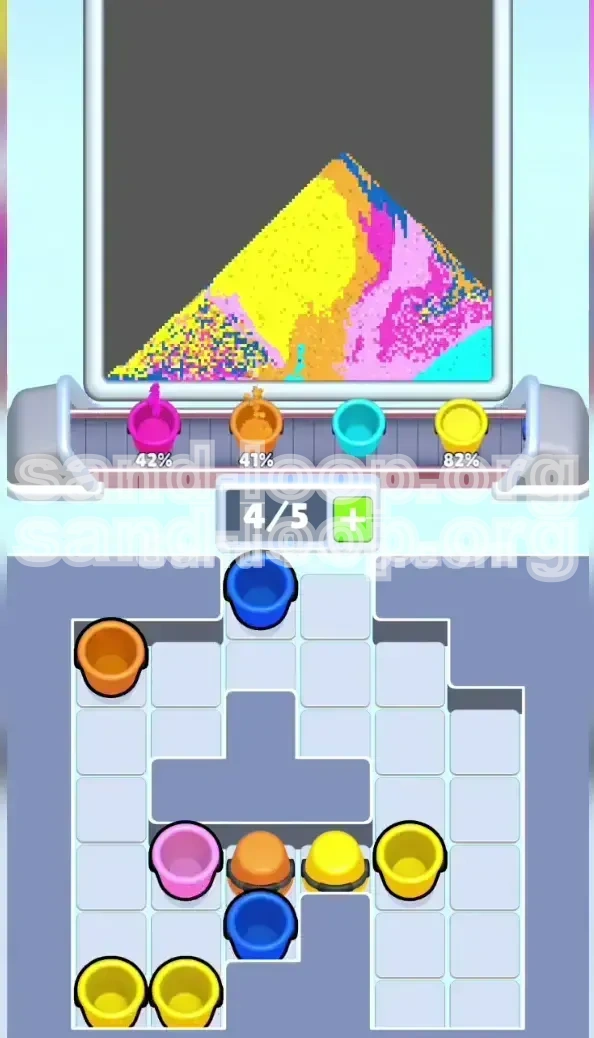
Once you have dug past the Pink/Magenta layer, the massive Yellow cups at the bottom left and bottom right will become accessible. This is the most critical moment. Your belt might still have a Pink or Magenta cup draining. Wait for the percentage to drop below 50%. Then, rapidly tap the bottom-left Yellow cups and the bottom-right Yellow cups. You want to flood the belt with Yellow now because it forms the base. The large volume of Yellow will take the longest to pour, effectively locking in your main color while you prepare for the final background adjustments.
Step 5: Cleaning Up the Background
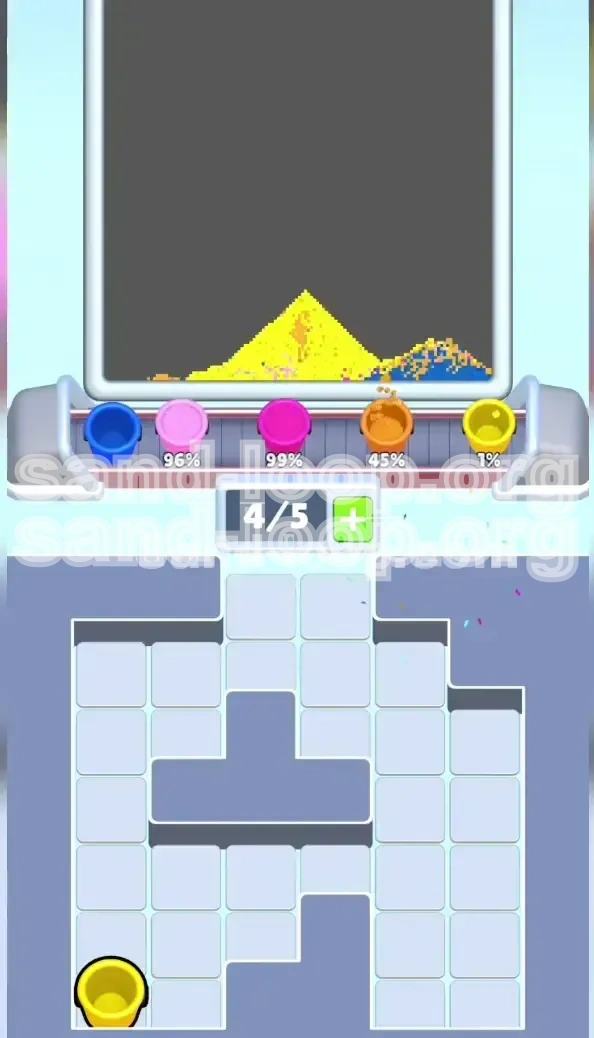
With the Yellow core pouring and the belt full of the massive body colors, shift your focus to the remaining scattered cups. You likely have isolated Cyan cups or leftover Magenta clusters in the middle rows. Now that the main body is established, you can safely pour these background colors. Tap the remaining Cyan cups to finish the floor, and touch up any remaining Pink stripes. Since the main body is already filled, these background pours won't contaminate the critical yellow areas.
Final Polish
Once all cups are tapped, the game transitions to a waiting period. Watch the percentage counters. If a cup is stuck at 1% for more than a few seconds, check if it is physically blocked by the T-Blocker. If it is, you may need to tilt your device slightly (if supported) or just wait for the physics engine to resolve the collision. Do not exit the app; just let the sand settle.
Key Tips for Success
Monitor the Percentage Counters
The numerical percentage displayed on each cup is your best friend, more so than the visual fill level. Do not rely on your eyes to guess when a cup is empty. Watch the numbers. If you have a cup at 5% and another at 95%, you know you have approximately 3 seconds before a slot opens up. Use this data to time your taps perfectly. Never tap a new cup if your total active pouring percentage is summing up to a full drain cycle that would overlap beyond your capacity.
The "One-Beat" Rule
To maintain rhythm and prevent overloading the queue, adopt the "One-Beat" rule. After tapping a cup to load it onto the conveyor belt, count to one (or wait a full second) before tapping another. This slight delay forces you to consciously evaluate if you have space. It breaks the "spam tapping" habit that leads to 5/5 deadlocks. This pause is usually enough time to realize a cup is almost done and prevents you from making a panic move.
Park Your Colors
If you dig up a cup that you don't need right now (e.g., a Cyan cup while you are still trying to reach the Yellow layer), you don't always have to tap it immediately. However, in Level 463, you often need to move it to get to the cup below it. If you must tap an unwanted cup, treat it as "Park and Pay." You tap it to move it out of the grid, but you must mentally account for its slot usage. Ideally, try to structure your moves so you only tap cups you intend to pour immediately to keep the slot economy fluid.
Visualize the Pixel Layers
Before you tap, visualize where the sand will land. The Yellow body is a contiguous block. The background stripes are vertical. If you pour a background color while the Yellow is only partially settled, the background sand might slide off the yellow pyramid and mix with the floor. Ensure the previous layer has settled sufficiently before dumping the next color on top. This "mental simulation" helps you realize why the order (Yellow first, Cyan last) is non-negotiable.
Handling the T-Blocker
Do not view the T-Blocker as an obstacle, but as a guide. It forces the separation of the Pink and Magenta stripes. Use the T-Blocker's vertical edge as a visual landmark. If sand is crossing that line, you are pouring too fast or from the wrong side. The T-Blocker effectively guarantees that the left side and right side of the canvas remain independent until they meet at the Yellow body.
Queue Prioritization
Not all slots are created equal. Slots 1 and 2 (closest to the sand bucket) drain fastest. Slots 4 and 5 (furthest away) have a travel time delay. When planning your queue, place the slowest-draining, large cups (like the big Yellow ones) in Slots 1 and 2 if possible, or accept that they will take the longest. Place small "filler" cups (like the Blue glasses) in the back slots so they can drain while you are busy tapping other things.
Common Mistakes to Avoid
The "Slot Economy" Trap
The most common failure in Level 463 is hitting the 5/5 capacity limit. This happens when players try to clear the grid too fast. They tap the top row, then the second row, then the third row in quick succession. Suddenly, the belt is full of Pink, Magenta, and Cyan, and the crucial Yellow cups are still buried. The belt stops, and the game is lost. Remember: the grid is not a race; it is a queue management puzzle. Slow down your tapping to match the drain speed.
Color Contamination of the Sunglasses
Players often focus on the big Yellow body first and leave the Blue sunglasses for the end. This is a mistake. If the Yellow body is already poured, and you try to pour Blue into the small eye sockets, the surrounding Yellow sand (which might be slightly overfilled or uneven) can mix with the Blue, turning it green or muddy. Furthermore, if you pour background stripes last, they can bleed into the top of the glasses. Always prioritize the Blue sunglasses early or in the middle of the cycle, never last.
Ignoring the T-Blocker Bottleneck
The T-Blocker dictates the flow. A common mistake is trying to clear the center of the grid. You cannot. Stop trying to tap the cups hidden behind the gray T-block. You must work the left and right columns exclusively. If you find yourself frustrated that you can't reach a cup in the middle, you are ignoring the level's design. Shift your focus to the outer columns; the middle will clear itself as the top layers are removed.
Mixing the Background Floors
Don't pour the Cyan floor at the same time as the Magenta stripes. If a Magenta stripe is still draining (at 20%) and you pour a Cyan floor cup that starts draining immediately, the conveyors will overlap. If they drain simultaneously, the sand streams will mix in the air or in the container, creating a muddy brown-purple mix at the bottom of the canvas. Ensure the vertical stripes (Magenta) are 100% finished before you start the horizontal floor layer (Cyan).
Panic Tapping
When players see a complex grid, the instinct is to tap everything to "clear the view." This is fatal in Level 463. Panic tapping leads to the 5/5 deadlock. If you feel overwhelmed, stop tapping entirely. Watch one cup drain. Take a breath. The level will not time out on you; patience is the only mechanic that beats the clock here.
Misjudging Sand Volume
The Yellow cups look small on the grid, but they contain a massive amount of sand. Do not assume that because a cup is small, it will drain quickly. The game often packs high-volume colors into deceptively small containers. Always assume a new color type will take longer than expected to drain and leave a buffer slot empty just in case.
Solutions for When You Are Stuck
Diagnosing a Deadlock
If your conveyor belt has stopped moving, you are in a deadlock. Check the number of cups. If it is at 5/5, you have overloaded the queue. The solution is patience. You cannot fix this by tapping faster. You must wait for the cup with the lowest percentage to drain. If you have multiple cups at high percentages (e.g., all above 80%), you have a few seconds of wait time. Use this moment to take a breath. Do not restart immediately; often the queue will clear itself if you just wait 10 seconds.
Recovering from Bad Order
If you accidentally poured the background Cyan before the Yellow body, you might feel the need to restart. However, you can sometimes salvage the run. If the floor is poured, the subsequent Yellow body sand will cover most of it. The risk is the edges. If the edges of the yellow body mix with the cyan floor, it looks messy. If this happens, focus on pouring the remaining Yellow very carefully to try and bury the mistake. If the mistake is in the sunglasses (Blue mixed with Yellow), however, a restart is the only option, as pixel art details cannot be fixed once mixed.
Unblocking the Grid
Sometimes players get stuck because they feel they have "no moves." All remaining cups seem blocked by the T-Blocker or each other. If you are stuck, look at the top-most layer of the "stack" in the left and right columns. There is always at least one cup available to tap on the periphery. If you truly have no moves, it means you have successfully cleared the top layers and are now waiting for the belt to drain to access the bottom layer. In this case, "stuck" just means "wait for the queue to empty."
Dealing with "Floaters"
Sometimes a cup drains, but the sand floats on top of another color instead of settling into its pixel. This is a physics engine hiccup. To fix this, try tapping the side of your device or waiting for the sand below to settle further. If the sand refuses to sink, you may have to restart, as this pixel will never fill correctly.
Resetting the Strategy
If you have failed three times in a row at the same step, your strategy is wrong, not your execution. If you keep getting stuck at 4/5 slots, you are tapping too fast. If you keep mixing colors, your order is wrong. Step back and re-evaluate the phase order. Are you trying to do the background before the face? Switch the order. The game is logic-based, not skill-based.
When to Quit
Know when a run is unsalvageable. If the Blue sunglasses are already green (mixed with Yellow), stop playing. You cannot fix it. If the Yellow body is only 50% done but the belt is full of background colors, restart immediately. Playing out a lost run wastes time and builds frustration.
Speed Run Tips and Shortcuts
Pre-Loading the Queue
For experienced players looking to speed run Level 463, the key is "Pre-Loading." You don't have to wait for a cup to finish 100% before tapping the next one. You can tap the next cup when the previous one is at roughly 15-20%. This ensures that as soon as slot 1 opens, slot 2 is already moving into position. This keeps the conveyor belt moving at maximum velocity without ever triggering the 5/5 overload alarm. It requires predicting the drain rate, which gets faster as the level progresses.
The "Top-Down" Sweep Strategy
Instead of clearing the left side then the right side, use a "Top-Down Sweep" for speed. Tap the available cups on the top row (Left, Center, Right) in a single, fluid motion immediately at the start. This instantly sends 3 cups to the belt. While those drain, immediately target the second row. This method clears the obstruction layers (the "roof" of the grid) as fast as possible, exposing the critical Yellow cups underneath much earlier in the timer. It is a high-risk, high-reward strategy that relies on perfect queue management.
Batch Processing Colors
Group your taps by color type to minimize mental switching time. For example, identify all the "Orange" cups you need to clear to get to the bottom. Tap them in a sequence. Then switch to "Magenta." By batching your cognitive load, you tap faster and more accurately. This prevents the hesitation of "Which color do I need next?" Constantly switching targets slows down your rhythm. Batching keeps the flow state active and significantly reduces your total completion time.
Optimizing the Final 20%
The final 20% of the level (the background cleanup) is where speed runs are won or lost. Once the main body is done, the conveyor belt usually has fewer cups, allowing you to tap faster. Don't let up. Aggressively tap the remaining background stripes. You can afford to overload the queue slightly here (e.g., having 4 cups draining at once) because there are no more complex layers to uncover. Sprint through the final background colors to shave seconds off your clock.
Movement Efficiency
Minimize the distance your finger (or thumb) travels. Organize your taps so you aren't jumping from top-left to bottom-right repeatedly. Clear one quadrant at a time. The less time your finger spends in the air between taps, the faster your queue rotates. This micro-optimization can save 2-3 seconds over the course of the level.
Advanced Slot Management
In a speed run, you want to operate at 4/5 capacity constantly. This is dangerous but fast. To do this safely, you must memorize the drain times. Small cups drain in 3 seconds, large cups in 8. If you have 1 small cup (3s) and 3 large cups (8s), you have a small window to tap a 5th cup when the small one hits 1s left. Mastery of this timing window is the difference between a fast run and a deadlock.