
Level 464
EXPERTHow to solve Sand Loop level 464? Get instant solution for Sand Loop 464 with our step by step solution & video walkthrough. Sand Loop 464 tips and guide.
Play Sand Loop Now
Experience the puzzle challenge firsthand
Game Screenshots
Sand Loop Level Guides
Level Overview: The Strategic Sand Puzzle
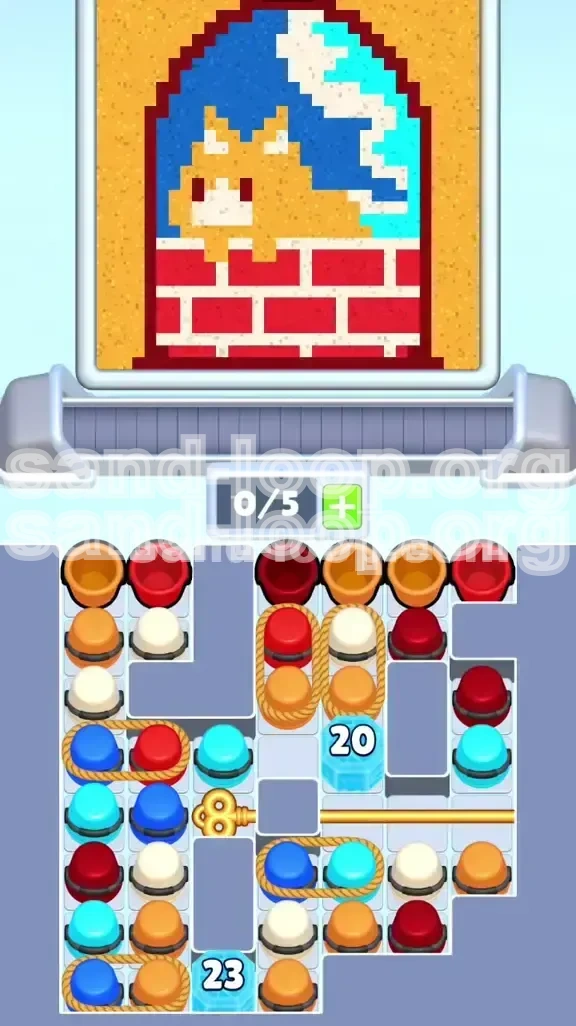
Welcome to the Sand Loop Level 464, a stage that masquerades as a simple art restoration task but functions strictly as a high-level resource management simulation. At first glance, the objective appears straightforward: guide the orange cat out of the red brick chimney. However, the level is built on a foundation of restrictive mechanics that punish impulsive gameplay. Unlike standard puzzles where speed is the primary factor for success, this level demands a rhythmic, calculated approach. The primary challenge here is not the dexterity of your taps, but the ability to forecast the chain reaction of every single move you make.
The Constraint of Five
The defining characteristic of Level 464 is the brutal limitation on your active inventory. You are restricted to a maximum of 5 active slots at any given moment. This constraint turns the game into a tightrope walk where resource management is paramount. If you indiscriminately tap cups to clear the board, you will instantly fill your slots and gridlock your entire tray. Unlike other levels where you can rely on rapid tapping to clear a jam, here you must pause between every sequence of moves to ensure your slots are cycling properly.
Structural Integrity Mechanics
The canvas is governed by a strict physics engine that enforces a specific order of operations. The game world is divided into zones that behave like containers. If you attempt to fill the "light" background zones (the sky) before solidifying the "heavy" foreground objects (the cat and chimney), the lighter sand will bleed into the unfinished zones. This creates a contaminated mix that is impossible to fix without a restart. The level forces you to respect the structural integrity of the image: the foundation must be laid before the scenery is added.
The Ice Block Gatekeeper
Progression is strictly gated behind a massive "20-count" Ice Block located in the upper center of the board. This block acts as a physical dam, preventing access to the colors required for the background. Until you chip this block down completely, you are forced to play a limited subset of colors, effectively forcing the player into the correct strategic path through design. This bottleneck is intentional; it prevents you from accessing the dangerous background colors until you have proven you can manage the foreground.
The Soft Lock Danger
A "soft lock" in this context occurs when your tray is full of cups that cannot be matched immediately, but you have no open slots to accept new cups from the conveyor. Level 464 is engineered to induce soft locks if you prioritize the wrong colors. The supply tray generates cups in a specific sequence, and if you waste your limited slots on background colors (Blue/Cyan) too early, you will run out of space to clear the foreground obstacles. This leads to a deadlock where the game effectively stops, forcing a level restart.
Visual Hierarchy vs. Gameplay Priority
Visually, the level suggests that the sky and the cat are equally important. However, the reality of the gameplay is that roughly 70% of your strategic focus must be on the Orange and Dark Red elements. The White, Cyan, and Dark Blue elements are secondary and exist primarily to clean up the board after the main structural work is done. Recognizing this hierarchy—function over aesthetics—is the first step to beating the level. You must ignore the temptation to "paint what you see" in favor of "playing what the logic dictates."
Clear Objectives and Strategy
To conquer Level 464, you must abandon the instinct to clear the board randomly or based on visual completeness. Your primary objective is to manage the limited slot capacity while navigating a strict color hierarchy. The goal is not just to paint the picture, but to manipulate the supply tray to keep the game flowing without hitting a deadlock.
Objective 1: Establish the Foreground Foundation
Your immediate and most critical goal is to complete the Orange Cat and the Dark Red Chimney. These elements represent the structural core of the image. Because they are centrally located and surrounded by other colors, they must be filled first to act as a dam. If the sky is filled before the cat is solid, the sand will bleed into the orange zones, creating a contaminated mix. Treat the cat and chimney not as drawing targets, but as structural walls that must be built to protect the rest of the board.
Objective 2: Manage the Ice Block
The "20" Ice Block is the gatekeeper of the level. You cannot access the bottom half of the supply tray until this block is destroyed. Therefore, a secondary objective is to efficiently chip away at this block using only the available Red and Orange cups. You must treat every cup of Red or Orange as a tool to break this ice, rather than just a pigment for the canvas. Efficiency here is key; wasted moves on non-ice colors delay your progression to the second half of the level.
Objective 3: Unlock the Golden Key
Located behind the Ice Block, the Golden Key is essential for progression. It separates the foreground colors from the background colors. Your strategy must focus on clearing the top of the board efficiently to reach and turn this key. Once the key turns, the board state shifts dramatically, unlocking the bottom half of the tray and introducing the final set of challenges. Do not focus on anything else until this key is activated.
Objective 4: Execute the Sky Fill
After the key is turned and the foreground is stable, the final objective is to fill the background. This requires careful slot management again, as you will likely be dealing with a tray full of Cyan and Dark Blue cups. The challenge here is to empty these cups without clogging your slots with the few remaining White or Red cups that might still be lingering. The sky fill must be done in a specific order to avoid overflow.
Objective 5: Maintain Slot Velocity
Throughout the level, your overarching objective is to maintain "Slot Velocity"—the rate at which your slots empty. You should aim to never sit at 5/5 slots for more than a second. Keeping 1 or 2 slots open at all times ensures that when the conveyor belt delivers a critical color, you have the capacity to grab it. This velocity prevents soft locks and keeps the game flow moving smoothly.
Step-by-Step Walkthrough
This guide breaks down the level into three distinct phases. Follow these steps in order to ensure a smooth completion. Do not deviate from the sequence, as the level is designed to punish unstructured play.
Phase 1: The Opening Moves (Breaking the Ice)
When the level starts, do not tap anything immediately. Assess the board. You will see a "20" Ice Block flanked by Roped Cups of Red and Orange. The supply tray at the top will likely offer a mix of colors, but you must exercise strict discipline.
- Step 1: Scan the board for "loose" (non-roped) Dark Red cups. Tap these first to begin filling the chimney bricks. This establishes your first color match and starts the flow.
- Step 2: Identify the Roped Cups. These usually contain a Red cup tied to an Orange cup. Tapping this counts as a massive double-hit against the Ice Block.
- Step 3: Tap the Roped Cups. This sends two cups to the conveyor and chips 2 points (or more, depending on combo) off the Ice Block. Watch the slots fill up—stop before you hit 5.
- Step 4: Pause and observe. Watch the conveyor. Do not fill your 5 slots. Wait for the first set of cups to empty under the dispensers before grabbing the next set.
- Step 5: Repeat this process, focusing exclusively on Red and Orange, until the "20" Ice Block counter hits zero. Ignore any other colors that appear.
Phase 2: The Golden Key Transition
Once the Ice Block shatters, the path to the Golden Key is clear. This is the most dangerous moment in the level because the board state shifts.
- Step 1: With the ice gone, look for the Golden Key icon on the board. It is likely guarded by a few remaining cups.
- Step 2: Clear the cups directly adjacent to the key to turn it gold and activate it. This usually requires tapping the remaining Red/Orange cups.
- Step 3: CRITICAL PAUSE POINT: The moment the key turns, the board configuration changes. New Ice Blocks (a "23" block and a "2" block) appear at the bottom. Do not spam taps here.
- Step 4: Finish clearing any remaining foreground cups (Red/Orange) that are still on the board. You want the Cat and Chimney to be 100% complete before moving on.
- Step 5: Only once the top half of the screen is solid Orange and Red should you look down at the bottom half of the tray.
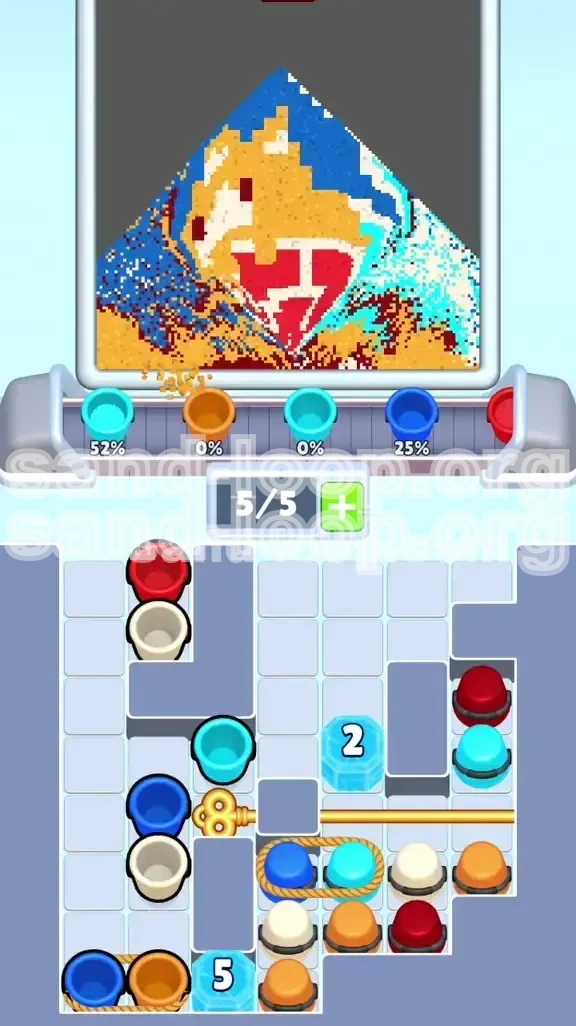
Phase 3: The Bottom Tray and Sky Fill
Now that the Key is active, you have access to Cyan, Dark Blue, and White cups. You also have a new set of Ice Blocks to deal with.
- Step 1: Locate the "2" Ice Block in the bottom middle. It is usually trapped under Roped Cyan/Blue cups. Break this immediately to free up the flow.
- Step 2: Focus on the White cups. Use these to fill the smoke trails and the mortar lines between bricks. White is a "safe" color as it doesn't bleed much.
- Step 3: Tackle the "23" Ice Block in the bottom left. This requires matching Dark Blue and Cyan cups systematically.
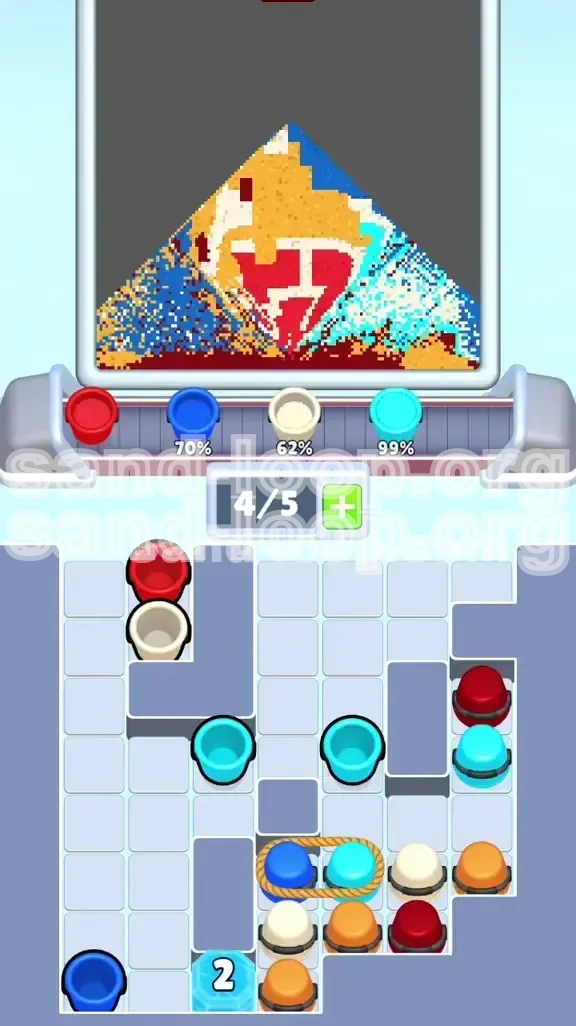
- Step 4: Switch to "Background Mode." Start tapping Cyan cups to fill the right side of the sky. This side usually fills up to 99% very quickly.
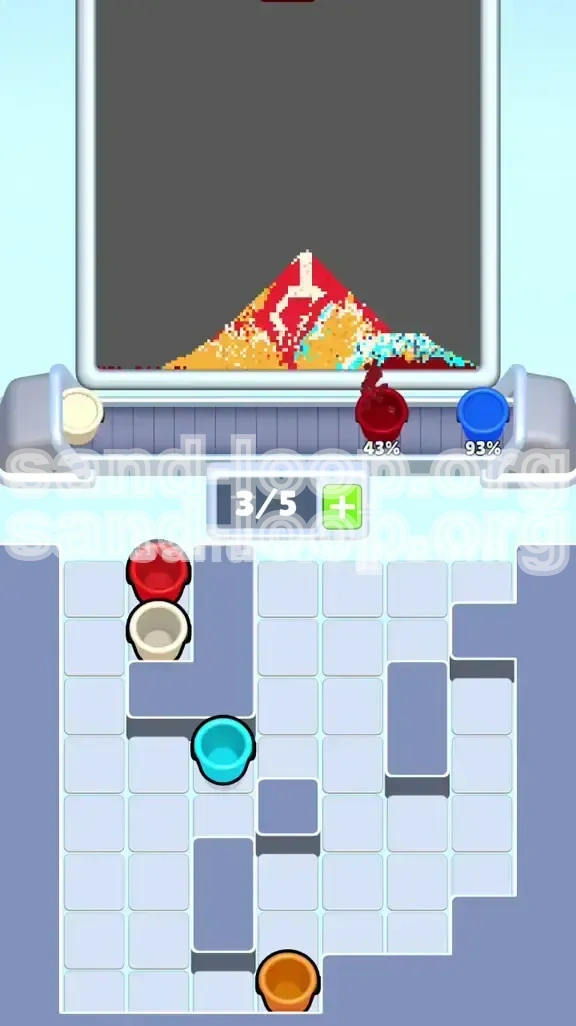
- Step 5: Finish with Dark Blue. Once the Cyan is done, pour the Dark Blue into the upper left sky. The solid structures you built earlier will act as a dam, keeping the blue sand contained in its correct zone.
Color Order and Processing Logic
The specific order in which you process colors is the mathematical solution to this level. Processing colors in the wrong order is the primary cause of failure. Follow this hierarchy precisely.
Priority 1: Dark Red (The Base)
Dark Red must be processed first for two reasons. First, the chimney bricks are large and act as a container for the rest of the image. Second, the Roped Cups required to break the initial Ice Block are almost always Red. By prioritizing Red, you are simultaneously building the image and clearing the path to the next stage. Do not hold Red cups; send them to the conveyor the moment you see them.
Priority 2: Orange (The Center)
Orange is your second priority. The cat is the focal point, and its body is large. Like Red, Orange is often tied up in the Roped Cups at the start. You want to get the Orange sand pouring as early as possible to ensure that by the time the background colors unlock, you don't accidentally contaminate the cat zone with blue sky sand.
Priority 3: White (The Detail)
White is your "clean up" color. It is used for the smoke and the thin lines between bricks. Because these areas are thin, they can be finicky. However, White sand is generally safe to pour mid-stage. It does not interact aggressively with the Red or Orange zones. Save White for when you are waiting for your slots to clear from the heavy Red/Orange pours.
Priority 4: Cyan (The Right Sky)
Cyan is a background color and must be treated as such. If you pour Cyan while the Cat is still empty, the Cyan will flow into the Cat's ears and face. Do not touch Cyan until the Cat is 100% complete and the Key is turned. Once you start, Cyan is low-risk because it fills the large open space on the right.
Priority 5: Dark Blue (The Final Layer)
Dark Blue is the absolute last thing you should touch. It is located in the upper left, and it is the most dangerous color regarding spills. If poured too early, it will flow down the chimney and ruin the Red bricks. Furthermore, the "23" Ice Block guarding the final game mechanics is usually tied to Dark Blue. You must process the other colors to free up the slot space needed to break this final block.
Key Tips and Common Mistakes
To secure your victory, keep these practical tips in mind and avoid the pitfalls that trap most players. This section focuses on the subtle mechanics that can ruin an otherwise perfect run.
Tip 1: The "Three-Match" Rhythm
Develop a rhythm of matching three cups, then stopping. Watch the conveyor belt. Wait for those three cups to pour and disappear (freeing up 3 slots), then grab the next three. If you match 5 cups rapidly, you have zero buffer. If a sudden Roped Cup appears, you have no room for it. The "Three-Match" rhythm keeps you safe from soft locks.
Tip 2: Ignore the Progress Bar
Don't watch the percentage completion of the colors at the top of the screen. In this level, the progress bar is a distraction. You might have 90% Blue ready, but if you pour it, you lose. Trust the visual state of the canvas (the pixel art) over the numerical progress bar. The level is won by visual isolation, not percentage completion.
Common Mistake: The "Sky First" Trap
The most common mistake is trying to clear the background (Blue/Cyan) because it looks easy or because there are many Blue cups available. Do not do this. The game gives you those cups to tempt you. If you fill the sky first, the sand will overflow into the empty cat and chimney slots, creating a muddy purple/brown mess that is impossible to separate.
Common Mistake: Overloading the Conveyor
Players often try to "speed run" the Ice Block phase by tapping every Red cup they see. This jams the conveyor belt. The dispensers at the bottom can only process so much sand at once. If you send 10 cups down, they will queue up, and your slots will remain full, preventing you from interacting with the board. You must wait for the sand to pour before sending more.
Stuck Solution: Soft Resetting Slots
If you find yourself stuck with 4/5 slots full and no matches available (a soft lock), look for the "Roped" pairs. Even if the colors aren't perfect (e.g., a Blue/White pair), tapping it might be necessary just to free up the slots. Sometimes, taking a small penalty in paint purity is worth it to regain the ability to move the board. It's better to have a slightly messy board than a frozen one.
Speed Run Tip: Pre-Loading
For experienced players looking to optimize time, you can "pre-load" the conveyor. As the last of the Ice Block is breaking (when it has 1 or 2 points left), you can start tapping the background cups (Blue/Cyan) that are already visible. They will sit in your 5 slots. The moment the ice breaks and the key turns, those cups are ready to be sent to the conveyor immediately, shaving seconds off your time. This requires precise confidence in your remaining slot count.