
Level 465
HARDHow to solve Sand Loop level 465? Get instant solution for Sand Loop 465 with our step by step solution & video walkthrough. Sand Loop 465 tips and guide.
Play Sand Loop Now
Experience the puzzle challenge firsthand
Game Screenshots
Sand Loop Level Guides
Level Overview: The "Cozy Living Room" Challenge
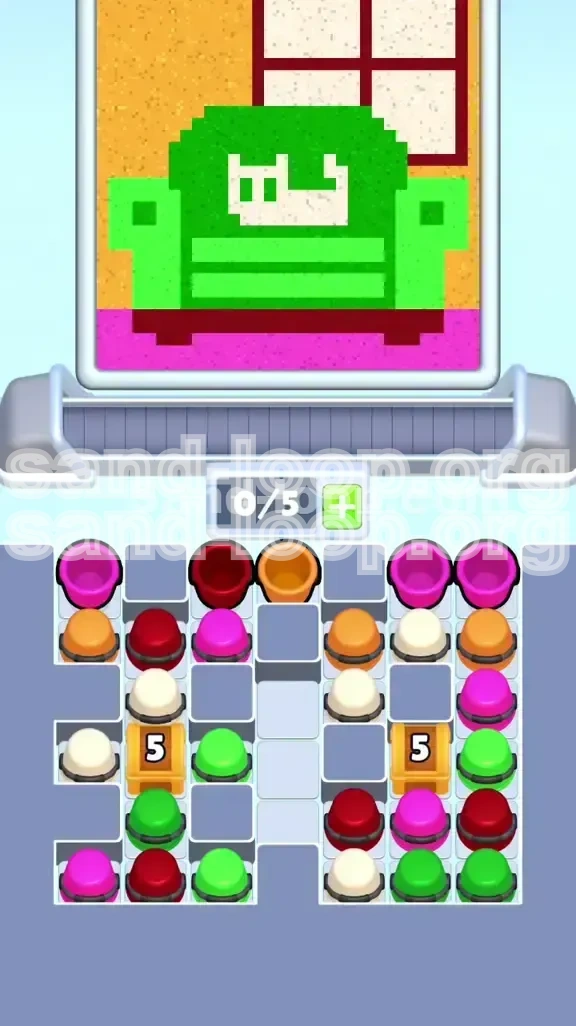
Sand Loop Level 465, often referred to as the "Cat on the Green Armchair" stage, is a deceptive puzzle that tests your ability to manage limited inventory space under pressure. At first glance, the pixel art—a serene scene of a white cat resting on a large green chair—seems inviting. However, the reality of the gameplay is a high-stakes logistical nightmare.
The primary difficulty in this stage lies in the "5-Count Lock Boxes." These are not merely obstacles; they are bottlenecks that determine the flow of the entire level. You are dealing with a 5-slot conveyor capacity, which is extremely tight. The game forces you to make difficult choices about which colors to process first to prevent a deadlock. Unlike levels where you can simply tap randomly, Level 465 requires a strict dependency chain. You cannot access the primary colors (Green and White) until you have cleared the path by cycling through the secondary colors.
Statistically, this level has a high failure rate for players who prioritize the largest color block (the Green Armchair) first. The game's mechanics are designed to punish greed. If you fill your conveyor with Green cups before unlocking the bottom tray, you will run out of moves, leaving the puzzle unsolved. Success in this level depends on your patience and your ability to resist the urge to fill the big areas immediately.
The 5-Slot Conveyor Constraint
Your conveyor belt in this level is restricted to a maximum capacity of 5 slots. This is the most critical mechanical constraint you face. Every cup occupies a slot until it passes under the sand dispenser and is emptied. If you fill all 5 slots with cups that are not currently under the dispenser, you enter a "soft lock" state where you cannot add new cups to the belt, and you cannot process the existing ones fast enough. This bottleneck is the leading cause of failure in Level 465. You must constantly monitor the "0/5 Capacity" bar at the top of your screen.
Strategic Resource Management
Resources in Level 465 are not just the sand; they are the "slots" on your belt and the "space" in the supply tray. The supply tray is layered. The most critical colors for the cat and the chair (White and Bright Green) are buried underneath layers of less critical colors like Orange and Dark Red. You must treat the early game as a mining operation. You are digging for the good colors by efficiently disposing of the blocking colors.
The "Cat" Complexity Factor
The White Cat is the "Complexity Factor" of this level. It is a small, detailed object located in the center of the largest object (the Green Armchair). In many puzzle games, you would fill the background first and then add the details. However, due to the lock mechanics, you might find yourself pouring Green sand while you still need to preserve space for the White cat. This requires precision. If you over-pour the Green sand, you will bury the cat's area, making it nearly impossible to place the White pixels accurately without creating a muddy, low-resolution edge. You must leave "negative space" for the cat while filling the chair.
Visual Breakdown of the Puzzle
The puzzle image is divided into five distinct color zones. The Bright Green zone occupies approximately 50% of the image, comprising the armchair. The Orange/Tan zone makes up the background wall, accounting for about 20% of the image. The Pink floor covers the bottom 10%, while the Dark Red window and shadow details cover another 15%. Finally, the White elements—the cat, window frame, and highlights—make up the remaining 5%. Understanding these percentages helps you prioritize. The Green zone is largest, but it is locked. The Pink and Dark Red zones are smaller, but they are the key to unlocking the level.
Mechanic: The Golden Lock Boxes
The Golden Lock Boxes are the gatekeepers of Level 465. These boxes appear in the lower-left and lower-right quadrants of the supply tray. They sit directly on top of the stacks of Bright Green and White cups. The mechanic is simple but demanding: each box has a counter of "5". To remove the box, you must successfully process 5 cups of the colors that are currently accessible (initially Pink, Dark Red, and Orange). You cannot simply tap 5 cups at once; you must wait for them to travel to the dispenser, pour, and exit the belt. Only when the cup is empty does the count decrement. This creates a natural rhythm to the game: Tap, Wait, Pour, Release.
Primary Objectives and Win Conditions
To clear Level 465, you must achieve 100% fill accuracy across all color zones. However, simply filling the colors is not enough; you must fill them in an order that keeps the supply tray moving. Your primary objective is not just "fill the chair," but rather "unlock the tray."
The first major objective is Breaking the Locks. You cannot start the main puzzle until the two Golden Lock Boxes are removed. This requires you to process 10 cups total (5 for each lock) using only the top-layer colors. This phase is a race against your own patience. If you rush and tap too many cups, you clog the belt. If you tap too few, the process is too slow.
The second major objective is The Chair and Cat Maneuver. Once the locks are broken, you gain access to the Bright Green and White cups. The objective here is to fill the massive Green chair without compromising the integrity of the White cat. This requires you to switch colors rapidly. You might pour 80% of the chair, then switch to White for the cat, then finish the remaining 20% of the chair. This "interleaving" of colors is the advanced skill required to beat this level.
The final objective is Detail Perfection. The window frame and the floor shadows are small areas that are easily missed. In the final stages of the level, you will likely have a mix of random colors left on the tray. Your goal is to match these remaining cups to the few empty pixels left on the canvas. This often requires using "non-matching" colors strategically to clear space, if the game rules allow for discarding, or simply being very precise with your taps to ensure the last 5% of the image is filled correctly.
Objective 1: Unlock the Supply Lines
Your immediate goal is to clear the path to the buried colors. The Bright Green and White cups are currently useless because they are covered by the Golden Lock Boxes. Therefore, your success condition for Phase 1 is purely based on clearing physical space in the tray. You need to cycle the Pink, Dark Red, and Orange cups until the locks vanish. This phase is complete when you see the Green and White cups become clickable.
Objective 2: Clear the Bottom Quadrants
While working on the locks, you should also aim to complete the "Pink Floor" and the "Dark Red" base of the chair. These areas are located at the bottom of the image, and they correspond to the colors you are processing to break the locks. By completing these sections early, you reduce the cognitive load later in the level. You don't want to be worrying about the floor when you are trying to execute the complex Chair/Cat maneuver.
Objective 3: Execute the "Negative Space" Strategy
When you start filling the Green Armchair, you must actively avoid the center seat area where the cat goes. This is counter-intuitive; usually, you want to fill large contiguous blocks. However, your objective is to preserve the "purity" of the White pixels. If you fill the chair completely, and then try to add the cat, you risk pixelation errors. The objective is to pour the Green sand around the cat's silhouette, leaving a "cat-shaped hole" in the green sand, and then fill that hole with White sand.
Objective 4: Manage the 0/5 Capacity Bar
Throughout the entire level, you must maintain a "Safe Capacity" of 3 or 4 cups on the belt. Your objective is to never let the belt reach 5/5 unless those 5 cups are actively being poured. If you have 5 cups waiting in line, you have failed the management objective. You must time your taps so that a new cup enters the belt just as an old cup is leaving it. This keeps the flow continuous and prevents the "Deadlock" scenario.
Objective 5: 100% Color Matching
The ultimate win condition is 100% completion. This means every pixel of the floor is Pink, every pixel of the wall is Orange, and every pixel of the chair is Green, except for the specific pixels defined as White. There is no margin for error here. A single misplaced color can reduce your completion percentage to 98%, forcing you to restart the level or waste valuable moves trying to fix it.
Step-by-Step Instructions: Phase 1 - The Lockdown
This phase is the most critical. If you make a mistake here, the level is effectively impossible to recover from. Follow these steps precisely. The goal is to remove the Golden Lock Boxes without clogging your conveyor belt.
Step 1: Assess the Top Row
When the level starts, do not tap anything immediately. Look at the top row of the supply tray. You will see a mix of Pink, Dark Red, and Orange cups. Identify the Pink cups first. These are your "Currency" for this phase. You need to use these to fill the floor and chip away at the locks. Do not be tempted by any Green cups you might see peeking out; they are locked and cannot be selected yet.
Step 2: The Initial Tap (Pink Floor)
Locate the two Pink cups, typically found on the far left and far right of the top row. Tap one Pink cup. Watch it move to the conveyor. Wait for it to travel to the sand dispenser. The sand will pour automatically, filling the bottom "Pink Floor" section of the image. As soon as the cup is empty and leaves the screen, tap the second Pink cup. Do not tap both at the same time. Tapping both simultaneously would fill 2 of your 5 slots immediately, which is risky this early. Stagger them to keep your capacity bar around 2/5 or 3/5.
Step 3: Process the Dark Red (Chair Base)
With the Pink floor started, look for the Dark Red cups. These are used for the shadow under the chair and the window panes. Tap one Dark Red cup. It will move onto the belt behind the Pink cup. While the Pink cup is pouring, the Dark Red cup is waiting. This is good queue management. Once the Pink cup exits and the Dark Red cup starts pouring, look for the next available color. If you see another Dark Red, tap it. If you see an Orange, tap it. The goal is to keep the belt moving, but never full.
Step 4: Monitor the Lock Counters
As your cups empty and exit the belt, look at the Golden Lock Boxes on the main tray. Every time a cup finishes pouring, a little golden particle will fly from the dispenser to the lock box, and the number on the box will decrease. You need to see this happen 5 times for each box. This visual cue is your confirmation that you are doing it right. If you tap a cup and it enters the belt, but the lock counter doesn't drop after it pours, you might have tapped the wrong type of cup or encountered a glitch. But usually, it just means you need to wait for the pour to finish.
Step 5: Breaking the First Lock
After you have processed about 4 or 5 cups (mix of Pink and Dark Red), you will see one of the Golden Lock Boxes shatter. This is a major milestone. The shattering effect reveals a new stack of cups underneath. This stack will contain more of the colors you need, and possibly some new ones. Do not stop to celebrate. Immediately look at the newly revealed cups. Are they the colors you need? If they are Green, great! But they might still be blocked by the second lock box.
Step 6: The Orange Cycle (Background Wall)
Once the first lock is down, you still need to clear the second lock. At this point, you might be running low on accessible Pink or Dark Red cups. This is where the Orange cups come in. The Orange/Tan color is for the background wall. It's a large area, so it's a safe place to dump a lot of sand. Tap an Orange cup. Let it pour. As it pours, scan the tray. You are looking for the moment the second lock breaks. When it does, the "Phase 1" objective is complete, and you can move to Phase 2.
Step-by-Step Instructions: Phase 2 - The Main Event
With the locks gone, the real puzzle begins. You now have access to the Bright Green and White cups. This phase is about managing the big colors while saving room for the small details.
Step 7: The Green Flood (The Armchair)
Now that the Green cups are accessible, you will see a lot of them. The Green Armchair is the largest object in the puzzle. You can start tapping Green cups more aggressively now. Tap 2 Green cups in quick succession. Let them fill the main body of the chair. The chair is so big that it's hard to miss the dispenser. However, you must be careful. As the Green sand piles up, it will start to encroach on the seat area.
Step 8: The "Cat Pause" Protocol
This is the most important tactical step in the entire guide. When the Green sand has filled about 70% of the chair, you will see the outline of the seat cushion. Stop tapping Green cups immediately. Even if you have more Green cups waiting, ignore them for a moment. You need to clear the belt and create space for the White cups. Your goal now is to jump to the White color to define the cat before the Green sand makes it impossible.
Step 9: The White Window (Precise Pouring)
Before you do the cat, look for the window. The window frame is also White. If you have White cups on the belt or in the tray, tap one. Align it so the sand pours into the window frame. This is a thinner area, so it requires a bit more precision. Using White here helps you clear out White cups without risking the cat area just yet. It's a good warm-up for the delicate operation of filling the cat.
Step 10: Inserting the Cat (The Core Operation)
Now, ensure your belt is relatively clear. Tap a White cup. Watch the dispenser. You need to catch the moment when the dispenser is directly over the center of the Green Armchair. The White sand will pour, creating the body of the cat. Because you left the Green sand unfinished in Step 8, the White sand will sit nicely on top of the "cushion" of green, creating a sharp contrast. If the cat is small, one cup might be enough. If it's a larger cat, you might need two. Do not over-pour. You only need a small blob of White in the center.
Step 11: The Green Wrap-Up
With the cat successfully placed (a little white blob on a green sea), you can return to the Green cups. The dispenser will likely have moved away from the chair. Wait for it to swing back over the remaining empty parts of the armchair. Tap the remaining Green cups. Finish the legs of the chair, the back of the chair, and the sides. The cat is safe in the middle, and you are filling in the space around it. This completes the "Chair and Cat" complex.
Step-by-Step Instructions: Phase 3 - Final Polish
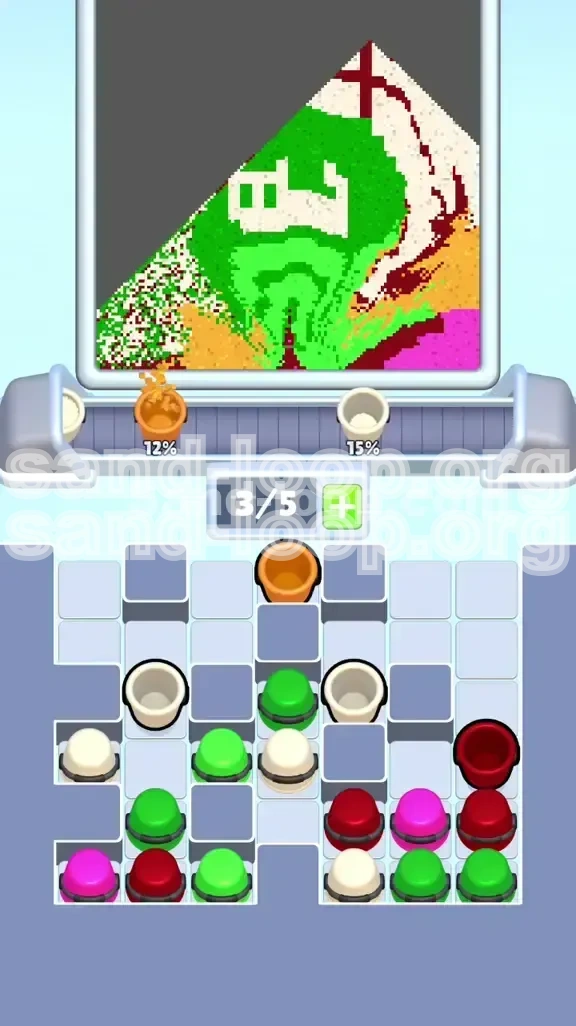
You are in the endgame now. The big blocks of color are done. The level is likely 80-90% complete. This phase is about cleanup and precision.
Step 12: The Background Check (Orange Wall)
Look at the background. Is the Orange/Tan wall completely filled? There are often gaps behind the chair or in the corners that you missed during the "Lockdown" phase. Now is the time to fix them. Tap any remaining Orange cups. These are "safe" taps because the background is huge and forgiving. It's hard to mess up the background. Use this time to clear any Orange cups that are clogging your tray.
Step 13: The Window Panes (Dark Red Detail)
The window is the trickiest part of the final phase. It has Dark Red panes and a White frame. You likely did some of this in Phase 1 or Phase 2. Now, check for any missing pixels. If the window panes are not 100% Dark Red, look for a Dark Red cup. This is a high-precision pour. You might need to wait for the dispenser to align perfectly with the window gaps. This is a test of your patience. Do not tap the cup until the dispenser is in the right position.
Step 14: Clearing the Dead Weight
At this stage, you might find yourself with a tray full of cups for colors that are already 100% full. For example, the Pink floor might be done, but you still have a Pink cup in the tray. You need to get rid of it to see what's underneath. The game usually requires you to use every cup. However, if a color is truly 100% full and you have a leftover cup, you are in a tricky spot. Your only option is to wait for the dispenser to pass over that color's area and "tap" the cup, even if no sand is needed, just to clear it from the tray. This is a common situation in the final 5% of the level.
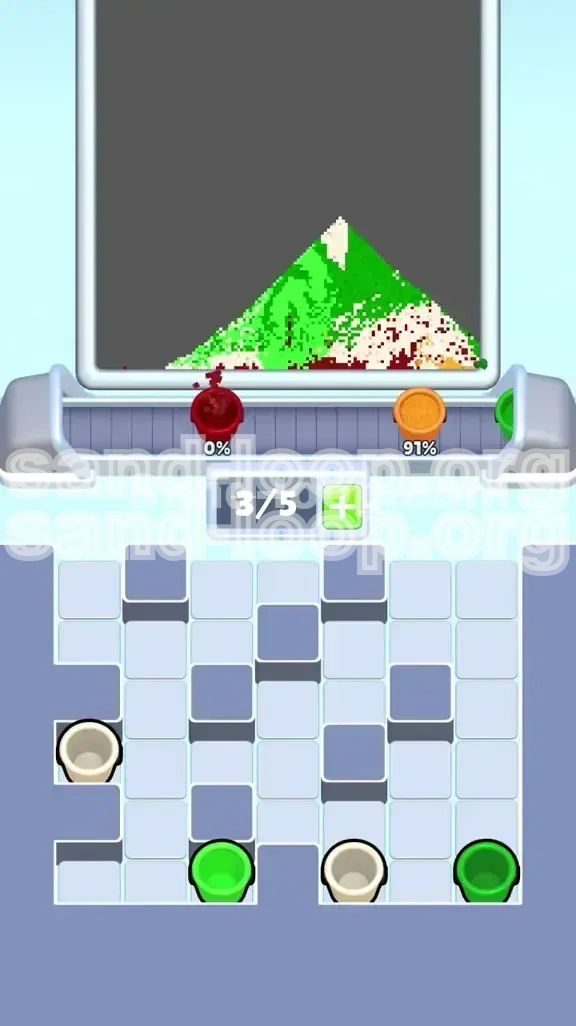
Step 15: The Final Countdown
You are likely at 95-98% completion. Scan the image. Look for any pixels that are not the right color. Is there a spot of Orange on the Green chair? Is there a spot of Pink on the White cat? These small errors are what prevent a 3-star rating or a clear completion. Use your remaining cups to fix these tiny mistakes. This is the moment of truth. A single, well-timed tap on the last correct cup will push you to 100% and trigger the victory animation.
Key Tips for "Sand Loop" Success
These tips apply generally to your playstyle but are specifically tailored for the challenges found in Level 465.
Tip 1: The "Rhythm Method" of Tapping
Do not treat the tapping mechanic as a continuous action. Treat it as a rhythmic one. Establish a beat: Tap... Wait... Pour... Exit... Tap.... If you break this rhythm and tap too fast, you will overfill the belt. If you tap too slow, you waste time. Find the groove where a new cup enters the belt just as the previous one is emptying. This optimal flow is what separates good players from great ones.
Tip 2: Queue Management is Key
Always look at the cups that are waiting on the belt, not just the one pouring. If you see a Green cup pouring, and the next cup in line is a White cup, you know you need to be ready to pour the cat. If the next cup in line is an Orange cup, you know you have time to finish the chair. The "queue" is your preview of the next 30 seconds. Use it to plan your strategy.
Tip 3: Don't Fear the "Void"
In Phase 2, we told you to stop pouring Green and leave a hole for the cat. This can feel wrong. Your instinct is to fill everything. Overcome this instinct. In Sand Loop, negative space is a tool. By leaving a part of the image empty, you are preserving a place for a future, more important color. This is a advanced technique called "reservation," and it is essential for levels with small details on large backgrounds.
Tip 4: Use the "Pause" to Plan
Most sand puzzle games have a pause function. Use it! Pause the game after every major phase (after breaking locks, after finishing the chair). Take a moment to look at the tray. Look at the image. Plan your next 3-4 moves. Unpause, execute those moves, and pause again. Thinking ahead is always more valuable than having fast fingers.
Tip 5: Understand "Layering" Logic
The game's art is created by layering sand. The first color you pour is the "base." The second color sits on top. In Level 465, the Green chair is the base, and the White cat is the top layer. This is why the order matters. If you poured the White cat first, and then tried to pour the Green chair around it, the Green sand would bury the cat. Always pour from the "bottom" layer of the image to the "top" layer. Background first, foreground last.
Tip 6: Managing the "End Game" Trays
The final 10% of the level is often the most frustrating because the tray is a mess of random cups. A key tip here is to not panic. Focus on one color at a time. Pick a color, say Dark Red. Hunt down every Dark Red cup and use it to fix every Dark Red pixel. Once Dark Red is 100% done, you can mentally delete that color from your concerns and move on to the next one. Systematically eliminating colors is the best way to finish a messy board.
Common Mistakes to Avoid
Learning what not to do is just as important as learning what to do. These are the most common ways players fail Level 465.
Mistake 1: The "Green Rush"
This is the number one killer of runs. Players see the huge Green Armchair and instinctively start tapping every Green cup they can find, ignoring the locks. They fill their belt with Green cups, which then get stuck behind the Pink and Red cups they are supposed to be using. The belt becomes a parking lot of useless Green sand. The result? A deadlock. You cannot clear the locks, so you cannot get more cups, and you cannot pour the Green cups you have because they are blocked by the full belt. Avoid this by trusting the process. Do not tap Green until the locks are gone.
Mistake 2: Overfilling the "Cat" Zone
Players often pour the Green chair too enthusiastically. They fill the entire seat of the chair, right up to 100%. Then, when they go to place the White cat, there is no distinct "seat" area left. The cat ends up looking like a white spill on the floor, or it doesn't fit at all. The White sand gets lost in the Green. Avoid this by leaving the seat cushion at 80% full. Preserve that central space for the cat.
Mistake 3: Ignoring the "Pink" Foundation
The Pink floor seems unimportant. It's just a strip at the bottom. Players often ignore the Pink cups in the top row because they are focused on the "big picture." This is a mistake. The Pink cups are your key to unlocking the level. By ignoring them, you fail to clear the top row, which prevents you from accessing the cups underneath. Avoid this by treating the Pink floor as a high-priority objective, not a low-priority detail.
Mistake 4: Tapping blindly without looking at the Queue
Players see a color they need, say White for the cat, and they tap it immediately. But they don't check the conveyor belt. There are already 3 cups on the belt, and the dispenser is on the other side of the screen. By the time the White cup arrives, the dispenser is over the floor, and the White sand pours uselessly onto the Pink floor. Avoid this by always checking the position of the dispenser before you tap. Anticipate where the dispenser will be, not where it is.
Mistake 5: Wasting the "Orange" Clearing Power
Orange is a very common color in this level, used for the background wall. Because it's common, players often use it carelessly, pouring it whenever they have a free slot. This is inefficient. You want to use Orange cups strategically to clear large chunks of the background wall all at once, not in small dribs and drabs. Avoid this by batching your Orange pours. Wait until you have 2-3 Orange cups queued up, then unleash them to clear a massive section of the wall.
Solutions for When You Are Stuck
Even with the best guide, things can go wrong. The game's randomizer can sometimes give you a bad draw of cups. Here is what to do if you find yourself in a jam.
Stuck Situation 1: The Belt is Full and Locked
The Problem: You have 5 cups on the belt. None of them are the color you need. The dispenser is stuck on a color you don't need. You cannot tap any new cups. The game is frozen.
The Solution: This is a true deadlock. Your only option is to wait. Wait for the current cup to finish pouring. It might be a Pink cup pouring onto an already full Pink floor. It's a waste, but it has to happen. Once that cup exits, a slot opens up. Immediately tap the cup you do need from the tray, even if it's not perfectly positioned. You have to get it on the belt to start moving the queue again. It might take 2-3 wasted pours to clear the bottleneck. Be patient and wait for the logjam to break.
Stuck Situation 2: The "One Pixel" Problem
The Problem: You are at 99% completion. You have one empty pixel left. It is, say, a Dark Red pixel in the window. You look at your tray, and there are no Dark Red cups left. You only have Green and Orange cups left. You cannot finish the level.
The Solution: This usually means you missed a Dark Red cup earlier, or it's buried under another cup. Scan your tray very carefully. Tap a cup to move it if you have to, to see if a Dark Red cup is hiding underneath. If you are 100% sure there are no Dark Red cups left, then you have a "pixel error." The pixel you think is Dark Red might actually be a different color. Zoom in (if possible) or look at the pixel art reference. Maybe that "Dark Red" pixel is actually a deep Orange shadow. Try using an Orange cup on it. If that doesn't work, the level may have bugged out, and you might need to restart.
Stuck Situation 3: The Dispenser Alignment Glitch
The Problem: You need to pour the White cat. The dispenser is moving back and forth. It seems to skip over the chair, or it moves so fast you can't get a clean pour.
The Solution: This is about timing, not a glitch. You need to "lead" your target. Don't tap the White cup when the dispenser is on the chair. Tap it when the dispenser is just approaching the chair. By the time the cup travels to the pour point, the dispenser will have arrived at the chair. It's like leading a target in a shooter game. Practice this timing. It is the only way to hit small targets in a fast-moving level.
Speed Run Tips for the Pros
Once you have mastered the level, you might want to try to complete it as fast as possible for a high score. These tips are for advanced players who are comfortable with the core mechanics.
Speed Run Tip 1: The "Double Tap" Start
At the very beginning of the level, don't just tap one Pink cup. Tap the two Pink cups on the ends of the top row almost simultaneously. This sends two cups to the belt right away. Since the belt is empty, this is safe. It gets the "Floor" objective started twice as fast. This aggressive start saves about 10-15 seconds off your total time.
Speed Run Tip 2: Pre-loading the Queue
While the first Pink cup is pouring, don't just watch. Use that time to scan the tray for the Dark Red cups. Find them. As soon as the first Pink cup is halfway done, tap the Dark Red cup. By the time the Pink cup exits, the Dark Red cup will be perfectly positioned to start pouring immediately. This eliminates the "dead time" between pours. Keeping the dispenser active 100% of the time is the key to a speed run.
Speed Run Tip 3: Batch Processing the Background
Don't fill the background wall one cup at a time. Wait until you have unlocked the Orange cups and have at least 3 of them ready. Then, tap all 3 in quick succession. The dispenser will flow from one Orange cup to the next, painting the entire background wall in one continuous, fast motion. This is much faster than tapping, pouring, waiting, tapping, pouring.
Speed Run Tip 4: The "Cat Dump" Shortcut
For advanced players, you don't need to be perfectly precise with the cat. If you have a large enough area of Green chair prepared, you can pour the White cat quickly, even if it's not perfect. The game's collision detection is somewhat forgiving. If the White sand mostly lands in the center of the chair, it will usually count as the cat. Don't spend 10 seconds trying to get the pixel-perfect outline. Just dump the White sand in the general vicinity and move on. You can clean up the edges with Green sand later.
Speed Run Tip 5: Ignore the "Full" Warning
When a color is 100% full, the game usually gives you a visual cue or sound. In a speed run, you can sometimes ignore this. If you have a Pink cup left over and the floor is full, you can just tap it to get rid of it, as mentioned in the walkthrough. But do it fast. Don't wait for it to pour perfectly over the floor. Just tap it, let it waste its sand, and get it off the tray. The time you save by clearing the tray is worth the wasted sand.