
Level 473
HARDHow to solve Sand Loop level 473? Get instant solution for Sand Loop 473 with our step by step solution & video walkthrough. Sand Loop 473 tips and guide.
Play Sand Loop Now
Experience the puzzle challenge firsthand
Game Screenshots

Sand Loop Level Guides
Level Overview: The Tropical Parrot Challenge
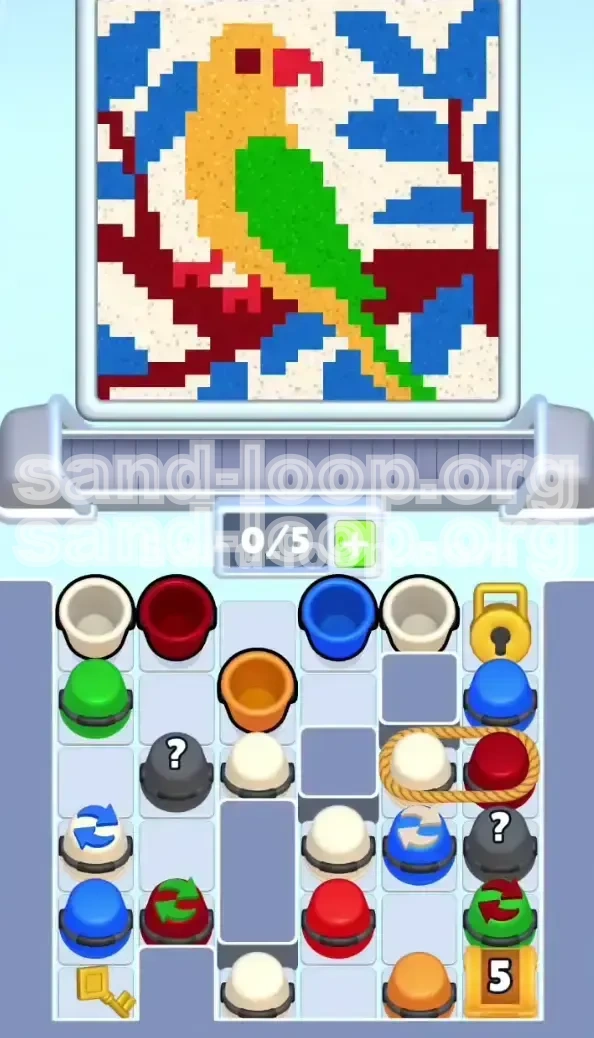
Level 473, titled "The Tropical Parrot," is a deceptively complex puzzle stage that masquerades as a simple art application but functions as a rigorous resource management test. Unlike standard levels where you might focus on a single color group, this stage requires you to manipulate a split-board mechanic involving locked zones and physics-based sand placement. The visual goal is to assemble a vibrant pixel-art parrot, but the gameplay challenge lies in navigating a "Sequence-Breaking" mechanic.
The primary difficulty spike in this level comes from the conveyor belt capacity limit (5 slots) combined with the "Roped Trap" mechanic on the right side of the board. You are forced to manage a strict dependency chain: the right side of the board is physically blocked by a Golden Lock until you solve the puzzle on the left. If you mismanage your inventory space when the lock opens—specifically by triggering the roped cups without empty slots—you will cause an immediate soft-lock, forcing a restart. Furthermore, the sand physics engine is unforgiving; pouring colors in the wrong order will result in "color bleeding," where lighter background colors flood the detailed pixels of the parrot's feet and feathers.
Zone Separation Mechanics
The board is strictly divided into two functional areas: the "Key Zone" (Columns 1-3) and the "Trap Zone" (Columns 4-6). The Key Zone contains standard cups, Recycle-Arrow mechanisms, and the buried Golden Key. The Trap Zone holds the Roped Cups, the Target Box (Orange '5'), and the Golden Lock. Understanding this separation is vital. You cannot effectively work on the right side until the left side has liberated the key. Attempting to clear the Target Box on the right is futile before the lock is broken, as the output is blocked.
The Inventory Crisis
Level 473 is essentially an inventory management puzzle. You have a maximum capacity of five cups on your conveyor belt. The level introduces mechanics that spawn two cups simultaneously (the Roped Pair) or shuffle the board (Recycle Arrows). If your belt has 4 cups and you trigger a pair that adds 2 cups, the game jams. A safe operating buffer is maintaining 3 or fewer active cups at all times, leaving two slots for "emergencies" or sudden board refreshes.
Visual Completion Requirements
To achieve 100% completion, you must satisfy three distinct conditions. First, clear the "Orange 5" target box in the bottom right by matching adjacent color pours. Second, unlock the Golden Lock located in the top row of Column 6. Third, fill the canvas with the correct color hierarchy: Golden Body -> Green Wing -> Crimson Branches -> Blue Foliage -> Cream Background. Failing to follow this priority list results in contamination, where the Cream background floods the delicate red feet of the parrot, rendering the level impossible to complete.
Time and Difficulty Estimation
For an average player, this level will take between 4 to 7 minutes to solve. Speed-runners can clear it in under 90 seconds, but this requires memorizing the specific outcomes of the hidden "?" cups. The difficulty is approximately 30% higher than the previous stages due to the combination of hidden elements and rope mechanics. Patience is your greatest asset; rushing leads to tap errors that jam the conveyor belt.
Soft-Lock Risks
The most common failure state in Level 473 is the "Soft-Lock." This occurs when the conveyor belt is full, and no moves are possible to free up space. This usually happens when players tap a "?" cup or a Roped Pair without calculating the remaining space. Once soft-locked, the game logic cannot recover, and you must restart the entire level. Avoiding this requires predictive planning rather than reactive tapping.
Strategic Phase Breakdown
Before you make your first tap, you need a solid game plan. Rushing into Level 473 without a strategy is the fastest way to fail. This section outlines the macro-strategy you will employ to dismantle the board systematically, breaking the level into six distinct phases of execution.
Phase 1: The Key Extraction (Left Side)
Your immediate priority is the bottom-left corner. The Golden Key is buried under three layers of cups and debris. You cannot touch the right side of the screen until this key is obtained. Attempting to clear the roped cups or the target box on the right is pointless because the Golden Lock blocks the output for that entire section. Focus 100% of your attention on Columns 1 and 2. You need to cycle through the Blue and Green cups sitting atop the key. Do not worry about filling the art perfectly yet; focus entirely on clearing the physical debris obstructing the key.
Phase 2: The Conveyor Preparation
Once the Key is tapped, it flies to the top right and smashes the Golden Lock. This is the "turning point" of the level. At this moment, the difficulty spikes. The right side of the board becomes active, revealing the roped cups. Your strategy must shift instantly from "digging" to "slot management." Before you tap anything on the right, ensure your top conveyor belt is relatively clear. If you have 4 cups waiting to be poured when the lock breaks, you are in trouble. Clear your queue immediately after the key flies up to prepare for the incoming influx of new cups.
Phase 3: The Roped Trap Trigger
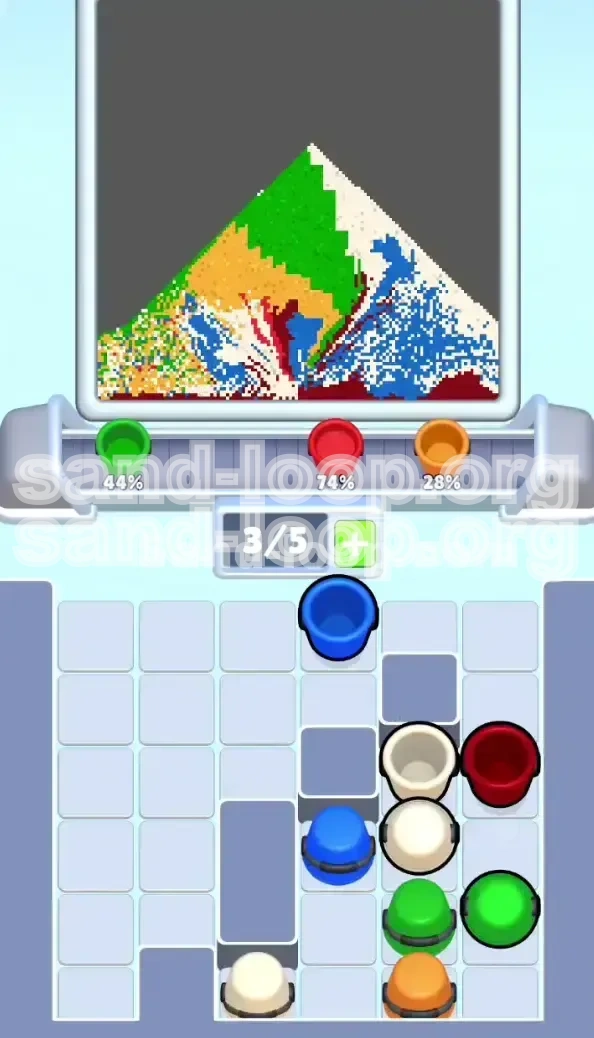
The Roped Trap consists of an Off-White cup and a Crimson cup tied together. Tapping one sends both to the belt. This is the biggest deadlock risk in the game. You must have two empty slots before triggering this. The strategy here is to "prep" the belt. Send two quick-use colors (like Green or Blue) to the canvas to create space. Once you have two empty slots, trigger the rope. Do not wait until you are desperate; plan the rope trigger as a deliberate action. The Crimson cup is high priority for the branch, while the Off-White is low priority for the background.
Phase 4: Target Box Elimination
The Orange '5' box in the bottom right acts as a sink for specific colors. It requires adjacent matches or specific pours to decrement its counter. Your strategy here should be "opportunistic clearing." Don't go out of your way to feed it, but if you have a cup that matches the color needed for the box, send it there instead of the canvas. This keeps your conveyor belt fluid and prevents the box from becoming a roadblock late in the game when you are running out of moves.
Phase 5: Layering the Art
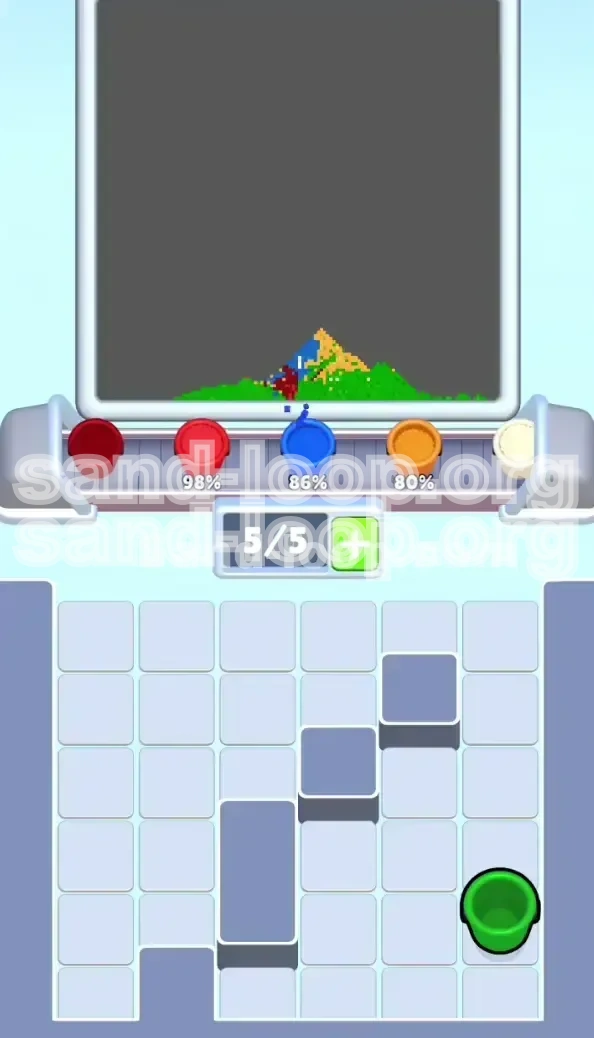
The painting phase requires strict adherence to the "Heavy to Light" rule. You must pour the massive Golden Body first to establish a foundation. Next, apply the Green Wing to claim territory adjacent to the body. Then, place the Crimson Branches to create a visual anchor. The Blue Foliage comes fourth to fill the negative space around the branches. Finally, the Cream background acts as a flood fill to finish the piece. Deviating from this order causes pixel displacement.
Phase 6: Final Settlement
Never assume the level is over just because the cups are gone. Watch the falling sand animation. A common mistake is quitting the level while sand is still settling, only for the game to register a "miss" on a pixel. Watch for the "shimmer" effect that indicates the sand has stopped moving. Once the conveyor is empty and the sand is still, the victory screen will trigger. Patience in these final 5 seconds saves you from having to replay the whole 7 minutes.
Step-by-Step Execution Guide
This is the actionable portion of the guide. Follow these steps in exact order. If you deviate, you risk deadlocking the board or contaminating the pixel art. This walkthrough assumes a standard starting board configuration.
Step 1: Clearing Top-Left Debris
Start by examining Column 1 and 2. You will see a stack of standard White and Crimson cups. Tap these first. Do not worry about where they land on the canvas; your goal is to lower the stack. You need to reach the recycle-arrow cup hidden in the lower half of the first column. By sending the top 2-3 cups to the belt, you expose the mechanisms underneath. This is the safest part of the level, so move quickly here to build momentum and clear the initial buffer.
Step 2: Triggering the Recycle Shuffle
Once the initial stack is lowered, you will see a Green cup sitting on a Recycle-Arrow cup. Tap the Green cup to send it to the belt. Now, tap the Recycle-Arrow cup. This will shuffle the remaining cups in the column. This shuffle is critical; it cycles the grid to bring the hidden Key closer to the surface. Do not ignore the recycle cups; they are the only way to manipulate the buried stack without wasting moves on cups you don't need yet.
Step 3: Isolating the Golden Key
After the shuffle, you will see the Golden Key at the very bottom of Column 1. It is likely blocked by a Blue cup or another Green cup. Tap the cup directly above the Key. If it is Blue, send it to the belt (but hold off on pouring it if your belt is getting full). The goal is to have the Golden Key as the only remaining item in that bottom slot. Once it is clear, tap the Golden Key immediately.
Step 4: Unlocking the Right Side
As soon as you tap the Key, watch it fly to the top right. The Golden Lock shatters. This triggers a board refresh. Now, turn your attention to the bottom right. You will see a White cup and a Crimson cup connected by a thick brown rope. Do not tap them yet. Look at your conveyor belt. Do you have two empty slots? If yes, proceed. If no, pour a cup from the belt to the canvas to free up space. Safety first.
Step 5: Triggering the Roped Pair
With two empty slots visible on your conveyor belt indicator, tap the Roped White cup (or the Crimson one). Both cups will fly up simultaneously. This is a high-tension moment. You now have two cups occupying slots. Check the colors. If one is Crimson, pour it onto the branches immediately to free up a slot. If one is White, hold it for the background phase. Do not let them sit on the belt if you need space for other moves.
Step 6: Handling the Hidden '?' Cups
Underneath the roped cups, you will find a '?' cup. This is a wild card. Tap it. It will flip to reveal a color—usually Green or Blue in this level. Since you cleared space in Step 4, you have room for this new cup. If it reveals a color you need (Green for the wing), pour it. If it reveals a color you don't need right now (like extra White), move it to the end of the conveyor line. Never tap a '?' cup if your belt is full (5/5), or you lose the cup entirely.
Step 7: The Orange Box Strategy
Look at the bottom right corner at the Orange Box with the number '5'. To clear this, you need to match adjacent colors or feed it specific cups. While you are working on the Roped Trap, keep an eye on this box. If you have a cup on the belt that matches the color next to the box, route it there. For example, if a Blue cup is on the belt and Blue is touching the box, pour it there. This reduces the counter from 5 to 0 efficiently.
Color Order and Mechanics
Why does the order of colors matter so much? In Sand Loop, sand is not just a flat layer; it has mass and collision properties. Pouring the wrong color first is like building a house from the roof down. This section explains the logic behind the color sequence so you understand *why* you are following these steps.
The Pyramid Principle (Golden Orange)
The Golden Orange body is the largest object in the pixel art. It occupies the center and the bottom layers of the image. In physics terms, it has the most mass. You must pour this first because it displaces other colors. If you pour a light color (like White) first, the heavy Orange will simply crush it or bury it, making the white background invisible. By pouring Orange first, you ensure it creates the "floor" and "walls" that other colors will adhere to.
Contrast Layering (Green Wing)
The Green wing is secondary in mass but distinct in color. It needs to sit right next to the Orange body. If you pour Green before Orange, the Orange body will grow over the Green feathers, making the wing look small or deformed. If you pour Green after the White background, the White will have already filled the space where the wing tips go. The Green must be poured second to "claim" its territory before the background floods in.
Structural Locking (Crimson Branches)
The Crimson branches act as a visual anchor. They are dark and thin. Dark colors in this game engine tend to get lost if poured under large amounts of light sand. By pouring the Crimson third, you ensure it sits "on top" of the base colors but "below" the background details. It creates a hard line that separates the bird from the environment, locking the composition together.
Detail Injection (Blue Foliage)
The Blue leaves are "details." They are small and occupy the edges of the branches. Think of these as putting the icing on the cake before you frost the sides. If you pour the Blue leaves after the Cream background, the Cream will have already filled the nooks and crannies where the Blue leaves need to go. The Blue sand will have nowhere to land but on top of the White, which looks messy. Pouring Blue fourth ensures it slots into the "negative space" left by the Crimson branches.
The Final Flood (Cream Background)
The Cream background is the "filler." Its job is to take up 100% of the remaining empty space. This is why it must be last. If you pour it first, it levels the entire playing field to "White." Any color poured afterwards will have to fight to displace the White, often resulting in color mixing (mud) or pixelated edges. By saving it for last, you let the Cream sand simply flow around the established structures, creating a clean, professional finish.
Key Tips and Common Mistakes
Even with a guide, it is easy to slip up. This section highlights the specific errors players make in Level 473 and how to correct your course if you catch them early. Mastering these tips is the difference between a failed run and a victory.
The "Full Belt" Deadlock
This is the number one cause of failure. Players get distracted by the art and tap cups without checking their slot count. The belt holds 5 cups. If you have 4 cups and you tap a Roped Pair (which adds 2 cups), the game cannot fit them. The Fix: Always look at the slot indicator before tapping a cup. If you have 3 or more cups, pour something immediately before tapping a new one. Keep the belt flowing.
The "?" Cup Gamble
The '?' cups are tempting because they clear clutter, but they are risky. If you tap a '?' cup when your belt is full, and it reveals a color you don't need (like a duplicate White when you need Green), that cup sits there blocking a slot. The Fix: Treat '?' cups as "Wild Cards." Only tap them when you have 2 or fewer cups on the belt. This gives you the flexibility to handle whatever color pops out.
Early Background Contamination
Many players try to "clean up" the board by pouring the White/Cream background early. This is fatal for the parrot's feet and beak. These details are small and red. If you pour White first, it covers the red pixels. The Fix: Be strict with the color order. Do not pour White until the Body, Wing, Branch, and Leaves are done. No matter how messy the canvas looks, trust the process.
Ignoring the Recycle Arrows
The Recycle-Arrow cups in the bottom left are often ignored by players who just want to tap "real" cups. However, these arrows shuffle the stack. If you don't use them, the Golden Key stays buried at the bottom, unreachable. The Fix: Tap the Recycle-Arrow cup as soon as it is the highest available cup in its column. This shuffle brings the Key up faster and saves you moves.
The Key Lock Oversight
Sometimes players unlock the Key, but then forget to actually *tap* the lock mechanism or realize they haven't cleared the path for the sand to pour. The Fix: When the Key is tapped, watch its animation. Ensure the lock on the right actually opens. If it doesn't, you may have tapped the wrong item or missed a trigger step.
Misinterpreting the Orange '5' Box
Players often try to "pour" sand onto the number 5 box directly. This doesn't work. The box is cleared by *matching* colors in adjacent cups or using it as a trash can for specific colors. The Fix: Don't force it. Let the box clear naturally as you process the adjacent columns. If you need a specific color to match it, look for that color in the "?" cups or the recycle shuffle.