
Level 491
HARDHow to solve Sand Loop level 491? Get instant solution for Sand Loop 491 with our step by step solution & video walkthrough. Sand Loop 491 tips and guide.
Play Sand Loop Now
Experience the puzzle challenge firsthand
Game Screenshots
Sand Loop Level Guides
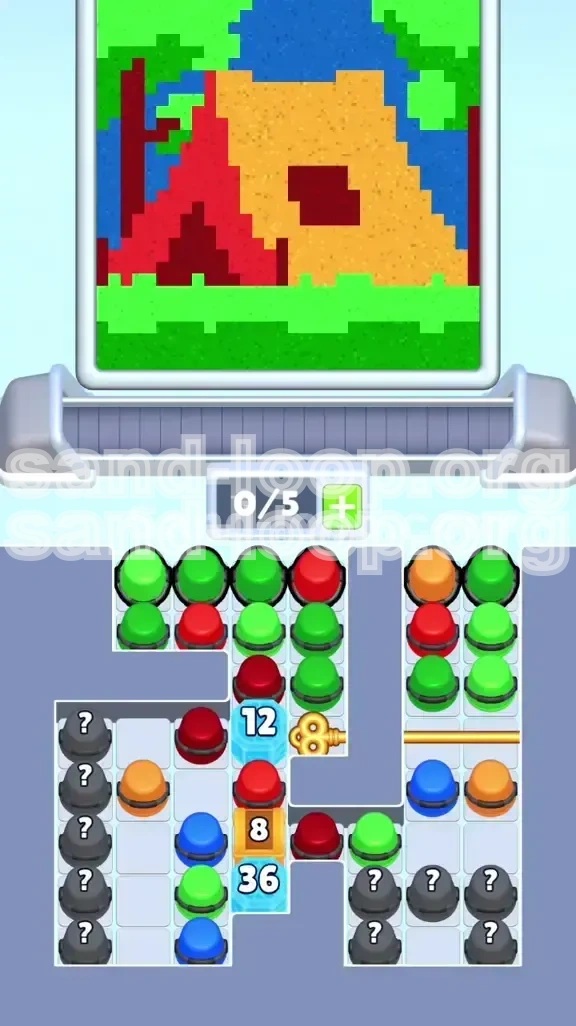
Level 491 Comprehensive Overview: The Camping Tent Challenge
Welcome to Level 491, widely considered one of the most stringent logic tests in Sand Loop. This stage, titled "The Camping Tent," shifts the gameplay focus away from high-speed tapping and toward calculated, precision engineering. Your objective is to construct a serene outdoor scene featuring a large tent against a backdrop of trees and sky. However, the path to completion is blocked by a massive vertical pillar of obstacles situated directly in the center of the board, effectively splitting your resources.
This level is a bottleneck management exercise. You begin with a restrictive tray capacity of just 0/5 slots. This tiny margin for error means that managing your inventory is just as important as pouring the sand. The color palette is deceptive; while it looks simple with its bright greens, tans, and reds, the physics of the sand require you to build specific barriers before you can safely fill in the detailed shadow work. If you rush this stage, you will inevitably contaminate the canvas and force a restart.
The Physics of the Outdoor Scene
Unlike previous levels where you might pour sand freely, Level 491 relies on the "container" principle. The canvas is empty space initially. To fill the dark maroon shadows inside the tent or the tree trunk, you cannot simply pour that color first. If you do, the dark sand will hit the bottom of the canvas and spread horizontally, ruining the bright red flaps and green grass that sit next to it. You must visualize the invisible walls. The bright green grass and the tan tent body act as physical dams. You must pour these "foundation" colors first to build up the walls that will eventually trap the liquid shadow sand, forcing it to settle into the correct, narrow outlines.
The Central Obstacle Pillar
The defining feature of this level is the "Tower of Doom" located in the center of the supply tray. It consists of four layers: a 12-Health Ice Block on top, sitting directly on a Golden Key, which rests on an 8-Health Brown Box, all supported by a massive 36-Health Ice Block at the base. This pillar blocks access to the top-right quadrant of the board, which holds the majority of the cups needed for the tent's body. You cannot access the Golden Key to unlock the right side until you shatter the first 12-Health Ice Block.
Understanding the Color Palette
Your resource management depends on understanding the five key colors:
- Bright Green (Grass/Trees): This is your most abundant resource and your primary tool for building walls.
- Tan/Yellow (Tent Body): The largest area of the canvas, but locked behind the Golden Key initially.
- Bright Red (Tent Flaps): Used for the door opening; requires a steady hand.
- Dark Maroon (Shadows): The most dangerous color. It flows like water and will contaminate adjacent areas if not contained by Green and Tan walls first.
- Sky Blue (Background): Trapped at the very bottom of the level; this is the absolute final step.
The Tray Limitation Challenge
The 0/5 starting capacity is your greatest constraint. You cannot hoard cups. You must adopt a "tap-and-wait" rhythm. If you fill all 5 slots with cups that are currently clogging the conveyor because their target zones aren't ready, you have deadlocked the game. You must keep at least one slot open (ideally two) at all times to allow the conveyor to cycle. This means you will frequently be tapping a cup, watching it pour, waiting for the slot to clear, and then tapping the next one. Patience is more valuable than speed here.
Strategic Objectives and Preparation
Before you tap a single cup, you need a clear roadmap. Level 491 is not about reaction time; it is about order of operations. Failing to respect the build order will result in "cross-contamination," where sand bleeds into areas where it doesn't belong, making the level impossible to finish. Below are the three core pillars of your strategy for this stage.
Objective 1: Establish the Foundation
Your immediate goal is to build the "Green Wall." You must fill in the grass and tree areas on the left and bottom edges of the canvas. This serves a dual purpose: it completes a section of the painting and, more importantly, creates physical barriers. Once the green sand is piled high, it acts as a container. You cannot pour the Dark Maroon or Bright Red sand until the Green sand is there to stop it from spreading sideways. Think of the Green sand as building a dam for a river; without the dam, the water (shadow sand) will just flood the land.
Objective 2: Breach the Central Tower
The middle of the board is locked down. You cannot ignore the central stack of Ice Blocks and Boxes. Your secondary objective is to chipping away at the 12-Health Ice Block. This requires using the cups adjacent to it on the left side. You must be surgical here; don't just tap random cups. You need to calculate exactly how many hits it takes to break the block (usually 12 hits) and ensure you have enough cups in the tray to deliver those hits without running out of momentum. Once the 12-Health block breaks, the Golden Key drops, unlocking the right side of the board.
Objective 3: Control the Shadow Spill
The highest risk in this level is the Dark Maroon shadow sand. This color has "high fluidity" in the game's physics engine—it tends to run and fill gaps aggressively. If you pour Maroon sand before the Tan tent body is built, it will run underneath the intended tent lines, creating a muddy mess. The rule is absolute: No Maroon until the Tan is down. You must resist the urge to clear those dark cups from your tray early. Hold them, wait for the tray to cycle, or use them to chip ice blocks if necessary, but do not pour them onto the canvas until the structure is ready.
Objective 4: The Late-Game Sky Flood
The Sky Blue cups are buried at the bottom of the level, trapped behind the massive 36-Health Ice Block. This is the endgame. You must not touch the blue cups until every single other color on the board is 100% complete. The Blue is a "flood" color; it is meant to wash over the top of the canvas. If you pour it while the tent or trees are still incomplete, the blue sand will cover the empty spots you needed to fill with other colors, effectively ruining the layering. The blue must be the final brushstroke.
Preparation Checklist
Before starting a run, ensure you are focused. This level requires about 3-5 minutes of deliberate play. Avoid playing when distracted.
- Visual Scan: Look at the center column. Memorize the stack: 12 Ice -> Key -> 8 Box -> 36 Ice.
- Slot Discipline: Tell yourself you will stop tapping if the tray hits 4/5 or 5/5.
- Color Lock: Remind yourself: Green -> Red -> Tan -> Maroon -> Blue.
Step-by-Step Walkthrough: Phase 1 (The Left Flank)
The first phase of the level is entirely restricted to the left side of the board. Your target is the 12-Health Ice Block standing between you and the Golden Key. You cannot access the right side yet, so focus entirely on managing the left-side resources.
Step 1: Initial Tray Management
As the level loads, do not tap wildly. You will see a cluster of Green cups and Red cups in the top-left corner.
- Tap the Green Cups first. You want to load exactly two Green cups into the conveyor tray.
- Wait for the sand to pour. Watch the Green sand hit the canvas and start building the grass foundation on the bottom left.
- While the Green is pouring, immediately look for the Red Cups located adjacent to the 12-Health Ice Block.
- Tap one Red cup. Your tray should now have a mix of Green and Red cycling.
Why this order? Green builds the floor. Red is needed to chip the ice, but you can't pour Red onto the canvas yet because the "doorway" area isn't ready. Using Red cups to break ice is a great way to clear them from the tray without messing up your painting.
Step 2: Chipping the 12-Health Block
This is a rhythm game now. The 12-Health Ice Block requires direct hits.
- Focus your tapping on the cups that are physically touching the Ice Block.
- Every time you send a cup to the conveyor, it moves forward and "attacks" the obstacle in front of it.
- The 4/5 Rule: Keep an eye on your slot counter. If you hit 5/5, the conveyor stops moving. If the conveyor stops, you stop breaking ice. Always try to keep the counter at 4/5 to maintain flow.
- Use the Mystery Cups (Question marks) if they appear on the left. In Phase 1, these usually contain Green or Red, which helps sustain your attack on the Ice Block.
Step 3: Triggering the Golden Key
Once the Ice Block health hits zero, it shatters.
- The Golden Key will fall into the tray.
- DO NOT pour the key's sand onto the canvas yet. The Key is an item, not a color, but sometimes it acts as a cup. You need to "use" the key to unlock the right side.
- As soon as the key drops, the Golden Bar on the right side of the screen will vanish.
- This releases a massive flood of Yellow and Green cups from the top right. Pause for a second here. Don't panic-tap the new cups.
Step 4: Consolidating the Left Side
Before you move to the right side, clean up the left.
- Ensure the Green grass on the left is fully filled. If there are gaps, tap more Green cups.
- Check your Red cups. If you have too many Reds clogging the tray and the "Tent Flap" area on the canvas isn't ready yet, you may need to strategically use Red cups to chip the next layer of obstacles (the 8-Health Brown Box) if they are within range.
- Make sure you have at least 2 empty slots in your tray to accept the new wave of Yellow cups from the right.
Step-by-Step Walkthrough: Phase 2 (The Right Side & The Tent)
With the Golden Key activated and the right side unlocked, the board state changes dramatically. You now have access to the main color for the tent: Tan/Yellow. However, you are immediately faced with the next layer of the central tower: the 8-Health Brown Box and the menacing 36-Health Ice Block.
Step 5: Unlocking the Yellow Supply
The top-right quadrant is now open.
- Begin tapping the Yellow/Tan Cups in the top right.
- Send them to the conveyor.
- Crucial Check: Look at the canvas. Is the Green grass fully formed? The Yellow sand for the tent needs to sit on top of or next to the Green grass. If the Green isn't there, the Yellow sand might spread too far. Assuming Green is done, pour the Yellow to start building the main body of the tent.
- The tent body is a large, triangular shape. This will take a significant amount of Yellow sand. Be patient.
Step 6: Dealing with the 8-Health Brown Box
The Yellow cups are often positioned near the 8-Health Brown Box.
- As you tap Yellow cups to fill the tent, you will also be dealing damage to the Brown Box.
- You can also use Dark Maroon cups to chip this box. By now, you might have some Maroon cups in the tray. Since you shouldn't pour Maroon yet (waiting for walls), using them to break the Brown Box is the perfect way to clear them from inventory.
- Break the 8-Health Box. This reveals the final boss obstacle: the 36-Health Ice Block.
Step 7: The 36-Health Ice Block Standoff
This is the hardest part of the level. The 36-Health Ice Block is a sponge. It takes a lot of hits to break. Meanwhile, your tray is filling up with cups you can't pour yet (Maroon, Mystery, maybe some Red).
- Strategy: You are in "Maintenance Mode." Your goal is to keep the conveyor moving to chip away at the 36-Health block, using any cup you can find, even if you don't pour the sand.
- Mystery Cup Usage: Look for the black Mystery Cups at the bottom left. These are your best friends now. They often cycle colors that you actually need, or they provide "wildcard" hits on the ice.
- Don't Force the Maroon: You will see Maroon cups stacking up. Do not pour them. Let them sit in the tray if you have to. It is better to have a full tray of Maroon than to ruin the level by pouring them too early. Use other cups to break the ice.
- Progress on the 36-Health block will be slow. It might take 2-3 full cycles of the tray to break it.
Step 8: Completing the Red and Maroon Details
As the 36-Health Ice Block gets closer to breaking (health below 10%), you should start finalizing the foreground details.
- By now, the Tan Tent body should be roughly 80% full.
- Look for the Bright Red cups. Now that the tent walls (Tan) and the grass (Green) are established, you can pour the Bright Red into the "doorway" of the tent. The Tan walls will stop the Red from spilling out of the tent area.
- Once the Red is down, look at the Dark Maroon cups. The "Danger Zone" is now safe. Pour the Maroon into the shadow of the door and the tree trunk. The Green and Red walls will contain it perfectly.
Step-by-Step Walkthrough: Phase 3 (The Final Flood)
The 36-Health Ice Block is gone. The bulk of the tent is finished. The foreground shadows are rendered. You are now in the endgame. This phase is about finishing the canvas cleanly without getting tripped up by the final color release.
Step 9: Freeing the Blue Sky
Breaking the 36-Health Ice Block was the key to the dungeon.
- With the 36-Health block destroyed, the bottom-most row of cups is finally accessible.
- You will see a cluster of Sky Blue cups and likely a few remaining Mystery Cups.
- Stop! Do not tap the Blue yet. Check the rest of your board.
- Is the Tent 100% Tan? Yes. Is the Grass 100% Green? Yes. Are the Red Flaps and Maroon Shadows solid? Yes.
- Only if every other color is complete should you touch the Blue cups.
Step 10: The Blue Sky Pour
This is the most satisfying part of the level, but it requires a specific technique.
- The Sky Blue cups are usually located at the bottom of the screen. When you pour them, the sand travels up (physics logic in this game) or fills the negative space at the top.
- The Chain Method: Do not tap one Blue cup and wait. Tap all available Blue cups in rapid succession. Fill your entire tray (5/5) with Blue cups if possible.
- Why? Because you want a continuous, heavy flow of Blue sand to wash over the top of the canvas, filling the "sky" area without leaving gaps. A slow trickle might dry out or settle unevenly.
- Pour the Blue. It will settle behind the tent and trees, completing the background depth.
Step 11: Clearing Remnants
Sometimes, breaking the big ice block leaves one or two straggler cups behind.
- Scan the board for any single cups of Green or Red that might be stuck in corners.
- Tap them to finish the level percentage.
- Use any remaining Mystery Cups now. If they contain a color you already finished, the sand will just overflow harmlessly or fill microscopic gaps.
Step 12: Victory Conditions
Once the Blue Sky has settled and the conveyor is empty, the level should auto-complete.
- Check for "wet" spots. If the sand is still moving, the level isn't done. Wait for the physics engine to settle the simulation.
- The "Camping Tent" scene should look crisp: Green grass, Tan tent, Red door, Dark shadows, and Blue sky.
- If you are stuck at 99%, look for a tiny pixel gap in the Sky corners or the Tree roots. A single Blue or Green drop usually fixes it.
Expert Tips, Mistakes, and Speed Running
Now that you understand the method, let's refine your technique. This section covers the common pitfalls that ruin runs and offers advice for those looking to optimize their clear time.
Common Mistakes to Avoid
90% of failed attempts on Level 491 happen because of impatience.
- Pouring Maroon Early: This is the #1 killer. If you pour Dark Maroon before the Tent Body (Tan) is up, it spreads under the tent. Restart immediately if this happens; you can't fix it.
- Ignoring the Green Foundation: Skipping the Green grass build to go straight for the Tent seems faster, but it leaves gaps where the Red door sand will escape.
- Tray Deadlock (5/5): Filling all 5 slots with cups you can't use (e.g., having 5 Maroon cups when the Tent isn't ready). Always keep a "vent" slot open to cycle the conveyor.
- Breaking Ice with the Wrong Color: Don't use your last Blue cup to break an Ice block. You need that Blue for the endgame. Use Green or Maroon (if just breaking) instead.
Speed Run Strategies
If you are chasing a 3-star time, you need to minimize "wait time."
- Pre-loading: While the Green sand is pouring, scan the board for the next target. Don't watch the sand fall; watch the board.
- Double Tapping: On the 12-Health Ice Block, you can often tap two Green cups in quick succession to send them down the belt together, provided you have the slot space.
- Skip the Perfectionism: In a speed run, you don't need the Tent to be 100% full before starting shadows, just "full enough" to act as a wall. You can live with 90% fill if it saves 30 seconds.
What to Do If You Get Stuck
Sometimes the RNG (Random Number Generator) of the cup supply feels unfair.
- The "No Green" Scenario: If you run out of Green cups before the grass is done, look for Mystery Cups. They are coded to help replenish low resources.
- The "Full Tray" Lock: If your tray is full of useless colors, you have to bite the bullet. Pour a "useless" color into a safe, already-filled area (like a thick patch of grass) just to empty the slot and get the conveyor moving again. This is better than a restart.
- Ice Block Sponge: If the 36-Health block feels like it's not taking damage, check if you are actually hitting it. Sometimes you need to rotate a cup or wait for the conveyor to align the cup directly with the block's hitbox.
Advanced Analysis: Color Interactions
Understanding how the sand types interact helps you plan.
- Tan vs. Green: These stack well. You can pour Tan directly on Green to build height for the tent.
- Red on Tan: Red sits cleanly on top of dry Tan sand. This creates the door flap effect.
- Maroon on Everything: Maroon is heavy. It wants to sink. If you pour it on loose sand, it disappears. If you pour it on flat canvas, it spreads. Pour it last (before Blue) to ensure it stays visible as a shadow.