
Level 502
EXPERTHow to solve Sand Loop level 502? Get instant solution for Sand Loop 502 with our step by step solution & video walkthrough. Sand Loop 502 tips and guide.
Play Sand Loop Now
Experience the puzzle challenge firsthand
Game Screenshots
Sand Loop Level Guides
Level Overview: The Bottleneck Strategy
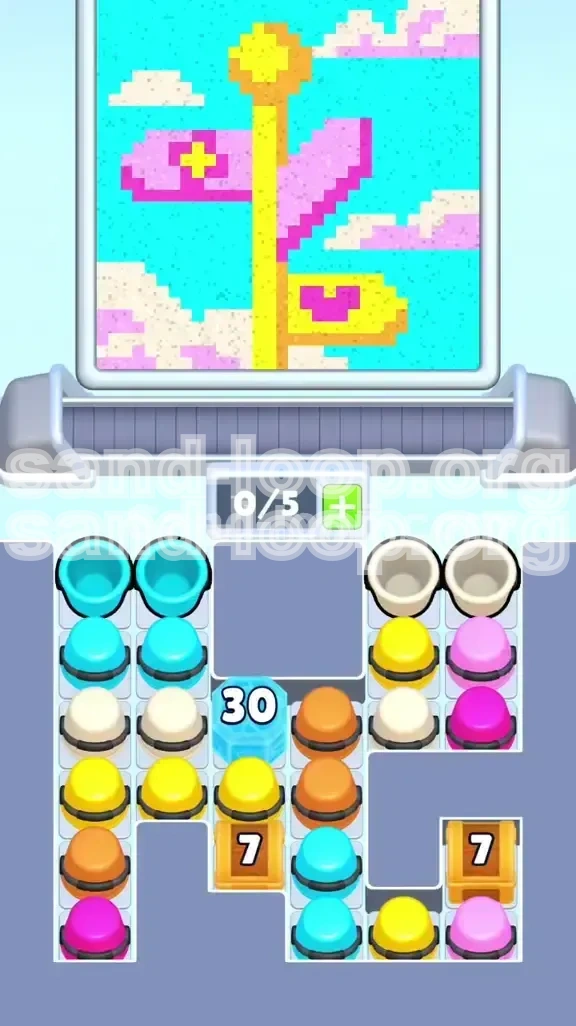
Sand Loop Level 502, often referred to as the "Pastel Signpost" stage, is a masterclass in resource management and bottleneck control. Unlike previous levels that might reward rapid tapping or aggressive clearing, Stage 502 is a logic puzzle that punishes impulsiveness. The visual appeal of the canvas—a bright sky scene with a directional signpost—belies the technical difficulty of the supply board beneath it.
The defining feature of this level is the extreme restriction on your workflow capacity. You begin with exactly five available slots on your conveyor belt. This might seem like a standard number, but given the configuration of the board, it effectively operates as a hard cap. If you allow all five slots to fill up with the wrong colors at the wrong time, you create a deadlock that is impossible to recover from. The challenge is not about speed; it is about rhythm and prediction.
You are dealing with a highly layered grid. The top section contains accessible cups, the middle section is dominated by a massive "30 Ice Block" barrier, and the bottom section hides crucial color clusters behind "7 Lock Boxes." To succeed, you must treat the conveyor belt like a precision instrument, managing the flow of sand while simultaneously chipping away at the obstacles that block your supply.
The Zero-Margin Error Zone
The most critical aspect of this level is the "Deadlock Zone." Because you have zero initial buffer, every tap must be calculated. If you fill your belt with cups that cannot be poured immediately—perhaps because the target area on the canvas isn't ready or because you are waiting for an ice block to melt—you stop the flow of the game.
Imagine a traffic jam where cars cannot move because the intersection is blocked. In this level, the "cars" are your sand cups, and the "intersection" is the pour point. If you tap five orange cups early in the level, thinking you are clearing space, you will lose. The orange is for shading, which happens last. Those cups will sit on your belt, blocking the white and cyan cups needed to build the sky. You must understand that an empty slot is as valuable as a filled cup here.
Visualizing the Signpost Canvas
Your target is a directional signpost floating in a pastel sky. The canvas is divided into distinct horizontal zones that dictate your build order. The bottom 40% is a Cyan sky. The next 30% is White clouds. The center features a Yellow post, and the foreground consists of Pink signboards with tiny Yellow details and Orange shading.
The danger lies in the small details. The Yellow heart and cross inside the Pink signs are tiny targets—often less than 5% of the total canvas area. If you pour a massive volume of Pink sand before the structure is ready, the "spillover" mechanics will flood those tiny yellow slots, ruining the pixel-perfect accuracy required to clear the level. You must visualize the build order: massive background volumes first, tiny details last.
The Ice Block and Lock Box Mechanics
The level introduces two major mechanical hurdles: the 30 Ice Block and the 7 Lock Boxes. The Ice Block sits in the center of the board, acting as a dam that holds back the lower reservoir of sand. It requires 30 adjacent clears to shatter. This means you cannot simply ignore the top half of the board. You are forced to cycle the top cups to generate the "damage" needed to break the center.
Simultaneously, the bottom corners are guarded by Lock Boxes that require 7 clears anywhere on the board to open. This creates a synergy. Every cup you clear from the top counts toward both the Ice Block destruction and the Lock Box opening. You are racing to hit two numbers (30 and 7) before your belt clogs. Understanding this dual dependency is the key to formulating your opening moves.
Economy of Movement
This stage demands an economy of movement. Wasted taps are wasted time. You should never be waiting for a cup to fill if there is an available action elsewhere. The cycle is: Tap -> Cup travels (delay) -> Pour -> Clear. During that "travel" delay, you must be tapping the next required cup or clearing space.
The professionals approach this level by looking two moves ahead. While the current cup is traveling to the pour point, their eyes are already scanning the board for the next valid tap. If you wait until the sand finishes pouring to look for the next cup, you have lost precious seconds. In a level with this tight of a margin, those seconds add up to a failed run.
Strategic Color Order: The Physics of Sand
In Sand Loop, the physics engine renders sand from the bottom up. This means that sand poured later will physically sit on top of sand poured earlier. This mechanic is the foundation of your color strategy. If you pour the "top" layer colors first, the "bottom" layer colors will overwrite them when they are poured later, burying your details and ruining your progress percentage.
The correct color order is non-negotiable for Level 502. You must respect the physical layers of the image. Attempting to "spot fill" a small detail in the middle of the level is risky because subsequent pours will likely bleed over into that area due to the spread mechanics. Therefore, we group the colors into three phases: The Base Layer, The Structural Layer, and The Detail Layer.
Phase 1: The Base Layer (Cyan and White)
The Base Layer consists of the Cyan sky and the White clouds. These colors cover approximately 60-70% of the canvas's total area. Because they form the background, they must be poured first. Any subsequent colors will sit "in front" of this sky.
However, even within the Base Layer, there is a sub-order. The Cyan sky is the absolute bottom. You should prioritize Cyan cups first to establish the floor of the image. Once the Cyan is established (roughly 20-30% fill), you introduce the White cups. The White clouds float within the Cyan sky. If you pour White first, the subsequent Cyan pour will bury the bottom edges of the clouds, making them look flat or cutting them off entirely. Establish Blue, then add Clouds.
Phase 2: The Structural Layer (Yellow Post)
Once your sky is largely filled (aim for >50% completion), you move to the Structural Layer. This is the Yellow central post. The signpost is a vertical element that cuts through the center of the canvas.
Pouring the Yellow post early is dangerous because the Cyan and White pours are wide and messy. They have a high spread radius. If you try to paint a thin yellow line while you are still dumping gallons of blue sky, the blue will bleed over the yellow edges, making the post look jagged or blurry. You want the sky to be mostly done so the Yellow sand has a stable "ground" to land on, ensuring crisp vertical lines for the signpost.
Phase 3: The Detail Layer (Pink, Yellow Details, Orange)
The final phase involves the Pink signboards, the small Yellow details (heart/cross), and the Orange shading. This is the most dangerous part of the level. The Pink signboards are large flat areas, but they contain the small Yellow details within them.
You must pour the Pink cups first to form the "body" of the sign. Once the Pink body is formed, you have a very narrow window to drop the specific Yellow cups needed for the heart and cross. If you miss this window, or if you pour too much Pink, the detail slots vanish. The Orange shading is the absolute last step. Shading is for depth; adding it too early will result in the darker sand being covered by brighter colors, rendering it invisible and wasting the cup entirely.
Step-by-Step Walkthrough: The Critical Path
This walkthrough provides the exact sequence of actions required to clear Level 502. Follow these steps in order. Do not skip ahead. The "Dependency Chain" mentioned in the analysis dictates that you cannot access the bottom of the board until you have cleared the top.
Step 1: The Opener - Top Row Cycling
As the level starts, your eyes must lock onto the top row of the supply board. Ignore everything else. You will see a cluster of Cyan cups on the top left and White cups on the top right. These are your only available moves.
Tap the Cyan cups first. Send two Cyan cups to the belt. Immediately follow with two White cups. Your goal is to keep the belt moving at roughly 3/5 capacity. Do not max it out. As these cups travel and pour, monitor the "30 Ice Block" counter in the center. You should see it drop from 30 to 26. This confirms you are damaging the block. Wait for these cups to pour completely before tapping more. Do not pre-load the belt.
Step 2: Triggering the Lock Boxes
Continue cycling the top row cups (Cyan and White). You will notice a counter for the "7 Lock Boxes" at the bottom. Once you have cleared approximately 7 cups total (combining the ones currently pouring and those queued), the bottom corners of the board will flash and open.
This is a critical moment. The opening of the boxes reveals a cache of Orange cups on the left and more Yellow cups on the right. Do not tap the Orange cups. They are a trap. Tapping them now will clog your belt for the rest of the game. Instead, look at the newly exposed Yellow cups near the center. Tap these Yellow cups. They are needed for the post, and tapping them continues to chip away at the Ice Block above them.
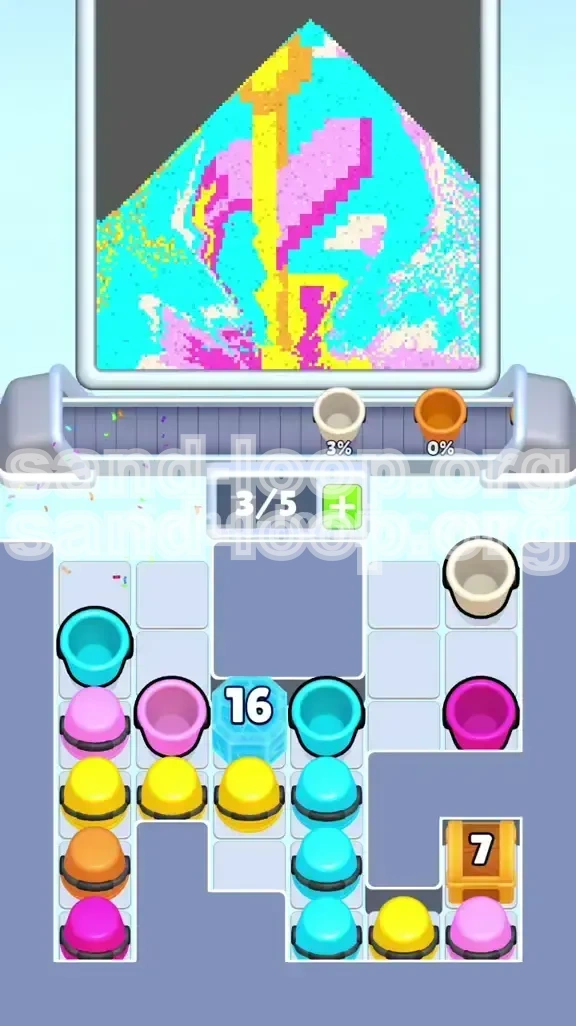
Step 3: Shattering the Ice Block
By now, you have cycled the top Cyan and White, and you've tapped the newly exposed Yellow. The "30 Ice Block" should be critically low (around 5-10 hits remaining).
Look for the remaining White cups located in the middle columns, right above the ice. These are usually frozen or surrounded by other blockers. If any are accessible, tap them now. If not, rely on the adjacent clears from the Yellow cups you just sent. Once the counter hits zero, the Ice Block shatters. This is the "turning point" of the level. The screen will shake, and the massive barrier in the center will vanish, revealing the full reservoir of cups at the bottom of the screen.
Step 4: The Flood - Bottom Cluster Management
With the Ice Block gone, you have access to the bulk of your resources. You will see large clusters of Cyan and Pink cups at the bottom. This is where the bottleneck test really begins.
Initiate a steady rhythm. Tap the Cyan cups from the bottom right. While they travel, tap the Pink cups from the bottom left. You want to alternate: Cyan, Pink, Cyan, Pink. The Cyan is filling the remaining sky gaps, and the Pink is building the signboards. Keep an eye on your belt. If you see it reaching 5/5, stop tapping for one second. Let one cup pour to free up a slot, then resume. Do not let the flow stop entirely, but do not let it choke.
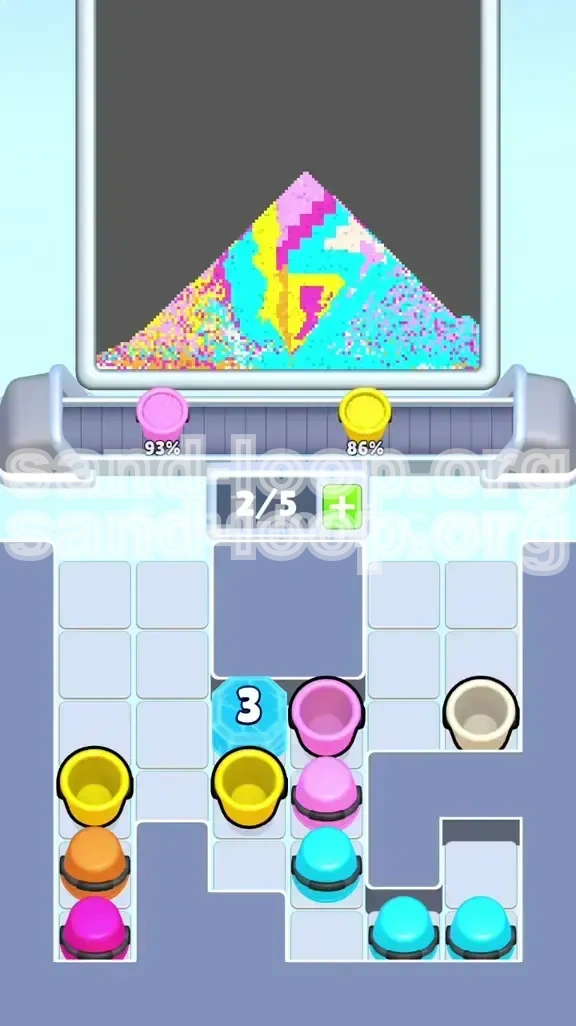
Step 5: The Detail Injection
Once the Pink signboards are formed on the canvas (you will see the pink shapes appear), the game will likely present you with the specific Yellow cups needed for the Heart and Cross details.
This is the "Feather" step. You need to tap these Yellow cups immediately while the Pink paint is still wet but settled. If you wait too long, the game logic might prioritize other colors. Tap the Yellow detail cups. They will pour a small amount of sand into the specific slots on the sign. Watch the canvas closely—if the yellow heart appears, you succeeded. Immediately switch focus to the final step.
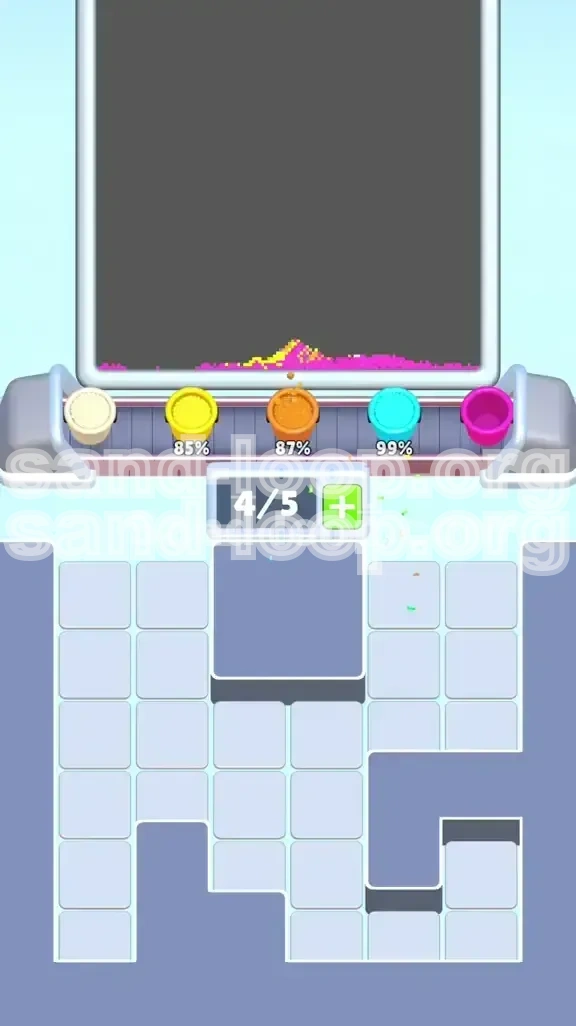
Step 6: Final Shading and Cleanup
The canvas should now look mostly complete. You might have some lingering empty spots in the clouds or the corners of the sky. Now, and only now, do you tap the Orange cups.
The Orange cups provide the shading for the signposts and depth for the clouds. Since they are dark, they are very forgiving if they overlap slightly, but they are useless if covered. Send the Orange cups down the belt. Follow them up with any remaining Cyan or White "cleanup" cups to fix any patchy areas. As the final Orange cup pours, the level should hit 100% completion.
Key Tips for Precision Execution
Even with a perfect strategy, execution errors can ruin a run. These tips focus on the micro-mechanics of the game that are often overlooked. Mastering these will separate a failed attempt from a clear.
The 2-Slot Buffer Rule
The "2-Slot Buffer" is a safety mechanism. While your belt has 5 slots, you should mentally act as if it only has 3. Why? Because if you keep 2 slots open, you always have room to react to an emergency. If a Lock Box opens and reveals a crucial color, you have a slot ready for it. If you run at 5/5 constantly, you are driving with your eyes closed. Keeping the buffer ensures you are never caught off-guard by a new supply.
Rhythm Tapping vs. Speed Tapping
Do not mash the screen. Speed is not the same as throughput. Mashing creates a jagged, unpredictable flow. Instead, find the rhythm of the pour point. Watch the sand pouring animation. There is a cadence to it. Sync your taps to this cadence. Tap... pour... tap... pour. This prevents the "input lag" that occurs when the game tries to register too many screen touches at once, which can lead to you accidentally tapping a blocker or the wrong cup.
Reading the "Next" Preview
Always look at the "Next" queue if your version of the game shows it, or simply look one tile behind the one you are about to tap. If you tap a Cyan cup, but the cup directly behind it is Orange, and the cup behind that is Cyan, you need to plan for that Orange. You cannot leave the Orange cup as the "front" cup of your selection, or you will be forced to tap it or waste time maneuvering around it. Select your taps to push the unwanted colors to the back of the queue.
Anticipating the Spread
Sand does not stay in perfect lines. It spreads. When pouring the Yellow post, be aware that the sand has a spread radius. Do not pour the Yellow post if it is directly adjacent to an unpainted area of White cloud. The Yellow will bleed into the White. Ensure the White cloud is fully defined (100% poured) before bringing the Yellow post too close to the cloud boundaries. This anticipation prevents "muddy" colors where they touch.
Common Mistakes and Stuck Solutions
Players often fail Level 502 for the same few reasons. Recognizing these patterns in your own play is the fastest way to improve. If you find yourself stuck, refer to this section to diagnose the problem.
The "Orange Trap" Mistake
The Mistake: As soon as the Lock Boxes open, the player sees a new color (Orange) and instinctively taps it to clear the clutter.
The Consequence: The Orange cup enters the belt. Because Orange is a late-game color, it sits on the belt for a long time. It occupies a slot that is desperately needed for the Pink and Yellow cups that are currently active on the board. The belt jams. The game stalls.
The Fix: Train yourself to ignore the Orange cups until the very end. Treat them as background scenery until the final 10% of the level.
The "Tiny Detail" Panic
The Mistake: The player notices the tiny Yellow heart on the canvas isn't filled and panics, trying to force a Yellow cup while the Pink is still pouring heavily.
The Consequence: The Yellow sand gets washed away by the incoming Pink flood, or the Yellow pour overflows the boundaries of the heart, turning it into a blob.
The Fix: Patience. The tiny details cannot be filled until the main body (the Pink sign) is established. Let the Pink cup finish pouring. Let it settle. Then, immediately send the Yellow detail cup. The window is small, but it exists only after the main pour stops.
Diagnosing a Deadlock
Symptom: You have no moves on the board, and the belt is full.
Diagnosis: You have mismanaged the color queue. You likely tapped a color that wasn't needed yet.
Solution: There is no "Undo" button, but you can sometimes recover by waiting. If the belt is full, watch the pour point intently. The millisecond a cup finishes and disappears, tap the corresponding color on the board that matches the *next* needed color. Do not clear space just to clear space; clear space to make room for the *correct* color. If you are truly deadlocked with no matching colors available on the board, the run is over, and you must restart.
Speed Run Tips and Shortcuts
Once you have mastered the clear, you may want to optimize for time or score. These advanced tips assume you are comfortable with the mechanics and are looking to maximize efficiency.
Pre-loading the Conveyor (Advanced)
Standard advice says "keep slots open." Speed run advice says "predict the flow." If you know exactly that the next three moves are Cyan, Cyan, White, you can tap all three in rapid succession *before* the first one pours. This only works if you are 100% sure of the sequence and the path is clear. It risks a deadlock, but if executed perfectly, it shaves seconds off your time by minimizing the "travel" delay for the subsequent cups.
The "Chain Reaction" Opening
Instead of tapping one by one, look for a cluster of 3-4 Cyan cups at the start. Tap them in a "Z" pattern or a line. This sends a wave of Cyan to the belt. This massive influx of sand helps you destroy the first 10-15 points of the Ice Block rapidly. It establishes the base layer faster, allowing you to move to the Yellow post phase sooner. It is a high-risk, high-reward opening move.
Late-Game Color Ignoring
In the final 10% of the level, perfectionism is your enemy. If you have a 95% fill rate and you are missing 3% of Cyan clouds and 2% of Orange shading, ignore the Cyan. Dump the Orange. The Orange shading, being darker, often visually "corrects" the canvas even if the underlying fill isn't 100% perfect. The game's percentage algorithm often weights later colors higher. Prioritizing the shading at the very end can sometimes push you over the finish line faster than trying to perfectly patch the background.