
Level 503
HARDHow to solve Sand Loop level 503? Get instant solution for Sand Loop 503 with our step by step solution & video walkthrough. Sand Loop 503 tips and guide.
Play Sand Loop Now
Experience the puzzle challenge firsthand
Game Screenshots
Sand Loop Level Guides
Sand Loop Level 503: The Ultimate "Snake in a Basket" Strategy Guide
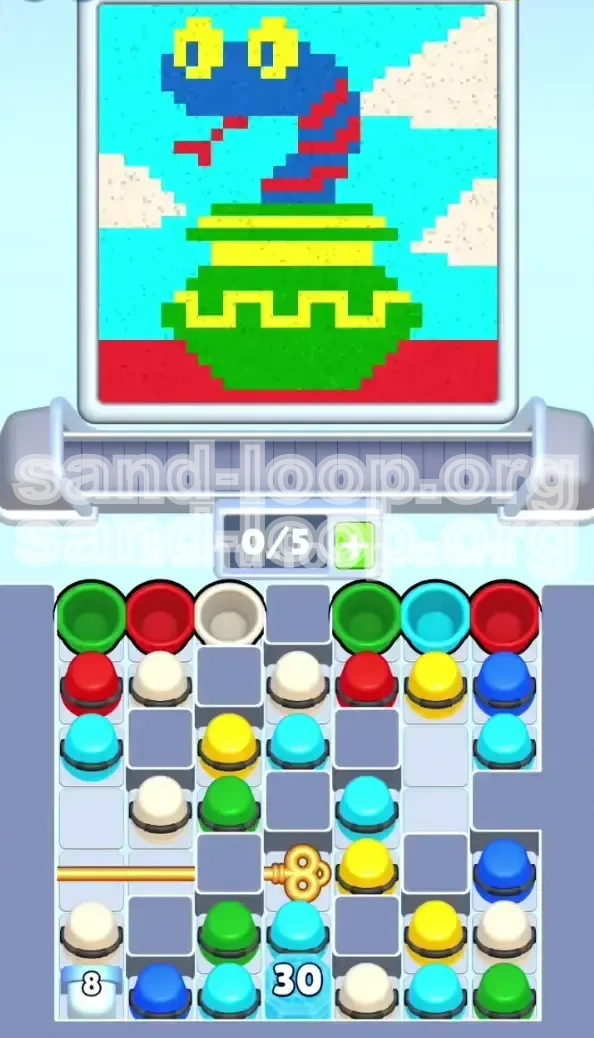
Welcome to the definitive walkthrough for Sand Loop Level 503. This stage is widely considered a difficulty spike in the game, blending complex color logistics with restrictive board management. The objective is to create a pixel art masterpiece of a blue snake emerging from a green basket, but the path is fraught with resource traps.
The core challenge of Level 503 lies in its severe inventory limitations and board obstructions. You are restricted to a mere 5-slot tray capacity, which is 40% less than the standard average for mid-game levels. This forces a playstyle that prioritizes precision over speed. Additionally, the board is locked by a Golden Key and heavy Ice Blocks, specifically a daunting "30-count" block in the center column that dictates the flow of the entire match.
Core Mechanics Analysis
Unlike previous levels where you could rapidly tap cups to clear the board, Level 503 is a test of rhythm and queue management. The sand pouring mechanic has a distinct delay; tapping a cup sends it to the conveyor queue, but the sand dispenses seconds later. If you fill your 5-slot tray with cups that cannot be poured immediately (e.g., waiting for a base layer to dry), you create a "soft lock" where no new cups can be retrieved from the board.
The Visual Canvas Breakdown
Your success depends on reading the canvas from the bottom layer up. The image is composed of approximately 85% foreground and mid-ground elements, leaving only 15% for the background sky.
- The Base Layer (35%): A solid Red floor and the main body of the Green basket. This is your foundation and must be poured first.
- The Mid Layer (40%): The Blue snake body. This is the most color-intensive section, requiring a massive volume of blue sand.
- The Detail Layer (10%): Red stripes on the snake, the snake's tongue, and Yellow eyes/basket rim. These are the "danger zones" for contamination.
- The Background Layer (15%): Cyan sky and White clouds. These must be poured last to avoid bleeding into the snake.
Board State and Obstructions
The supply board is rigged against you. Two major impediments control your access to resources:
- The Golden Key: Located in the bottom-left quadrant, this key locks a column containing essential Green and Cyan cups. It acts as a gatekeeper; you cannot access the lower board until you clear the specific cups holding the key.
- The Ice Blocks: You face two frozen cups. A White cup frozen with an '8' counter (minor obstacle) and a Cyan cup frozen with a '30' counter (major obstacle). The '30' block is located centrally and cannot be cleared directly. You must reduce its counter by clearing adjacent cups, effectively forcing you to clear the center of the board to access the end-game Cyan supply.
The "Slot Economy" Strategy
Managing your 5 slots is the single most critical skill here. Think of your slots as currency. You must always keep 1 to 2 slots open for emergency grabs.
- The 80% Rule: Never let your tray fill up past 80% capacity (4 slots) unless you are about to perform a massive pour.
- Rhythmic Pouring: Match your tapping speed to the pouring speed. If the conveyor belt is full, stop tapping the board and wait for the sand to flow.
Strategic Color Sequencing: The Order of Operations
Many players fail Level 503 because they paint the sky too early or mix the yellow details with the blue snake body. To secure the win, you must adhere to a strict dependency chain. Processing colors in the wrong order will result in "contamination," where blue sand bleeds into the yellow eyes, or white clouds obscure the snake's stripes.
Phase 1: The Foundation (Red and Green)
Why start here? The Red floor and Green basket are the bottom layers of the image. If you attempt to fill the Blue snake first, you will inevitably spill blue sand onto the empty red zones, creating a dirty purple mix that is impossible to fix later.
- Priority Target: Immediately hunt for Red and Green cups.
- Execution: Fill the entire red floor first. It requires the least precision. Once the floor is done, switch entirely to Green for the basket body.
- Tip: Do not worry about the Yellow zig-zag rim on the basket yet. Just fill the solid green body.
Phase 2: The Heavy Lift (Blue Snake)
The Blue snake is the largest single color block in the level. It sits directly on top of the green basket and red floor.
- Transition Trigger: Only start grabbing Blue cups when your Red and Green layers are 100% complete.
- Volume Management: The snake body is thick. You will need to process roughly 40-50% of all Blue cups on the board to finish this section.
- Zone Control: Be careful around the "head" area where the eyes go. Do not pour blue sand into the eye sockets.
Phase 3: The Precision Phase (Yellow and Red Details)
This is the hardest phase. You are adding small, high-risk details to a large canvas.
- Yellow Danger: The Yellow eyes and basket rim are tiny. If you send a Yellow cup to the conveyor while there is still Blue sand in the machine, the transition color (Greenish-Blue) will ruin the bright Yellow.
- The Cleanse: After finishing Blue, run a "cleanse" cycle (tap a cup you don't need or wait for the belt to clear) to ensure the dispenser is empty before pouring Yellow.
- Red Stripes: Tap the Red cups for the snake's tongue and stripes only after the main Blue body is finished.
Phase 4: The Backdrop (Cyan and White)
The sky is the final layer. It covers everything else. If you pour Cyan too early, the blue sand will fall onto the empty spaces where the snake should go, forcing you to waste Blue sand later to cover it up.
- The Ice Block Link: You cannot effectively do this phase until you break the '30' Ice Block, as the majority of Cyan cups are trapped or blocked by it.
- Spacing: Pour the Cyan sky slowly. If you dump three Cyan cups at once, the sand volume might overflow and bleed into the White cloud zones.
Dynamic Adjustment Rules
While the sequence above is ideal, Level 503 is dynamic. You must adjust based on what the board gives you.
- If the board offers NO Green/Red: And your tray is empty, you may grab a Blue cup to "hold" it, but do not pour it until the base is ready. However, this is risky. It is better to clear blocking cups to reveal the colors you need.
- If the '30' Ice Block is low: (e.g., below 5 hits), you can shift to Phase 4 early to finish the game, even if details aren't 100% perfect, provided the main art is recognizable.
Step-by-Step Walkthrough: The Opening Moves
The first 30 seconds of Level 503 are critical. A bad opening move can clog your board before you even see the bottom half. Here is the exact move-by-move guide to navigating the start.
Initial Board Assessment
As the level loads, do not tap anything immediately. Scan the top exposed layer. You will likely see a mix of Green, Red, White, and perhaps a Cyan cup.
- Identify the Key Column: Locate the column where the Golden Key is sitting. Identify the 3 cups sitting directly on top of the key. Usually, this is a stack of White, Yellow, or Red.
- Identify the Center Column: Look at the '30' Ice Block in the center. Note the colors of the cups adjacent to it (usually Blue or Red).
- Inventory Check: Ensure your conveyor belt is empty.
The First Tap: Unlocking the Key
Your primary goal is to rotate the board. The Golden Key prevents you from accessing the bottom-left resources.
- Action: Tap the cups directly stacked on the Golden Key. Typically, you will tap a White cup and a Yellow cup first.
- Strategic Pause: Send these to the conveyor. Since White and Yellow are not needed for the base layer (Red/Green), they will sit on your belt. This is fine, but it limits you to 3 remaining slots.
- The Result: Clearing these cups triggers the Golden Key mechanism. The key will unlock, vanishing from the board and dropping the upper column down. This unlocks the lower-left quadrant, granting access to more Green and Red cups essential for Phase 1.
Establishing the Flow (Red and Green)
With the Key gone, look for the low-hanging fruit.
- Action: Tap all accessible Red cups. Send them to the conveyor immediately after the initial Key cups.
- Follow-up: Tap Green cups.
- Tray Management: You now likely have White, Yellow, Red, and Green cups moving. Monitor the belt. As the Red cup pours (filling the floor), that slot becomes free. Immediately fill it with another Red or Green cup from the board.
- Ignore Cyan: Even if Cyan cups are available, do not tap them. They are for the end-game. Tapping them now wastes a slot.
Engaging the '30' Ice Block
While your Red and Green cups are pouring, you must start working on the biggest obstacle: the center Ice Block.
- The Mechanics: You cannot break the block directly. You must clear the cups adjacent to it. For every adjacent cup cleared, the counter drops by 1.
- Action: Identify the Blue cups touching the '30' block. Tap them.
- Why Blue? Since Phase 2 is the Blue Snake anyway, grabbing these Blue cups serves a dual purpose: it lowers the Ice Block counter and stocks your inventory for the next phase.
- Timing: Don't clear the whole block yet. Just chip it down to about 20-25 while you finish the Red/Green base.
Dealing with the '8' Ice Block
There is a smaller White cup frozen with an '8' counter in the bottom left.
- Decision: Ignore this for now. White is a background color (Phase 4).
- Reasoning: If you clear the '8' block early, the White cup goes to your tray. Since you can't pour White yet (it covers the snake), it will occupy a valuable slot for the rest of the level, reducing your capacity to 4. Leave it frozen until the very end.
Mid-Game Execution: Managing the Snake and the Trap
You have cleared the Golden Key and established a rhythm of Red and Green. The board is now shifting, revealing the complex center and bottom rows. This section of the guide covers how to transition from the base to the main art without getting stuck.
The Transition to Blue
Once the Red floor is solid and the Green basket is taking shape, you must pivot.
- Visual Check: Look at the canvas. If the red pixels look solid and the green basket body is about 60% full, stop tapping Red/Green.
- Inventory Dump: Allow your current Red and Green cups to finish pouring. Do not add new ones.
- Blue Ramp-up: Aggressively tap Blue cups. You need to create a "Blue queue" on the belt.
- The Sandwich Method: If you have a stray Yellow cup on the belt from the opening moves, make sure it pours *before* your main Blue batch starts. You don't want Yellow sand contaminating the Blue snake body.
Chipping the Center Block
During the Blue phase, the '30' Ice Block becomes your obsession.
- Target Priority: Any cup touching the Ice Block is a priority target, regardless of its color (unless it is White/Cyan).
- The Domino Effect: As you clear adjacent Blue and Red cups, the board shifts. New cups will slide into place next to the Ice Block. Keep clearing them.
- Strategy: Treat the Ice Block counter as a timer. If it hits zero before you are ready, you get a flood of Cyan. You ideally want it to break just as you finish the Blue snake.
Handling the Yellow Detail Risk
The Yellow basket rim and eyes are small pixel clusters.
- The Mistake: Tapping a Yellow cup while the Blue dispenser is still active.
- The Fix: If you must grab a Yellow cup to clear a column, try to time it so it pours between two Blue cups. Even better, let the belt clear completely for 2 seconds to let the Yellow sand pour in isolation.
- Precision: The Yellow eyes on the snake are only a few pixels wide. It is better to slightly under-fill Yellow and leave a gap than to over-pour and spill onto the Blue face.
Slot Crisis Management
In the mid-game, the board will offer you a mix of Green (leftovers), Blue (current), and Cyan (future). It is easy to fill your 5 slots with the wrong mix.
- The Scenario: Your tray has: 1 Green, 2 Blue, 1 White (from earlier), and 1 Red. You are stuck.
- The Solution: You must discard or "burn" a cup. Look at the canvas. Is the Green basket done? If yes, tap that Green cup to send it to the conveyor, but accept that it might over-fill slightly just to get it out of your tray.
- Prevention: Never hold onto "done" colors. If the Red floor is 100% complete, do not put any more Red cups in your tray, even if the board is full of them. Leave them on the board as "roadblocks" until you need them for Ice Block chipping.
End-Game Strategy: The Ice Block Meltdown and Victory
You are in the final stretch. The Blue snake is slithering across the canvas, and the '30' Ice Block is likely in the single digits. This phase is about speed and clean execution to finish the background.
Breaking the '30' Block
When the counter hits 0, the Ice Block shatters, freeing the trapped Cyan cup (and likely shifting the entire bottom row).
- The "Cyan Flood": Be prepared. Once this block breaks, you will likely have access to 4-5 Cyan cups at once.
- Don't Panic Tap: Do not tap all of them. Your tray might still have Blue residue.
- Clear the Belt: Wait for the last of the Blue sand to pour. Then, tap 2 Cyan cups.
The Sky Pour (Cyan)
Pouring the sky is the final satisfaction.
- Technique: Tap a Cyan cup, wait for the sand to start flowing, then tap the next. You want a continuous stream of Cyan, not a burst.
- Watch the Clouds: The canvas has White cloud patterns in the sky. If you pour Cyan too fast, it will bleed into the White cloud zones, making them look dirty blue.
- Gap Strategy: If you see a White cloud zone approaching on the canvas, pause your Cyan tapping for a second to let the sand level settle, ensuring the cloud remains white.
Finalizing the '8' Block and White Clouds
With the sky poured, only the White clouds and the frozen '8' block remain.
- Unlocking: By now, you have cleared almost everything else. The cups adjacent to the '8' block are likely gone. You might need to clear remaining corner cups to reduce the counter from 8 to 0.
- The Pour: Once the '8' block breaks, grab the White cup.
- Completion: Pour the White sand to finish the clouds. Since this is the top layer, a little overflow is acceptable, but try to keep it within the lines for a perfect score.
Speed Run Tips for High Scores
If you are aiming for a 3-star rating or a personal best time:
- Pre-loading: While the Red sand is pouring, scan the board for the specific Green cups stacked on the Golden Key. Have your next tap ready the millisecond the previous cup leaves the tray.
- Ice Block Prediction: Don't wait for the Ice Block animation to finish after every tap. If you know tapping a Red cup will clear the way to a Blue cup, tap the Blue cup immediately. The game allows you to queue input while animations are playing.
- Combo Colors: If you have two large areas of the same color (e.g., two separate patches of Blue snake body), you can double-tap Blue cups on the board to fill the queue faster, provided you have the slot space.
Common Mistakes and Troubleshooting
Even with a strategy, things can go wrong. Here is how to fix the most common failure points in Level 503.
Mistake #1: The "Cyan Bleed"
Symptom: You poured the Cyan sky too early, and now the snake looks like it's fading into the background.
Fix: You cannot erase sand. You must over-paint. You have to go back to the Blue cups, refill your tray with Blue, and carefully pour Blue sand *over* the leaked Cyan areas to redefine the snake's edges. This wastes valuable time, so avoid it by following the phase order strictly.
Mistake #2: The "Full Tray" Lockup
Symptom: You have 5 cups on your belt, none are pouring because the previous color is still "drying" or filling, and you can't tap the board.
Fix: This is a tempo failure. You tapped too fast. The only way out is to wait. It may take 5-10 seconds for the queue to clear. To prevent this, always watch the conveyor belt machine. If the machine is "active" (sand is flowing), do not tap a new cup unless you have an empty slot showing on the UI.
Mistake #3: Ignoring the Ice Block Counter
Symptom: You are ready for the Sky phase, but the '30' block is still at 15. You have no cups left to tap except the frozen ones.
Fix: You ran out of "chipping" cups. This happens if you cleared the board too efficiently without touching the center. In the future, always prioritize the center column. In this specific scenario, you are stuck. You must restart the level, as there is no way to generate new cups to hit the block.
Mistake #4: Yellow/Blue Mixing
Symptom: The snake's eyes look green or muddy.
Fix: You poured Yellow while Blue was active. Since you can't remove the Yellow, try to find a tiny gap to pour a "cleanse" color (like White or Red if applicable) to flush the machine, then go back to Yellow. If the eyes are ruined, you may have to restart for a perfect score, as the pixel art detail is too small to correct manually.
What to Do If You Get Stuck Mid-Game
If you are staring at the board and nothing seems to match your current phase:
- Check the Belt: Is there a cup you can discard?
- Check the Ice Block: Is it blocking your only move? If so, look for adjacent cups, regardless of color.
- Look for the "Next Layer": If you can't find Green, maybe the Green is done? Look at the canvas. If the basket looks full, move to Blue. Don't force a color that isn't needed.