
Level 67
HARDHow to solve Sand Loop level 67? Get instant solution for Sand Loop 67 with our step by step solution & video walkthrough. Sand Loop 67 tips and guide.
Play Sand Loop Now
Experience the puzzle challenge firsthand
Game Screenshots
Sand Loop Level Guides
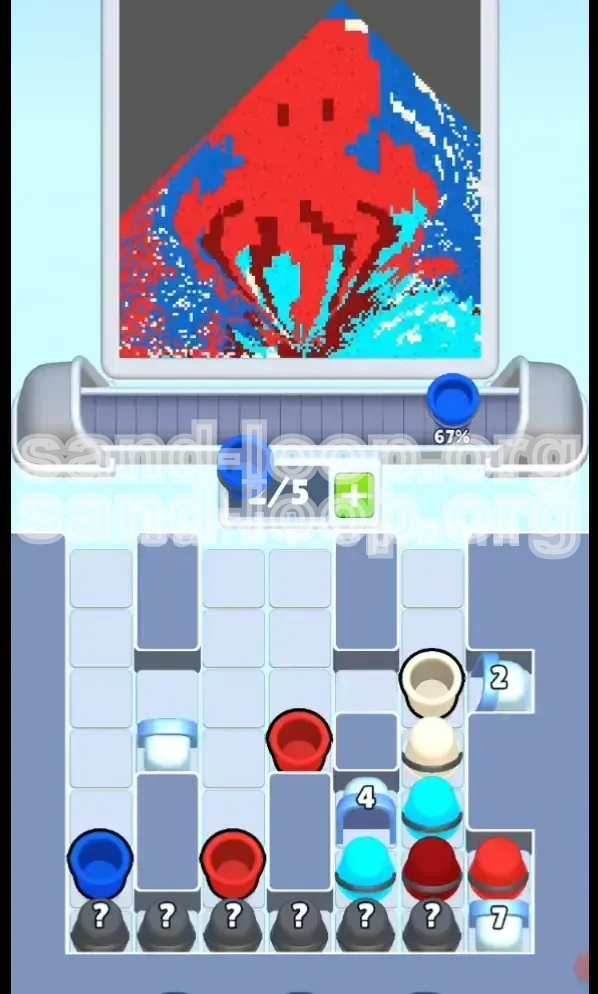
Level Overview: The "Red Octopus" Challenge
Welcome to the definitive walkthrough for Sand Loop Level 67, also known as the "Red Octopus" stage. This level represents a significant spike in difficulty, primarily due to the introduction of heavy ice mechanics and a restrictive 5-slot conveyor belt. Unlike previous stages where you could focus solely on the canvas, Level 67 requires you to play a strategic meta-game with your supply tray.
The visual centerpiece is a pixel-art Red Octopus swimming against a Cyan and Dark Blue ocean. While beautiful, the "Danger Zones" here are the tentacles—thin, jagged lines of red surrounded entirely by water. This creates a high risk of "bleeding" colors, where pouring red accidentally spills into the blue water, ruining your accuracy percentage.
The Ice Block Economy
The defining feature of this level is the "Ice Economy." You do not have free access to your paint. The tray is clogged with massive Ice Blocks labeled 4, 8, and a central 16. These blocks require a specific number of adjacent clears to shatter.
- The "16" Block: Located centrally at the bottom. This is the biggest hurdle. It locks away your mid-to-late game resources.
- The "8" Blocks: Located on the sides, guarding Mystery Blocks.
- Impact: If you ignore the ice to paint comfortably, you will run out of cups. The board will deadlock, leaving you with no moves and an unfinished canvas.
Conveyor Belt Limitations
Your belt only holds 5 cups. In this level, space is your most valuable asset. You cannot afford to have the belt filled with colors you don't immediately need. Every slot must be utilized to either fill a large canvas area or, more importantly, chip away at the ice blocks blocking your supply.
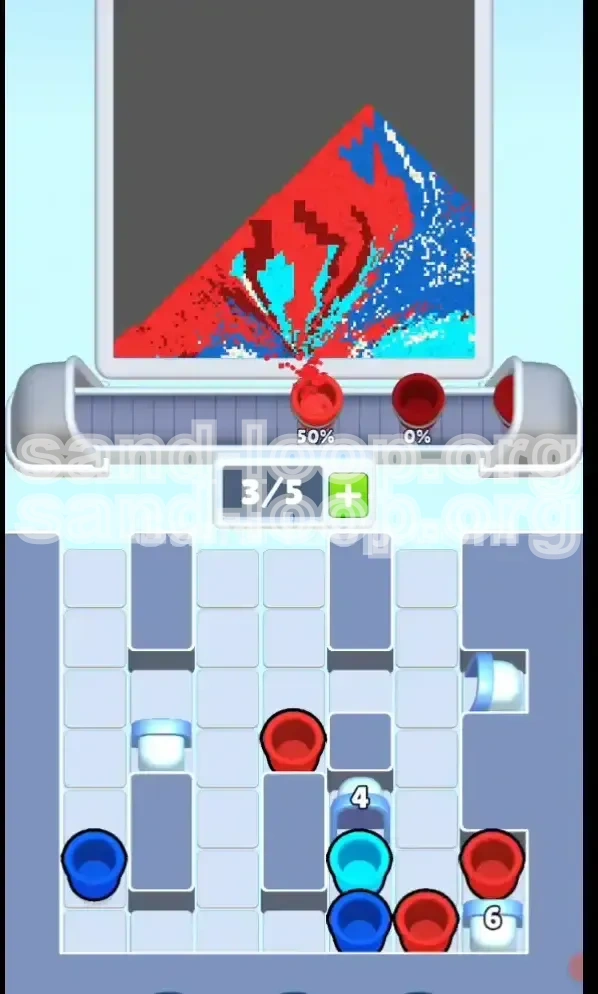
Risk Assessment: The Tentacles
The Octopus head is a "safe zone"—a large, contiguous block of Red. However, the tentacles are "high risk." They are thin and surrounded by Cyan. This dictates your late-game strategy: you must clear the Red head early while you have space for error, and leave the tentacles for when you can micromanage your belt.
The Mystery Block Variables
Hidden beneath the "8" ice blocks are Mystery Blocks (marked with a ?). These provide random cups. Since RNG (Random Number Generation) is involved, you cannot plan a perfect 100% move order. You must build a "buffer" of extra space in your tray to accommodate bad rolls from these blocks.
Winning Condition
To achieve the 3-star rating, you likely need a completion rate above 95%. This means you cannot rely on the "Auto-Fill" mechanic to finish the level for you; you must manually fill almost every pixel, especially the hard-to-reach Dark Blue shadows in the corners.
Clear Objectives: Your Mission Goals
Before you tap a single cup, understand your win conditions. This level is not just about painting; it is about resource management.
Objective 1: Break the Central "16" Ice Block
This is your primary logistical goal. The "16" block in the bottom center must be shattered by the mid-game. If you reach the tentacle phase and this block is still up, you will likely run out of paint and lose. Do not focus on the corners of the canvas until this central obstacle is gone.
Objective 2: Clear the "Red Dump" Early
The Octopus head is large. It is your opportunity to dump Red cups rapidly. Clearing Red cups serves two purposes: it completes 40% of the canvas and it clears vertical space in the tray to reach the ice blocks buried underneath.
Objective 3: Preserve Dark Blue for the End
Dark Blue is used for shadow detailing. These are sparse but difficult to reach. If you waste Dark Blue cups on the main water body (which should be Cyan), you will be unable to finish the corners at the end. Keep Dark Blue cups on the belt until the final 10% of the level.
Objective 4: Prevent "Bleeding" on Tentacles
You must finish the level with the background water pure Cyan. Any Red paint spilled into the water will deduct points. Your objective is to create "gaps" (empty slots) on your belt to switch between Red and Cyan without spilling.
Objective 5: Manage Tray Flow
Ensure the top layer of cups (the "Trash" layer) is moved to the belt immediately. Letting useless cups sit in the tray blocks new cups from spawning, stalling your ability to hit the ice blocks.
Step-by-Step Instructions: The Execution Phase
Follow this exact sequence of operations to navigate the level safely. This walkthrough prioritizes tray survival over pretty painting.
Phase 1: The Trash Clear (Moves 1-10)
At the start, your tray is blocked by top-layer cups that are often not immediately useful.
- Scan the Top Layer: Look at the very top row of the tray. Identify Dark Blue or White cups that are sitting above Red or Cyan stacks.
- Immediate Tap: Tap these top blockers immediately to move them to the conveyor belt. It doesn't matter if the nozzle isn't perfectly aligned yet. Get them out of the tray.
- Goal: You want to expose the Red and Cyan cups buried in the second and third rows. These are your fuel for the next phase.
Phase 2: The Red Head Rush (Moves 10-30)
Once the top layer is cleared, you will see a cluster of Red cups in the center-left and center-right.
- Load the Belt: Tap 3 or 4 Red cups in a row. Load your belt with Red.
- Flood the Head: Pour continuously into the Octopus head. It is a large area, so aim for the center to minimize overflow risk.
- Why do this? Clearing Red cups rapidly causes the stacks above them to drop down. This dropping effect is what triggers "hits" on the Ice Blocks sitting underneath or adjacent to the Red stacks.
Phase 3: The Ice Breaking Maneuver (Moves 30-60)
This is the most critical phase. Your Red cups will run low. Now you must look at the "8" and "16" ice blocks.
- Target Selection: Ignore the canvas for a moment. Look at your tray. Identify which cup, if tapped, would clear a cup sitting directly on top of an Ice Block.
- The Sacrifice: You may need to tap a Cyan cup even if you are currently painting Red. Send it to the belt.
- The Chip: If the Cyan cup isn't useful right now, use it to "chip" a nearby small spot or just hold it on the belt until you can swap it out. The key is removing the cup from the tray to drop the stack and crack the ice.
Phase 4: The Mystery Gamble (Mid-Game)
Once the side "8" blocks break, Mystery Blocks will rise from the bottom.
- The Slot Saver: Ensure you have at least 1 empty slot on your belt before you break an "8" block.
- Evaluate the Reward: The Mystery Block will give you a random cup. If it's a color you need (e.g., Cyan for the water), great. If it's a color you've already finished (e.g., Red), you must treat it as trash—get it on the belt and pour it somewhere safe to get rid of it.
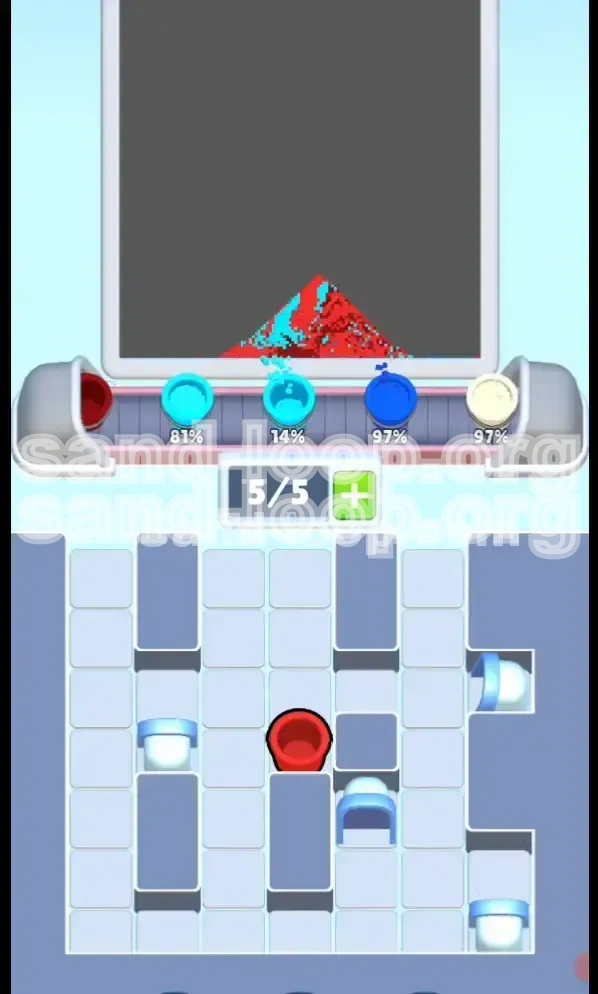
Phase 5: The Tentacle Precision (End-Game)
The large areas are done. You are left with the thin tentacles and the water background.
- Slow Down: Stop tapping multiple cups at once.
- The One-by-One Method: Tap one Red cup. Paint one tentacle segment. Then tap one Cyan cup. Paint the water next to it.
- Wait for the Nozzle: Ensure the nozzle has stopped dripping Red before you switch the belt to Cyan. Patience here prevents the "Pink Water" failure that ruins scores.
Color Order: The Logical Sequence
Processing colors in the wrong order is the leading cause of failure in Level 67. Here is the priority hierarchy you should follow to maximize efficiency.
Priority 1: Bright Red (The Body)
Reason: Volume & Tray Access.
Strategy: The Octopus body comprises about 40-50% of the pixel count. Furthermore, Red cups are often stacked in the center of the tray, sitting directly on top of the "4" and "16" ice blocks. By aggressively clearing Red first, you achieve the highest visual progress and simultaneously deal the most damage to the ice blocking your supply.
Priority 2: Cyan (The Water)
Reason: Background & Side Ice.
Strategy: Cyan is the "connective tissue" of the level. It fills the background. It is also located on the sides of the tray, often stacked above the "8" Ice Blocks. Once Red is thinned out, shift focus to Cyan to break the side walls and free up the Mystery Blocks.
Priority 3: White (The Highlights)
Reason: Low Quantity, High Visibility.
Strategy: White is used sparingly for wave caps and eyes. Because there are fewer White pixels, you don't need many White cups. However, they are often high up in the tray. Move them early to unblock the columns, but pour them carefully. It is better to leave White until the end to avoid turning your light Gray/White dots into messy blobs by accident.
Priority 4: Dark Blue (The Shadows)
Reason: Precision & Risk.
Strategy: DO NOT TOUCH DARK BLUE UNTIL THE END. Dark Blue is almost indistinguishable from Black in dim lighting, but visually, it contrasts poorly with the main Cyan water if you are not careful. Save these cups for the very last 5% of the level to fill the corner shadows. If you use them early, you might run out when you need them most, forcing a restart.
Key Tips & Strategic Notes
Master these nuances to turn a frustrating loss into an easy win.
The "Gap" Strategy
In the late game, keep 1 or 2 slots on your conveyor belt empty. Do not fill the belt with 5 cups. Why? Because if you have a "bad" cup (e.g., a Red cup when you need to paint Blue), you need a slot to move it to so you can access the cup behind it. A full belt is a stiff belt; a flexible belt allows you to shuffle cups to find the color you need.
Nozzle Alignment Discipline
The nozzle moves horizontally. Before you pour, pause for 0.5 seconds to ensure the nozzle is perfectly centered over the column you want to paint. In Level 67, the tentacles are only 1 pixel wide. If the nozzle is off-center by one pixel, you pour Red into the water. Centering your nozzle prevents 90% of errors.
The "Tap to Check" Method
Unsure which cup to tap next? Don't guess. Look at the bottom of the stack. If a cup is resting on an Ice Block, prioritize tapping the cups above it to drop it down. Think in terms of "Gravity Chess"—every tap drops the stack. Plan your drops to hit the ice, not just to paint the picture.
Mystery Block Management
When you break the "8" ice blocks, the Mystery Blocks appear. If you are tight on space, do not break the ice block immediately. Wait until you have cleared enough of the canvas to have a clear "landing zone" for the new Mystery cup. Breaking the ice too early can clutter your tray with a color you don't want yet.
Common Mistakes to Avoid
Learn from the failures of other players. Avoid these pitfalls to ensure a smooth run.
Mistake 1: Ignoring the "16" Block
Many players focus on the top of the canvas and leave the bottom of the tray alone. This is fatal. The "16" block takes a long time to break. If you wait until the canvas is 80% done to start hitting it, you will run out of moves. You must be hitting this block from Move 1, indirectly, by clearing the cups above it.
Mistake 2: Flooding the Belt
Do not treat the conveyor belt like a storage unit. Tapping cups wildly fills the belt with a random mix of colors (e.g., Red, Cyan, Red, White, Dark Blue). This creates a "traffic jam." If you have this mix and you need to paint a thin tentacle, you might be forced to pour the wrong color because the right one is buried behind three others. Tap selectively.
Mistake 3: Using Dark Blue Too Early
You see a Dark Blue spot on the octopus shadow. You have a Dark Blue cup. You pour it. Stop. That Dark Blue cup is rare. Save it. Use Cyan for now (even if it looks slightly off) and reserve the Dark Blue for the final deep shadows where Cyan definitely won't work. Using Dark Blue early is a recipe for running out of ink at 98% completion.
Mistake 4: "Rushing" the Tentacles
The tentacles are tempting because they stand out. But painting them while you still have 10 Red cups on the belt is dangerous. The risk of overflow is too high. Clear the large head first, clear the water background second, and only then—when the belt is relatively empty—should you tackle the intricate tentacle lines.
Stuck Solutions: Troubleshooting
If you find yourself in a dead state, use these emergency protocols.
Scenario: "I have no moves left, but the canvas isn't finished."
This is the "Deadlock." It means your tray is full of cups you can't use (e.g., all Red cups, but only Blue spots left).
- Solution: You made a mistake in the Ice Breaking Phase. You likely ignored the Ice Blocks too long.
- Fix for next run: When you restart, prioritize breaking the "8" Ice Blocks on the sides much earlier. You need the Mystery Blocks to spawn to give you fresh, random colors to break the deadlock.
Scenario: "I'm stuck at 98% completion."
You are missing just a few pixels, likely Dark Blue or White.
- Solution: Check the corners of the canvas. Use the zoom function (if available on your device) to check the deep ocean corners.
- Tray Check: Look for "hidden" cups in the tray. Sometimes a needed color is buried beneath a stack of "trash" colors. You may need to waste a few cups pouring into "full" areas just to clear space in the tray to find that last specific color.
Scenario: "I keep spilling Red into the Blue water."
This is a control issue.
- Solution: Stop pouring directly on the border. Pour the Red into the center of the tentacle mass and let the paint flow outward naturally to the edges. Keep at least a 1-pixel distance from the water border with your nozzle stream.
Speed Run Tips & Shortcuts
For players aiming to top the leaderboards or finish under 60 seconds.
The "Pre-load" Technique
As soon as the level loads, look at the top-left and top-right corners of the tray. Memorize the colors there. While the nozzle is moving to the start position, tap those top corners immediately. You can save 2-3 seconds of "thinking time" by clearing trash while the game is animating the intro.
Streamlining Color Switches
Do not wait for the nozzle to stop moving before tapping the next cup. If you know you are switching from Red to Cyan, tap the Cyan cup while the last drop of Red is falling. This queues up the next color, shaving milliseconds off every cycle. Over a level with 50 pours, this saves significant time.
The "Combo" Break
Look for opportunities to break two Ice Blocks at once. If you have a stack configuration where a cup is touching both a "4" and an "8" block (rare, but possible in stacked setups), clearing that cup yields double progress. Prioritize these "intersection" cups to speed up the Ice Phase.